


Hanging Rail Heavy Duty: Your Complete Guide to Installation and Use
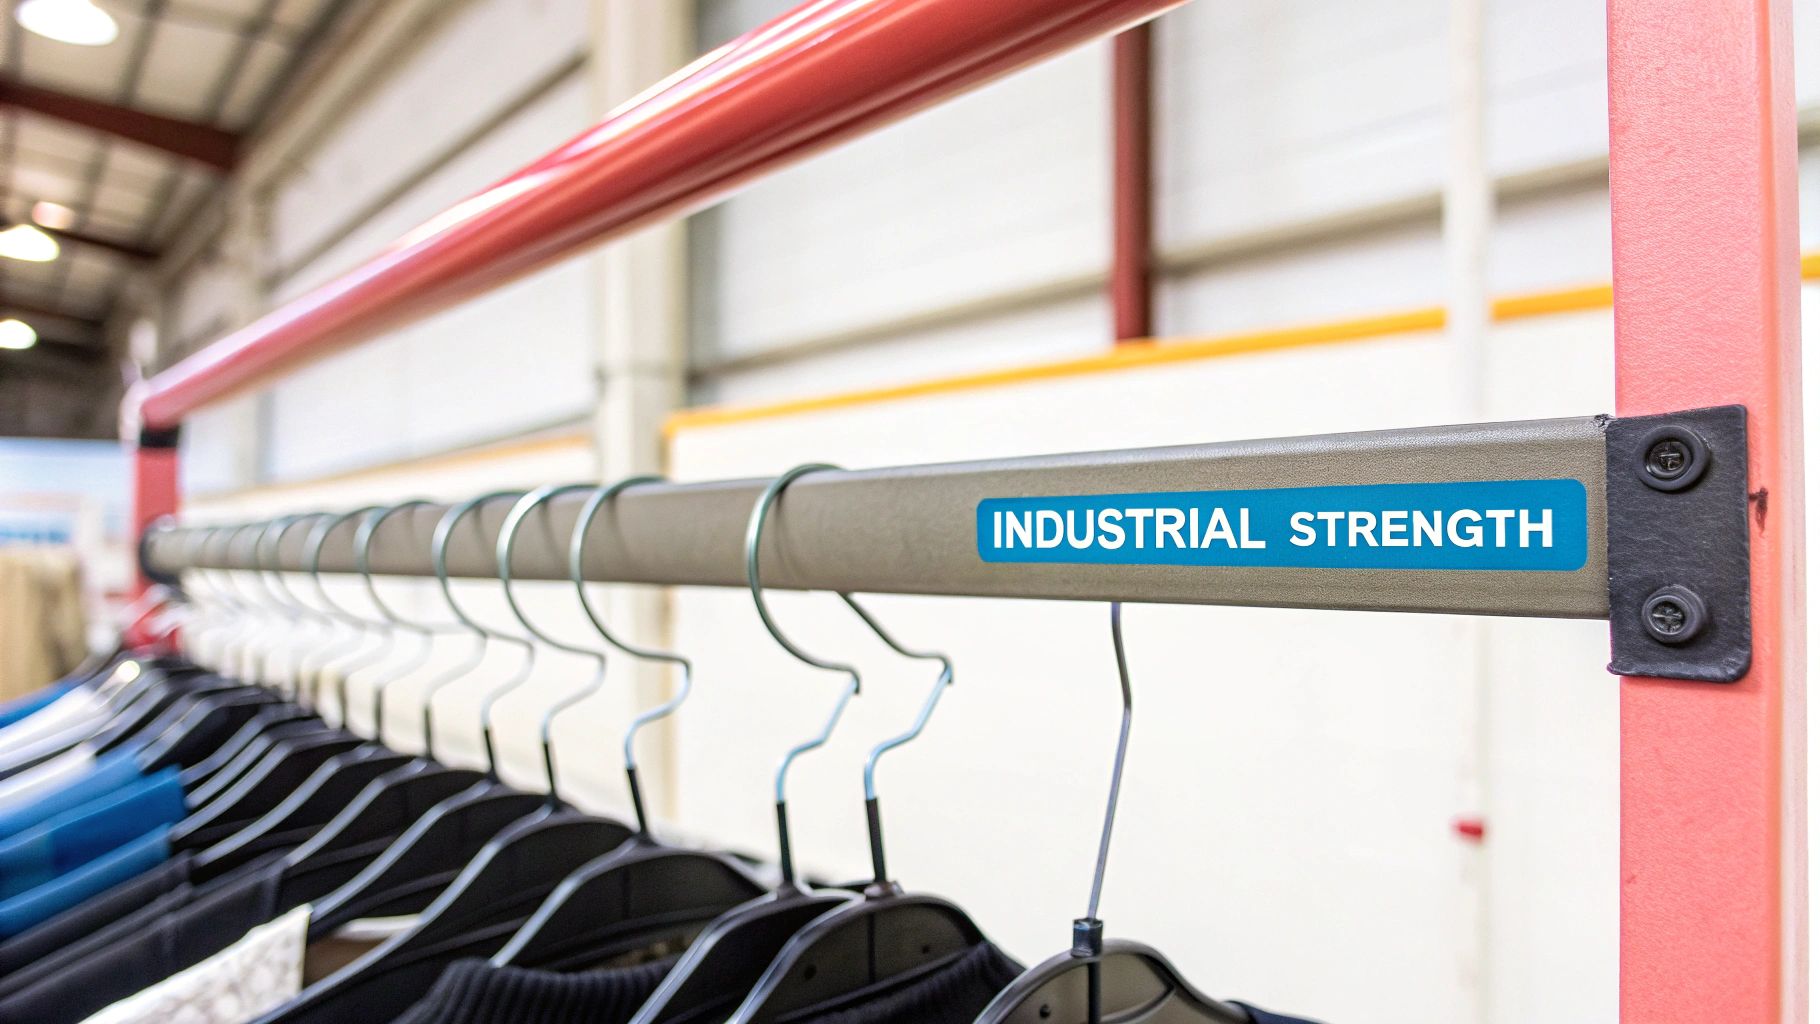
When you’re running a business that depends on garment storage, the term ‘heavy-duty’ isn't just a buzzword – it’s a non-negotiable standard. A genuine heavy duty hanging rail is built from the ground up for industrial loads and relentless daily use, a world away from the flimsy rails you’d find in a typical home.
We’re talking about a system defined by its robust, commercial-grade steel construction, clever reinforcement, and a seriously high load capacity. For any professional who needs safe, dependable, and long-term garment storage, this is a cornerstone piece of equipment.
What Makes a Hanging Rail Truly Heavy Duty
Before you part with your money, it's crucial to know what really separates a professional-grade heavy-duty rail from a standard one. It’s a bit like comparing a commercial delivery van with a family car. Both will get you from A to B, but only the van is engineered to handle heavy loads, day in and day out, without falling apart.
A proper heavy-duty rail is more than just a place to hang clothes; it's a piece of industrial kit designed for performance, safety, and a long working life.
This difference all comes down to a few core principles of engineering and material science that dictate its strength and reliability.
Core Engineering and Material Choice
The heart and soul of any heavy-duty rail is the material it's made from. You’ll find they are almost always crafted from industrial-grade steel, a material chosen specifically for its incredible tensile strength and ability to resist bending under immense pressure. It provides the essential backbone needed to support a huge amount of weight without buckling or warping over time.
Beyond the raw material, the construction itself is in another league entirely. Key features to look out for include:
- Reinforced Joints: Check for clean, solid welds or heavy-duty bolts where the parts connect. These are potential weak spots, so on any quality rail, they will be seriously beefed up.
- Thicker Tubing: The diameter and wall thickness of the steel tubing are a dead giveaway of its strength. Professional rails use much thicker, wider tubes to prevent that dreaded bowing effect in the middle.
- Durable Fittings: Every single component, from the castors on a freestanding rail to the wall mounts, is built to handle significant stress. The quality of these supporting parts is just as vital as the rail itself, which is why understanding the role of a proper clothing rail bracket is so important for a secure fix.
The Concept of Uniformly Distributed Load
One of the most important specifications you'll see is the Uniformly Distributed Load, or UDL. This isn't just dry technical jargon; it's a precise engineering term for the maximum weight a rail can safely hold when the load is spread evenly across its full length.
A rail's UDL is its true capacity rating. It’s the guaranteed performance benchmark that separates professional equipment from consumer-grade products, ensuring it can handle the demands of a busy stockroom, retail floor, or costume department without risk.
Ignoring the UDL is like deliberately overloading a lift. It might hold for a while, but you’re gambling with a catastrophic failure. For any professional environment, whether it's a tailor’s studio or a packed retail stockroom, respecting the UDL is fundamental. It’s the one number that confirms your rail is a reliable business asset, not a liability.
Understanding Load Capacity and Material Strength
Choosing the right heavy-duty hanging rail isn't just about picking one that fits the space. It’s about getting to grips with what makes it strong enough for the job. The load capacity rating is the most important number you’ll see, and it’s there for a reason. Think of it like the weight limit on a bridge – it’s a non-negotiable figure based on solid engineering, materials, and design.
Getting this right from the start means you’ll never have to deal with the nightmare of a rail collapsing under the weight of your valuable stock. It’s a costly and all-too-common problem when people try to make do with flimsy, domestic-grade rails.
The Anatomy of Strength: Materials and Construction
The real strength of a rail comes down to two things: the materials it's made from and how well it's put together. These factors are what determine its final load-bearing capability. The Uniformly Distributed Load (UDL) you see advertised is a direct result of the choices made in the workshop.
Here's what really makes a difference:
- Material Grade: There's a reason industrial-grade steel is the standard. It has incredible strength and resists bending under pressure, providing the backbone needed to support hundreds of kilograms without breaking a sweat.
- Tube Diameter: A quick glance at the thickness of the steel tubing tells you a lot about its toughness. Professional systems use substantial diameters, often 32mm steel tubing, which makes a huge difference in preventing that dreaded bowing effect when a rail is fully loaded.
- Weld Quality: A rail is only as strong as its weakest link. High-quality, clean welds at the joints are absolutely critical for structural integrity. They ensure every connection can handle the constant stress of a full load.
- Finishes: A good finish, like a black powder-coating, does more than just look sleek and professional. It adds a crucial layer of protection against rust and daily wear and tear, which helps the rail last longer and maintain its strength over time.
These aren't just bullet-point features; they are the core of what defines a rail's capacity. Understanding how they come together is key, and you can learn more about what separates the best from the rest in our detailed guide on strong clothing rails.
Calculating Your Required Load Capacity
Before you can pick the right rail, you need a clear idea of how much weight you're actually going to hang on it. Underestimate, and you risk overloading. Overestimate, and you could end up paying for strength you don’t need. A little bit of planning here goes a long way.
Start by looking at your stock. In most UK retail and stockroom setups, professional rails are rated somewhere between 100 kg and 160 kg UDL. To put that in perspective, a 100 kg rail can comfortably hold around 50 to 66 heavy winter coats, assuming each weighs about 1.5–2.0 kg. The top-tier 160 kg models can handle between 80 and 106 of those same coats, which shows just how vital these ratings are when you’re planning your inventory layout.
The goal is to calculate a realistic total weight, giving you a clear target UDL to look for. This simple exercise removes guesswork and ensures the rail you choose is perfectly suited for your specific inventory, from delicate dresses to heavy leather jackets.
To make this process easier, you can work out an estimate by thinking about the types of garments you handle the most. Heavy items like coats and denim obviously contribute far more to the total load than lighter pieces like shirts and blouses.
Estimating Your Garment Load by Type
Here’s a practical table to help you work out the total weight your heavy-duty hanging rail system will need to support. Think of it as a starting point for calculating the load per metre for your own unique stock.
Estimating Your Garment Load by Type
| Garment Type | Average Weight (per item) | Approx. Number of Items per Metre | Estimated Weight per Metre |
|---|---|---|---|
| T-Shirts / Blouses | 0.2 kg | 50-60 | 10-12 kg |
| Jumpers / Knitwear | 0.6 kg | 25-30 | 15-18 kg |
| Suits / Blazers | 1.2 kg | 15-20 | 18-24 kg |
| Denim Jeans | 0.7 kg | 25-30 | 18-21 kg |
| Heavy Winter Coats | 1.8 kg | 10-12 | 18-22 kg |
| Wedding / Formal Gowns | 2.5 kg - 5.0 kg+ | 4-6 | 10-30 kg+ |
Using these figures, a retailer planning to hang a full metre of heavy winter coats knows they need a rail with a capacity of at least 25 kg per metre. In contrast, a costume department storing several heavy gowns would need to aim for a much higher rating. Taking this kind of data-driven approach means you’ll invest in a rail that isn’t just strong, but is exactly right for your business.
Choosing the Right Mounting System for Your Space
Picking the right type of heavy-duty hanging rail is more than just a practical choice—it's a strategic one that can define your workflow and how you use your space. It isn’t just about the rail itself, but how it integrates into your workshop, stockroom, or retail floor. The three main players—wall-mounted, ceiling-mounted, and freestanding—each bring something different to the table, and the best one for you depends entirely on your needs.
Think carefully about how you work day-to-day. A system that’s a lifesaver on a busy shop floor could be a total nightmare in a cramped back-of-house area. Getting to grips with the pros and cons of each type is the first step to making a smart investment that will pay off for years to come.
Wall-Mounted Rails for Permanent Stability
When you need unwavering stability and want to keep your floor space clear, wall-mounted rails are the undisputed champions. By fixing them directly to the wall, you open up the floor completely. This is a massive win in narrow corridors, packed stockrooms, or bustling tailoring studios where every inch of floor is prime real estate. Think of them as the built-in wardrobes of the commercial world: solid, dependable, and perfectly integrated.
This setup offers rock-solid stability. If you install a wall-mounted heavy-duty hanging rail correctly into solid brickwork or wall studs, it can handle an incredible amount of weight without a hint of a wobble. That’s why it’s the go-to choice for long-term storage of heavy winter coats, archived costumes, or hefty bolts of fabric.
Of course, their greatest strength—permanence—is also their biggest drawback. Once they’re up, they’re up for good. This makes them less than ideal for spaces that need a bit of a shake-up now and then, like pop-up shops or visual merchandising displays that change with every season.
Freestanding Rails for Unmatched Flexibility
For any business that thrives on change, freestanding rails are the answer. These self-contained units, often kitted out with industrial-grade castors, give you total freedom to move things around. You can reconfigure your layout, shift stock, or tuck them away with almost no effort, offering an agility that fixed systems just can't compete with. They’re like modular furniture for your inventory, letting you reinvent your space whenever you feel like it.
This kind of flexibility is a game-changer in a few key scenarios:
- Retail Environments: Effortlessly create eye-catching displays or move key items to high-traffic zones.
- Pop-Up Shops: Set up a professional-looking garment system in any temporary space in minutes.
- Production Studios: Wheel entire wardrobes between fitting rooms, stages, and storage without breaking a sweat.
The secret to a good freestanding rail lies in its base and wheels. You’ll want a model with a wide, stable footprint and heavy-duty, lockable castors. This ensures it stays put once you've got it in position, even when it's loaded to capacity.
Ceiling-Mounted Rails The Specialist Solution
Ceiling-mounted rails are a more specialised, almost architectural solution. They come into their own when both your wall and floor space are completely maxed out. By suspending the rail from ceiling joists, you can create a 'floating' storage system that takes full advantage of a room's vertical height. It’s a genuinely clever fix for studios with towering ceilings or quirky layouts where walls just aren't an option.
This diagram breaks down the key factors that determine how strong any rail system truly is.
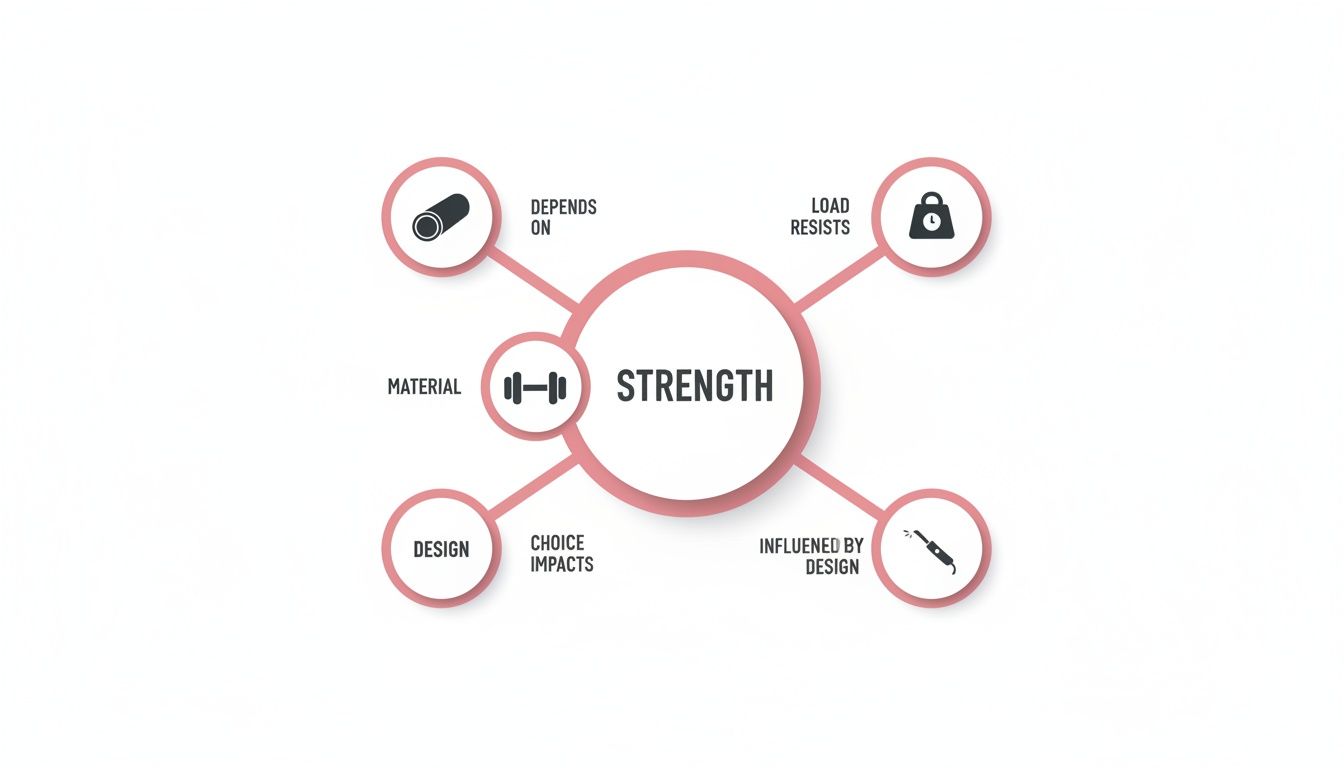
As the image shows, a rail's real-world strength comes down to a mix of what it's made of, how it's designed, and the specific load it's built to handle.
Be warned, though: while brilliant, ceiling-mounted systems are not a DIY job. They need professional installation to ensure they’re anchored safely into the building’s structural framework. The ceiling’s own load-bearing capacity becomes the make-or-break factor, so a structural check is often essential to keep things safe and compliant.
Ultimately, choosing the right system is a balancing act between permanence and flexibility, and making the most of your floor and wall space. For a much deeper dive into getting the installation spot-on, our guide on clothes rail and brackets has all the crucial details you'll need for a secure and long-lasting setup.
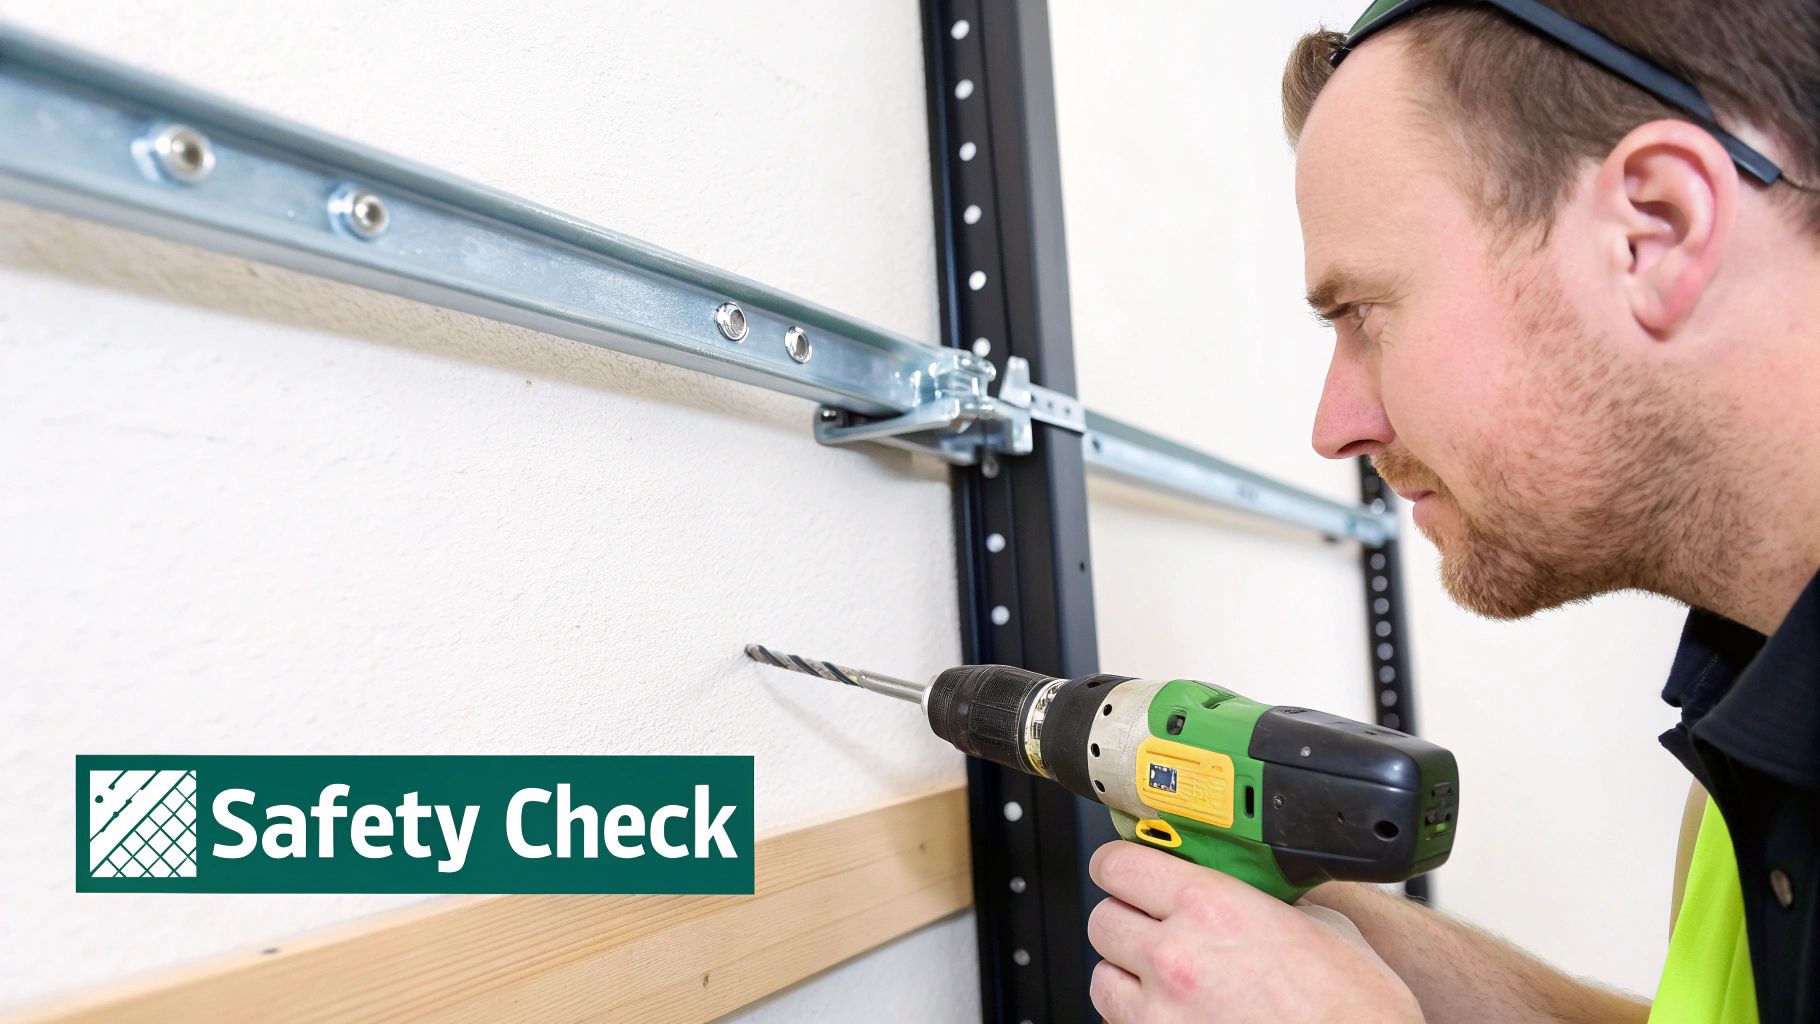
Safe Installation and Essential Safety Checks
A top-quality heavy-duty hanging rail is a fantastic investment, but it's only as strong as its installation. Getting this part right is non-negotiable. A properly secured rail is the bedrock of a safe workspace, preventing the kind of catastrophic collapse that can wreck valuable stock, injure someone, and bring your operations to a grinding halt.
Whether you're mounting a permanent fixture to a wall or putting together a mobile unit, this isn't a job to rush. It’s about more than just following the instructions in the box; it's about understanding how the rail, its fixings, and your wall work together. Nail this, and you’ll have a setup that’s not just functional, but fundamentally safe for everyone.
Securing Wall-Mounted Rails Correctly
For a wall-mounted rail, everything hinges on one thing: choosing the right fixings for your specific wall type. Get this wrong, and you're setting yourself up for failure. The material of your wall dictates your entire approach.
If you're dealing with solid masonry like brick or concrete, you'll need heavy-duty anchor bolts or sleeve anchors. These are designed to expand inside the wall, creating an unshakeable grip that can handle serious weight. On the other hand, standard screws in plasterboard will just pull straight out as soon as you load the rail. For these cavity walls, you must use specialist toggle bolts or hollow wall anchors, which pop open behind the board to spread the load over a much wider area.
The rule is simple: the fixing must be as strong as the rail itself. Whenever you can, anchor directly into the wooden studs behind the plasterboard for maximum security. Never just guess—a stud finder is a cheap tool that prevents expensive and dangerous mistakes.
For a more detailed guide, our post on installing a https://www.displayguru.co.uk/blogs/news/hanging-rail-wall-mounted system walks you through every step to ensure a secure, professional fit.
Assembling Freestanding Units for Stability
With freestanding rails, the challenge isn't the wall, but the structural integrity of the unit itself. Assembly is usually straightforward, but a couple of common slip-ups can make a rail dangerously wobbly. The biggest culprit? Not tightening all the bolts and connections properly.
Every joint and screw should be tightened until there is absolutely no play or movement in the frame. Pay close attention to the base and the castors. If your rail has locking wheels, check they’re installed correctly and actually work—they’re vital for stopping the unit from rolling away once it’s loaded up.
Your Ongoing Safety Checklist
Installation isn’t the end of the job; it’s the start of your safety routine. Think of it like a pilot's pre-flight check. Regularly inspecting your hanging rails helps you spot small issues before they snowball into big, dangerous problems. It's a simple, proactive habit that’s key to maintaining a safe environment.
Set up a recurring check for all your garment rails. Your routine should cover:
- Inspecting for Metal Fatigue: Take a close look at the main stress points, especially the centre of the top bar and any welded joints. You're searching for any signs of bending, cracking, or bowing.
- Checking Connections: For both mounted and freestanding rails, give all the bolts and screws a physical check to make sure they're still tight. The vibrations of daily use can work them loose over time.
- Examining Castors: On mobile rails, make sure the wheels spin freely and the locking mechanisms engage and disengage as they should. A worn or broken castor can make a heavy rail unstable and a nightmare to move.
Following a simple protocol like this helps you meet workplace safety obligations. While there's no single statutory load standard for rails in the UK, businesses use supplier specifications as a practical benchmark. For instance, many UK suppliers see 32 mm steel tubing with 100 kg UDL ratings as a commercial baseline—a figure businesses can document in risk assessments to show due diligence. A review of a reinforced heavy duty rail example on a commercial site shows how these specs are typically presented. As you ensure the safety of your setup, it's also wise to stay informed on broader standards, as reviewing guidelines like emergency exit signage requirements can provide useful context on regulatory expectations.
Designing a Strategic Layout for Your Business
Think of a heavy-duty hanging rail system as more than just a place to hang stock. It’s the backbone of your entire operation. When you plan your layout with a bit of foresight, your rails can transform how your business runs, guiding the flow of work, making everything easier to find, and turning inventory management from a headache into a simple task. The real goal here is to move past basic storage and build a system that actively makes your team more productive.
This means thinking critically about how both people and garments move through your space. Whether you're running a busy shop floor, a packed-out stockroom, or a creative studio, a smart layout cuts down on wasted steps and faff. That efficiency boost goes straight to your bottom line.
Creating a Smooth and Sensible Workflow
First things first: map out your process from start to finish. Where does new stock get delivered? Where are items prepped, steamed, or altered? Where do they need to be next? Your rail layout should act as a natural guide for this journey, creating a clear path that makes every task more straightforward.
Take a busy theatre’s costume department, for example. They might use a mix of fixed and mobile rails to create a kind of production line. Garments could move seamlessly from the main storage area (on static rails) to alteration stations, then on to final fittings, and finally onto racks organised by actor or scene (using mobile rails), ready to be wheeled backstage at a moment's notice.
A well-designed layout doesn't just store items; it directs the flow of work. By placing rails strategically, you can create dedicated zones for different stages of your operation, preventing bottlenecks and making it easier for your team to find exactly what they need, when they need it.
This approach stops your space from being just a storage room and turns it into a highly organised, high-functioning workspace.
Key Layout Considerations for Professional Spaces
Once you've got the workflow clear in your head, it's time to get into the nuts and bolts of the layout. Three things are absolutely essential to get right:
- Aisle Width: You need to leave enough room between rails for staff to move around without bumping into things, especially when they're carrying bulky items or pushing trolleys. Aim for a minimum of 90cm (about 3 feet) as a good starting point.
- Inventory Segmentation: Use your rails to group your stock in a way that makes sense. You could organise by collection, season, size, or colour. This simple step makes finding specific items much quicker and takes the pain out of stock-taking.
- Mixing Rail Types: Don’t be afraid to combine different systems for the best results. You could use permanent wall-mounted rails for long-term or archival storage, while keeping mobile, freestanding units for new arrivals or daily tasks. If you're looking to create a seamless storage system, check out our guide on integrating a wall-to-wall hanging rail setup.
For retailers and event managers, this kind of planning is non-negotiable. An efficient layout built with sturdy, heavy-duty rails cuts down on both product damage and staff hours. UK suppliers often point out how reinforced rails on castors are perfect for weekly stock rotations or for getting merchandise to events. A typical retailer restocking 200 items a week could stage that new inventory safely with just 2–4 rails rated at 100–160 kg—a simple metric that shows how a bit of planning pays off.
For a deeper dive into creating truly efficient, integrated storage spaces, it's often helpful to explore established built-in wardrobe design principles. Applying some of these concepts can help you turn your own workspace into a model of efficiency.
Your Professional Buyer's Checklist
Choosing the right heavy-duty rail isn't just about buying a piece of equipment; it's an investment in your business's efficiency and safety. To help you cut through the marketing noise and focus on what really matters, I've put together a practical checklist. Think of it as your final quality control step before you commit.
We’ll break it down into four key areas: the build, the capacity, the features, and the company behind the product. Let's make sure you get a rail that's built to last.
Structural Integrity
First things first, let's look at the bones of the rail. The physical construction is what separates a genuine workhorse from something that will buckle under pressure. These are the non-negotiables.
- Material and Finish: What’s it made of? You're looking for industrial-grade steel. Just as important is the finish – a good powder-coating isn't just for looks; it's your frontline defence against rust and daily wear and tear.
- Tube Diameter: Don't overlook the thickness of the tubing. A 32mm diameter is a good benchmark for a professional-grade rail. Anything less, and you risk the rail bowing under the weight of your stock.
- Weld Quality: Take a close look at the joints. Are the welds neat, solid, and complete? Shoddy welding is a classic weak point and a disaster waiting to happen when the rail is fully loaded.
Capacity and Dimensions
Now, let's match the rail to your reality. It has to fit your space and, more importantly, handle the weight of your stock without breaking a sweat.
- Verified UDL: Does the supplier state a clear Uniformly Distributed Load (UDL) rating? Look for specific figures like 100 kg or 160 kg. If they can't give you a straight number, be wary.
- Practical Dimensions: Measure your space, then check the rail's height, width, and depth. Make sure there’s enough clearance for your longest garments and that it fits into your workflow, not against it.
- Modularity: Think about the future. Can you add to the system later? Rails with options for centre bars or extension kits give you the flexibility to grow without starting from scratch.
A supplier who is transparent about their rail’s UDL and construction materials is demonstrating confidence in their product’s engineering. Vague specifications should be treated as a red flag.
Mobility and Features
If you're looking at a freestanding rail, don't get so focused on the frame that you forget the parts that make it usable. The castors and brakes are just as crucial.
- Castor Type: What are the wheels made of? Flimsy plastic just won't cut it on a workshop or retail floor. You need tough rubber or industrial-grade castors that can handle the surface without seizing up.
- Locking Brakes: A fully loaded rail on the move is a serious hazard. Check that it has at least two locking castors to keep it firmly and safely in place.
Supplier Vetting
Finally, you're not just buying a product; you're buying from a company. A little due diligence here can save you a lot of headaches down the line.
- Warranty: Do they offer a manufacturer’s warranty? This is a clear sign that the company stands by the quality and durability of its work.
- UK-Based Support: What happens if you have a question or an issue? Having access to reliable, UK-based support you can actually talk to is invaluable.
Got a Few More Questions?
Even after digging into the details, you might still be mulling over a few things before picking out the perfect heavy-duty hanging rail. That's completely normal. Here are the answers to some of the most common questions we get from professionals, designed to help you make that final decision with confidence.
Can I Put a Heavy-Duty Rail Together Myself?
You certainly can. Most of our freestanding heavy-duty rails are designed for a simple, one-person build. The real secret is to follow the instructions to the letter and make sure every single connection is properly tightened. It’s that final turn of the screw that gets rid of any potential wobble.
When it comes to wall-mounted rails, an extra pair of hands makes a world of difference. While one person can do it, having a helper hold the rail steady and level while you mark the drill holes is the best way to guarantee a perfectly straight, secure fit.
What's the Best Way to Clean and Look After My Rail?
Keeping your rail in top shape is easy. For day-to-day cleaning, a quick wipe with a dry or slightly damp microfibre cloth is all you need to tackle dust and keep the finish looking sharp. It's best to steer clear of harsh chemical cleaners, as they can wear down the protective powder-coated finish over time.
Think of it like a quick monthly MOT. Once a month, just give all the connections a quick check to ensure they're tight and glance at the castors to make sure they're clear of debris. Catching a loose bolt early is far better than dealing with a bigger problem down the line.
How Can I Be Sure My Wall is Strong Enough?
This is probably the most important question for anyone installing a wall-mounted rail. Solid walls made of brick, blockwork, or concrete are the gold standard – they give you the strongest possible fixing. If you're working with plasterboard, you must find the wooden studs behind it and mount the rail directly onto them.
Whatever you do, don't fix a heavy-duty rail straight onto plasterboard. It simply isn’t designed to take that kind of weight and will fail, pulling the fixings right out of the wall. A simple stud finder is a cheap, essential tool that ensures your rail is safe, secure, and built to last.
Does a Higher Price Always Mean Better Quality?
Not always, but there's often a strong link between price and the quality of the engineering and materials. A higher price tag on a hanging rail heavy duty model usually gets you thicker-gauge steel, a higher certified UDL, stronger welds, and tougher industrial-grade castors.
My advice? Look past the price and focus on the specs. A rail with a clearly stated UDL of 150 kg from a trusted supplier is a much smarter investment than a cheaper, unrated option. You're not just buying a rail; you're buying proven performance and safety for your workspace.
Ready to invest in a storage solution that works as hard as you do? Explore the professional-grade collection at Display Guru and find the perfect heavy-duty rail for your business. Visit us at https://www.displayguru.co.uk to see the range.