


The Professional Guide to Wardrobe Pole and Fittings
In any professional setting where clothes are king, a solid wardrobe pole and fittings system is the unsung hero. We’re not just talking about bits of hardware; these are the crucial components that protect your valuable stock, streamline your workflow, and give your clothing displays that essential professional polish.
The Backbone of Professional Garment Display
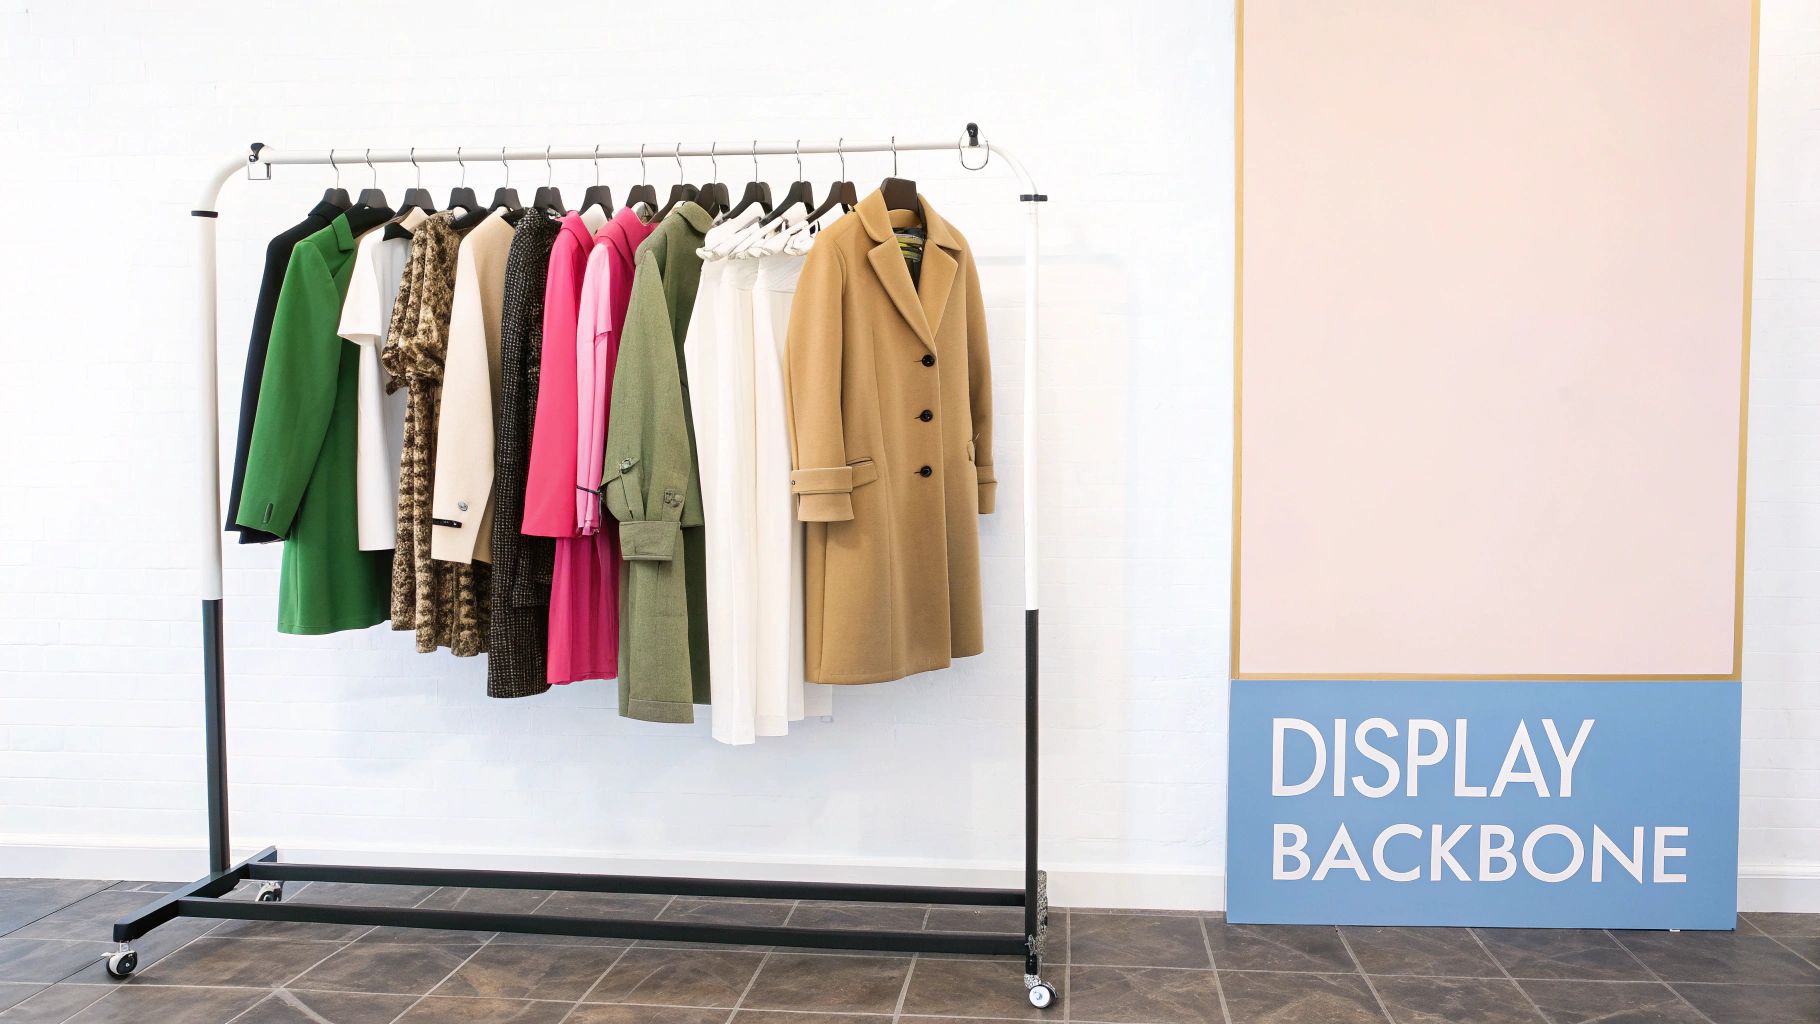
Think of it like this: a high-quality wardrobe pole is the foundation of a house. If the foundation is weak, the whole structure is at risk. It’s the same with your rail system. A flimsy setup leads to sagging poles, broken brackets, and, worst of all, damaged garments. For anyone in retail, tailoring, or stock management, these aren't just annoyances—they cost time, money, and can even damage your reputation.
This guide isn’t just a list of parts. It’s a deep dive into solving the real-world problems professionals face every day. We’ll look at how choosing the right components can prevent that all-too-common nightmare of a rail buckling under the weight of heavy winter coats or a fitting giving way in a busy stockroom. A well-chosen system is a smart investment in your business’s efficiency and presentation.
Why Quality Hardware Is Non-Negotiable
In a professional environment, the difference between good and bad hardware is felt every single day. A dependable system doesn't just hold up your garments; it actively improves how your business runs and how customers perceive your brand.
- It Protects Your Inventory: The most obvious benefit. No more costly damage from rail collapses or sagging.
- It Boosts Efficiency: Staff can find, move, and manage stock quickly and safely without wrestling with a faulty system.
- It Elevates Presentation: A clean, organised, and professional look is non-negotiable in retail spaces, studios, or showrooms.
The right hardware transforms a storage area from a simple utility into a high-functioning professional asset. It’s the difference between a system that fights you every step of the way and one that genuinely supports your goals.
With the UK's apparel retail market valued at a staggering £64.5 billion in 2023, the need for robust storage has never been greater. Clothing sales in Great Britain have jumped 7% year-over-year, meaning retailers and tailors need efficient ways to handle more stock than ever.
To really grasp how these components work together, it helps to see the bigger picture. For example, this excellent guide on Built In Wardrobe Design highlights how the choice of pole and fittings is absolutely fundamental to a wardrobe's long-term success. Of course, knowing the basics of installation is just as key, which is why we’ve put together our own guide on https://www.displayguru.co.uk/blogs/news/hanging-wardrobe-rails.
Selecting the Right Pole Material and Profile
Choosing the right wardrobe pole isn't just about aesthetics; it's a decision that underpins the durability and practicality of your entire setup. The material you pick will define its strength, how long it lasts, and whether it’s genuinely up to the job you have in mind.
Think of it like choosing the right tool. You wouldn't use a fine-art brush to slap on industrial paint, and the same thinking applies here. A busy stockroom has completely different demands from the showroom floor of a high-end boutique.
Matching Material to Mission
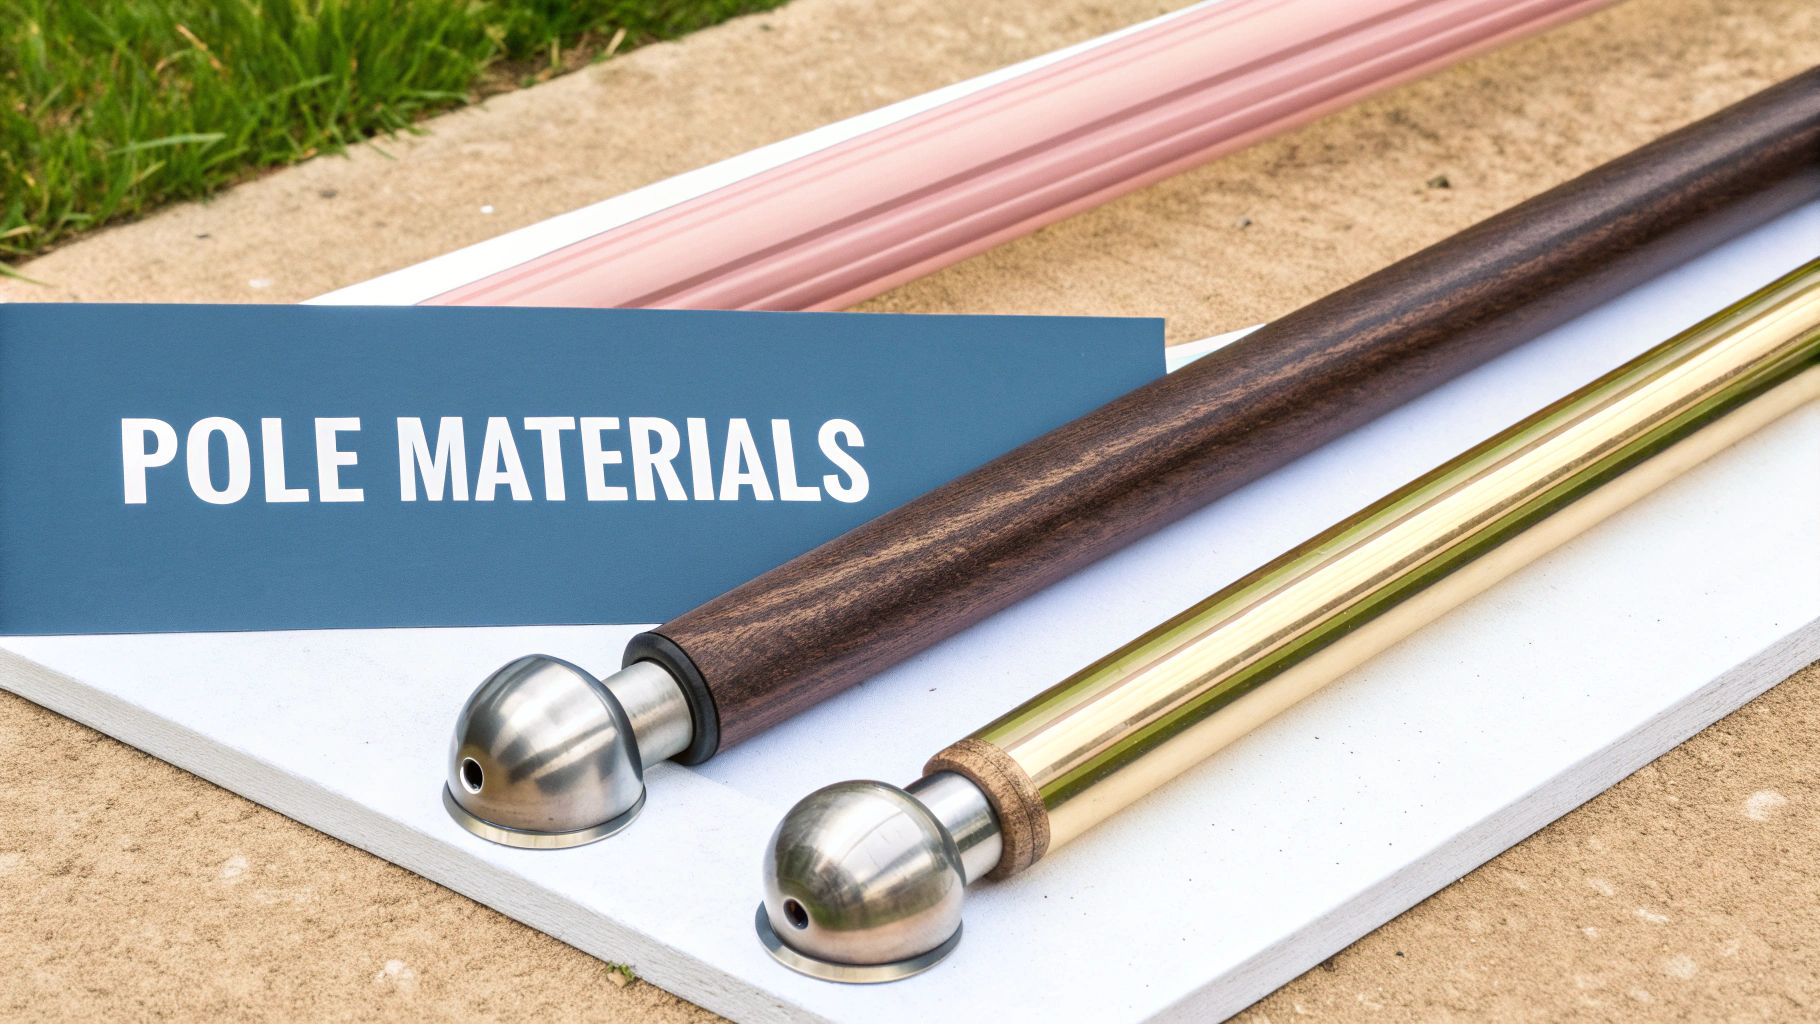
When you get down to it, most professional-grade poles are made from one of three core materials: steel, aluminium, or chrome-plated steel. Each has its own distinct strengths, and knowing which is which is the first step towards a system that won't let you down.
-
Heavy-Gauge Steel: This is the absolute workhorse. Known for its incredible strength and rigidity, it’s the go-to for back-of-house stockrooms, industrial laundries, or anywhere you’re hanging heavy items like winter coats in bulk. Its job is simple: hold a lot of weight without complaining.
-
Aluminium: Lightweight but still impressively strong, aluminium is a fantastic all-rounder. It's much easier to handle and install than steel and is naturally rust-resistant, making it a solid choice for spaces where humidity might be a concern. This makes it popular for custom wardrobe builds and retail spots with moderate stock levels.
-
Polished Chrome: Typically built on a steel core, a polished chrome finish delivers a sleek, premium look that instantly lifts a retail space. You get the underlying brawn of steel combined with a bright, reflective surface that works beautifully in modern shop fits. That smooth finish isn't just for show, either—it lets hangers glide effortlessly.
The rule of thumb is simple: function first, form second. A beautiful rail that starts to bend under the weight of your stock is a liability, not an asset.
The push for smarter, more effective storage is a huge driver in the UK's furniture market, which hit a value of USD 21.9 billion in 2024. This growth shows just how much professionals need durable, well-thought-out solutions for modern retail and studio environments.
To help you decide at a glance, here’s a quick comparison of the most common materials.
Wardrobe Pole Material Comparison
| Material | Key Benefit | Best For | Consideration |
|---|---|---|---|
| Heavy-Gauge Steel | Maximum strength & rigidity | Heavy-duty stockrooms, industrial settings, hanging very heavy garments (e.g., leather jackets, winter coats). | Heaviest option and can be susceptible to rust if the finish is compromised. |
| Aluminium | Lightweight & rust-resistant | Custom wardrobes, retail displays with moderate loads, areas with potential humidity. | May not have the same top-end load capacity as heavy-gauge steel for extreme applications. |
| Polished Chrome | Aesthetic appeal & smooth glide | High-end retail showrooms, boutique displays, front-of-house where appearance is key. | The chrome finish can be scratched if treated roughly; quality of the underlying steel core matters. |
Ultimately, the best material is the one that directly answers the demands of your specific space and stock.
The Impact of Pole Profile
Beyond what it's made of, the actual shape—or profile—of the pole plays a huge part in its performance. The two main profiles you'll encounter are round and oval, and they each have their place.
A round pole is the classic standard, compatible with the widest range of wardrobe pole and fittings. It's a reliable, do-it-all choice for general use. But for situations that demand superior strength and a flawless presentation, the oval profile is the clear winner.
The very shape of an oval pole gives it greater structural resistance to sagging, especially over longer spans. For visual merchandisers, its flat top surface is a game-changer. It stops hangers from spinning around, ensuring every single garment faces forward for a perfectly uniform, professional display. Our guide on clothes hanging poles delves deeper into how these small details can make a massive difference.
Calculating Load Capacity and Pole Sizing
Figuring out how much weight a wardrobe pole can handle isn't about complicated physics; it's mostly common sense and good planning. The easiest way to think about a hanging rail is to picture it as a small bridge. Its strength comes down to three things: what it's made of, how thick it is (its diameter), and the distance between its supports.
These three elements are constantly in a balancing act. A thick, heavy-gauge steel pole is obviously going to hold more weight than a thin aluminium one across the same span. But the single biggest factor is usually the spacing of the support brackets. Even the toughest pole will eventually sag in the middle if the gap between supports is too wide. That sag doesn't just look bad—it puts a huge amount of strain on the pole and its fittings day in, day out.
Estimating Your Garment Load
Before you can pick the right wardrobe pole and fittings, you need a decent estimate of the weight they'll be supporting. Don't worry, you don't need to get the scales out for every single item, but a ballpark figure will save you from making a costly mistake.
- Light Items (Blouses, T-shirts): On average, a metre of rail will hold around 15-20 kg of light garments.
- Medium Items (Trousers, Jackets): For these, you're looking at closer to 25-35 kg per metre.
- Heavy Items (Winter Coats, Leather): A metre packed with heavy coats can easily top 45 kg.
As you can see, a one-size-fits-all approach is a recipe for disaster. A stockroom rail built for heavy winter jackets needs a completely different setup than a boutique display for summer blouses.
The real aim here is to build in a safety margin. Always over-engineer for the weight you expect. It ensures your display stays secure and your stock is protected, even when you're fully loaded during the busiest season.
The Golden Rule of Support Spacing
For almost any professional job, you should install a support bracket at least every 1.2 metres (1200mm). This isn't just a friendly suggestion; it's the bedrock principle for preventing a pole from sagging. If you know the rail is going to be holding seriously heavy items, closing that gap to every 80-100cm is a smart move for long-term safety and stability.
This becomes absolutely critical for the long, continuous rail runs you see in many retail spaces. Well-placed centre supports are what share the load, transferring all that downward force into the wall instead of letting the pole take the full strain.
To get a better sense of how all the different parts work together to create a strong system, take a look at our guide to heavy-duty hanging rails. By getting the combination of pole diameter, material, and bracket spacing right for your estimated garment weight, you're building a reliable setup that protects your investment.
3. Choosing the Best Fittings for Your Application
You can have the strongest pole in the world, but it’s only ever as good as the fittings holding it in place. Think of these small bits of hardware as the unsung heroes of your display system. They’re the critical connection points that bear the entire weight of your garments, transferring it from the pole to the wall or wardrobe carcass. Get this wrong, and the whole setup is compromised.
Choosing the right wardrobe pole and fittings isn’t just about picking the shiniest metal parts from a catalogue. It’s about being strategic. The needs of a sprawling, wall-to-wall retail display are completely different from those of a tailor’s compact and meticulously organised workshop.
Matching Fittings to Professional Scenarios
Understanding what each fitting does is the key to building a system that can handle the real-world demands of your space. A visual merchandiser, for instance, might be looking for sleek, almost invisible end supports to create a minimalist, high-end look. On the other hand, a stockroom manager’s top priority will always be heavy-duty sockets that scream durability.
Let’s break down the most common types and where they really shine:
- End Supports and Sockets: These are the absolute essentials, the anchors for any rail system. They securely hold the ends of the pole. Open sockets are great because they let you lift the pole out easily, which is perfect for flexible retail spaces where you’re constantly changing layouts. Closed sockets offer a more permanent, locked-in fixture.
- Centre Brackets: As we’ve touched on, these are your secret weapon against pole sag. For any rail stretching beyond 1.2 metres, a centre bracket is non-negotiable. It provides that vital reinforcement right at the point of maximum stress.
- Corner Joints: Essential for creating wraparound rails in walk-in wardrobes or making the most of a stockroom's perimeter. These clever fittings let you connect poles at a 90-degree angle, ensuring not a single inch of valuable hanging space goes to waste.
When you're piecing together a professional-grade system, especially a heavy-duty steel one, having some background knowledge helps. A practical guide to SS Pipe Fittings can be surprisingly useful, offering insights into material grades and standards that translate directly to durability.
The image below really brings home the three core elements that create a strong and reliable wardrobe pole.
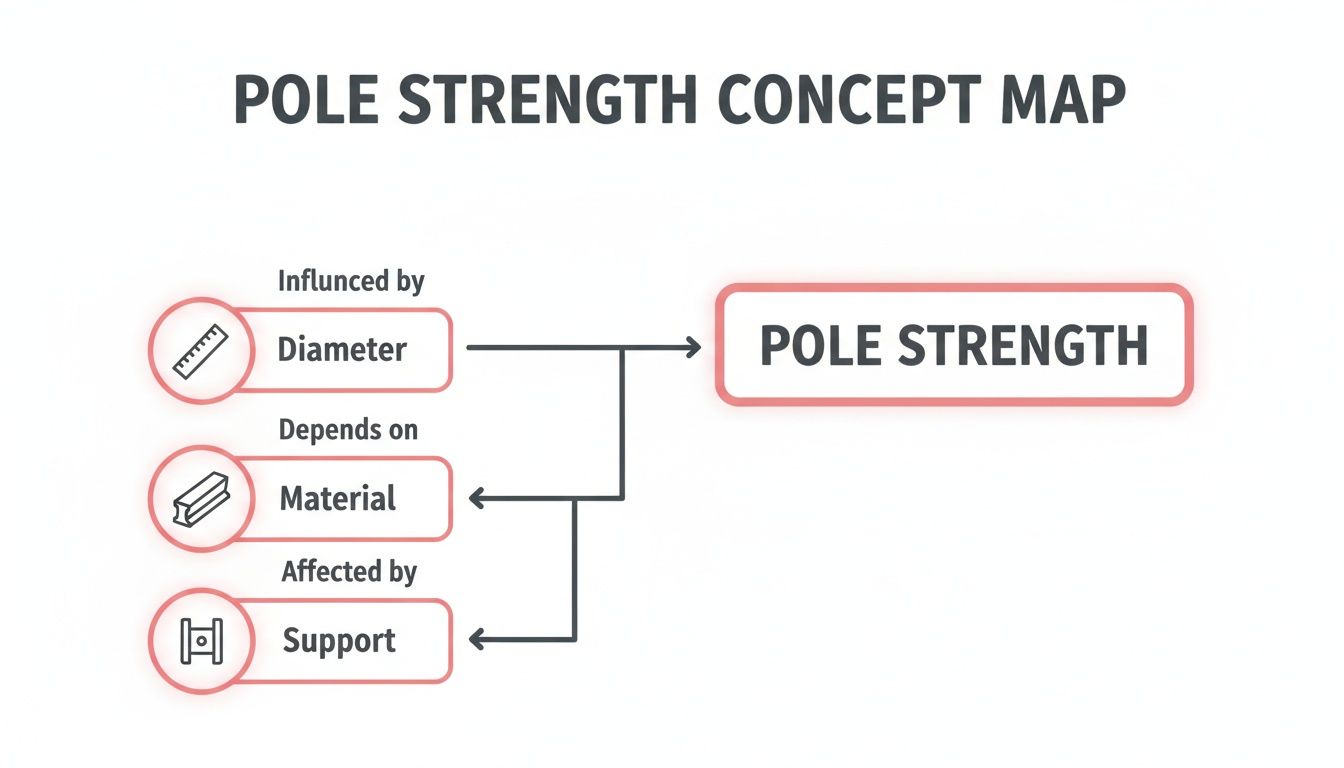
It’s a simple but powerful reminder of how pole diameter, the material you choose, and where you place your supports all work in tandem to guarantee a rock-solid setup.
Fittings for Retail vs. Tailoring
Let’s put this into practice. Picture a bustling high-street fashion store. The goal here is a clean, uninterrupted line of clothing running the full length of a feature wall. A merchandiser would likely pair strong end sockets with several discreet centre brackets to maintain that seamless visual flow, putting the focus entirely on the garments. For a really heavy-duty commercial display, understanding the specifics of a clothing rail bracket is crucial for maximising its load-bearing capacity.
Now, switch gears and imagine a tailor's studio. Here, space is at a premium, and the workflow is king. Garments are constantly being moved between cutting tables, sewing stations, and fitting areas. In this scenario, the tailor would probably opt for several shorter rails using open-ended sockets. This creates a modular, flexible system where they can quickly lift out a pole loaded with a single client’s order and move it without dismantling everything.
The right fitting isn't just a piece of metal; it’s a functional tool that should make your daily work easier and more efficient. By thinking about your workflow first, you can select components that actively support your operational needs.
By taking a moment to consider how you’ll actually use the space, you can build a custom garment system that’s more than just storage—it becomes a high-performance asset for your business. The choice of fittings has a direct impact on the system's strength, flexibility, and, ultimately, its longevity.
Installation Best Practices for Professionals
A perfectly chosen wardrobe rail is only as good as its installation. Getting this final step right is what separates a reliable, long-lasting display from one that fails under pressure. For professionals, this isn’t just about putting up a rail; it’s about guaranteeing strength and performance in a demanding commercial setting.
The secret to a rock-solid installation starts with finding the best anchor points. If you're working with plasterboard, your primary target is the vertical wooden studs hidden behind the surface. Securing your brackets directly into these studs gives you the strongest possible foundation. A good quality stud finder is your best friend here—it takes out all the guesswork and ensures every screw grips into solid wood.
Anchoring to Different Wall Types
Walls, of course, come in all shapes and materials. Using the right fixing for the right wall is non-negotiable; a mismatch here is one of the most common reasons for a rail system to fail.
-
Plasterboard (without studs): Sometimes, you have no choice but to fix into the plasterboard itself. For these situations, you'll need specialised hollow wall anchors or spring toggles. These clever fittings expand behind the board, spreading the weight over a much larger area and stopping the bracket from being pulled straight out.
-
Masonry (Brick or Blockwork): For solid brick or block walls, the job calls for a drill with a proper masonry bit and heavy-duty wall plugs. It's vital to match the plug size to both the screw and the hole you've drilled. This creates a tight, unshakeable fit that won’t work its way loose over time.
A secure fitting isn't just a detail—it's everything. The entire stability of your rail system, and the safety of the stock hanging on it, hinges on how well each bracket is anchored. This is where precision and choosing the right hardware really count.
Common Installation Mistakes to Avoid
Even the most experienced fitters can fall into simple traps that can compromise an installation. Knowing what to look out for is the best way to make sure it doesn't happen to you.
One of the most frequent errors is incorrect bracket spacing. As we've mentioned, pushing supports further apart than the recommended 1.2 metres is a surefire way to invite sagging and eventual failure. Another classic pitfall is using inadequate wall plugs or screws. The fixings that come in the box might not be up to the task for your specific wall type or the heavy loads you plan for. Don't be afraid to upgrade to superior quality fixings designed for the job.
You can dive deeper into selecting the right hardware in our complete guide to wardrobe rail and fixings.
Troubleshooting Common Rail System Issues
Even the best-installed wardrobe pole and fittings can start to show a bit of wear and tear over time, especially in a high-traffic retail environment. But don't worry. A little proactive maintenance and knowing what to look for will keep your displays safe, sturdy, and looking their best.
Think of it like this: a quick weekly check-up is far easier than a major repair job. For a polished chrome pole, a simple wipe with a soft, microfibre cloth is all it takes to banish dust and fingerprints and bring back that shine. Just be sure to steer clear of any harsh, abrasive cleaners that could scratch the finish. If you have painted steel rails, it’s worth giving them a quick once-over now and then to check for any chips that might let moisture in and start the rusting process.
Solving Common Problems
Most of the little niggles that crop up are surprisingly easy to fix yourself. A sagging pole, a wobbly fitting, or hangers that screech along the rail aren't just minor irritations—they're signals that your system needs a bit of attention. Catching them early is the key.
Here’s a rundown of the three most common issues and how to sort them out:
-
The Sagging Pole: This is a classic case of too much weight over too long a distance. The quickest and most reliable fix is to add an extra centre support bracket. It immediately takes the strain, sharing the load and giving the pole the reinforcement it needs right at its weakest point.
-
The Wobbly Fitting: A loose support bracket is more than just wobbly; it's a safety risk. Nine times out of ten, the culprit is a screw that has worked its way loose from the wall. First, try tightening it. If the screw just spins without gripping, the wall plug has given up. You’ll need to pop the screw out, remove the old plug, and replace it with a fresh, correctly-sized one to get that solid, secure fit back.
-
Noisy or Sticking Hangers: In a quiet shop, the sound of hangers scraping along a rail can be really distracting. This is usually just down to a bit of dust or residue building up on the pole itself. A good clean will often do the trick. If it's a persistent problem, a tiny dab of silicone lubricant or even just rubbing a piece of wax paper along the top of the rail can make a world of difference, helping hangers glide smoothly and silently.
Think of troubleshooting as preventative medicine for your display system. A few minutes spent diagnosing and fixing a small issue like a loose screw today can prevent a catastrophic rail failure tomorrow, protecting both your garments and your peace of mind.
By keeping these simple fixes in your back pocket, you can make sure your wardrobe pole and fittings continue to work hard for your business for years to come.
Got Questions? We've Got Answers
Even with the best plans in place, you’re bound to have a few questions when you're speccing out or installing a professional garment rail system. Getting straight answers to these common queries is the key to getting it right the first time, helping you sidestep those frustrating mistakes and future headaches.
Here are some practical, no-nonsense answers to the questions we hear most often from professionals working with wardrobe poles and fittings.
What’s the Maximum Length for a Pole Before it Needs Centre Support?
This is a big one. For most standard steel or aluminium poles, you absolutely need a centre support bracket for any span over 1.2 metres (1200mm). Try to go longer than that without support, and you’re just asking for the pole to sag under the weight of the clothes. In a busy commercial environment, that’s a risk you don't want to take.
If you’re planning to hang heavy stock like winter coats or denim, I’d strongly recommend tightening that span up to 80-100cm. Always double-check the manufacturer’s specs, though – the pole’s diameter and what it’s made of will be the final word on its unsupported strength.
Can I Cut a Wardrobe Pole to Size?
Of course. Most metal wardrobe poles are designed to be cut to a precise length on-site. The best tool for the job is a simple hacksaw, but make sure it’s fitted with a fine-toothed blade meant for cutting metal. That’s how you’ll get a clean, professional finish.
Once you’ve made the cut, don't forget the most important finishing touch: use a metal file to smooth down any sharp edges or burrs. It only takes a second, but it stops hangers from catching and prevents damage to delicate fabrics. And the golden rule always applies – measure twice, cut once. Don't forget to account for the space your end fittings will take up inside the measurement!
Should I Go for a Round or an Oval Wardrobe Pole?
The honest answer? It really depends on what you need it to do. Round poles are the classic industry workhorse. They’re incredibly versatile and compatible with the widest variety of fittings, making them a solid choice for general-purpose use.
However, if sheer strength is what you’re after, oval poles are the clear winner. Their profile gives them much greater structural resistance to bending and sagging, especially over longer distances. This makes them the go-to option for heavy-duty commercial setups where you need to maximise your load capacity.
There's another little trick to oval poles, too. Their flat top surface naturally keeps all your hangers facing perfectly forward. It might seem like a small detail, but for creating that immaculate, uniform retail display, it’s an absolute game-changer.
For a complete selection of professional-grade rails, fittings, and display solutions, explore the curated collection at Display Guru. Find the perfect hardware to build a robust and reliable system for your business at https://www.displayguru.co.uk.