


The Definitive Guide to an Adjustable Dressmakers Form
An adjustable dressmaker's form is less of a tool and more of a silent partner in your sewing room. It's essentially your personal body double, a customisable mannequin that you can shape to perfectly match specific measurements, making sure every garment you create fits like a dream. Think of it less as a dummy and more as a three-dimensional, reusable pattern.
Your Creative Partner in the Workshop
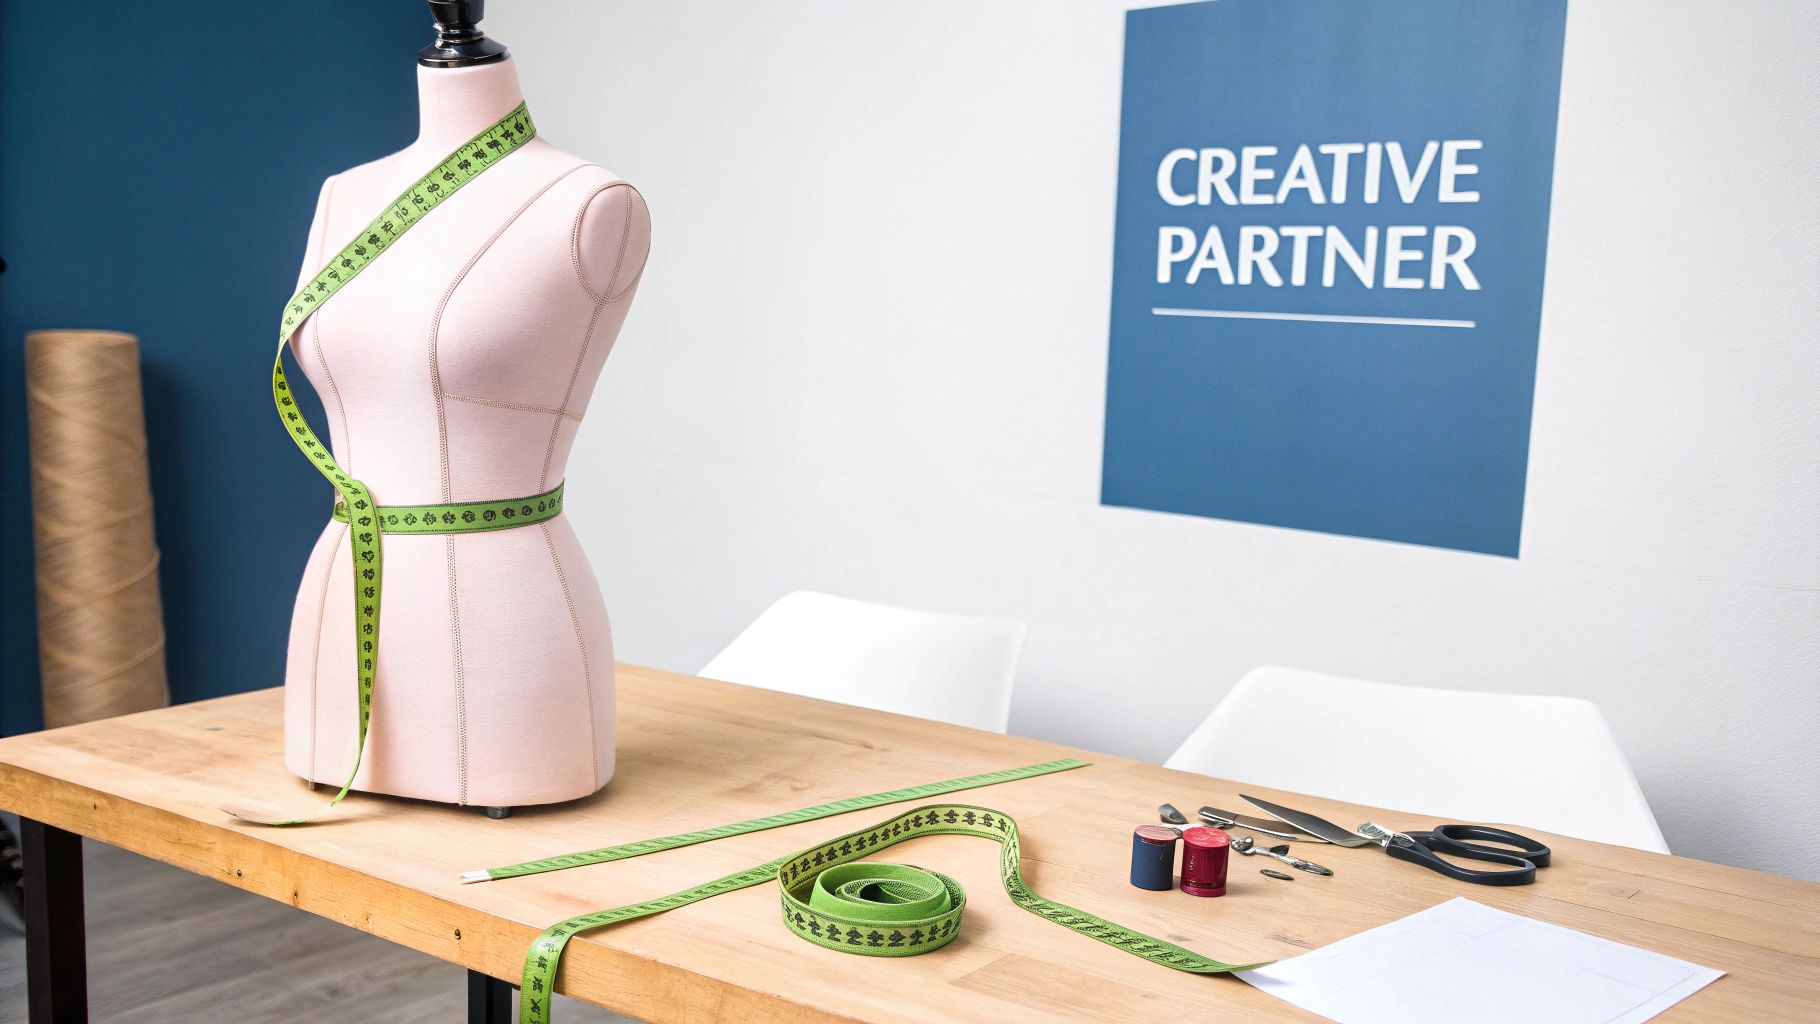
This is so much more than a simple stand for hanging clothes on. An adjustable form is a dynamic, hands-on piece of equipment that completely changes how you make garments. It’s like a sculptor's armature—that hidden framework that gives a statue its shape and support. For a dressmaker, the form does exactly that, giving you a solid, reliable foundation to drape, pin, and fit fabric on.
The ability to accurately mimic a real human body is what makes it so essential for anyone who's serious about their craft. Standard, static mannequins have their place, but they can’t offer the bespoke precision needed to bridge the gap between a flat paper pattern and the final piece. Getting those measurements right is a detailed process, as you can see in our complete guide on how to take mannequin measurements.
Who Is This For?
From a home hobbyist’s sewing corner to a bustling professional studio, just about everyone who works with fabric can benefit from having one of these. Its adaptability helps solve the common headaches faced by all kinds of creators.
- Home Sewers: Finally, you can get a truly professional fit for your own clothes without having to ask someone else for help. Your form is a patient model, always available, making tricky adjustments something you can handle on your own.
- Professional Tailors: Cut down on client fittings dramatically. Once you dial in a client's exact measurements, you can tackle complex alterations with total confidence, saving valuable time for both of you.
- Fashion Designers: This is your canvas for draping and pattern-making. It lets you experiment and see exactly how a fabric will hang and move in 3D before you commit to cutting that expensive bolt of silk.
- Costume Designers: Need to build a specific historical silhouette or a wild, fantastical shape? An adjustable frame gives you the structure you need for corsetry, padding, and any other elaborate elements a design calls for.
These forms aren't a new invention; they've been a quiet revolution in the trade for over a century. In London's fashion districts, where tailors have been perfecting their craft for generations, the adjustable form became a genuine game-changer in the early 20th century. UK patent records show that by 1925, there were over 1,200 inventions filed for adjustable forms—a 45% jump from before the First World War.
A 1930s survey of London workshops found that these new tools, often built from wood and metal, cut fitting times by up to 60%. This was a massive leap in efficiency.
At the end of the day, working with an adjustable dressmaker's form gives you control, precision, and creative freedom. It saves you time, cuts down on wasted fabric, and helps you produce clothing with an impeccable, bespoke finish that you just can't achieve as efficiently with a static form or a live model.
Exploring the Different Types of Adjustable Dress Forms
Walking into the world of adjustable dress forms can feel a bit overwhelming. You're met with all sorts of materials, shapes, and weird-looking dials. But once you break it down, it's actually quite simple. The right choice boils down to what you plan to make and how you like to work.
Think of it like choosing a painter’s canvas; a watercolourist needs something entirely different from an oil painter. In the same way, the surface and shape of your dress form needs to support your specific sewing or draping style. The first major fork in the road is all about the material and whether you can stick pins in it.
Pinnable vs Non-Pinnable Surfaces
The single biggest difference between forms is whether you can pin directly into the body. This one feature completely changes how you can use it, so it's the first thing you need to decide on.
Traditional Fabric-Covered Forms are often what people picture first. They typically have a hard plastic shell covered with a thin layer of foam and a fabric finish. They’re great for fitting and seeing how a finished garment hangs, but you can't just jab pins into them anywhere. You usually have to slide pins in sideways or aim for the seams between the adjustable panels.
Pin-Friendly Polystyrene Forms, on the other hand, are a game-changer for serious design work. Their bodies are made from a dense, solid polystyrene that lets you push pins straight in, wherever you need them. This makes them absolutely essential for professional draping, hands-on pattern making, and any kind of complex design. If you want to dive deeper, our guide to dress forms for sewing has more on this.
A fully pinnable form isn't just a fitting model; it's a creative tool. It allows you to sculpt fabric directly onto the silhouette, much like a sculptor works with clay on an armature. It gives you total freedom to experiment with shape and structure.
Honestly, this distinction is critical. If your work involves creating new designs by draping fabric from scratch, a pinnable polystyrene model is non-negotiable. If you're mainly focused on alterations or checking the fit of commercial patterns, a traditional fabric-covered form will probably do the job just fine.
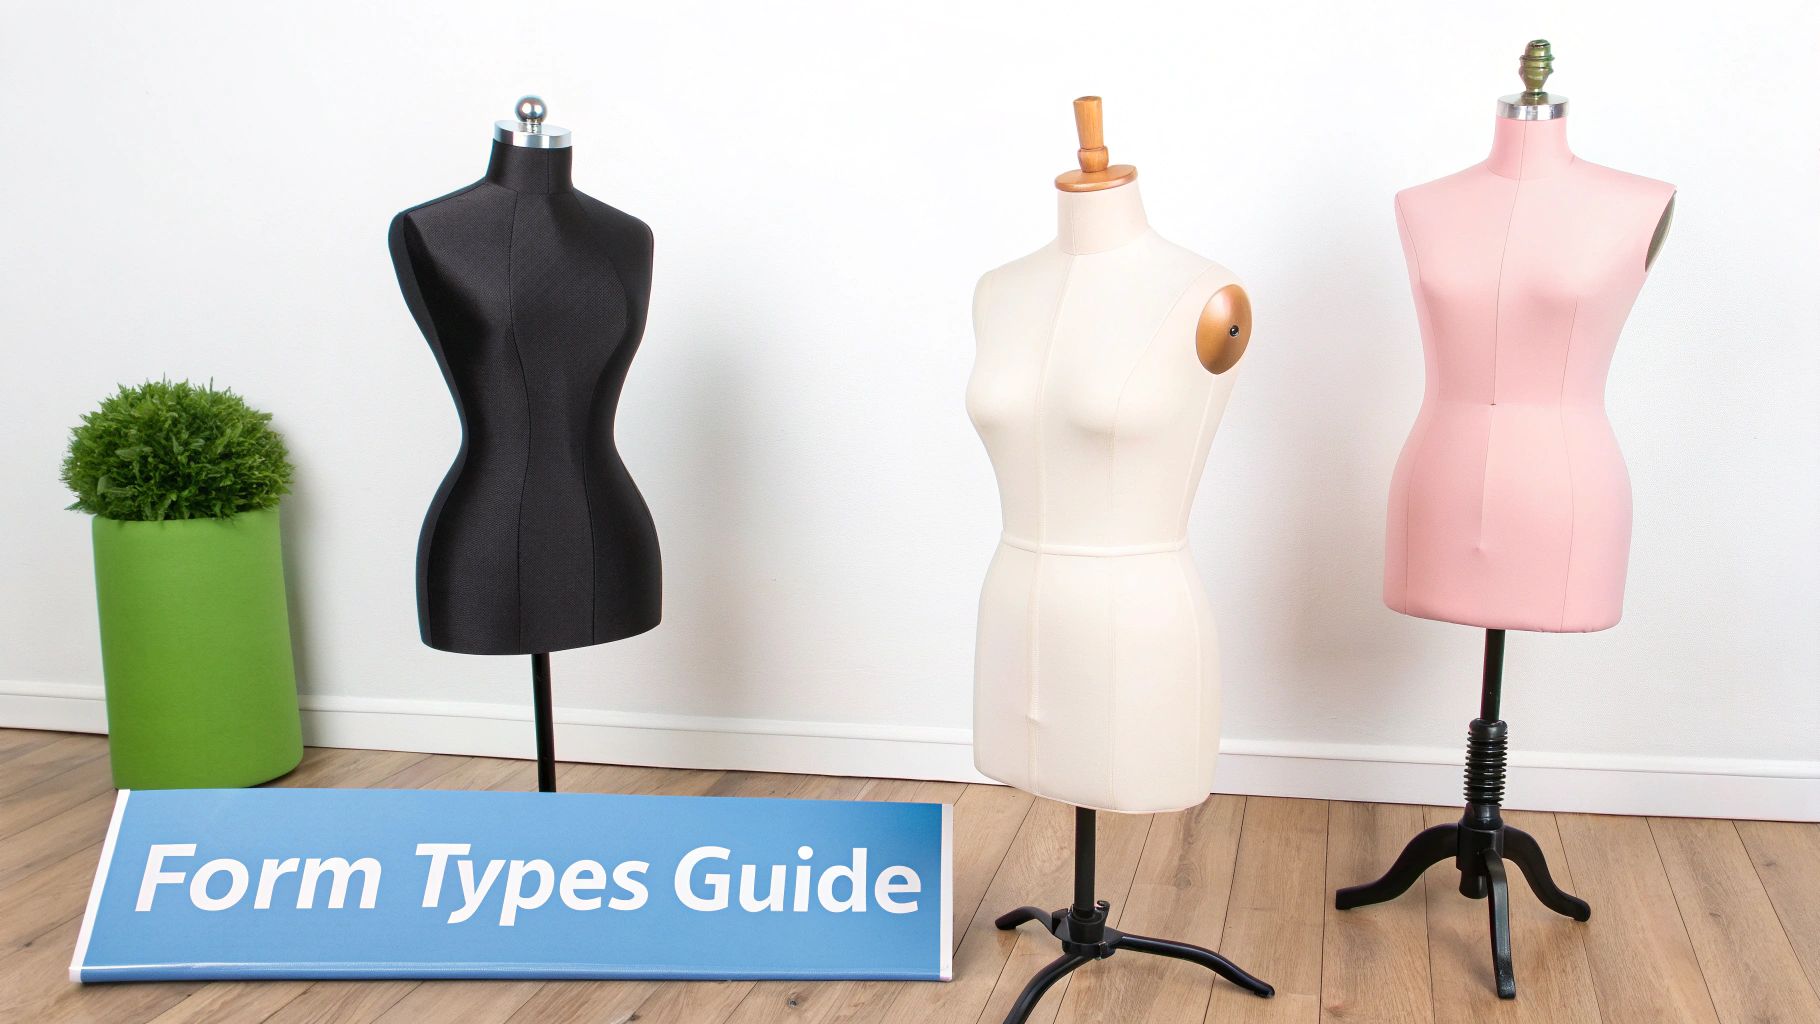
Torso, Legged, and Specialised Forms
Once you've sorted the surface, you need to think about the shape. The form’s silhouette dictates what you can realistically create on it.
-
Torso-Only Forms: This is the classic workhorse. It represents the body from the neck down to the hips and is perfect for designing blouses, jackets, dresses, and skirts. Its versatility makes it a staple for home sewers and professional tailors alike.
-
Full-Body Forms with Legs: If you're making trousers, jumpsuits, or even close-fitting evening gowns, you need legs. A full-body form lets you properly assess the fit and drape through the crotch, inseam, and thighs—areas you simply can't get right on a torso model.
-
Half-Scale and Child Forms: These smaller forms are brilliant tools. Fashion students and designers use half-scale models to prototype ideas quickly without wasting metres of expensive fabric. And, of course, child-sized forms are a must-have for anyone crafting bespoke clothing for little ones.
Adjustment Mechanisms and Stands
Finally, don't forget the practical bits—how the form adjusts and what it stands on. These details really affect your day-to-day workflow.
Adjustments are usually handled with dials (you'll often see 12 or more) or a key-operated system. Dials are very common and let you tweak the bust, waist, and hip measurements bit by bit. Some find the key systems offer a slightly smoother, more even expansion.
The stand is just as important. It’s all about stability and movement.
- Tripod or Four-Legged Stands: These provide a solid, stable base, which is crucial when you're working with heavy fabrics or yanking things into place. A classic wooden tripod looks beautiful, while a metal one is all about durability.
- Stands with Castors: If you’re constantly shifting your form around the studio, a stand with wheels is a lifesaver. Just make sure the castors can be locked, so it doesn’t go rolling away while you're trying to work!
By looking at these three areas—the surface, the shape, and the mechanics—you can cut through the noise and find the adjustable dress form that will truly become your best assistant.
Which Adjustable Dress Form Is Right for You?
Choosing a form can be tricky, as the best one really depends on your profession and the projects you tackle most often. This table breaks down our recommendations to help you find the perfect match for your workshop, studio, or retail space.
| User Type | Recommended Form Type | Key Features to Look For | Primary Use-Case |
|---|---|---|---|
| Home Sewer / Hobbyist | Traditional Fabric-Covered Torso | 12 adjustment dials, hem marker, sturdy tripod stand | Alterations, fitting commercial patterns, general dressmaking. |
| Professional Tailor | Pin-Friendly Polystyrene Torso | Solid polystyrene body, sturdy stand with castors, precise dials | Custom fittings, draping, bespoke garment creation. |
| Costume Designer | Full-Body Form with Legs | Pinnable surface, full leg definition, highly adjustable | Creating trousers, jumpsuits, historical costumes, fantasy wear. |
| Retailer / Visual Merchandiser | Traditional Fabric-Covered Torso | Aesthetically pleasing finish (e.g., black or cream fabric), stable decorative stand | Displaying garments in-store, online product photography. |
| Fashion Student | Half-Scale Pinnable Form | Accurate proportions, lightweight, stable base | Prototyping designs, learning draping techniques, saving fabric. |
Ultimately, the best form is one that removes friction from your creative process. For a tailor, that means a pinnable surface for draping, while for a retailer, it might be an elegant stand that complements their brand's aesthetic. Consider your daily tasks, and the right choice will become clear.
How to Choose the Perfect Adjustable Form
Picking out your first (or next) adjustable dressmaker’s form is a real investment in your craft. To get it right, you need to think beyond a simple list of features and focus on what you actually need it for. Think of it like hiring a new assistant—you want one that fits seamlessly into your workflow, understands your projects, and helps you reach your goals.
The whole process should start with a bit of honest self-assessment. Before you even start browsing, take a minute to nail down what you expect this form to do for you. Are you a professional tailor crafting bespoke suits? A home sewer tweaking commercial patterns? Or a boutique owner looking for a standout display? Each of these roles demands something different from a dress form.
What Are You Actually Making?
The type of projects you tackle day-in and day-out will be the biggest clue to the features that matter. Not all forms are created equal, and what’s perfect for a visual merchandiser can be a nightmare for a pattern maker.
Let's break it down by a few common tasks:
- Precision Tailoring and Draping: If you’re draping fabric from scratch or fitting custom-made garments, a fully pinnable polystyrene body isn't just a nice-to-have; it's essential. You need to be able to stick pins anywhere on the form, not just along the seams.
- Alterations and General Sewing: For everyday jobs like hemming trousers, taking in a dress, or working from a pattern, a more traditional fabric-covered form will do the trick. The most important things here are accurate dial adjustments and a solid, stable base that won't wobble.
- Retail Display and Photography: Here, it’s all about aesthetics and stability. A form with a clean, classic finish (like a simple black or cream fabric) and an elegant wooden stand will showcase the garment beautifully without being a distraction. Whether you can stick pins in it is much less of a concern.
It’s interesting to see how adjustable dressmaker's forms have taken off in the UK retail world, particularly for visual merchandising. The entire mannequin market, which pulled in USD 278.2 million in 2023, is expected to grow to a massive USD 649.7 million by 2030. Retailers made up over 50% of the USD 312.8 million spent in the UK alone in 2024, using these forms to create eye-catching displays in cities like Birmingham and Manchester. One report even found that shops using these versatile polystyrene forms saw footfall jump by 28%, largely because they can be adjusted to fit 95% of UK female sizes (from a UK 6 to a 20).
Finding the Sizing "Sweet Spot"
This is, without a doubt, the most crucial part of the decision—and where so many people go wrong. The golden rule is this: don’t just buy a form that can adjust to your measurements. Buy one where your main measurements fall comfortably in the middle of its adjustment range.
An adjustable form is at its most stable and true-to-shape when it isn't dialled to its absolute minimum or maximum sizes. Pushing it to the extremes can create awkward gaps between the panels and distort the overall silhouette.
Let’s say your own measurements (or your most frequent client’s) include a 36-inch bust. A form with a range of 32-40 inches is a much smarter buy than one with a 36-44 inch range. With the first option, you're working right in the form's strongest, most balanced configuration. With the second, you’re at its smallest possible setting, which means you have no room to size down and you risk the whole structure feeling a bit flimsy.
To nail this, grab the set of measurements you use most often—bust, waist, and hips—and hunt for a form where those numbers sit right in the middle of its advertised range. For a bit more on this, our article on how to buy a dress form dives even deeper into getting the sizing just right.
Balancing Your Budget with the Must-Have Features
Finally, we have to talk about money. Your budget will obviously play a big part in the quality and features you can get. While it’s always tempting to go for the cheapest option, try to think about the long-term value.
- Entry-Level Forms (£100-£150): These are perfectly fine for students and hobbyists just starting out. They usually come with basic dial adjusters and a lightweight tripod stand. They’ll get the job done for simple fitting and alteration work.
- Mid-Range Forms (£150-£250): This is often the sweet spot for serious sewers and small business owners. In this price bracket, you start seeing fully pinnable polystyrene bodies, much sturdier stands (some even have handy castors), and more precise adjustment mechanisms.
- Professional-Grade Forms (£250+): Aimed at professional tailors, designers, and costumiers, these forms are built to last. They boast superior durability, heavy-duty stands, and often have specialised features like collapsible shoulders or attachable trouser legs.
A wise investment simply means matching your budget to what you genuinely need. A student doesn't need a top-of-the-line professional model, but a full-time tailor will quickly get frustrated with a wobbly, non-pinnable one. If you properly assess your projects, find that sizing sweet spot, and align your budget with the features that truly matter, you’ll choose a form that will be a reliable partner for years to come.
Getting Your Dressmakers Form Set Up Just Right
That moment when you unbox a new adjustable dressmakers form is always a good one. It’s a real milestone, promising a future of better-fitting garments, easier draping, and more professional displays. But to get from a box of parts to a perfect fit, you need a thoughtful setup process. It’s less about just building it and more about coaxing it into a precise replica of a human body.
First things first: the assembly. Lay everything out and follow the instructions to put the stand together. Your main goal here is rock-solid stability. Double-check that every screw is tight and the base sits flat on the floor with zero wobble. An unsteady form is a recipe for wonky seams and draping disasters, so a secure base is completely non-negotiable.
This quick guide sums up the journey from choosing your form to getting it ready for setup.
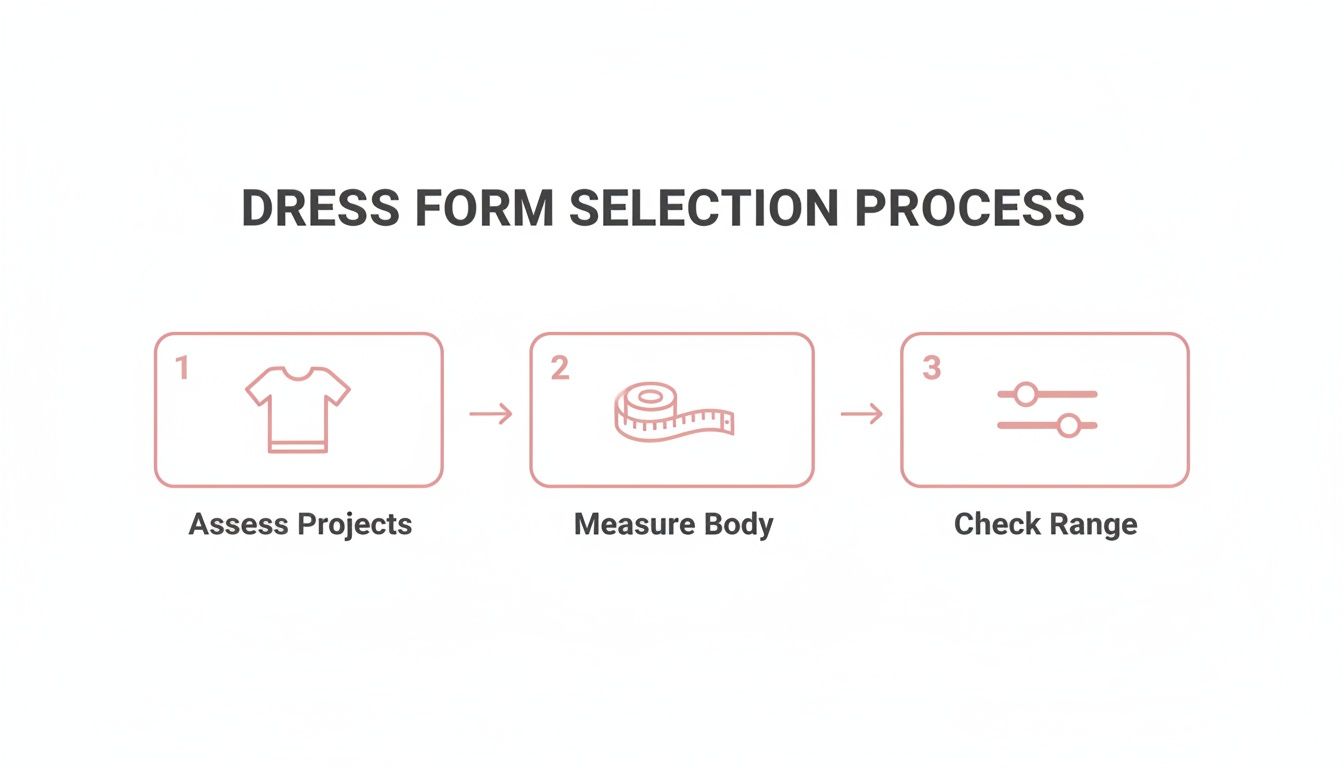
As you can see, making sure the form’s adjustment range matches your measurements is the vital middle step. Get that right, and the setup process becomes a breeze.
From Numbers to a 3D Shape
With the stand built, the real magic begins. This is where you translate a list of measurements into a three-dimensional shape. Precision is everything at this stage, so start by taking a fresh set of accurate measurements from the person you want the form to mimic.
Key Measurements You'll Need:
- Bust: Measure around the fullest part, keeping the tape measure level all the way around the back.
- Waist: Find the natural waistline—it's the narrowest part of the torso, usually a touch above the navel.
- Hips: Wrap the tape around the widest point of the hips and bottom.
- Back Waist Length: This is a crucial one. Measure from that prominent bone at the base of your neck straight down to your natural waistline.
Armed with these numbers, you can start dialling them into the form. Most models have separate dials for the neck, bust, waist, and hips, plus a way to adjust the overall torso length.
The Correct Adjustment Sequence
Believe it or not, the order you turn the dials really does matter. If you just start twisting them randomly, you can end up with a lopsided, distorted silhouette. For a balanced and realistic shape, it's best to work from top to bottom.
- Set the Torso Length: Start with the back waist length. This sets the entire vertical framework, making sure the bust, waist, and hip lines will all fall in the right places.
- Adjust the Bust: Now, turn the bust dials. The trick is to adjust them all a little bit at a time, moving between them until the form’s circumference matches your measurement. Keep your tape measure handy to check your progress.
- Define the Waist: Next up, the waist. Just like before, make small, even turns on all the waist dials to expand the form gradually and symmetrically.
- Shape the Hips: Finally, adjust the hip dials until you hit your target measurement. This completes the core silhouette.
Always adjust the dials on both sides of the form at the same time, using small increments. Cranking one dial all the way before touching the others is a common mistake that can jam the mechanism or create an uneven shape.
Finishing the Fit with Padding
An adjustable form gives you a fantastic starting point, but let’s be honest—no human body is perfectly symmetrical or shaped like a standard mannequin. Padding is the secret weapon that turns your form from a close approximation into a true body double. This step is an absolute game-changer for getting a flawless fit on trousers or closely-tailored bodices.
You can use materials like quilt wadding, foam shoulder pads, or even a specialised body padding kit. The goal is to build up any areas where the form's shape doesn't quite match the real body. Common spots that need a bit of extra shape include:
- The upper chest or between the shoulder blades
- The curve of the stomach or lower abdomen
- The fullness and specific shape of the bottom
- The unique slope or width of the shoulders
Secure the padding with pins or, even better, a snug-fitting cover that will smooth everything out. You're aiming for a firm, smooth surface that mirrors all those unique personal contours. For more advice on ensuring the whole setup is stable, our guide on choosing a sturdy dress form stand has some great tips. By taking the time to measure, adjust, and pad methodically, you’ll have a truly customised tool ready for precision dressmaking.
Advanced Techniques for Your Adjustable Form
Once you’ve mastered setting up your adjustable form to perfectly mirror a body, you start to unlock its real creative potential. This is where you move beyond simple fitting and the form becomes less of a tool and more of a creative partner. For designers, costumiers, and even retailers, this is the point where you can truly push the boundaries of what’s possible.
For costume designers, the form is an indispensable armature for building out historical or fantastical silhouettes. Creating period pieces, like an 18th-century gown with its distinctive panniers or a Victorian bustle dress, demands a solid, correctly shaped foundation. Your adjustable form gives you that core structure, which you can then build upon with padding and specialised underpinnings to get the silhouette just right—long before you even think about touching the final fabric.
Sculpting Historical and Theatrical Silhouettes
Recreating a specific historical look is often less about the person inside the garment and more about the structured shape of the era itself. This is where an adjustable dressmakers form is absolutely brilliant.
- Corsetry and Stays: You can set the form to the actor's "un-corseted" measurements, then build and fit a corset directly onto it. This lets you achieve the desired waist reduction and shaping without needing the actor there for every single fitting.
- Hoops and Panniers: For those massive, voluminous skirts, the form provides a stable base to construct and balance the underlying support structures, ensuring the final garment hangs and moves exactly as it should.
- Character Padding: In theatre, you might need to completely transform an actor's physique. You can use your form to build up padding for a hunchback, a muscular hero, or any other body type, making sure the costume fits the character perfectly, not just the actor.
Think of your form as a theatrical understudy. It can stand in for the actor, wearing restrictive or heavy underpinnings for hours on end, allowing you to perfect the outer layers without exhausting your cast.
These techniques aren't just for historical recreation; they're fundamental to modern fashion education and professional costume work. In fact, adjustable dressmakers forms are the unsung heroes of UK fashion schools, where student demand makes up 15% of the USD 312.8 million mannequin market in 2024. A recent study found that these forms enable up to 90% accuracy in pattern drafting, and professional surveys show they can slash refitting times by as much as 35% for designers working with diverse casts. You can find more insights on the growth of the UK mannequin market.
Experimental Draping and Pattern Making
For a fashion designer, an adjustable form is a playground for innovation. It's a three-dimensional canvas for experimenting with unconventional shapes and challenging designs that are often impossible to visualise on a flat pattern alone.
Draping asymmetrical designs, for instance, becomes far more intuitive. You can work on one side of the form, step back to see how it balances, and make adjustments in real-time. It’s also invaluable for developing complex, sculptural pieces with unique tucks, folds, and seam lines that just wouldn't come to life on paper. You can learn more about bringing sketches into 3D in our guide on sewing for a dummy.
Dynamic Retail Displays and Photography
The versatility of an adjustable dressmakers form doesn't stop at the design studio; it extends right into the commercial world. For boutique owners and online sellers, the form is a surprisingly powerful merchandising tool.
Instead of relying on a static, standard-size mannequin, you can adjust the form to perfectly fit every single garment you want to display. This ensures each piece looks its absolute best, without any awkward pulling or sagging. You can create dynamic, layered outfits for your window displays that tell a compelling story. For product photography, a perfectly fitted garment on a form looks far cleaner and more professional than one on a hanger, helping to boost sales by showing customers exactly how the clothing is meant to drape on a body.
8. Keeping Your Dressmakers Form in Top Shape
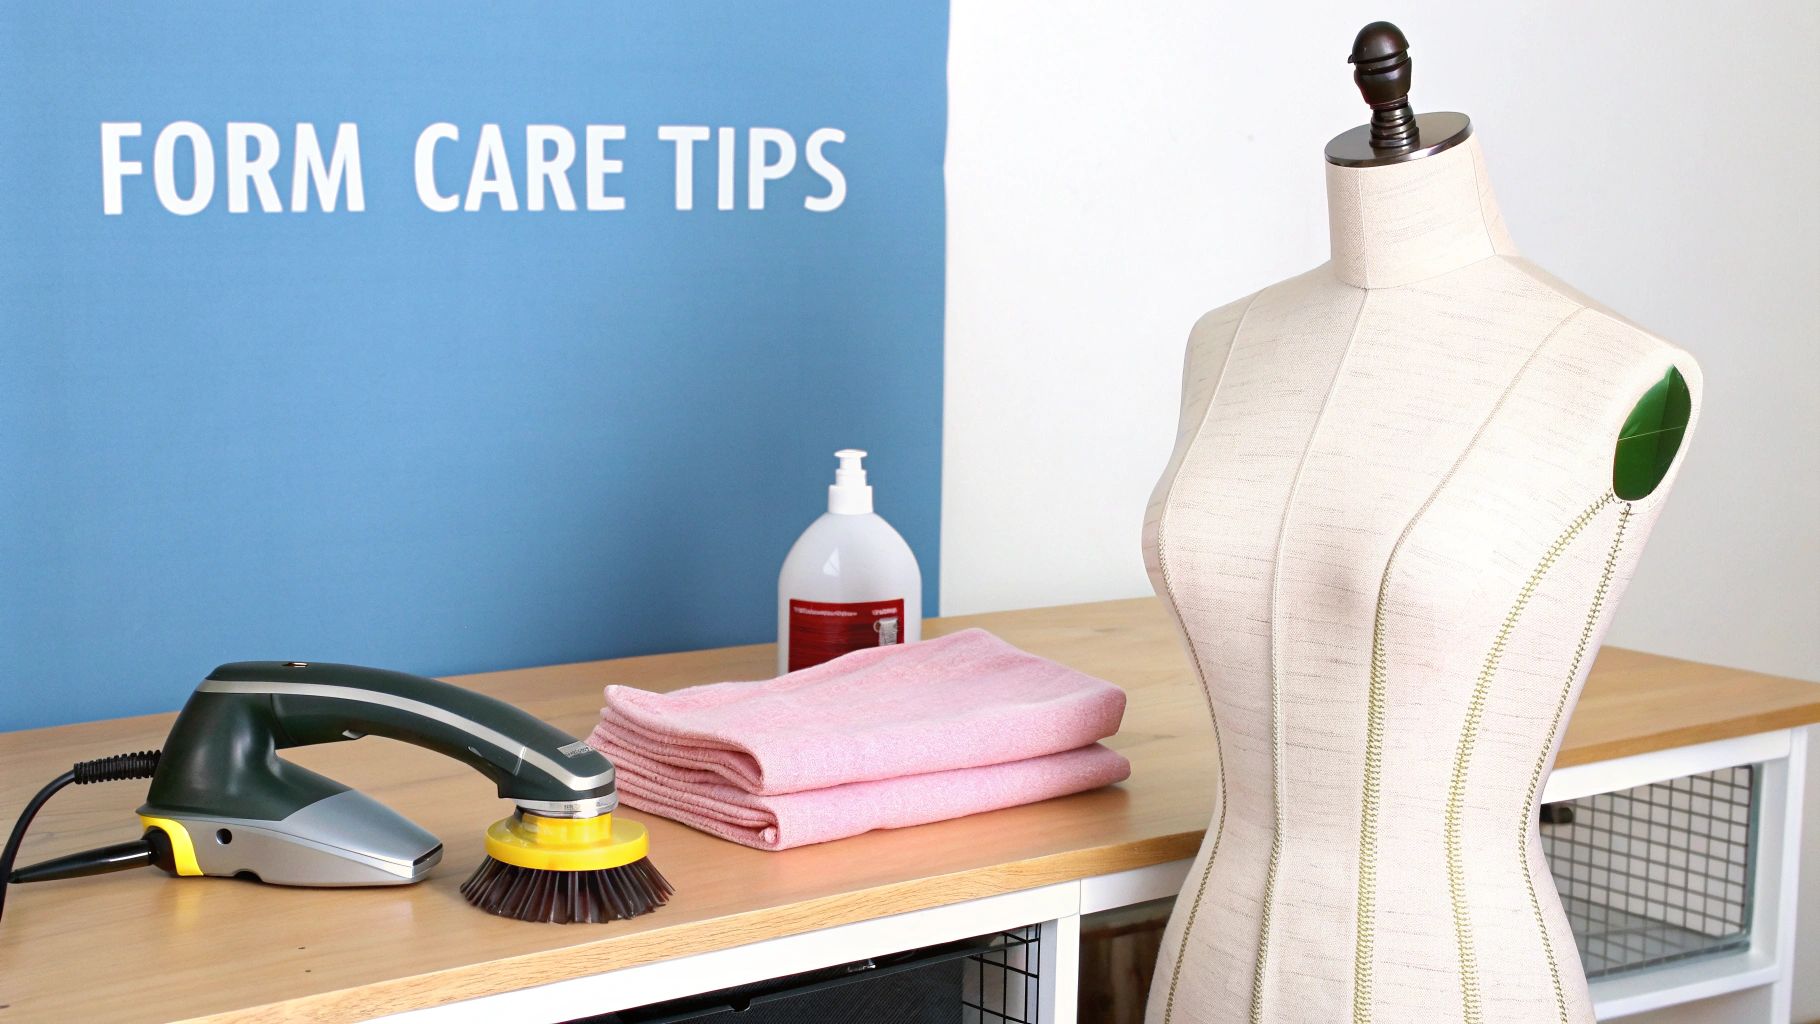
Think of your adjustable dressmakers form as a trusted partner in your work. It's a real investment, and like any quality tool, a bit of regular care will ensure it serves you well for years to come. A little maintenance goes a surprisingly long way.
The easiest win is regular cleaning. For those fabric-covered models, a quick once-over with a lint roller or the brush attachment on your hoover is fantastic for lifting dust, stray threads, and fabric fibres. Doing this stops grime from transferring onto your lovely light-coloured fabrics during a fitting.
If you're working with a polystyrene form, a simple wipe with a slightly damp cloth is usually all it takes to keep it looking fresh. Letting dust settle can eventually lead to stains on your garments, and nobody wants that.
Looking After the Inner Workings
The adjustment dials and internal gears are the real heart of your adjustable dressmakers form. Keeping them in good working order is absolutely key to making smooth, accurate size changes over the years.
Treat the adjustment dials gently; they're designed for precision, not for brute force. Trying to force a dial that feels stuck is the fastest route to breaking the internal mechanism for good.
If a dial feels a bit stiff, try to gently ease it back and forth to loosen any debris. Once a year, you could apply a tiny drop of silicone-based lubricant to keep things moving freely. Steer clear of oil-based lubricants, though, as they tend to attract dust and can seep through and stain the form's fabric cover.
Finally, think about where you store it. A simple dust cover is a brilliant idea when your form isn't in use. It protects it from sunlight, which can cause the fabric to fade and become brittle over time. Keeping it in a dry room with a stable temperature also prevents damp from getting into the internal parts, making sure your form stays a reliable partner for all your creative projects.
Frequently Asked Questions About Dressmakers Forms
Even with all the details covered, a few common questions always pop up just when you're about to make a choice. Let's clear up those last-minute queries so you can buy and use your new dress form with total confidence.
Think of this as your go-to guide for those nagging little doubts. We’ll tackle the practical issues that sewers, tailors, and designers run into all the time.
Can I Pin Directly Into Any Adjustable Dressmakers Form?
That’s a great question, and the answer is no—this is a critical difference between models. Many adjustable forms have a hard plastic body under the fabric cover. On these, you can only really slide pins in sideways or along the gaps between the panels, which is perfectly fine for most fitting jobs.
But if you’re doing serious draping or pattern work, you’ll want a 'pin-friendly' model. These are made with a dense polystyrene core that you can stick pins straight into, anywhere on the body. It’s a game-changer. Always double-check the product description for the word "pinnable" before you commit.
Should I Size Up or Down If I Am Between Sizes?
Always go for the smaller size. I know it sounds a bit backwards, but it gives you so much more flexibility. You can always add padding to a dress form to build it up to the right shape, but you can never shrink it smaller than its minimum settings.
Buying a form that’s too big at its smallest point is a mistake you can't undo. A smaller form is a blank canvas, letting you pad it out to perfectly match your own measurements or a client's specific shape. It creates a far more accurate body double.
This simple rule ensures your adjustable dressmakers form will serve you well across countless projects and different body shapes for years to come. It’s a much smarter way to invest your money.
How Do I Replicate Specific Posture on My Form?
Standard adjustable forms are fantastic for getting the bust, waist, and hip measurements right, but they can't replicate posture. To mirror things like sloped shoulders, a full bust, or a sway back, you need to get hands-on with padding.
First, dial in the main measurements. Then, start building. You can use foam shoulder pads, quilt wadding, or even buy a dedicated padding kit. A brilliant trick is to put a well-fitting top on the form and then stuff padding underneath it until the garment hangs exactly as it does on the actual person. This is how you turn a generic dummy into a true custom-fit tool.
Ready to find the perfect creative partner for your sewing studio? Display Guru offers a comprehensive range of professional-quality, adjustable, and pin-friendly dressmakers forms to suit every project. Explore our collection and enjoy free UK shipping on all orders at https://www.displayguru.co.uk.