


How to Fit a Wardrobe Rail and Fixings for Maximum Strength
Getting the right wardrobe rail and fixings from the outset is the most crucial part of creating a secure, long-lasting storage space. It’s the difference between a rail that confidently holds your heaviest winter coats and one that ends in a collapsed mess on the floor. The secret lies in matching the rail to the weight it needs to bear and, just as importantly, pairing your fixings to the type of wall you’re working with.
Choosing Your Rail and Fixings
A solid installation is about more than just looks; it's about strength and durability. Selecting your wardrobe rail and fixings isn't a complex job, but it does demand a bit of thought about the materials, the weight you expect it to hold, and the construction of your wardrobe or walls. It's a similar mindset to picking out kitchen units – you need to balance style with function, a process detailed in guides on topics like how to choose kitchen cabinets.
First up, let’s look at the rail itself. Rails come in various materials and profiles, each offering different levels of strength. A standard chrome-plated steel tube works perfectly well for most everyday bedroom wardrobes, but if you’re planning on hanging a lot of heavy garments, you’ll want to look at heavy-duty oval or chunkier round profiles.
Rails: Matching Material to Weight
For a typical wardrobe at home, a 25mm diameter round tube is usually more than enough for hanging shirts, trousers, and a few jackets. But if your collection includes a serious number of heavy wool coats or leather jackets, you’ll need to step it up to something more robust.
Take a cue from professional retail fit-outs. In a UK clothes shop, you’ll often see displays for heavy winter coats using rails rated for an impressive 50–120 kg per metre. Lighter fashion items, on the other hand, might only need a rail rated for 20–40 kg per metre. This is a great real-world example of matching the hardware to the job. For a much closer look at high-capacity options, it's worth reading our guide on choosing your heavy duty wardrobe rail.
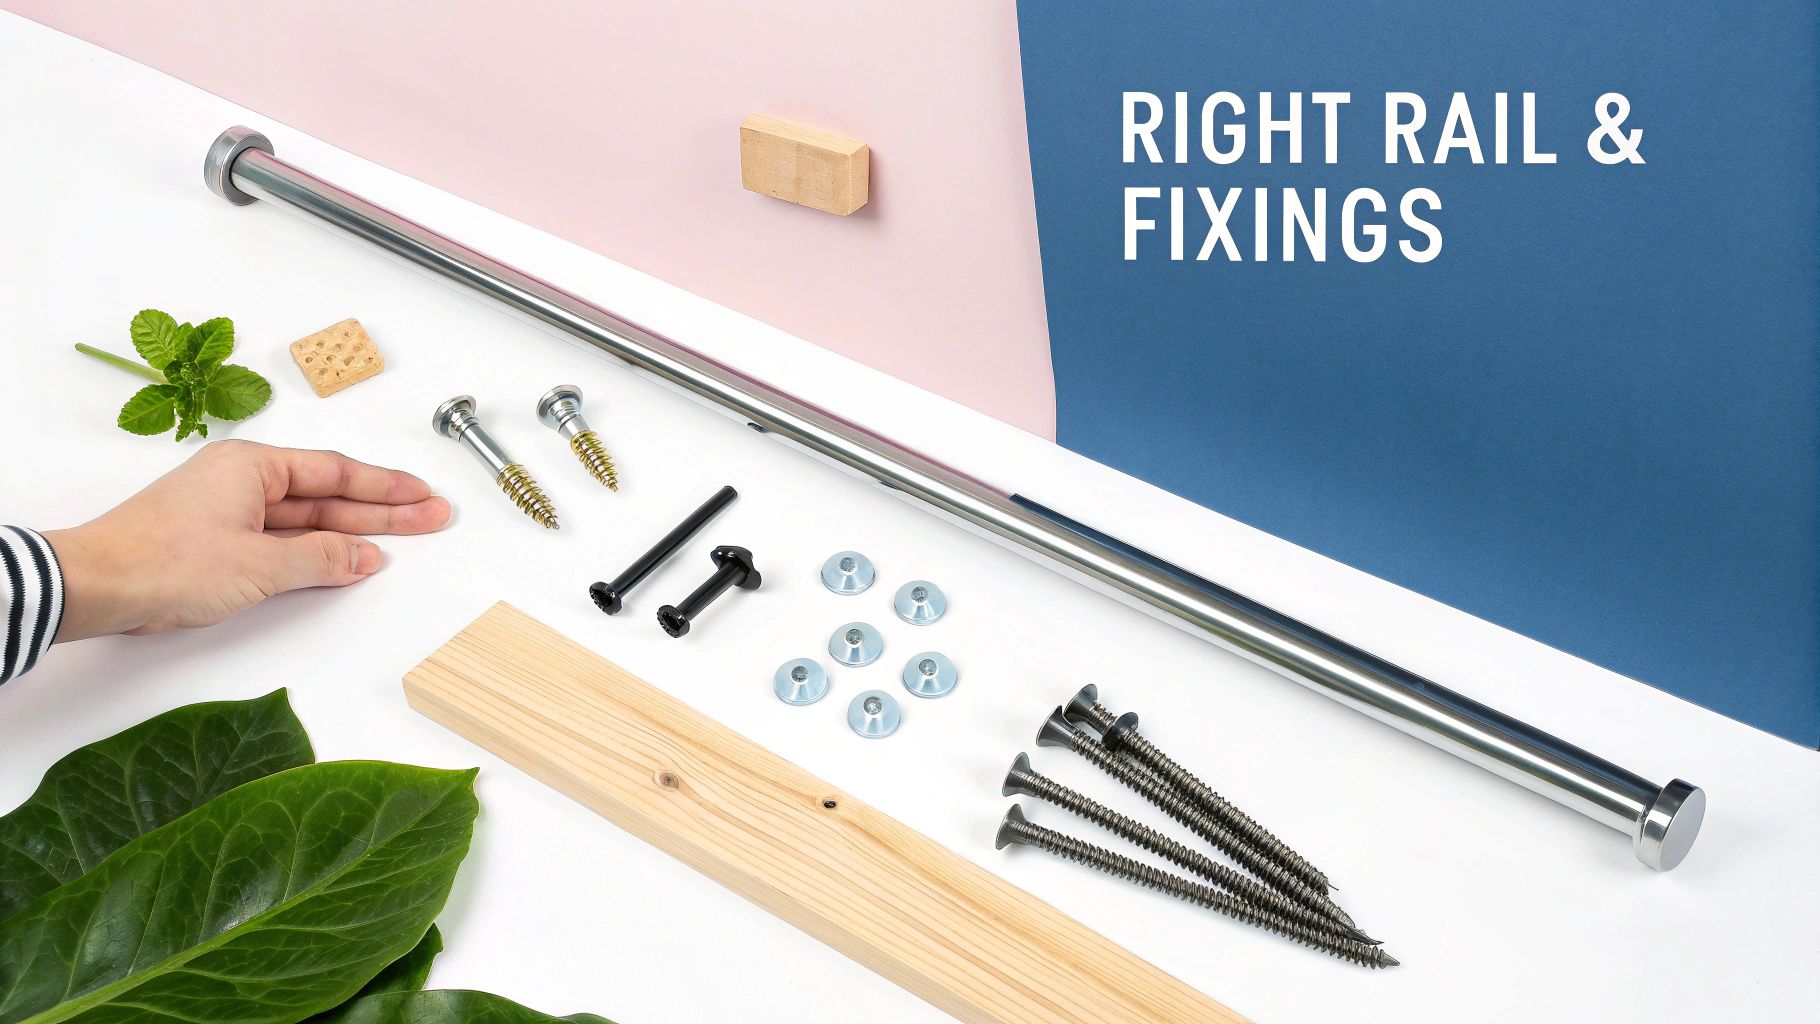
Fixings: The Key to a Secure Mount
Once you've picked your rail, the fixings are what hold everything together. This is where most DIY installations go wrong. The type of wall you have determines the hardware you need – no exceptions.
Choosing the right fixing for the job is essential. The table below breaks down the most common wall types you'll encounter and the best fixings to use for a secure, reliable hold.
Matching Fixings to Common Wall Types
| Wall Type | Recommended Fixing | Best For | Key Tip |
|---|---|---|---|
| Masonry (Brick/Block) | Brown/Red Wall Plugs & Screws | Providing the strongest possible anchor point. | Drill a clean hole and ensure the screw is long enough to fully expand the plug deep inside the wall. |
| Plasterboard (Drywall) | Self-Drilling Plasterboard Fixings or Spring/Gravity Toggles | Securing directly to the board when a stud isn't available. | These work by spreading the load over a wider area behind the board. Never use standard wall plugs. |
| Lath and Plaster | Specialist Lath & Plaster Fixings or Long Screws into Studs | Older properties with traditional wall construction. | Use a stud finder. Lath and plaster can be brittle, so aim for the solid wood structure behind it. |
| Wardrobe Carcass (MFC/MDF) | Connector Screws or Woodscrews | Fixing rail brackets directly inside a wardrobe unit. | Choose a screw length that won't poke through the other side of the panel. Pre-drilling a pilot hole helps. |
Getting this right ensures your rail stays put, no matter how much you load it up. Remember, the fixing is the critical link between your rail and the wall.
If there's one pro tip to take away, it's this: for plasterboard walls, always try to find the wooden studs. A stud finder is your best friend here. Driving your screws directly into these vertical supports provides a hold that no plasterboard anchor can ever match. It's the secret to a professional-grade installation that will simply never let you down.
The Right Tools and Prep for a Flawless Finish
Before you even think about drilling, a bit of careful preparation is what separates a shaky, wonky rail from one that’s rock-solid for years to come. Getting this stage right is the secret to a professional-looking job and avoids a lot of frustration down the line.
Think of it as setting the foundation. A rushed job with the wrong gear is a fast track to a slanted rail, or worse, a chunk of plaster on the floor. Let's get your toolkit sorted first.
Your Essential Toolkit
You don’t need a full workshop, but having a few key pieces of equipment on hand makes all the difference. Get these laid out and ready before you start, and the whole process will feel much more straightforward.
- A quality spirit level: Honestly, don't try to eyeball this. Even a tiny slant becomes glaringly obvious once you hang a few shirts on the rail.
- A reliable tape measure: Accuracy is your friend here. Double-check every measurement.
- A stud finder: This is an absolute must-have if you're working with plasterboard walls. It’s the only reliable way to find the strong timber studs you need to anchor into.
- A pencil: Simple, but essential for making clear, fine marks on the wall.
- A drill and the right drill bits: Make sure your bit matches the wall. You'll need a masonry bit for brick or block walls, and a wood bit for drilling into timber studs. A basic set of hand tools will usually cover what you need.
Measuring and Marking for Perfect Placement
This is where precision really pays off. First, decide on the height. As a rule of thumb, 165-180cm from the floor is about right for longer items like coats or dresses. For shirts, trousers, and shorter items, somewhere around 100-105cm is a good starting point. If in doubt, measure your longest garment and add a little extra clearance.
With your height decided, grab your tape measure and spirit level. Mark your desired height, then use the level to draw a faint, perfectly horizontal pencil line to guide where the top of your brackets will sit. This is your master guide for drilling. Place your bracket against the line and mark the screw holes precisely.
Quick Safety Check: Before a drill bit touches the wall, always scan the area with a cable and pipe detector. Accidentally hitting a hidden electrical wire or a water pipe is a dangerous and expensive mistake. It only takes a moment to be sure.
Finally, run the stud finder along your marked line. If your bracket positions line up with a timber stud, you've hit the jackpot. Drilling directly into a stud gives you the strongest possible fixing for your rail.
Bringing It All Together: The Installation
Right, with all your tools laid out and the measurements double-checked, it's time to get hands-on. This is where that careful prep work really pays off. Getting this stage right means you’ll end up with a wardrobe rail that’s solid, perfectly level, and built to last. Let's walk through the steps together, and I'll share a few pro tips to make the job go smoothly.
Before you even think about picking up the drill, remember the golden rule: measure twice, drill once. This simple sequence is the key to a flawless installation.

Skipping or rushing these prep stages is honestly the number one reason DIY rail installations go wrong. Take your time here, and the rest will be a breeze.
Drilling and Fixing the Brackets
First up, we're drilling the pilot holes for your fixings on the marks you so carefully made. Here’s a handy trick to keep the dust down: fold a piece of painter's tape in half, sticky side out, and stick it to the wall just below where you're drilling. It’ll catch most of the mess and save you getting the hoover out.
Make sure you’ve got the right drill bit for the job – a masonry bit for brick walls, or a wood bit if you're going into timber studs. Keep the drill steady and perpendicular to the wall, drilling only as deep as your wall plug requires. Not sure how deep that is? Just hold the plug against your drill bit and wrap a small piece of tape around the bit to mark the correct depth. Simple.
With the hole drilled, pop the wall plug in and give it a gentle tap with a hammer until it’s sitting flush with the wall. Now you can position your support bracket over the plug and drive the screw in. You want it to feel snug and secure, but be careful not to over-tighten it. Going too far can strip the screw, or worse, crack the plaster. Repeat this for all your brackets, giving each one a quick check with the spirit level as you go.
If you're looking for more specific advice on different support types, our guide to clothes rail and brackets is a great resource.
What to do if a wall plug spins?
This is a classic DIY problem and usually means the hole is just a fraction too big. Don't panic. Just pull the plug out, wrap it once with a bit of electrical tape to make it slightly thicker, and push it back in. That little bit of extra friction is often all you need for a solid grip.
Securing the Rail in Place
Your brackets are on the wall, they're level, and they feel rock solid. The final piece of the puzzle is fitting the rail itself. Thankfully, most rail systems are designed to make this bit easy, with the rail just dropping or clicking into the supports.
Lift the rail and gently seat it into the brackets at each end. If your rail is longer than 120cm, you'll have a centre support—make sure the rail sits properly in this one, too. That middle bracket isn't just for show; it’s absolutely vital for stopping the rail from bowing under the weight of all your clothes.
Lastly, you just need to lock it all in place. Most brackets have a small grub screw on the underside. Tighten this just enough to stop the rail from sliding side-to-side or rotating. Give the whole setup a firm but gentle wiggle to make sure everything feels secure. And that's it – your new wardrobe rail is installed and ready for action.
Preventing Overload and Ensuring Safety
So, your new wardrobe rail is installed and looks the business. But before you start loading it up, it’s crucial to understand its real-world limits. This isn’t just about the rail itself; a steel bar is incredibly strong, but it's only as sturdy as the fixings holding it to the wall. Getting this right is key to its longevity and, more importantly, your safety.
You don't need to get the kitchen scales out to weigh your clothes, but a little common sense goes a long way. Think about the difference between a dozen heavy winter coats and a pile of lightweight summer t-shirts. The best practice is to spread your heaviest items, like leather jackets or thick woollen jumpers, evenly across the rail.
Clustering all the heavy stuff in one spot is a recipe for disaster. It creates a focal point of stress that can cause the rail to bow and puts immense pressure on a single bracket. For a deeper dive into how different designs handle weight, it's worth checking out various options for strong clothing rails.
Dynamic Load and Common Mistakes
It's easy to forget about dynamic load. This isn't just the dead weight of your clothes hanging there; it’s the extra force you apply when you're rummaging through your wardrobe or yanking a jacket off a hanger. These everyday movements create surprisingly sharp jolts of strain on the wardrobe rail and fixings, which can slowly work screws loose over time.
This is precisely why a rock-solid installation is non-negotiable. Luckily, the most common mistakes that lead to an overloaded rail are easy to sidestep:
- Forgetting the centre support: Any rail longer than 120cm that doesn't have a central support bracket is practically asking to sag once it's full.
- Concentrating the weight: Piling all your heavy denim jeans or bulky coats right in the middle is the fastest way to find a weak point.
- Choosing the wrong fixings: This is the big one. Using standard wall plugs in a plasterboard wall is the number one cause of a rail dramatically parting company with the wall.
The way we shop has also changed things. With online apparel sales in the UK jumping from 35% in 2019 to over 50% by 2022, our wardrobes are working harder than ever. We're buying and returning more, meaning our storage is under more frequent and varied stress. You can find out more about this retail market shift on retaileconomics.co.uk.
Your Final Post-Installation Safety Check
Once your rail is up, but before you hang a single item, do this quick check for complete peace of mind.
The Quick Tug Test
Grip the empty rail firmly in the middle and give it a short, sharp tug downwards, then another one forwards. You're listening and feeling for any movement. A properly installed rail won't budge, flex, or make creaking noises from the brackets. If it feels completely solid, you’re good to go.
This simple test is the best way to confirm your brackets are securely anchored. If you feel even the slightest bit of give, you absolutely must investigate your fixings before loading it up. A secure rail is a safe rail, after all.
Troubleshooting Common Installation Issues
Even the most carefully planned DIY project can hit a snag. A screw that just won't bite or a wall that crumbles at the slightest touch can be seriously frustrating. But don't worry, most of these common headaches have a straightforward fix. Let’s walk through how to diagnose and solve them.
Nearly every problem with a wardrobe rail and fixings boils down to the relationship between your hardware and the wall. Figuring out what’s going on behind the plaster is the first step to a solid, lasting repair.
The Spinning Screw or Loose Wall Plug
This one's a classic. You've drilled your hole, popped in the wall plug, and started driving the screw, only for it to spin endlessly without tightening. This is a dead giveaway that your drilled hole is a fraction too big, preventing the plug from expanding and gripping the sides.
- What's Happening: The plug simply can't create the friction it needs to bite into the wall. This happens a lot in older, softer plaster or if your drill bit wobbled a bit as you were drilling.
- How to Fix It: Whatever you do, don't just keep turning the screw. The best bet is to pull the plug out and try the next size up. If you're caught without one, an old-school trick is to push a couple of matchsticks or a bit of a wooden skewer into the hole alongside the original plug. This gives it the extra material it needs to grip properly.
If the wall itself is the culprit, you might need to think about more specialised hardware. For a deeper look at this, our detailed guide on installing a hanging rail on various wall types has you covered.
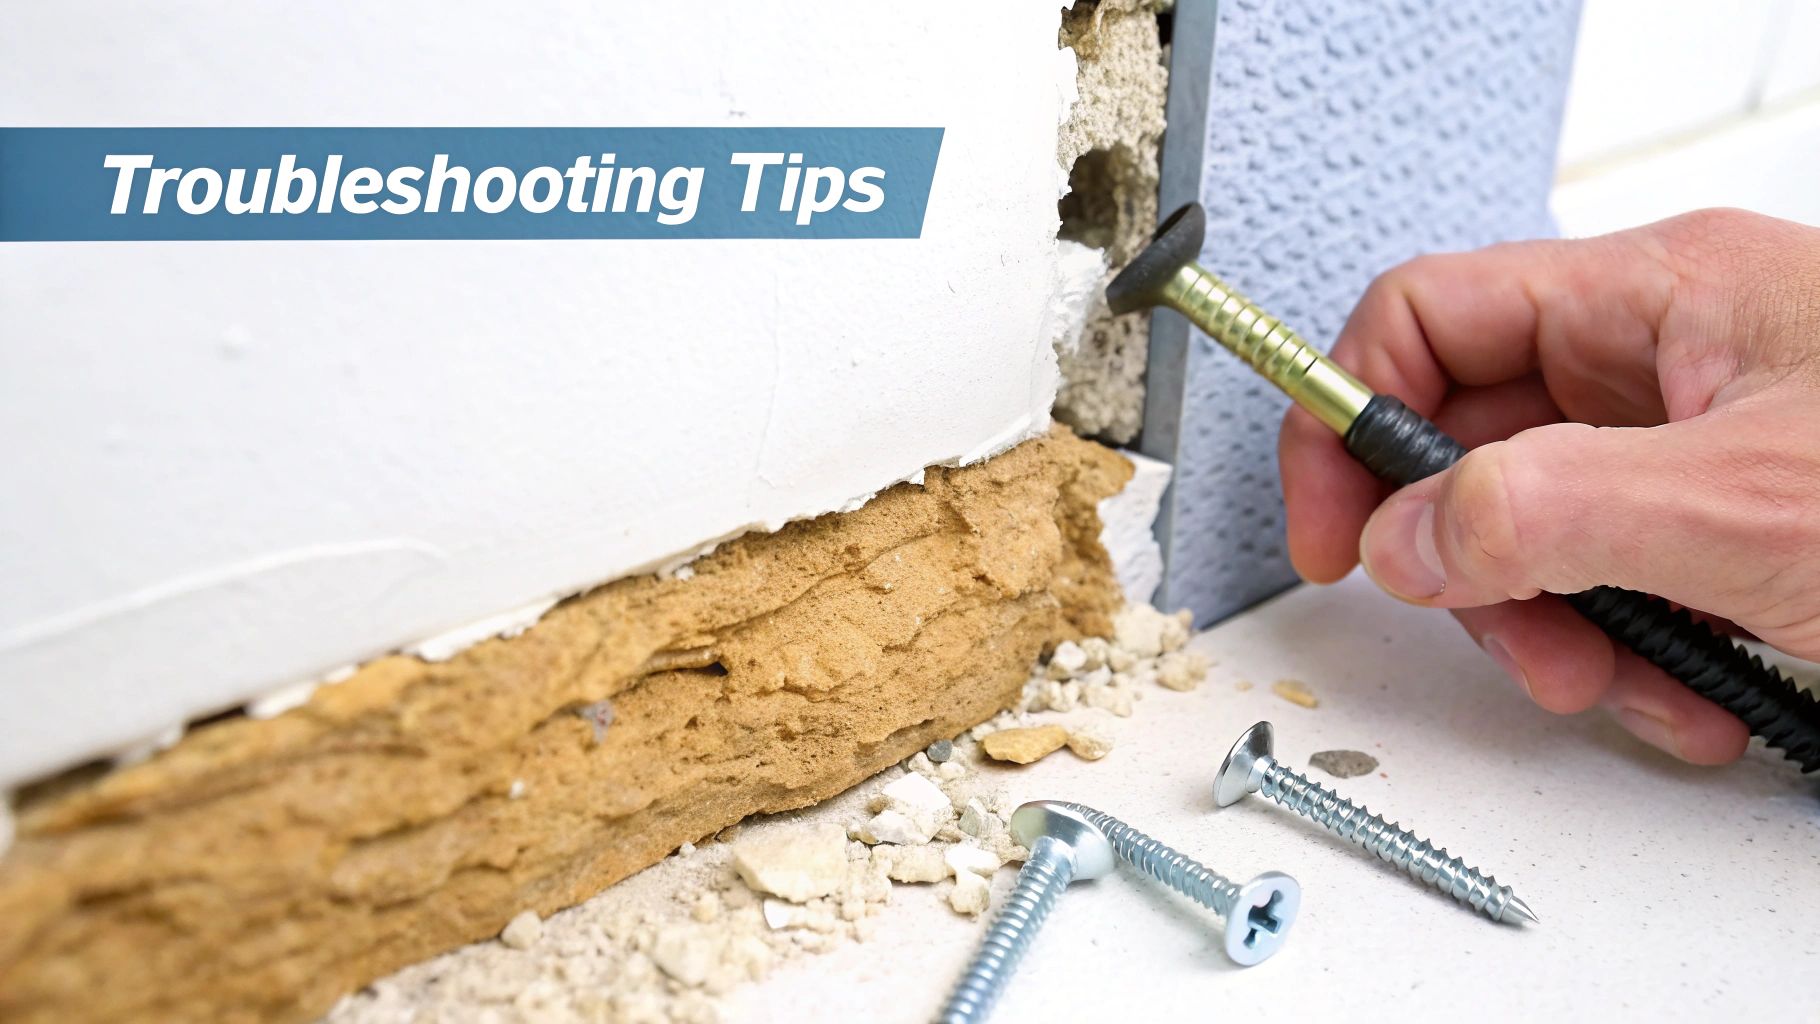
Dealing with Crumbly or Soft Walls
Sometimes, the problem isn't your technique—it's the wall itself. Older homes with lath and plaster or walls made of soft thermalite blocks are notorious for crumbling. A neat pilot hole can quickly become a gaping crater with nothing for a standard fixing to hold onto.
In these situations, a simple plug and screw just isn't going to work. You need a fixing designed to spread the load across a much wider area behind that weak surface.
When to Upgrade Your Fixings
If your drill bit disappears into the wall and a small avalanche of dust follows, stop right there. That's a sure sign the wall can't support a standard plug. It's time to switch to a heavy-duty fixing like a spring toggle or a gravity toggle. These clever bits of kit open up behind the plasterboard, clamping against a solid surface and providing a much more secure anchor point.
The Sagging or Bowing Rail
So, you’ve got everything installed, loaded it up with clothes, and a few days later you notice a worrying dip in the middle of the rail. This is a tell-tale sign of overload. It’s either carrying too much weight, or the span between its supports is too great.
This problem isn't about your wall fixings; it’s a simple matter of physics. Any long, unsupported rail will eventually bend under a heavy load.
- What's Happening: The distance between the end brackets is too wide for the weight of your clothes. This puts a huge amount of strain right in the centre of the rail and will only get worse over time.
- How to Fix It: The only real solution is to install a central support bracket. As a rule of thumb, any rail spanning more than 120cm needs this extra support. It takes the strain off the middle of the rail, distributes the weight properly, and keeps the whole setup secure for years to come.
Got a Question About Wardrobe Rails?
Even with the best guide, a few specific questions always pop up. Here are some quick answers to the most common queries I hear, helping you sort out those final details and get the job done right.
What’s the Best Height for a Wardrobe Rail?
The perfect height really comes down to what you’re hanging. There’s no single magic number, but these guidelines are a great starting point for most people.
For longer items like dresses, macs, or full-length coats, I’ve found that placing the rail around 165-180cm from the floor works best. It gives you plenty of drop so your clothes don't bunch up at the bottom. For shorter garments like shirts, blouses, or trousers folded over a hanger, a height of 100-105cm is usually spot on.
Thinking of a double-rail system to really max out your space?
- Aim for the top rail to be at roughly 210cm.
- Position the bottom rail at 105cm.
This two-tier setup gives both levels enough breathing room. Honestly, the best pro tip I can give is to simply measure your longest garment before you even think about drilling. It’s the only foolproof way to get it right the first time.
Can I Put a Wardrobe Rail on a Plasterboard Wall?
Yes, you certainly can, but this is a job where your choice of wardrobe rail and fixings is absolutely critical. Don't even think about using standard wall plugs—they simply won't hold and are guaranteed to fail once you load the rail up.
You need to use fixings designed specifically for plasterboard. I'd recommend self-drilling metal anchors or spring toggles, as they’re designed to open up and spread the load behind the board. For the most secure hold, though, nothing beats finding the studs. Use a stud finder to locate the vertical wooden beams behind the plasterboard and screw your brackets directly into them. For a deeper dive into the different techniques, have a look at our complete guide on hanging wardrobe rails.
How Do I Stop My Wardrobe Rail From Sagging?
A sagging rail is a classic problem, and it’s almost always caused by one of two things: it's either overloaded, or the rail is too long for its supports. If your rail spans more than 120cm (around 4 feet), you absolutely must install a centre support bracket.
This extra bracket mounts to the wall or the top of the wardrobe, right in the middle of the rail. Its job is to take a share of the weight, distributing the load evenly and stopping the metal from bowing under pressure. Trust me, it’s a small step that makes a huge difference.
The search for better home storage is bigger than ever. In fact, market research suggests that UK spending on closet organisers and wardrobe accessories could hit between £339–£678 million annually by 2025. It shows just how many of us are looking to improve our spaces. You can learn more about the UK wardrobe market size on marketresearchfuture.com.
Should I Get a Fixed or a Freestanding Rail?
This choice really boils down to how you plan to use it. A fixed rail is a permanent solution, installed securely inside a wardrobe or directly onto a wall. It’s a sturdy, reliable option that’s perfect for bedrooms and built-in cupboards.
On the other hand, a freestanding garment rail is a mobile unit—often on wheels—that needs no installation whatsoever. These are a far better fit for temporary displays, managing stock in a retail setting, or for renters who need flexible storage without drilling any holes.
For a complete range of heavy-duty rails, brackets, and display solutions designed for both home and professional use, explore the full collection at Display Guru. Find the perfect hardware for your project at https://www.displayguru.co.uk.