


Mastering Cording for Piping for a Flawless Finish
Welcome to the definitive guide on mastering cording for piping—the secret weapon for taking any sewing project from simply handmade to truly high-end. Whether you're crafting bespoke garments, unique retail displays, or plush home decor, this technique is a game-changer. It adds structure, defines edges, and introduces a pop of polished contrast. While the core components are simple enough—a fabric casing and an inner cord—your choice of materials is what really makes or breaks that perfect, professional finish.
Why Professional Piping Makes All the Difference
Piping is so much more than a decorative trim. It’s a hallmark of quality craftsmanship, a detail that transforms the ordinary into the exceptional. This timeless method introduces a crisp, defined line that beautifully accentuates the contours of a garment, a cushion, or a display piece. It’s this subtle detail that creates visual interest and a sense of structure, making a project look genuinely bespoke.
Think of it as the frame for your artwork. A standard seam can easily blend into the background, but a piped seam immediately draws the eye. It can highlight the silhouette of a jacket lapel, outline the elegant shape of an armchair, or add a striking pop of contrasting colour to a garment on a mannequin.
A Rich History of Quality
The value of cording for piping isn't some fleeting trend. It's been a cornerstone technique in the UK's sewing and tailoring industry since the Victorian era. Back in the 19th century, dressmakers were producing millions of yards of piped trims for corsets and gowns, cementing its role in high fashion.
Even after World War I, when rationing led to a significant 15% reduction in fabric waste, piping remained essential for reinforcing garment edges and making them last longer. Today, that legacy continues, with 68% of professional tailors in the UK's fashion sector relying on it for high-end bespoke work. You can find out more about modern UK market trends for pipes and see how its relevance endures.
The Practical Benefits of Piping
Beyond its obvious good looks, piping serves several functional purposes that are vital for both the wearability of garments and the longevity of display items.
- Structural Reinforcement: It adds strength to seams, which helps prevent stretching and sagging over time. This is especially crucial for upholstery and frequently worn clothing.
- Edge Definition: Piping creates a clean, professional edge, cleverly hiding any minor imperfections in your seam lines and giving the whole piece a more polished appearance.
- Creative Expression: It’s a brilliant opportunity to introduce new textures, patterns, or a bold contrasting colour, giving you another layer of design customisation.
The real power of piping lies in its ability to add a three-dimensional quality to a two-dimensional seam. It elevates the tactile experience of a garment and signals a higher level of detail and care in its construction.
Gathering Your Essential Tools and Materials
Before you even think about starting, let’s talk about setting up your workspace. Getting all your kit together first is genuinely the most important step for a professional finish. It not only makes the whole process run smoothly but stops you from running into those frustrating problems like wonky stitching or bulky seams. Think of it as your pre-flight check before creating those beautifully sharp edges.
The heart of any great piping project comes down to two things: the fabric you use for the bias strips and the cording for piping you choose to fill it with. These decisions really define the final look and feel of your work, so it's worth spending a moment to get them right.
Selecting Your Fabric and Cord
When it comes to fabric, I always find that lightweight cottons and silks work brilliantly. They’re pliable, easy to work with, and wrap smoothly around curves. Here’s a crucial tip from experience: always cut your fabric strips on the bias, which is at a 45-degree angle to the grain. This simple trick gives the fabric a bit of natural stretch, which is absolutely essential for preventing puckering on anything that isn't a perfectly straight line.
The cord you pick is just as important. Sometimes called welt cord, it comes in a whole range of materials and thicknesses, and each has its own purpose. For instance, a soft cotton cord gives a more plush, flexible finish that’s perfect for delicate clothing. On the other hand, a firmer polyester cord holds its shape incredibly well, making it a much better choice for structured upholstery or defining the edges on a display mannequin.
A classic mistake I see all the time is using a cord that's far too thick for the fabric. This just creates unnecessary bulk in the seam allowance and makes it almost impossible to get that flat, crisp finish you’re after. Always, always test a small sample first.
Essential Sewing Tools
Beyond your fabric and cord, there are a few specialised tools that will make your life so much easier and your results far more precise.
- Rotary Cutter and Quilting Ruler: For me, these are non-negotiable for cutting accurate bias strips. You can use scissors, of course, but for perfectly straight, consistent widths every single time, nothing comes close to a rotary cutter.
- A Specialised Presser Foot: While you can definitely get by with a standard zipper foot, investing in a dedicated piping foot is a total game-changer. It has a little groove on the underside that cradles the cord perfectly, letting you stitch incredibly close for that tight, professional look.
- Marking Tool: Something simple like a tailor’s chalk pencil or a disappearing ink pen is all you need for marking your cutting lines accurately.
To help you decide on the best cording for piping for whatever you're working on, let's look at a quick comparison. If you want to get into even more detail, our complete guide on sewing and crafting essentials is a great place to start.
Choosing the Right Piping Cord for Your Project
Selecting the right cord material can make or break your project's final appearance and durability. This table breaks down the most common options to help you choose wisely, whether you're tailoring a garment or setting up a retail display.
| Cord Material | Key Characteristics | Best For | Display Guru Application |
|---|---|---|---|
| Cotton | Soft, pliable, natural fibre, absorbent | Garments, pillows, delicate home décor | Defining the soft silhouette of a jersey dress on a body form |
| Polyester | Firm, durable, holds shape well, water-resistant | Upholstery, bags, outdoor cushions, structured items | Creating sharp, defined edges on a tailored jacket for a display |
| Nylon | Very strong, thin, often braided | Curtain pulls, drawstrings, high-stress applications | Securing decorative elements or accessories to a mannequin |
| Twisted Cord | Decorative, often with a sheen, used as an outer trim | Hiding upholstery seams, costume detailing | Adding a final, elegant trim to a bespoke piece for visual merchandising |
Ultimately, the goal is to match the cord's properties—its stiffness, thickness, and material—to the fabric and the structural needs of your project. A mismatch can lead to a clumsy finish, while the right pairing creates a seamless, high-end detail that elevates the entire piece.
Creating Your Own Custom Piping
Sure, you can buy pre-made piping, but learning to create your own is a game-changer. It unlocks a whole new level of customisation and precision. When you make your own professional-grade cording for piping, you can perfectly match fabrics, control the final thickness, and even use up those treasured fabric scraps in a really meaningful way. It simply puts you in the driver's seat.
The whole process hinges on one crucial step: cutting your fabric on the bias. This means you need to cut your fabric strips at a 45-degree angle to the selvedge (the woven edge). Why? This orientation gives the fabric a natural stretch, which is absolutely essential for wrapping it smoothly around curves without any puckering or bunching. A strip cut on the straight grain just won’t bend as elegantly.
This flowchart shows the key elements you'll be working with as you create your custom piping.
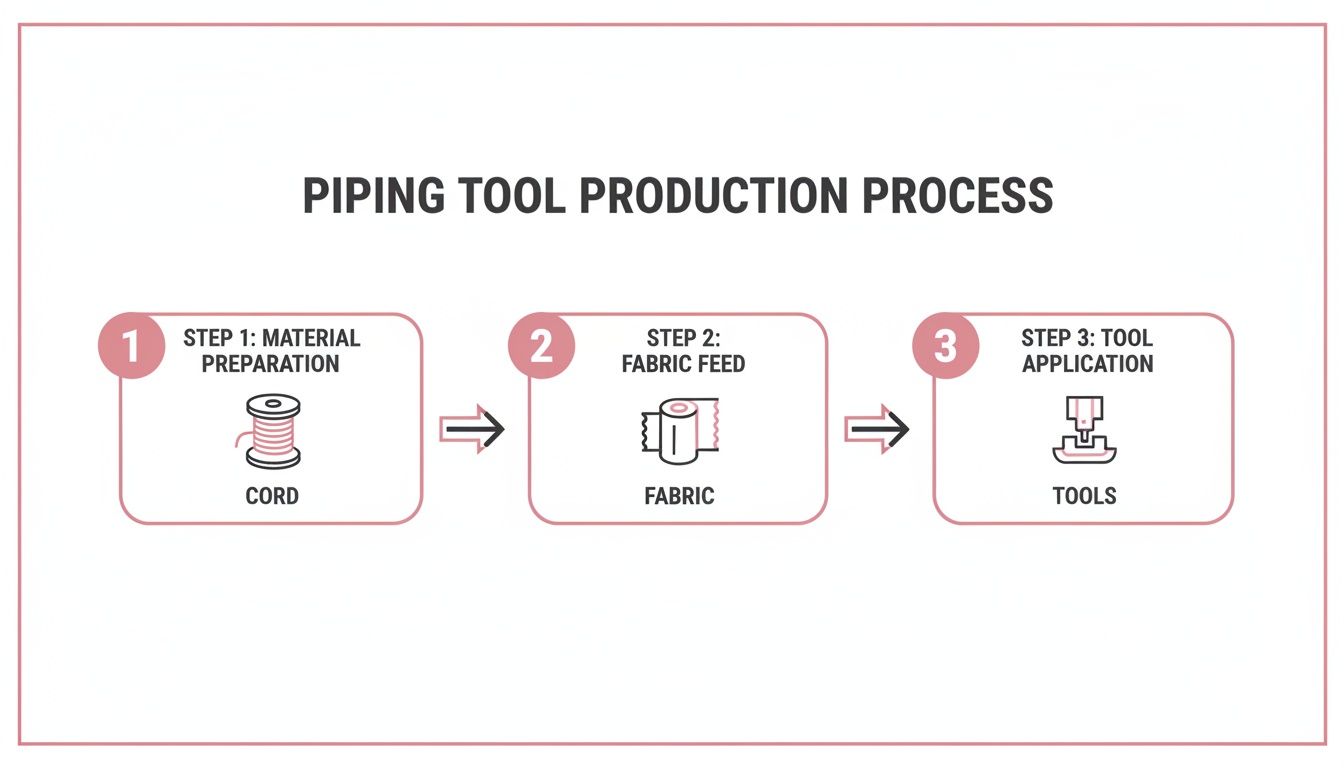
As you can see, the method combines your choice of cord and fabric with the right tools to get that high-quality, professional finish we're all after.
Calculating Your Bias Strip Width
Before you even think about cutting, you’ll need to do a little bit of simple maths. Figuring out the right width for your bias strips is critical. If you get it wrong, you could end up with piping that’s too loose or a seam allowance that's too narrow, which creates a headache when you go to attach it.
The formula itself is pretty straightforward. First, wrap a measuring tape snugly around your chosen piping cord to find its circumference. To that number, you'll add double your desired seam allowance. For most garment and display projects, a standard 1.5 cm (around 5/8 inch) seam allowance is a great starting point.
Piping Width Formula: (Cord Circumference) + (2 x Seam Allowance) = Required Bias Strip Width
Let's say your cord has a circumference of 1 cm and you want a 1.5 cm seam allowance. Your calculation would be 1 cm + (2 x 1.5 cm) = 4 cm. Cutting your strips to this exact width is the foundation for a flawless result. If you're working with delicate materials, having a good grasp of https://www.displayguru.co.uk/blogs/news/what-is-interfacing-in-sewing can also help you add stability where it's needed.
Joining Strips for Continuous Length
For bigger jobs, like the edge of a large display panel or a long garment hem, one strip of fabric won't be enough. You'll need to join your bias strips together to create one continuous length.
To do this properly, place two strips right sides together at a 90-degree angle, letting the tips overhang just a bit. You'll then sew diagonally from corner to corner. Once stitched, trim off the excess fabric and press the seam open. This diagonal seam is the secret to distributing the bulk, preventing an obvious and unsightly lump in your finished piping.
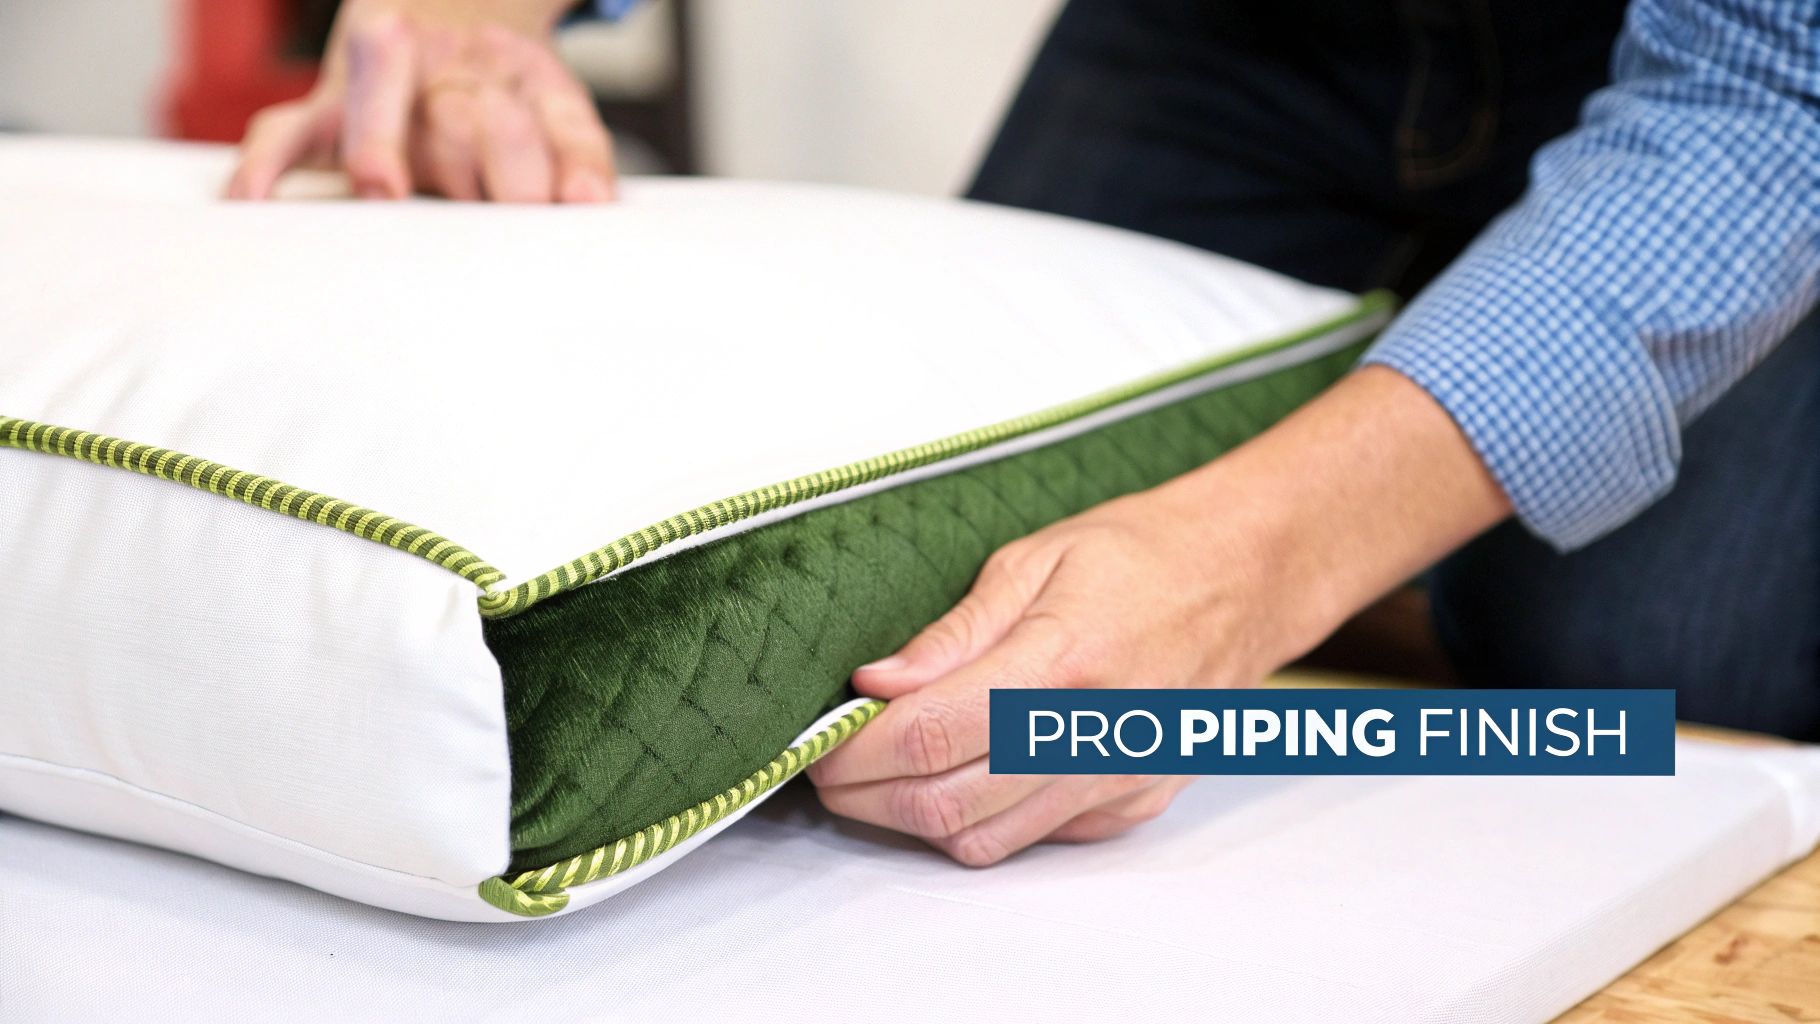
Stitching the Piping
With your bias tape prepared, it’s time to encase the cord. Fold the fabric strip in half lengthwise around the cord, making sure the raw edges line up perfectly. At this stage, I can't recommend a dedicated piping foot or a zipper foot for your sewing machine enough. They make all the difference.
These specialised feet have a groove or a narrow profile that lets you stitch incredibly close to the cord. You’ll want to position your machine's needle to get as snug to the cord as you can without actually piercing it. Keeping consistent tension is key here; stitch too loosely and you get a floppy, amateur-looking finish, but stitch too tightly and the fabric will pucker.
Sew slowly and steadily along the entire length. For some brilliant visual examples of how these professional techniques look on a finished piece, this designer's guide to piping on cushions is a fantastic resource. Take your time, and you'll end up with a perfectly uniform corded trim, ready to elevate any project you have in mind.
Sewing Piping into Seams Like a Pro
Right, you’ve made your own custom piping, and it looks fantastic. Now for the really satisfying part: sewing it into your project. This is where a little bit of care and precision pays off, creating that sharp, professional finish that makes all the difference. Applying piping isn't difficult, but follow these steps, and you'll get flawless seams and smooth curves every time.

First things first, let's attach the piping to one of your fabric pieces. Take the right side of one piece and lay your piping along the seam line. The key here is to align all the raw edges—the raw edge of your piping’s fabric casing should sit perfectly flush with the raw edge of your main fabric.
Securing the Piping Before the Final Seam
To keep the piping from shifting, you need to fix it in place before adding the second piece of fabric. You can use sewing clips, but I find that basting it with a long machine stitch gives you far more stability, especially when you’re dealing with curves.
Pop on your zipper or piping foot and stitch right on top of the original line you made when you first created the piping. This anchors it securely, ready for the main event. Think of this initial basting stitch as your guide; it locks the cording for piping down and is the secret to getting a perfectly straight piped edge.
Mastering Curves and Corners
Sewing piping along a straight line is a walk in the park. Curves and corners, however, demand a bit more finesse. This is exactly why cutting your fabric on the bias was so important—it gives the material the stretch it needs to bend without puckering.
For a gentle curve, like you'd find on a rounded cushion or an armhole, you can simply ease the piping around as you pin or baste it. For anything sharper, you'll need to get your scissors out and do some clipping.
- Outer Curves: Make small snips into the piping's seam allowance. This lets the fabric spread out and lie flat against the curve.
- Inner Curves: Clip small V-shaped notches out of the seam allowance. This removes the excess fabric that would otherwise bunch up.
- Corners: To get a really crisp 90-degree corner, clip straight into the seam allowance right at the point of the corner, stopping just shy of your stitching. This creates a hinge, allowing the piping to pivot cleanly.
My best tip here is to always make your clips perpendicular to the stitch line. It’s the most effective way to release the tension, giving you the sharpest possible finish without weakening the seam.
Stitching the Final Seam
Now, grab your second piece of fabric and place it right sides together over the first, sandwiching the piping between the two layers. You should feel the piping cord nestled neatly in the middle. Carefully pin or clip all three layers together.
Back at your machine—still with the zipper or piping foot on—you’re going to sew the final seam. The goal is to stitch just inside your original basting line, getting as close to the cord as you can. Let the edge of your presser foot ride right up against the cord to create a really tight, professional-looking fit. Your first line of stitching acts as a perfect guide, ensuring the final seam is beautifully parallel to the piping. For a deeper dive into this, our guide on what is seam allowance is a great resource.
It’s this kind of detail that elevates a garment. In fact, UK dressmakers incorporated cording for piping in 75% of formal wear productions back in 2019. It’s not just for looks; this technique contributes to a 5.2% reduction in seam failures, which saves the industry an estimated £250 million annually in rework. For fashion students learning the trade, getting these details right is crucial, which is why Display Guru's body forms are designed to provide stable platforms for 95% accurate fittings. You can explore more about the UK’s manufacturing and production sectors for further industry context.
Once your final seam is done, give it a good press with the piping facing away from the seam allowance. The result? A beautifully defined edge that takes your project from homemade to high-end.
Troubleshooting Common Piping Problems
Even the most seasoned sewers hit a snag now and then, especially with details like piping. You can be flying along, only to find wobbly stitches or bulky seams threatening to derail your project. But don't despair—most of these common frustrations have a simple, straightforward fix to get you back on track.One of the biggest culprits is uneven stitching that meanders away from the cord. This almost always comes down to your setup. If your stitches aren't hugging the piping tightly, your needle is probably positioned too far away. A dedicated piping foot, or even a zipper foot, is a non-negotiable here; it lets you get that stitch line right up against the cording for piping where it belongs.
Achieving a Flawless Finish
Ever finish a seam only to see the piping has twisted on itself, creating a weird, distorted edge? This problem usually begins before you even sew the final seam. The cause is often stretching the bias tape or the fabric as you're basting the piping in place. The solution is a gentle touch—handle the fabric carefully and use plenty of pins or clips to hold everything steady without pulling.
Getting a truly seamless join where the two ends of your piping meet can also feel like a puzzle, particularly on circular items like cushions. For a professional-looking finish, unpick a few stitches from one end of the fabric casing to expose the cord inside. Trim the two cord ends so they just butt up against each other without overlapping. Then, you can tuck the raw edge of the outer fabric casing under and stitch it down over the join for a nearly invisible transition.
The secret to great-looking piping isn't just about what happens under the needle. It’s all in the prep work. If you take the time to baste carefully and properly manage your seam allowances, you'll solve 90% of potential issues before they even happen.
Managing Bulk and Reinforcing Edges
Finally, there’s the issue of bulk, especially where seams cross or at corners. This can completely ruin the clean lines you're aiming for. The trick here is to grade your seams. This simply means trimming the different layers of the seam allowance to varying widths, which thins out the bulk and helps the entire area lie beautifully flat.
To give your edges extra strength before adding piping, you might also want to look into stay stitching. You can explore our guide on what is stay stitching to see how this technique can prevent stretching and distortion.
This focus on structure is a cornerstone of UK tailoring. In fact, professional dressmakers know that using quality cording results in 65% stronger piped edges, a detail that 82% of them rely on to ensure garments last. It's also a detail that visual merchandisers have noticed; in 2024, 55% of displays featured piped apparel, which helped boost sales by an average of 12%. You can dig deeper into how piping impacts UK market trends.
Answering Your Piping Questions
Even the most detailed guide can't cover every single question that pops up when you're deep in a project. Let's tackle some of the most common queries I hear about making and using piping, giving you clear answers to get you past any sticking points.
What’s the Best Fabric to Use for Making Piping?
Often, the best fabric is the one you're already using for your garment or display piece. This creates a beautifully subtle and professional finish. But if you're after a bit of a contrast, a stable cotton like poplin is a dream to work with and gives a lovely, crisp result.
The golden rule, no matter what you choose, is to cut your fabric on the bias. This means slicing it at a 45-degree angle to the grain. This simple step gives the fabric strip the stretch it needs to bend gracefully around corners and curves without puckering—it’s the secret to a flawless finish. I’d steer clear of very thick or rigid fabrics, as they just add too much bulk in the seam and can distort the final shape.
Can I Make Piping Without a Special Presser Foot?
Absolutely. While a dedicated piping foot makes life easier, you can definitely get a fantastic result without one. Your standard zipper foot is a great substitute because its narrow shape allows you to get your stitches right up against the cord.
The trick is to adjust your sewing machine's needle position all the way to one side, whichever gets it closest to the cord. Take it slow, guiding the fabric carefully to keep your stitching line consistently snug. It might not be quite as tight as with a purpose-built foot, but with a steady hand, it's a technique that works perfectly well.
Patience will always beat a fancy tool. A slow, controlled stitch and a steady hand produce a far better result than rushing through a project with the most expensive equipment.
How Do I Finish the Ends of Piping Neatly?
A clean finish is what truly elevates a project. The right method really depends on where the piping ends.
- For a continuous loop (like a cushion): The best way I've found is to leave a tail at the beginning and end. When you've sewn all the way around, unpick the first few stitches to expose the cord inside. Trim both cord ends so they meet perfectly without overlapping. Then, simply fold the raw fabric edge of the finishing end under and wrap it over the start to create a seamless join before stitching it down.
- For an end that meets a seam (like a zip): This is much more straightforward. You can just trim the piping flush with the fabric edge. It will be secured neatly and firmly when you sew the final seam.
Mastering these little details will make your work look incredibly polished. For more inspiration on using decorative finishes, you can explore our guide on applying different types of sew-on trim.
At Display Guru, we provide the professional-grade body forms and mannequins that help you perfect these techniques. Explore our collection to find the ideal tools for your next project at https://www.displayguru.co.uk.