




Clothes Rail No Screws: The Complete Setup Guide
You've found the spare clothes rail, loaded it with coats, and watched one side begin to twist away from the other. Or you're renting a flat, need hanging space in an alcove, and can't justify drilling into the wall for a storage problem that may change next month. A clothes rail with no screws can solve both situations, but only if you match its structure to the load, surface, and frequency of use.
The phrase “no screws” describes an installation method, not a guarantee of strength. Freestanding frames, tension poles, and clip-lock systems behave differently under weight and movement. A stable setup starts with choosing the right mechanism, then checking every joint, contact point, and load path before garments go on the bar.
Evaluating Drill-Free Clothes Rail Options
A rail that stays upright when empty can still fail once garments are pulled from it. Select the design by examining its load path, contact points, joints, and intended handling, rather than treating “no screws” as a strength rating. The three practical categories are freestanding floor frames, tension-mounted telescopic rails, and modular clip-lock systems.
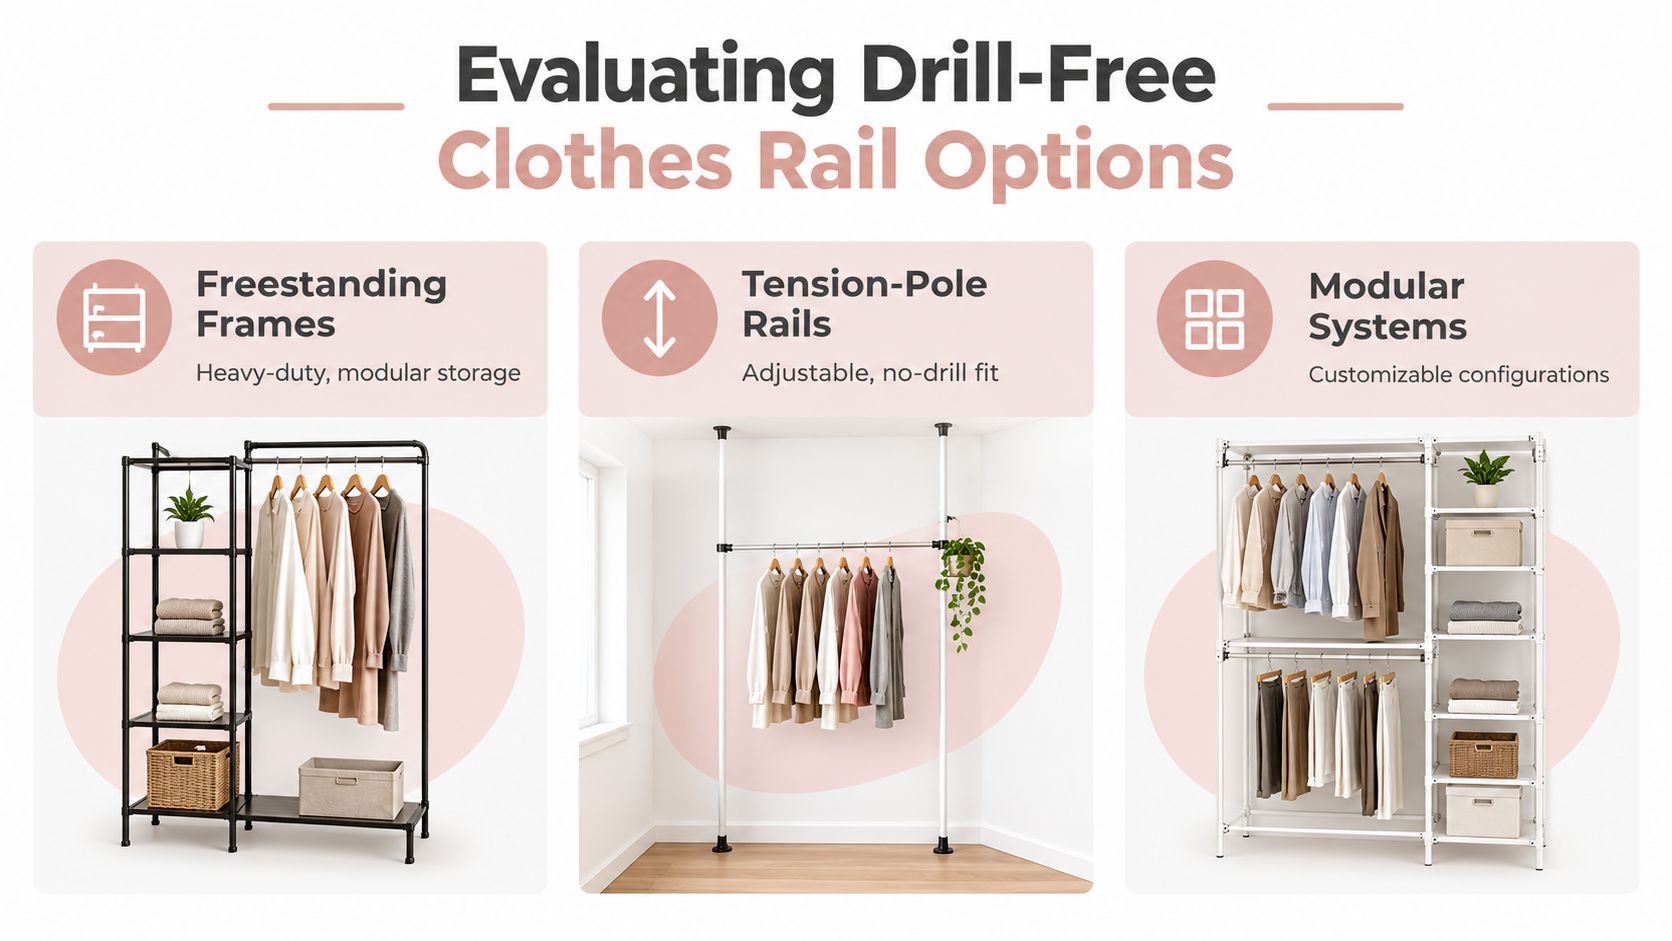
Freestanding frames
A freestanding frame sends weight through its uprights into feet, shelves, or a wheeled base. For selection, inspect the base footprint, wheel locks if fitted, bar height, and whether the manufacturer specifies a capacity for the complete assembled frame. A rear brace can limit sway, but it cannot correct a loose joint or an unsuitable floor.
These frames usually suit open studios, costume fitting rooms, retail backrooms, and temporary displays where staff or customers may brush against the rail. Some heavy-duty UK retail models use a 32mm industrial-grade steel frame, tool-free pin locking, and stated capacities ranging from 50kg to 200kg, depending on the model, as shown in UK POS's heavy-duty clothes rail range. Those figures apply to the specified products, not to every freestanding rack.
Choose a model with a clear capacity, positive locking points, and a base appropriate to the stock. A narrow domestic rack is a poor match for dense winter garments or one-sided loading.
Tension-mounted telescopic rails
A tension pole presses outward between two opposing surfaces. It works well in a wardrobe, alcove, or narrow recess where drilling is prohibited, but the surfaces must be sound, sufficiently level, and able to resist pressure without crushing or slipping. Check for painted plaster, loose lining, fragile trim, or uneven contact before installation.
Tension rails are generally suited to light to moderate hanging, occasional use, and overflow storage that will not be handled constantly. They are a weak choice for crowded retail areas, heavy coats, or any location where the pole may be knocked sideways. A visible pressure pad does not prove that the surrounding wall can support the installation.
Modular clip-lock systems
Clip-lock systems use interlocking tubes, pop-clips, or pin joints. They suit studios and temporary merchandising because the frame can be altered without a toolbox. Their structural reliability depends on connectors being fully engaged and tubes meeting squarely.
Before loading one, press each connector into position, check that pins or clips have seated, and test every joint for rotation. Tool-free retail systems commonly use rear braces or click-lock connectors to limit movement, as described in this UK guide to tool-free clothes rails. Reject any frame with a connector that remains loose after assembly.
Selection rule: Match the mechanism to the room and handling pattern. Floor frames use a base, tension poles depend on opposing surfaces, and clip-lock systems depend on seated joints and a correctly assembled frame.
For a sewing studio, a freestanding two-tier frame may provide useful access and mobility. A rental alcove may suit a tension pole after careful surface inspection. Temporary merchandising often benefits from a modular frame, provided its specification, joints, and contact points match the garments on display.
Comparing No-Screw Rails Against Fixed Fittings
A fixed rail is attached to a wall or other permanent structure with brackets, screws, wall plugs, or stud fixing. That connection gives the rail a defined support point, so pulling garments along the bar creates less movement than it would on a lightly tensioned pole or narrow freestanding frame. For a permanent wardrobe, heavy daily use, or a rail that will be handled by many people, fixed fittings usually offer the more rigid arrangement.
A no-screw rail makes a different trade. You gain portability, reversible installation, and the ability to change a shop floor or studio layout without repairing holes. That matters to renters and leased commercial spaces. UK housing data for 2023-24 records 33.5% of households as rented, including 19.0% in the private rented sector and 14.5% in social renting, according to the UK government's housing tenure statistics. A drill-free option can therefore remove a practical barrier, but it doesn't remove the need to assess stability.
Where fixed fittings win
Wall-mounted rails work well when the rail must stay in one position and carry garments through repeated handling. A customer pulling a coat from the centre of a crowded bar creates a changing load. A fixed bracket, properly attached to suitable structure, resists that movement more effectively than a tension pole relying on friction.
For permanent installations, review the fixing principles in this guide to clothes rail brackets, then select screws and plugs that suit the wall rather than relying on a generic fixing pack. If you're unfamiliar with fastener selection, the XTREME EDEALS INC. fastener guide is a useful reference for understanding how different fasteners relate to substrates and loads.
Where no-screw rails win
A freestanding or modular rail is preferable when you need to clear the floor for a fitting, move stock between rooms, or refresh a visual merchandising plan frequently. It also protects the reversibility of a rental property. The cost of that flexibility is inspection. A mobile frame can be knocked, rolled over an uneven threshold, or gradually loosened during repeated assembly.
Floor protection deserves attention too. Rubber feet or suitable castors reduce marking and help the base maintain contact, but they won't compensate for an overloaded top bar. Place the rail on a level surface, keep heavy garments low where the design allows it, and avoid treating mobility as permission to exceed the manufacturer's rating.
A useful decision is not “screws or no screws”. It's whether the rail needs permanent rigidity or controlled flexibility. Use fixed fittings for a stable long-term line. Use a no-screw system when the ability to reconfigure, remove, or relocate the storage has operational value.
Assembling and Squaring Freestanding Garment Frames
A freestanding rail can look complete while remaining structurally unsound. A connector may be partly engaged, a foot may sit above the floor, or the uprights may lean in opposite directions. Once garments are added, those small assembly errors become sway, twisting, and uneven load transfer through the frame.
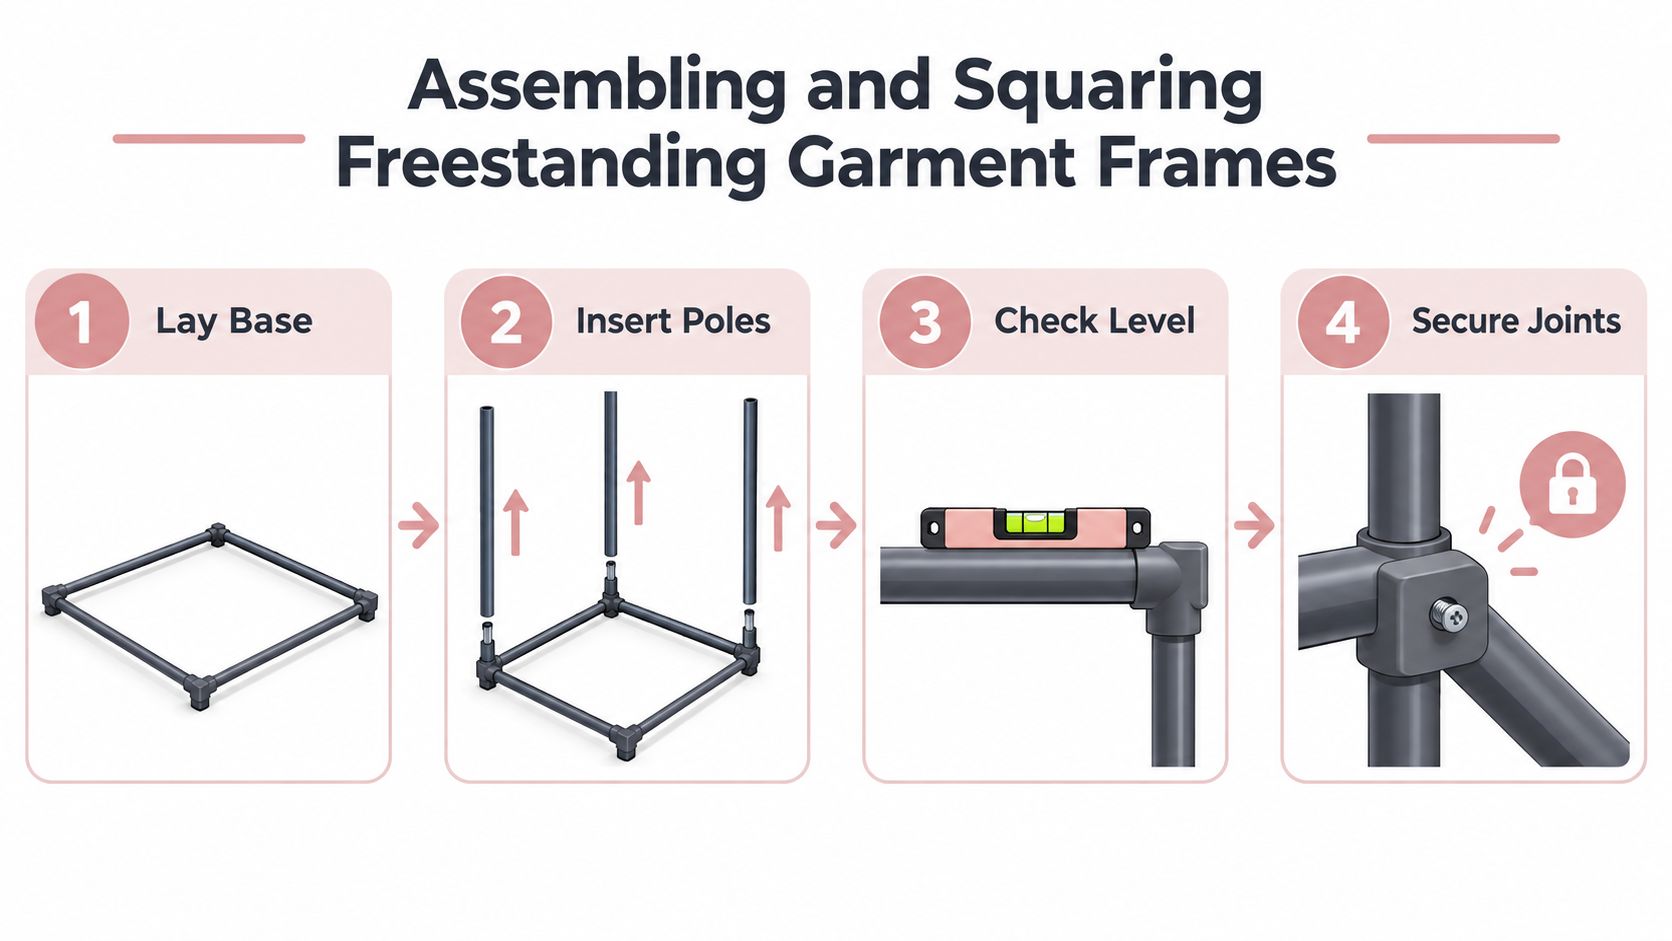
Prepare the base before adding height
Assemble the rail on the surface where it will be used. A sloping floor can distort the frame during construction, and moving it after loading adds unnecessary strain to the joints. Lay out the feet, lower tubes, shelves, or castor supports in their final orientation, checking that left and right components are not reversed.
Insert each upright fully into its receiving joint. With a pin-lock design, the spring pin must pass completely through the receiving hole. With a pop-clip system, push the tube in until the clip clicks, then pull it lightly to confirm that the connection has retained the pole.
Follow this sequence:
- Lay the base components flat. Match each part to the instruction diagram and keep the longer sides parallel.
- Fit the vertical uprights. Push every pole to its full insertion depth. Stop if a joint will not seat properly.
- Add the top bar and braces. Fit the crossbar without forcing it sideways. Install rear cross-braces before loading the rail.
- Square the frame. Compare the two diagonals, either by measurement or visually, then adjust the base until the uprights are parallel.
- Check the feet. Press each corner in turn. Every foot should contact the floor without rocking.
- Test the joints. Push the top bar gently from front to back and side to side. Slight flex through the complete frame is acceptable. A connector that rotates or clicks indicates a faulty connection.
Why squaring matters
An out-of-square rectangle transfers stress into the joints instead of distributing it through the frame. One upright may then carry more load, while the opposite corner lifts or shifts. Rear bracing limits side-to-side movement, but it cannot correct a base that is poorly seated or misaligned.
Use empty-frame testing to find problems early. If the rail has castors, lock them before checking alignment. If it has adjustable feet, make small corrections rather than lifting one corner sharply. Add garments only after the frame stands evenly, then distribute them across the available hanging space.
A portable clothing rack suits mobile work, but its value depends on the frame staying aligned when it is moved. Roll it over thresholds slowly, keep the castors oriented consistently, and recheck the joints after relocation.
Practical rule: Never use hanging garments to hide a wobble. Remove the stock, correct the frame, and test it empty.
Finish by inspecting the welds, tube ends, clips, pins, and receiving holes. Reject any component that is bent, cracked, loose, or unable to lock cleanly. Tool-free assembly reduces installation time, but it does not replace a physical safety check before use.
Installing Tension-Mounted Rails in Alcoves and Wardrobes
A tension rail is only as secure as the surfaces pressing against its ends. The rod can be strong while the wall finish is weak, uneven, or unable to tolerate concentrated pressure. Treat the alcove or wardrobe as part of the rail's structure, not as a neutral container.

Inspect the contact points
Look for opposing surfaces that are flat, firm, and free from loose paint, soft plaster, or fragile trim. Plasterboard alone may not provide a dependable bearing surface for a heavily loaded tension rail. Where possible, identify studs or position the end pads over stronger areas rather than pressing against a hollow section.
Clean the contact areas according to the product instructions and remove dust. Don't add improvised adhesive unless the manufacturer permits it. Adhesive can alter friction, damage paint, or create the false impression that the rail has a mechanical lock.
Fit and test the pole
Extend the rod until the end pads meet both sides. Engage the internal spring, twist mechanism, or threaded adjustment exactly as the instructions specify. Avoid overtightening. Excessive pressure can damage a wall finish, distort the pole, or make removal difficult.
Test the rail empty first. Apply a firm downward touch to the centre and then a light sideways pressure. If either end shifts, reduce the span, improve the bearing surface, or choose a freestanding rail. Do not solve movement by twisting harder.
A tension rail should remain stable under normal handling, not just appear tight immediately after installation.
Add a small number of lighter garments and test again. Keep the load distributed around the centre rather than building a dense cluster at one end. A rail intended for a rental alcove may be suitable for everyday clothing, but it isn't automatically suitable for a costume store, heavy coats, or a busy fitting area.
The hanging rails for cupboards guide is useful when deciding whether a cupboard arrangement needs a rail inside the cabinet or a different support approach. In a high-traffic retail environment, a fixed rail is normally safer because accidental contact can overcome friction. In a quiet wardrobe, a correctly fitted tension rail can provide flexible extra hanging space without drilling.
Check the pole after the first period of use and after moving garments aggressively. Look for slipping, crushed paint, pad movement, or a change in tension. If any appears, unload it immediately and reassess the installation.
Calculating Load Limits and Planning Your Space
A rail can look secure while its weakest joint is already overloaded. Start with the manufacturer's stated rating, then check how that rating applies to the complete frame, its span, and the way garments will be handled. Heavy-duty no-screw rails are listed with spread-weight capacities from 50kg to 200kg, depending on the frame. See the heavy-duty clothes rail specifications from UK POS before applying a capacity to your chosen model.
Spread weight describes a distributed load across the bar. A rail may carry that load safely yet become unstable when dense coats are grouped at one end. The bar, connectors, uprights, feet, and floor contact all contribute to stability. The first component to bend, loosen, or slip sets the practical limit.
Use your inventory, not guesswork
Sort stock by both weight and handling frequency. Lightweight tops can occupy a studio rail, while denim, wool coats, and costumes should be distributed across the strongest part of the frame. On a two-level rail, place heavier garments where they will not collide with the lower bar or push the centre of gravity outward.
The supplied brief gives no verified average garment weights or defensible maximum item count for a 150cm span. Avoid inventing either figure. Weigh a representative bundle with luggage scales, or check shipping information from the garment manufacturer where available, then total the measured weights.
| Garment Category | Average Weight (kg) | Max Items per 150cm Span |
|---|---|---|
| Lightweight tops | Not specified | Calculate from measured item weight and rail rating |
| Denim garments | Not specified | Calculate from measured item weight and rail rating |
| Wool coats | Not specified | Calculate from measured item weight and rail rating |
| Dresses and costumes | Not specified | Calculate from measured item weight and rail rating |
Divide the stated spread-weight capacity by the measured weight of one garment to estimate a working quantity. Keep a conservative operating margin rather than filling the rail to its rating. Include hanger weight, uneven distribution, pulling forces, and movement of the frame. A rail rated for a static load may behave differently when staff or customers repeatedly remove garments.
Plan clearance around the bar
Space affects structural performance. Long dresses need uninterrupted vertical clearance, while folded trousers or short jackets may suit a lower tier. Leave enough room to remove garments without lifting the bar or dragging neighbouring hangers along it.
Handling pressure can expose a weakness that a static load check misses. Keep frequently selected pieces within easy reach so users do not pull sideways. For mobile displays, maintain a clear route around castors and avoid corners that can catch sleeves or encourage people to grab the frame for support.
Use this guide to strong clothes rails to compare frame construction, bar arrangement, and intended use. Select a model that suits both the calculated load and the available footprint. Capacity without clearance creates forceful handling, while clearance without sufficient capacity leaves the bar liable to bow.
Load check: Weigh the actual stock, distribute it across the span, and inspect the frame after the first full loading. A rating is a boundary, not a target.
Troubleshooting Stability and Maintenance Issues
A clothes rail usually gives warning before it becomes unsafe. The signs are familiar in studios and stockrooms, a side-to-side wobble, a top bar that dips, or a locking pin that no longer sits cleanly in its hole. Diagnose the source with the garments removed. Testing a loaded frame can hide the loose joint and puts unnecessary force on the structure.
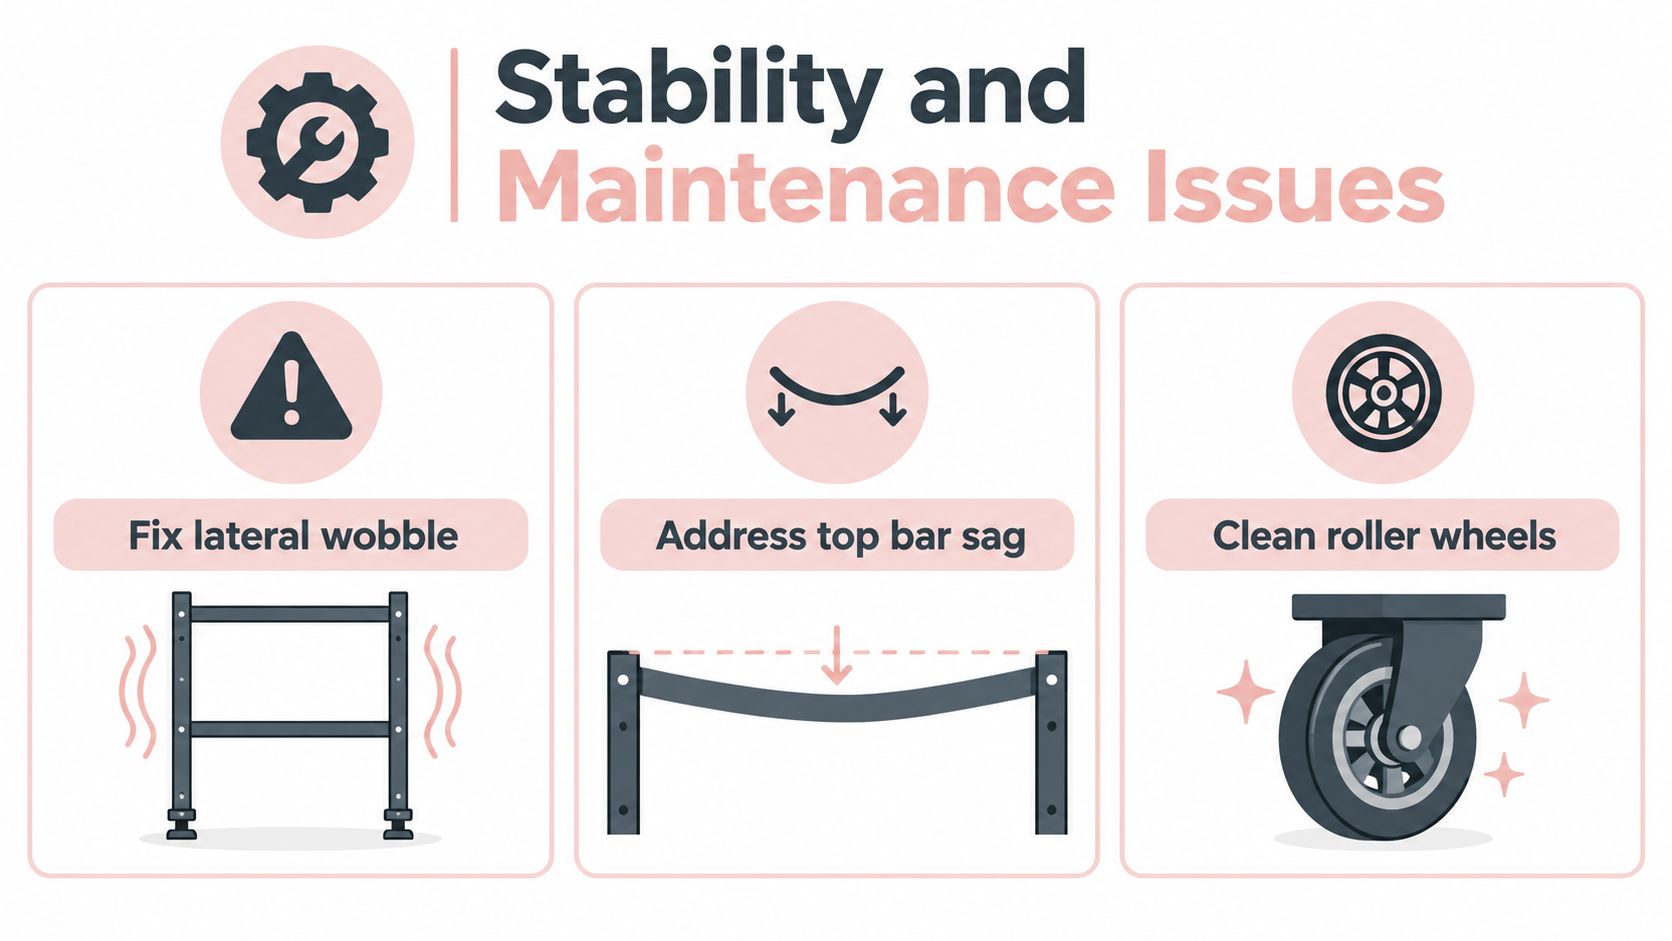
When the frame wobbles laterally
Push the top bar gently from each side and watch the base. If one foot lifts, adjust the foot leveller or relocate the rail to a flatter surface. If the base remains planted but the uprights move, inspect the rear cross-brace and each connector.
Re-seat every pop-clip or pin. A clip that looks engaged may not have passed fully through its opening. If the frame still sways, don't add garments to stiffen it. Replace a bent brace or use a manufacturer-approved brace rather than improvising with cord or tape.
When the top bar sags
A sagging bar usually indicates excessive span load, concentrated weight, a damaged tube, or inadequate intermediate support. Remove the stock and inspect the bar on a flat surface. If it remains curved when empty, retire the part instead of trying to straighten it by hand.
If the bar is straight when empty, reload lighter items first and spread them across the full span. Move dense coats away from one end and check whether the design allows a second level or central support. The clothes rail support guide can help when you're deciding whether the frame needs additional support or a different rail configuration.
When wheels or joints cause trouble
Castors collect thread, lint, and dust quickly in sewing rooms. Remove debris from the wheel and axle area, check that each wheel turns freely, and lock the castors before loading or fitting garments. A seized wheel can make a mobile rail drag sideways, placing twisting force on the frame.
During routine maintenance, examine weld points for cracks, check tubes for deformation, and confirm that pins still spring back into position. Clean connectors before reassembly so grit doesn't prevent full engagement. Keep a simple inspection routine for every rail that is moved often, especially after transport or a layout change.
Display Guru supplies garment rails, including wheeled and two-tier options, alongside display equipment for tailoring, retail, costume fitting, and studio work. Visit Display Guru to compare rail formats with the rest of your workspace equipment, then choose a frame whose construction and capacity match your measured stock.
Before putting a clothes rail no screws into service, identify its support type, verify the surface or base, square every joint, and load the bar gradually. Those checks take less time than recovering a fallen rail, damaged garments, or a marked rental wall.