


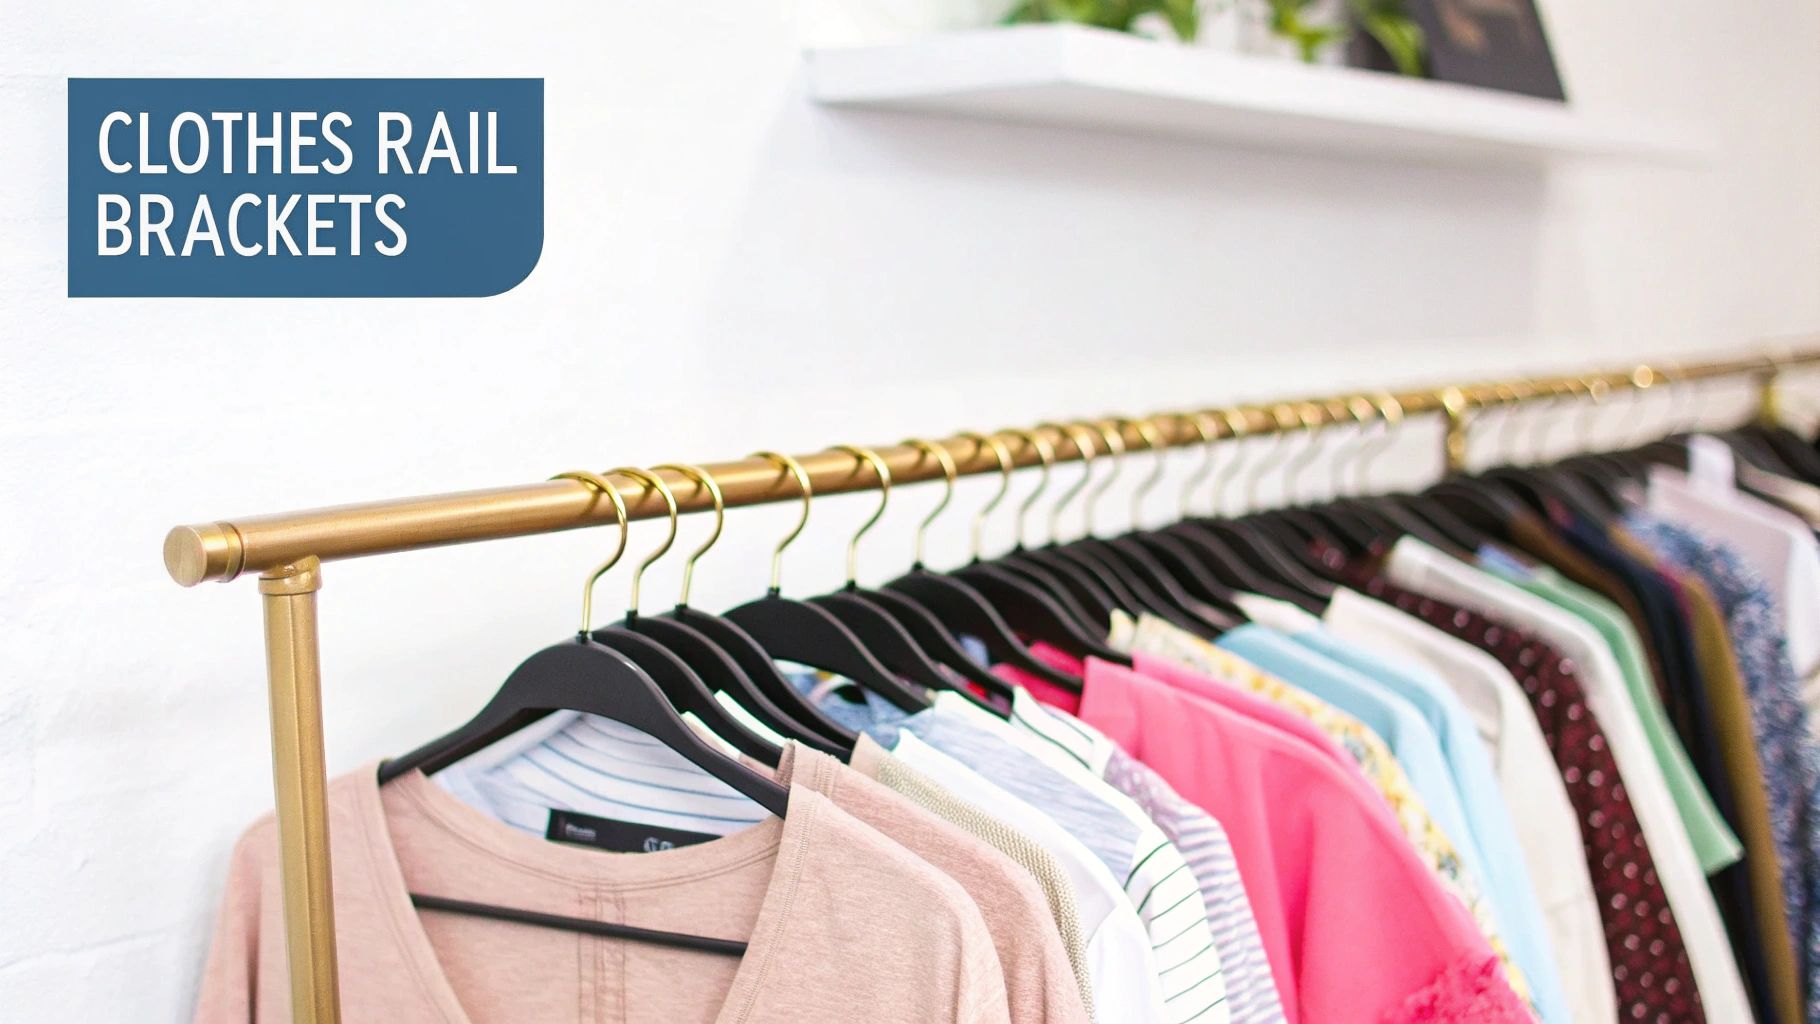
A Complete Guide to Clothes Rail Brackets
When you're setting up a garment rail, the brackets are the bits that attach it to the wall, ceiling, or another surface. But they're so much more than just hardware. Think of them as the support system that makes sure your clothing display is stable, secure, and stylish—whether it's in a bustling shop or your dream walk-in wardrobe.
The Unsung Heroes of Garment Display
It's easy to overlook clothes rail brackets, but they're the true unsung heroes of any decent garment display. They’re like the foundations of a house; without a solid base, the whole thing is at risk. A well-chosen bracket doesn't just hold a rail up—it defines the entire system's strength, look, and how well it works day-to-day.
For anyone in retail, tailoring, or even just organising a home, picking the right bracket is a surprisingly important decision. It affects everything from how much weight you can safely hang to the overall visual feel of your space. This guide will walk you through what really matters, turning a simple rail into a professional and lasting storage solution.
Why Your Bracket Choice Matters
Choosing the right bracket is about more than just finding a style you like. You need to think about the practical side of things to guarantee it’s safe and performs well for years to come. Here’s what you should be looking at:
- Material Strength: This tells you how durable the bracket is and how much wear and tear it can handle.
- Load Capacity: This is the big one. It dictates the maximum weight your rail system can support before it becomes a hazard.
- Mounting Type: The way the bracket is installed affects its stability and whether it's suitable for your specific wall type.
Getting these fundamentals right is the first step to a perfect setup. If you're looking for more ideas on getting the most out of your space, our guide on innovative clothes rail storage solutions has some great inspiration.
In the UK retail world, these components are absolutely essential for good visual merchandising. The UK actually holds an 11.80% share of the European clothes display market, a sector worth around £72 million and set to grow even more. If you're selling brackets or rails online, high-quality photos are non-negotiable; this guide for e-commerce product imagery is a fantastic resource for that.
Choosing the Right Bracket for Your Space
Picking the right clothes rail brackets is a lot like choosing the right tool for a job. What works perfectly in one space might be all wrong for another. The best choice always comes down to your specific environment and what you're trying to accomplish. Understanding the key differences between bracket types is crucial for building a display that’s not just functional, but looks the part too.
You'll mainly come across three types: wall-mounted, ceiling-mounted, and freestanding options. Each one has a unique purpose and offers distinct advantages in stability, aesthetics, and how it uses the room. Get this choice right, and your garment display will be secure while enhancing the entire feel of your space.
The humble clothes rail bracket has a long history in the UK, especially with the boom in retail after the war, and its importance has only grown. Today, it’s a vital component in a global garment rack sector worth an incredible £5.2 billion. The UK market is a major player, with projected regional growth of 4.5%. Since 65% of UK shoppers still prefer to buy in-store, the need for tough, steel-reinforced brackets in shopfitting is as strong as ever.
Wall-Mounted Brackets: The Foundation of Stability
Think of wall-mounted clothes rail brackets as the trusty workhorses of the display world. They fix directly onto a wall, giving you rock-solid stability and a fantastic load-bearing capacity. This makes them the default choice for any high-traffic area, from busy retail stores and stockrooms to professional tailoring workshops where you simply can't afford for things to go wrong.
By using vertical wall space, they're also incredibly efficient, freeing up the floor for customers or other fixtures. That secure anchoring gives you real peace of mind, particularly when you’re hanging heavy items like winter coats or a large volume of stock. For more practical advice, check out our guide on installing a wall-mounted clothes rail.
Ceiling-Mounted Brackets: For a Modern Aesthetic
If wall-mounted brackets are the workhorses, then ceiling-mounted ones are the show ponies. They offer a design-led alternative, creating a striking, minimalist look by suspending the rail from above. This makes it seem as though your garments are floating in mid-air, a style that’s become incredibly popular in modern boutiques, galleries, and home wardrobes where an open, airy feel is desired.
They look fantastic, but they do demand a solid ceiling structure—like joists or a concrete slab—to anchor into safely. They’re perfect for creating distinct zones within a larger room or for adding a high-end, contemporary touch to your display. To get a feel for the different designs available, you can explore product options on the prodshots-hadzm8fa homepage.
When deciding between these common types, it helps to see their strengths side-by-side.
Bracket Type Suitability Matrix
| Bracket Type | Best For | Key Advantage | Consideration |
|---|---|---|---|
| Wall-Mounted | High-traffic retail, stockrooms, heavy garment storage, workshops. | Unbeatable stability and high load capacity. Frees up floor space. | Requires a solid, structurally sound wall for secure fixing. |
| Ceiling-Mounted | Modern boutiques, minimalist home wardrobes, creative displays. | Creates a unique, high-end "floating" aesthetic. | Needs a strong ceiling with accessible joists or anchor points. |
| Freestanding | Pop-up shops, market stalls, temporary displays, exhibitions. | Highly portable and flexible. No installation needed. | Can take up significant floor space and may have a lower weight limit. |
Ultimately, each bracket serves a different master. Whether you need the robust reliability of a wall-mount or the visual flair of a ceiling-hung rail, the right choice is out there.
Key Takeaway: Choosing your bracket is a balancing act between practical needs and visual ambition. Wall-mounted options put strength first, while ceiling-mounted brackets deliver a bold design statement. Always, always check the integrity of your wall or ceiling before you commit.
Matching Materials and Finishes to Your Needs
Choosing the material and finish for your clothes rail brackets goes far beyond aesthetics. It's about a bracket's strength, how long it will last, and the overall feel it brings to your space. Think of it like picking the right fabric for a suit; the material needs to look the part, but it also has to perform under pressure.
Whether you need the rugged resilience of steel or the quiet elegance of brass, getting this combination right ensures your display is both rock-solid and visually on point. It’s a decision that affects everything from durability to the story your space tells.
Understanding Core Bracket Materials
The base material is the heart of the bracket. It dictates its raw strength and what kind of weight it can handle day in, day out.
For any serious, heavy-duty work—think a bustling retail stockroom or a tailor's workshop stacked high with rolls of heavy fabric—stainless steel is the undisputed champion. It offers incredible strength and is naturally resistant to corrosion, meaning it won’t let you down in a demanding environment.
On the other hand, if you're creating a more refined boutique or a decorative display, brass provides a classic, warm look. While it's not as tough as steel, its timeless appeal is perfect for bespoke spaces where visual flair is a priority. It even develops a lovely, unique patina over time, adding a touch of character.
Exploring Popular Finishes
The finish is the final touch. It's the protective layer that also defines the bracket's style, helping you tie the entire display into your existing decor.
Here are a few of the most popular finishes and where they shine:
- Matte Black: A hugely versatile favourite. Matte black offers a modern, understated look that fits in almost anywhere, from an industrial-chic shop to a minimalist wardrobe at home. Its non-reflective surface is also great for hiding smudges and fingerprints.
- Polished Chrome: If you want a bright, clean, and contemporary feel, you can't go wrong with polished chrome. The reflective surface bounces light around the room and is incredibly easy to wipe down, making it perfect for slick retail environments.
- Powder-Coated: This is one of the toughest finishes you can get. Powder coating is a process where a dry powder is applied and then baked on, creating a finish that's much more durable than standard paint. It offers fantastic resistance to scratches, chips, and fading, which is ideal for high-traffic areas.
Choosing a finish is really about creating a mood. A powder-coated black bracket feels rugged and industrial, while polished chrome suggests modernity and cleanliness. Think about the atmosphere you want to build and choose a finish to match.
Ultimately, the aim is to strike the perfect balance between function and form. For a deeper look at how all these different parts come together, our guide to using wall racks for clothes offers more tips on creating a complete and effective system. By carefully weighing up both the core material and the final finish, you can choose clothes rail brackets that are not just strong enough for the job, but a perfect aesthetic match for your brand or home.
How to Calculate Load Capacity Correctly
Getting your head around load capacity isn't just a technicality—it's the single most important step for guaranteeing safety and the long-term life of your display. Think of it like a bridge: you wouldn't drive a heavy lorry over one without knowing its weight limit. Overload your brackets, and you're risking sagging rails, damaged walls, or worse, a complete collapse.
When you calculate this properly, you’re building a display that’s genuinely fit for purpose. A rail destined for a theatrical costume department, groaning under the weight of heavy woollen coats, needs a vastly different setup to one in a boutique showcasing light-as-air silk blouses. Nail this from the outset, and you’ll avoid costly, and potentially dangerous, mistakes later on.
Estimate Your Total Garment Weight
First things first, you need a solid estimate of the total weight you plan to hang. This sounds more daunting than it is; a bit of simple multiplication is usually all it takes to get a reliable figure.
Here’s a quick way to break it down:
- What are you hanging? Jot down the main types of clothing, like shirts, trousers, or heavy jackets.
- How many of each? Estimate the maximum number of each item you'll have on the rail at one time.
- Do the maths. Multiply the number of items by their average weight. For example, 10 heavy winter coats at around 2 kg each means you’re already at 20 kg of load.
This quick calculation gives you a baseline weight your brackets must comfortably support. I always recommend adding a 20-25% buffer on top. This little bit of extra capacity covers you for seasonal stock changes or unexpectedly heavy new arrivals.
If you know you'll be dealing with some seriously heavy items, our guide on choosing the right heavy-duty rails for your needs has more detailed advice.
To help you get started, here's a quick reference table with some common garment weights.
| Garment Type | Average Weight (per item) | Estimated Items per Metre | Total Weight per Metre (kg) |
|---|---|---|---|
| T-Shirts/Blouses | 0.2 kg | 30-40 | 6-8 kg |
| Trousers/Jeans | 0.7 kg | 15-20 | 10-14 kg |
| Suits/Jackets | 1.5 kg | 10-12 | 15-18 kg |
| Heavy Winter Coats | 2.0 kg | 5-7 | 10-14 kg |
Remember, this is just a guide. The material and design of the clothing can make a big difference, but it gives you a much better starting point than a pure guess.
This chart gives you a clear visual on how different materials stack up in terms of raw strength.
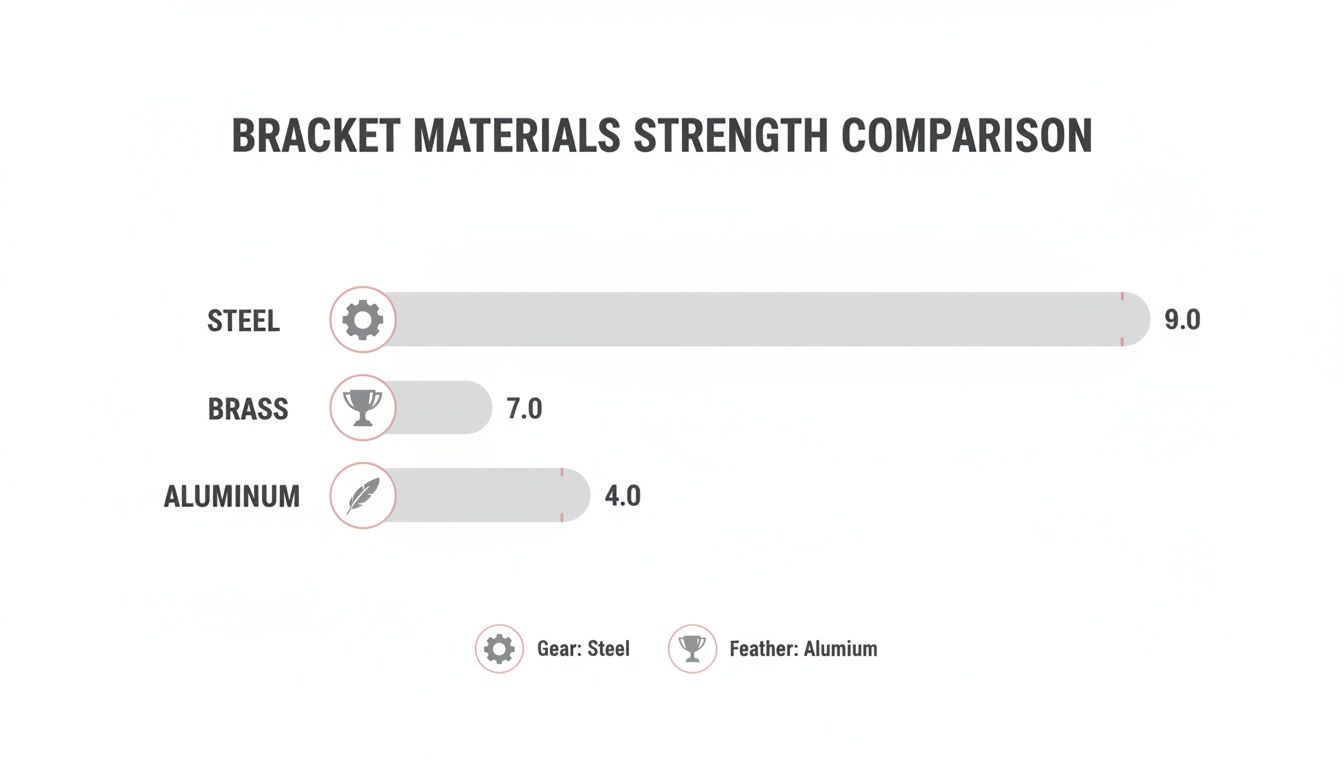
As you can see, steel is the undisputed champion for heavy loads, making it the go-to choice for serious commercial use. Aluminium, while perfectly fine for lighter domestic displays, just can't compete on brute force.
The Critical Role of Bracket Spacing
Once you have your total weight figured out, the next piece of the puzzle is how far apart you place your brackets. Get the spacing right, and the load is distributed evenly, preventing that dreaded bowing in the middle of the rail.
Expert Tip: For most standard uses with moderate loads, spacing your brackets somewhere between 80-120cm apart is a solid rule of thumb. But if you’re setting up a heavy-duty system, you’ll want to close that gap to 60-90cm. That extra support is absolutely essential for maintaining stability and preventing any long-term strain on the rail or the wall.
A Practical Guide to Secure Installation
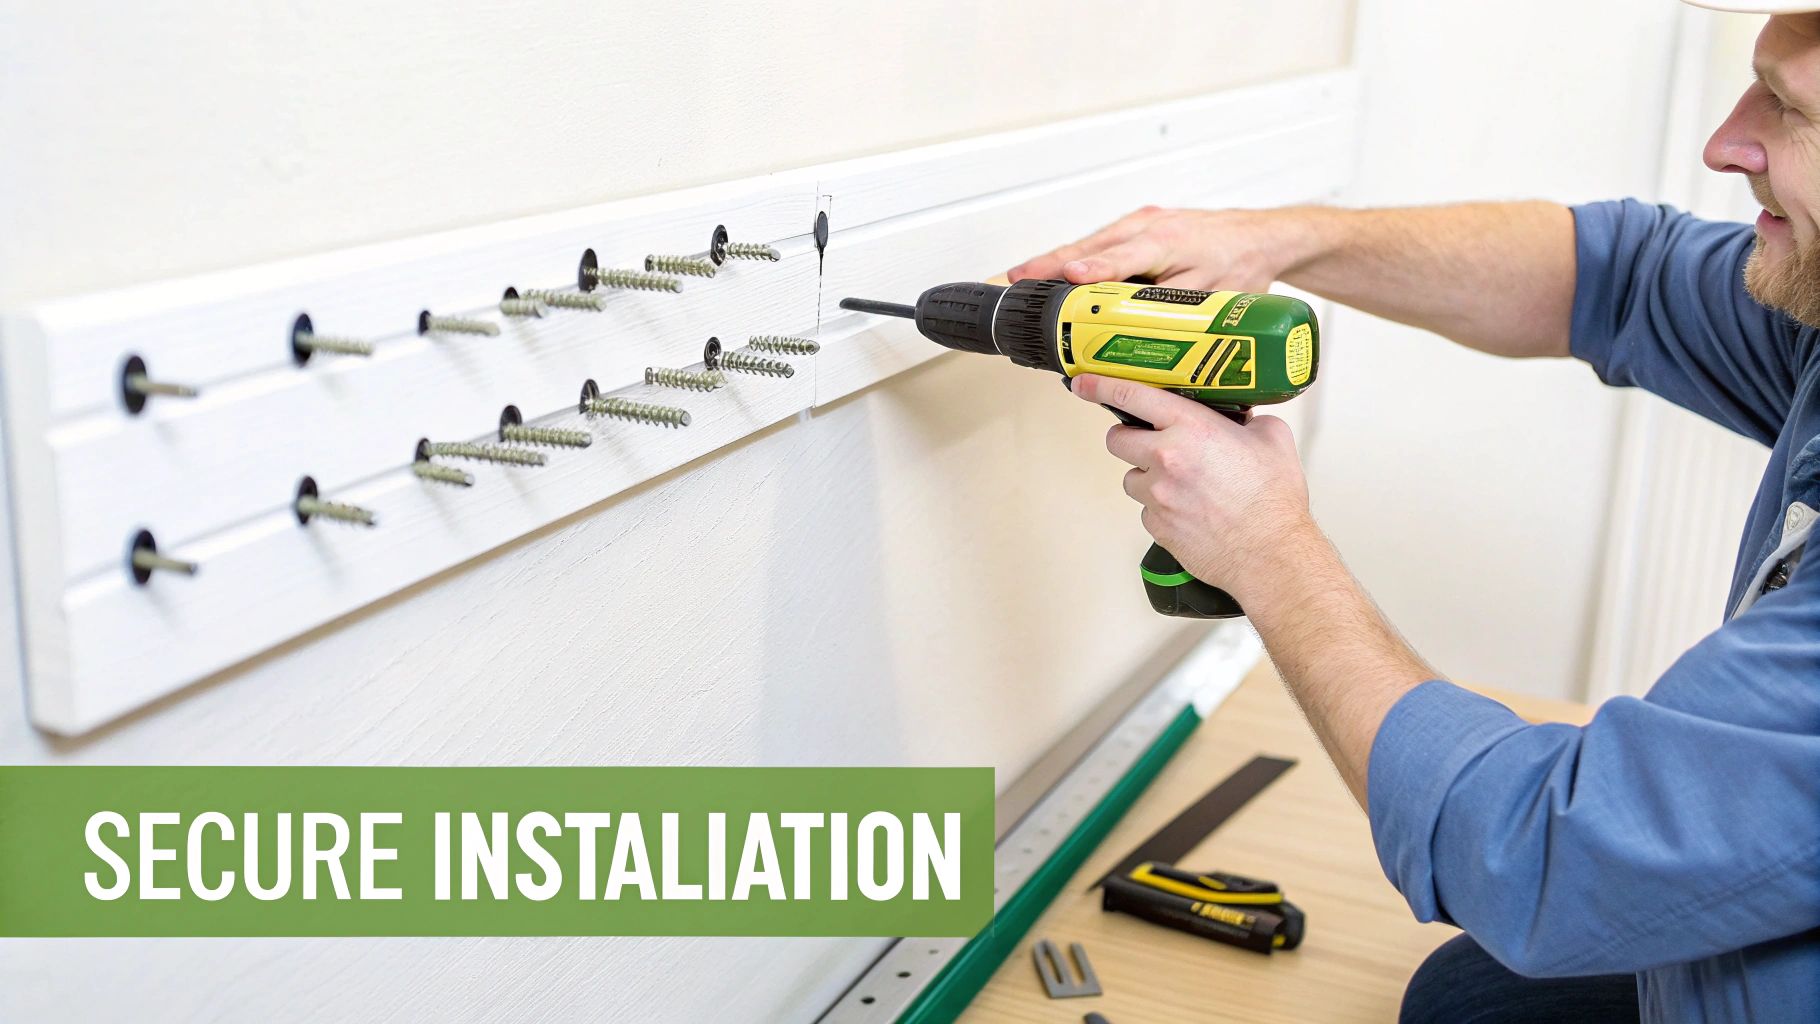
Getting your clothes rail brackets up securely and looking sharp is completely doable with a bit of prep and care. It all comes down to two simple things: using the right fixings for your specific wall type and measuring properly to get everything perfectly level. Get these right, and you'll avoid any wobbles, protect your walls from damage, and have a display that's built to last.
Think about it like hanging a heavy mirror – you wouldn't just tap a small nail into plasterboard and hope for the best. The same logic applies here. A rock-solid installation starts well before you even pick up a drill.
Choosing the Correct Wall Fixings
The wall you're drilling into is the most important piece of the puzzle. It dictates exactly which type of hardware you’ll need. Grabbing the wrong fixings is a classic mistake, and it's one that can easily lead to a failed bracket and a hole in your wall.
Here’s a quick guide to what works where:
- Solid Brick or Concrete: For these sturdy walls, a good set of heavy-duty wall plugs (often called rawl plugs) and screws will give you a strong, reliable anchor.
- Plasterboard (Drywall): This is where people often run into trouble. Standard plugs just won't cut it. You must use special plasterboard fixings, like toggle bolts or hollow wall anchors, that are designed to expand behind the board and spread the load.
- Timber Studs: The gold standard. If you can find the wooden studs inside a plasterboard wall, driving your screws directly into the timber gives you the strongest fixing imaginable.
Crucial Tip: Before you drill into any plasterboard wall, always use a stud finder. If you can line up your brackets with the timber framework, you'll get a much more secure hold than any plasterboard fixing can offer on its own. It's a game-changer for heavy-duty rails.
Measuring and Marking for a Perfect Finish
Precision is your best friend when it comes to installation. Taking an extra couple of minutes to measure and mark everything out carefully is the secret to a rail that's perfectly level and looks fantastic. A wonky rail doesn't just look unprofessional; it can also make all your clothes slide down to one end.
A spirit level is absolutely essential for this part. Once you've decided on the height, hold your first bracket in place, get it level, and mark your drill holes. From there, measure across to where the next bracket will go, using the spirit level again to ensure the two points are perfectly aligned.
If you’re looking for a more detailed walkthrough, our guide on installing clothes rail and brackets covers various types. A little patience at this stage makes all the difference and guarantees a flawless result.
Simple Maintenance for Lasting Performance
Think of proper maintenance as your secret weapon. It’s what keeps your clothes rail brackets safe, strong, and looking sharp for the long haul. Just like any hardworking bit of kit, a little care goes a long way in protecting your investment and stopping small problems from turning into big headaches.
A quick visual check every few months can make all the difference. In a busy shop where the rails are in constant use, these checks are absolutely vital for safety and peace of mind.
Your Routine Check-Up List
The best approach is to get into a simple routine. A quick inspection only takes a few minutes, but it’s the most effective way to catch any potential issues before they cause trouble.
Here’s what you should be looking for:
- Loose Fixings: Give the bracket a gentle wiggle. If you feel any movement at all, the screws probably need a tighten. This is especially important for brackets fitted to plasterboard, as everyday vibrations can work the fixings loose over time.
- Signs of Stress: Keep an eye out for any subtle bending in the bracket arm or signs of strain where it meets the wall. Hairline cracks in the paint around the fixings are a classic tell-tale sign that the rail might be overloaded.
- Corrosion or Finish Damage: Check for any rust spots on steel brackets or chips in powder-coated finishes. Catching this early stops it from spreading and keeps your whole display looking professional and well-maintained.
A Tip for Retailers: The perfect time to run these checks is during a stock changeover. With the rails empty, you get easy access to the brackets and can make sure everything is solid before the new season's collection goes up.
Keeping Your Brackets Clean
Cleaning is simple, but the method depends on the finish. For polished chrome or stainless steel, a soft microfibre cloth and a little water is usually all you need to get rid of dust and fingerprints and bring back that brilliant shine.
If you have matte black or other powder-coated clothes rail brackets, stick to a gentle cleaner. Definitely avoid abrasive pads or scourers, as they’ll scratch and ruin the finish. A quick wipe-down doesn't just keep them looking good; it also prevents grime from building up and hiding any underlying problems.
Frequently Asked Questions
Even the most straightforward DIY jobs can throw up a few questions. When it comes to fitting clothes rail brackets, we’ve heard them all. Getting these details right from the start is the key to a secure, level rail that will stand the test of time.
Let's walk through some of the most common queries we get, giving you the straightforward answers you need to get the job done right.
How Far Apart Should My Brackets Be?
This is a great question, and the answer really depends on two things: what your rail is made of and how much weight you’re planning to hang on it.
As a solid rule of thumb for most everyday uses, spacing your brackets every 80-120cm will give you plenty of support and stop the rail from bowing in the middle.
However, if you're setting up for a serious amount of stock or a wardrobe full of heavy winter coats, it’s a smart move to bring them closer together. For these heavy-duty jobs, aim for a spacing of 60-90cm. This spreads the load more evenly, ensuring your rail stays perfectly straight and secure for the long haul.
It's always a good idea to check the manufacturer's own guidelines. The design and strength of the bracket itself can influence the ideal spacing.
What’s the Best Way to Fix Brackets to Plasterboard?
This is a critical one. Standard wall plugs and screws just won't cut it for plasterboard – they'll pull straight out once you load up the rail, often taking a chunk of your wall with them.
Because plasterboard is softer, you need fixings designed specifically to grip it from behind. Your best bets are:
- Toggle Bolts: These clever fixings have spring-loaded wings that pop open behind the plasterboard, distributing the weight over a much wider area for a rock-solid hold.
- Hollow Wall Anchors: Working in a similar way, these expand behind the board as you tighten them, creating a firm anchor that won’t let you down.
Don't be tempted to skip this step; using the right plasterboard fixing is essential for a safe and secure installation.
Can I Paint My Brackets to Match My Décor?
Absolutely! A custom colour can make all the difference. The secret to a finish that lasts, though, is all in the prep work.
For any metal bracket, you’ll want to give it a light sanding first. This scuffs up the surface just enough to give the paint something to grip onto.
Next, apply a good quality metal primer. Once that’s fully dry, you’re ready for your topcoat. We find that a spray paint designed for metal usually gives the smoothest, most professional-looking result. If your brackets already have a powder-coated finish, that initial sanding is even more important to break through the tough outer layer.
At Display Guru, we stock the kind of robust, high-quality clothes rail brackets that form the foundation of a great display, whether for a retail space, a workshop, or your home. Take a look at our collection and find the perfect support for your garments at https://www.displayguru.co.uk.