




Clothes Rail Support That Holds Up: A Real Guide
A lot of people start at the wrong end of this problem. The rail bows a little, or the whole thing feels nervous when you pull a hanger off, and the first instinct is to shop for a higher kilogram rating. Sometimes that helps. Often it doesn't.
In practice, clothes rail support comes down to where the load travels, where it concentrates, and which part of the setup gives up first. A longer span can fail before a thinner tube does. A mobile rail can tip before the bar itself even starts to deflect. A solid-looking wall bracket can still let go if the fixing behind it is wrong for the wall.
That's why I always start with three questions. Where is the load sitting. How far is it spanning. Is the rail failing by sagging, swaying, or tipping. Once you answer that, the right support type usually becomes obvious.
Why Rails Bend, Tip or Sway
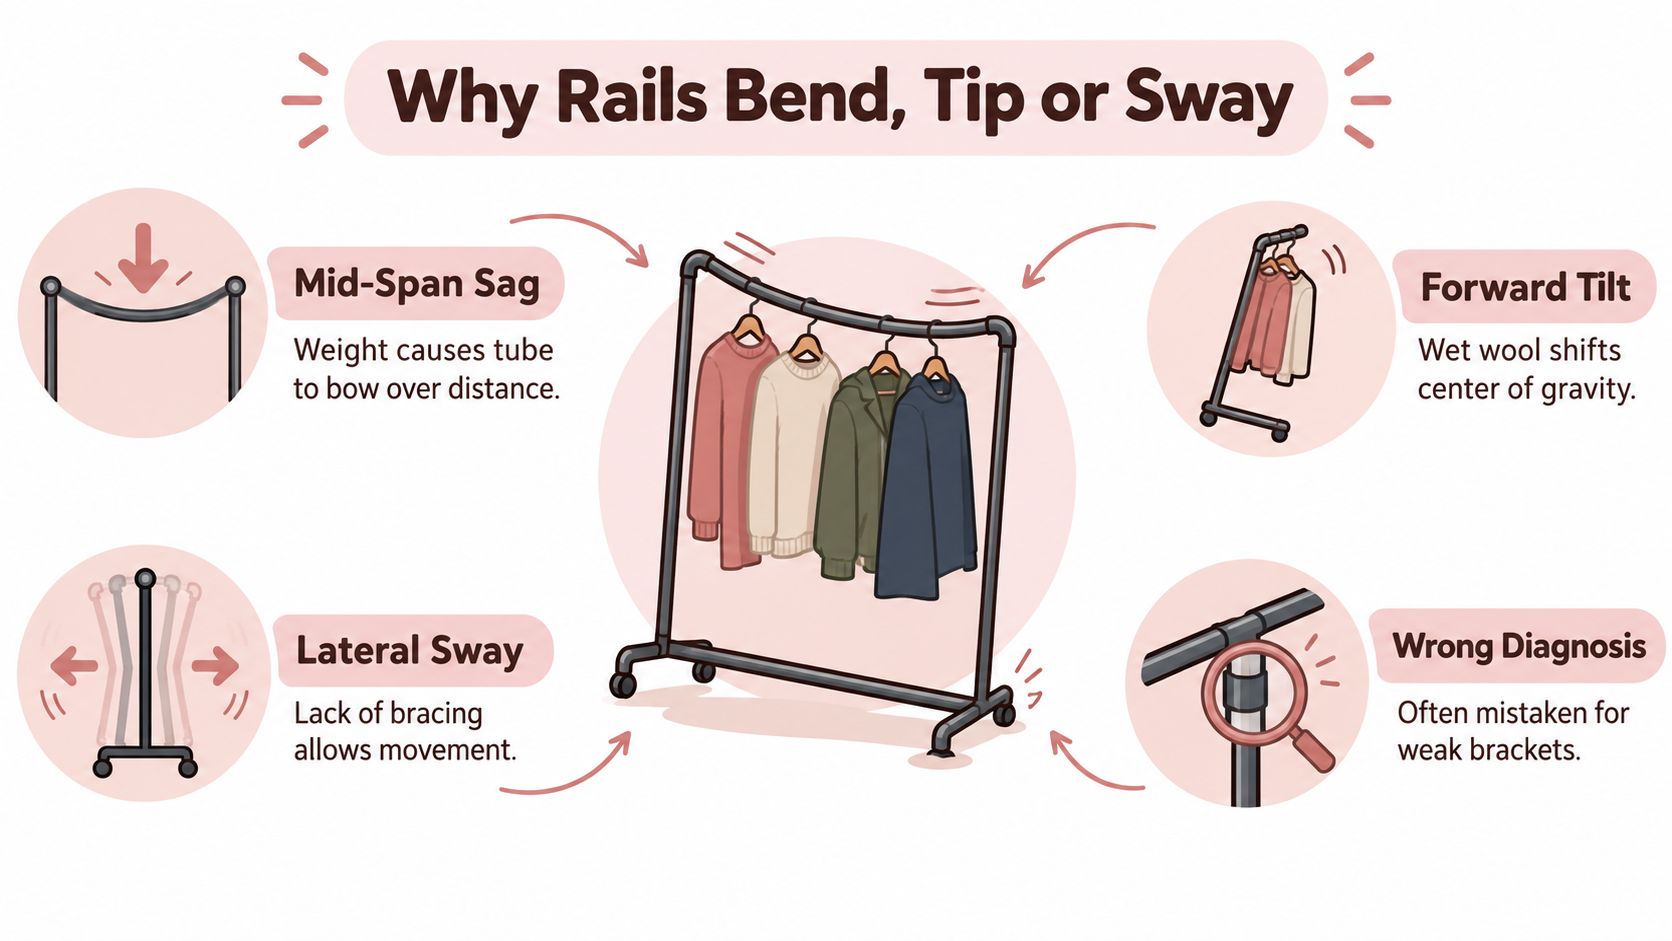
You see the problem the first time the rail is used properly. A boutique owner loads winter coats onto a rail that felt fine in the showroom, and the centre drops. In a small workshop, a freestanding unit stays upright all week, then starts rocking the moment stock is pushed to one side. The failure starts under live load, not on the product label.
A clothes rail only works as well as its weakest part in the load path. The bar carries weight to the supports. The supports pass it into the wall, base, or frame. If the span is too long, the tube bends. If the footprint is too narrow, the unit tips. If the fixings are poor, the whole thing sways even when the bar itself is strong.
Start with span, not headline load
This is the part buyers skip. They compare kilogram ratings before they check the unsupported distance between brackets or uprights. On site, span length usually tells you more than the advertised capacity.
A long rail with a modest, evenly spread load will sag sooner than a shorter rail carrying the same total weight. Add a centre support and the same bar often becomes usable again. Swap to a heavier tube without changing the span, and you may spend more without fixing the actual fault.
Published guidance on clothing capacity and rail loading makes the same basic point in a more consumer-friendly way. Garment numbers and weight only mean something once span and layout are accounted for (clothes rail loading guide).
If you're using industrial-style tube, diameter and wall section still matter. This guide to scaffold pipe diameter options is useful for judging when two rails that look similar are not structurally similar.
What I check first on site
These checks sort the problem quickly:
- Clear span between supports: This is the first number to measure. Overall rail length matters less than the unsupported middle section.
- Where the load gathers: Ten heavy coats in the centre will punish a rail faster than the same pieces spread across the full length.
- Support type: End brackets, centre saddles, hanging sockets, and freestanding uprights fail in different ways.
- Base footprint or fixing quality: A rail can feel strong in the tube and still be unstable because the feet are too narrow or the wall fixings are poor.
- Tube size and shape: Section choice matters, but only after span and support spacing are right.
A practical rule holds up across retail fit-outs and home storage alike. If the bar dips in the middle, solve the span first. If the whole unit moves, solve the support. Chasing the highest load rating only helps when that rating matches the way the rail is being used.
The Four Real Failure Modes of a Clothes Rail
A rail can look solid at first glance, then fail the moment the stock goes on. In practice, the weak point is usually obvious once you separate the problem properly. Is the bar bending, is the whole frame moving, or is a connection starting to give way?
That matters more than chasing the biggest kilogram figure on a product page. A high rating does not help if the rail is failing in the wrong place.
Sag
Sag is the easiest fault to identify and the one people misread most often. The middle of the bar drops, the ends stay where they are, and the load starts gathering toward the lowest point. That is a span problem first.
I check sag by sighting along the tube from one end with the rail loaded as it is used, not empty. If the centre is visibly low, the unsupported section is too ambitious for that tube, that spacing, or that load pattern. A thicker bar can help, but shortening the effective span usually fixes more than increasing the headline load rating.
Tip
Tip is a stability fault. The rail does not need to bend at all. It wants to pitch forward, backward, or sideways because the centre of gravity has moved outside the footprint.
You see this on freestanding rails loaded with long coats on one side, rails on castors that move slightly as people browse, and narrow-base units that feel fine empty but nervous once the garments go on. A heavier tube will not cure that. More footprint, lower load height, and better balance will.
Sway
Sway is the wobble you feel in use. Customers pull one hanger and the whole rail shuffles or flexes. Staff restock a wall rail and the brackets move before the tube does.
In wall-mounted work, sway usually points to poor fixings, weak substrate, or brackets with too much play. In freestanding rails, it often comes from loose joints, uneven floors, untidy levelling, or frames that have no real resistance to side movement. If you want a good comparison of how different heavy-duty rail formats behave in practice, this guide to heavy-duty clothes rails in practical use is useful alongside a site check.
Joint failure
Joint failure starts small. A grub screw backs off. A tube creeps out of a socket. A bracket twists slightly because it was never sitting flat to begin with.
This is common on rails that are moved, knocked, or reconfigured often. The bar may be strong enough and the base may be stable enough, but the connection between parts takes repeated small shocks and eventually gives up. On site, this is why I treat connectors and bracket faces as load-bearing parts, not accessories.
Four Clothes Rail Failure Modes
| Failure mode | What you see | Typical cause | Fix direction |
|---|---|---|---|
| Sag | Centre of bar dips under load | Unsupported span too long for the tube and load pattern | Add centre support or shorten the effective span |
| Tip | Whole rail wants to pitch forward or sideways | Footprint too narrow, load biased to one side, high centre of gravity | Widen the base, rebalance the load, reduce height if needed |
| Sway | Side-to-side movement during normal use | Weak fixings, loose joints, uneven floor, poor bracing | Improve fixing method, level the unit, tighten and stiffen connections |
| Joint failure | Tube slips, bracket twists, connection loosens | Connector under strain, poor seating, repeated movement | Upgrade the joint, reseat the bracket, reduce movement stress |
Matching Support Type to Span and Use
A rail full of winter coats can fail three different ways, and each one points to a different support choice. If the bar sags, shorten the unsupported span. If the whole unit rocks or creeps, fix the base or the wall fixing. If it feels lively side to side, stiffen the frame and the joints. Chasing the biggest quoted load rating does not solve the wrong problem.
Wall brackets and centre brackets
End wall brackets suit short runs where the wall is up to the job. Masonry and solid timber give you more margin. Tired plasterboard with vague fixings does not. I fit these where the rail length is modest, the load is predictable, and floor space matters more than future adjustment.
Centre brackets are the first upgrade I reach for when the bar is fine but the span is doing too much work. They cut the effective length of the rail, which is what reduces sag. That matters more in practice than buying a thicker tube and leaving a long gap unsupported.
If you are building a rail from loose tube and fittings, not buying a welded one-piece unit, scaffold pipe fittings for garment rails make it much easier to put support exactly where the load gathers.
Freestanding frames and base-plate rails
Freestanding frames solve a different problem. They are for spaces that change, rented rooms, pop-up retail, costume storage, and work areas where drilling the wall is not an option. The trade-off is clear. You gain flexibility, but you need enough footprint to resist tipping and enough frame stiffness to stop sway once people start pulling hangers across the bar.
Base-plate rails sit somewhere between fixed and mobile setups. They are useful when the floor can carry the load cleanly and the wall cannot be used. For short, dense runs, they often feel steadier than light mobile rails because the load path goes down into the plate instead of through a narrow wheeled base.
The same basic rule shows up in other physical builds. Stable structures come from span, support position, and anchoring, not just thicker material. Even outside shopfitting, these budget-friendly fence building tips rely on the same idea.
Support Type by Span, Load and Room
| Support type | What it handles well | Where it falls short | Best room |
|---|---|---|---|
| End wall brackets | Short spans with sound fixing points and predictable loads | Longer open spans, weak wall substrates, loads that bunch in the middle | Wardrobes, alcoves, compact rooms |
| Centre-bracketed wall rail | Longer runs where sag is the main risk | Layouts that need clear uninterrupted hanging access across the full length | Home studios, dressing rooms, stock walls |
| Freestanding frame | Changeable layouts, temporary use, spaces where fixing is not allowed | Narrow bases, tall loads, uneven floors, heavy one-sided loading | Rental spaces, studios, retail floors |
| Base-plate rail | Short dense display runs with no wall fixing available | Areas that need frequent movement or a very small floor footprint | Shops, showrooms, temporary display zones |
Choose the support that deals with the failure mode you have. For sag, reduce span. For sway, stiffen the frame or the fixing. For tip, widen the footprint or move the load lower and more central.
Choosing a Load Rating That Actually Fits
A rail can carry a big quoted load and still fail in the room it is going into. I see that regularly with long wardrobe spans, mobile rails loaded heavily in the middle, and freestanding frames that are stable when empty but awkward once the hangers bunch to one side.
Start with the span and the way the clothes will sit on it. Then read the rating.
Start with use, not maximum capacity
For ordinary home storage, you do not need to chase the biggest number on the page. A sensible domestic benchmark is around 30kg for standard clothing storage, provided the span is controlled and longer runs get proper intermediate support, as noted earlier in the article.
Commercial rails are a different job. Published UK retail guidance puts free-standing commercial clothes rail support in the 100kg to 200kg of evenly distributed load range, with stronger models using 32mm industrial-grade steel tubing and independent SATRA/BS EN 16121 testing under retail conditions (commercial rail load guidance).
Those figures only help if the loading pattern matches the test condition. A rail full of evenly spaced shirts is easy work compared with dense winter coats pushed into the middle third.
Read the right part of the specification
The specification is often misread at this point:
- Evenly distributed load: treat this as the primary figure, not the headline number on its own.
- Static versus moving load: a rail that is fine standing still can become unstable once it is rolled over thresholds or uneven flooring.
- Tube size and support layout: thicker tube helps, but it does not rescue an overlong span or a weak bracket arrangement.
- Intended use: showroom display, daily stock handling, and home wardrobe storage place very different stresses on the same frame.
One option in the market is Display Guru's heavy-duty rail range, including height extension poles for specific rail setups, which helps in cases where the constraint is vertical clearance rather than pure load. If you are comparing formats, this guide to heavy-duty clothes rails for higher-load setups is a useful cross-check against your actual span and use pattern.
Load rating matched to use
| Use case | Load range | Tube size | Centre bracket? |
|---|---|---|---|
| Standard home wardrobe | Around the lower domestic range, with 30kg as a practical minimum benchmark | Lighter sections can work on short, controlled spans | Often yes once the run gets longer |
| Shared home storage or small studio | Mid-range build with better tube and better support details | Step up in section and fixing quality | Usually sensible on longer wall runs |
| Retail floor or stockroom | 100kg to 200kg evenly distributed load in published commercial guidance | 32mm industrial-grade steel tubing is common at this level | Often part of the answer unless the frame is engineered another way |
If you only remember one rule, use this one: match the rating to the failure mode. For sag, shorten the span or add support. For sway, improve the frame or fixing. For tip, look at the base and where the weight sits.
Installing Wall Brackets and Freestanding Rails Well
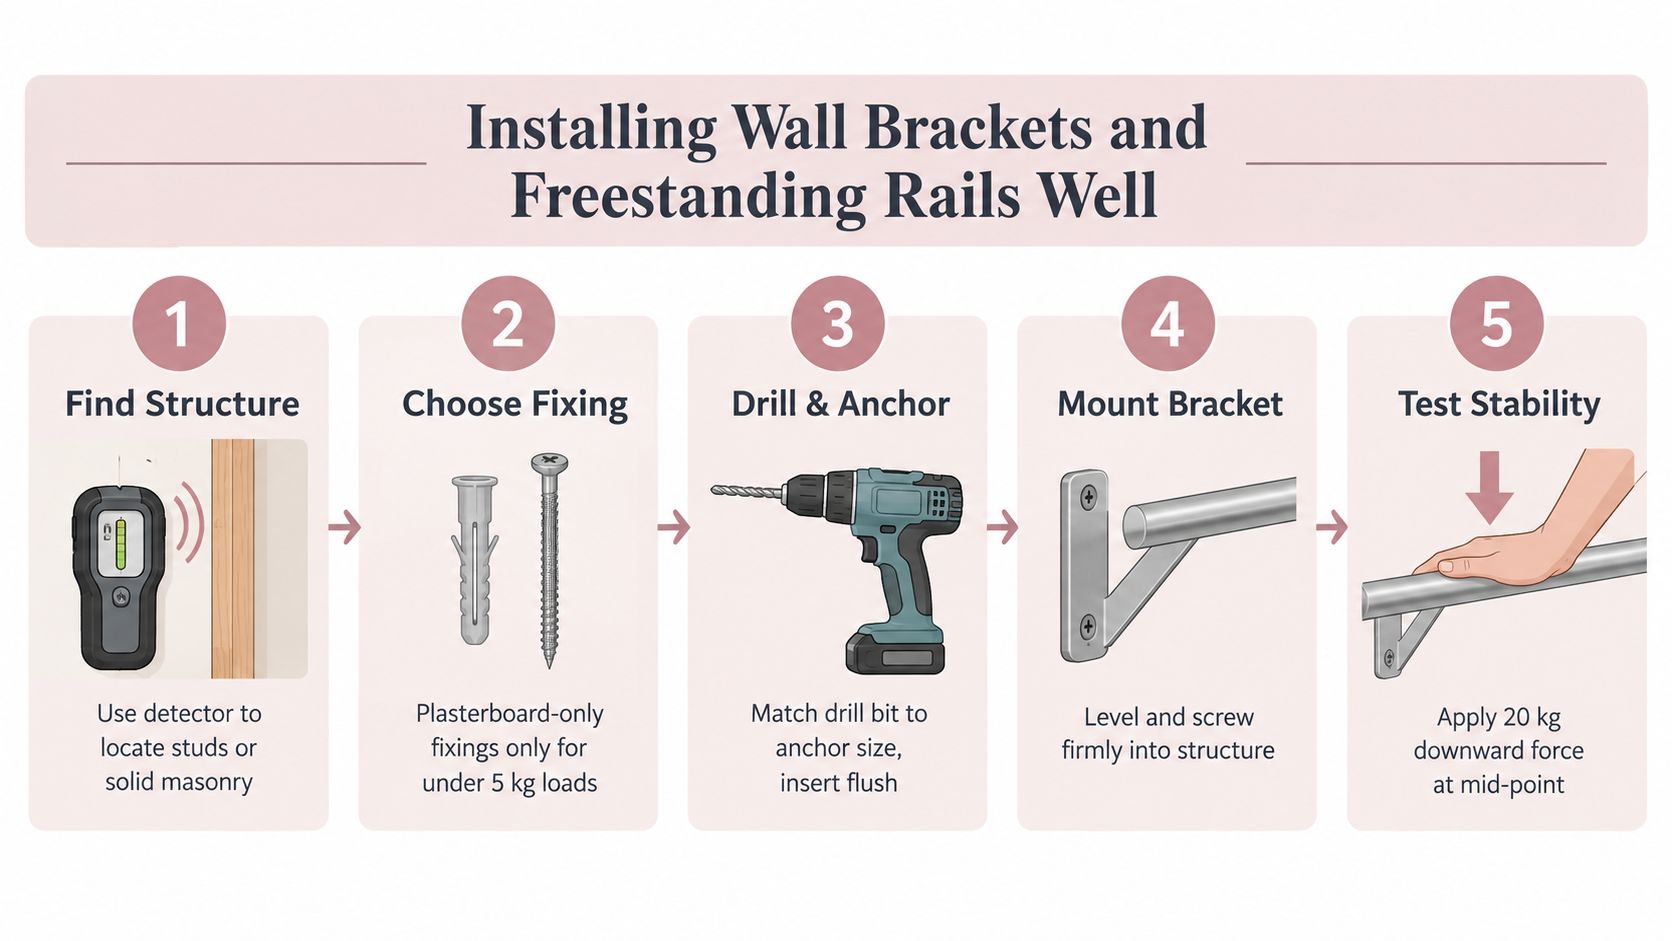
A rail can carry the right published load and still fail early if the install sends that load into the wrong point. I see this more often than undersized tube. The bracket is fixed into weak board instead of structure, or the freestanding frame is left slightly out of level, so the weight never shares properly.
Wall-mounted rails
Start with the wall, not the rail.
Masonry usually gives a clean answer. Stud walls can work well too, but only if the fixings land in timber or in a support method suited to the actual wall build-up. Plasterboard alone is where neat-looking installs turn into callbacks.
Bracket spacing matters as much as fixing choice. If the span is already close to the limit for that rail, being casual with bracket positions invites sag even if every screw holds. Set out from the support points first, then check where the rail ends and garments will sit.
Keep the bracket faces flat to the wall and in line with each other. If one base plate is pulled onto a high spot or twisted by an over-tightened fixing, the rail is already under stress before any hangers go on. A practical guide to wardrobe rail fixings and support types helps if you need to compare bracket and fixing options before drilling.
Site habit: If a bracket rocks, packs out, or refuses to sit flat, sort that before fitting the tube.
Freestanding rails
Freestanding rails fail lower down. The usual problem is not the hanging bar first. It is the base, the joints, or the floor contact.
Build the frame loose enough to square it, then tighten it in sequence. Set levellers before loading. On castor rails, confirm all wheels are bearing properly and any brakes are fully engaged where needed. A rail that carries most of the weight through three points instead of four will sway sooner, and it will often start to creep out of square once heavier garments are grouped on one side.
Use a firm side push and a light forward pull. You are checking for rock, joint movement, and any delay before the frame settles back. That short hesitation is often the first sign the base is too narrow for how the rail will be used.
Details that prevent callbacks
Small install errors stack up fast:
- Check every contact point: Feet, castors, and bracket bases all need full bearing.
- Tighten in order: Square the frame first, then lock opposite sides evenly.
- Load test with real garments: Empty rails can feel fine and still misbehave once coats or denim go on.
- Watch the first deflection: A slight drop at mid-span or a small corner lift under load is an early warning, not something to ignore.
Good installation is load management in practice. The job is to send weight into the wall, base, and frame cleanly, so the rail does not spend its life fighting sag, sway, or tip from day one.
Two Setups That Show the Principles in Practice
A rail can look under-specced when the problem is somewhere else. I see that a lot on refits. The bar gets blamed first, but the failure usually starts with span, base width, or how the load sits day to day.
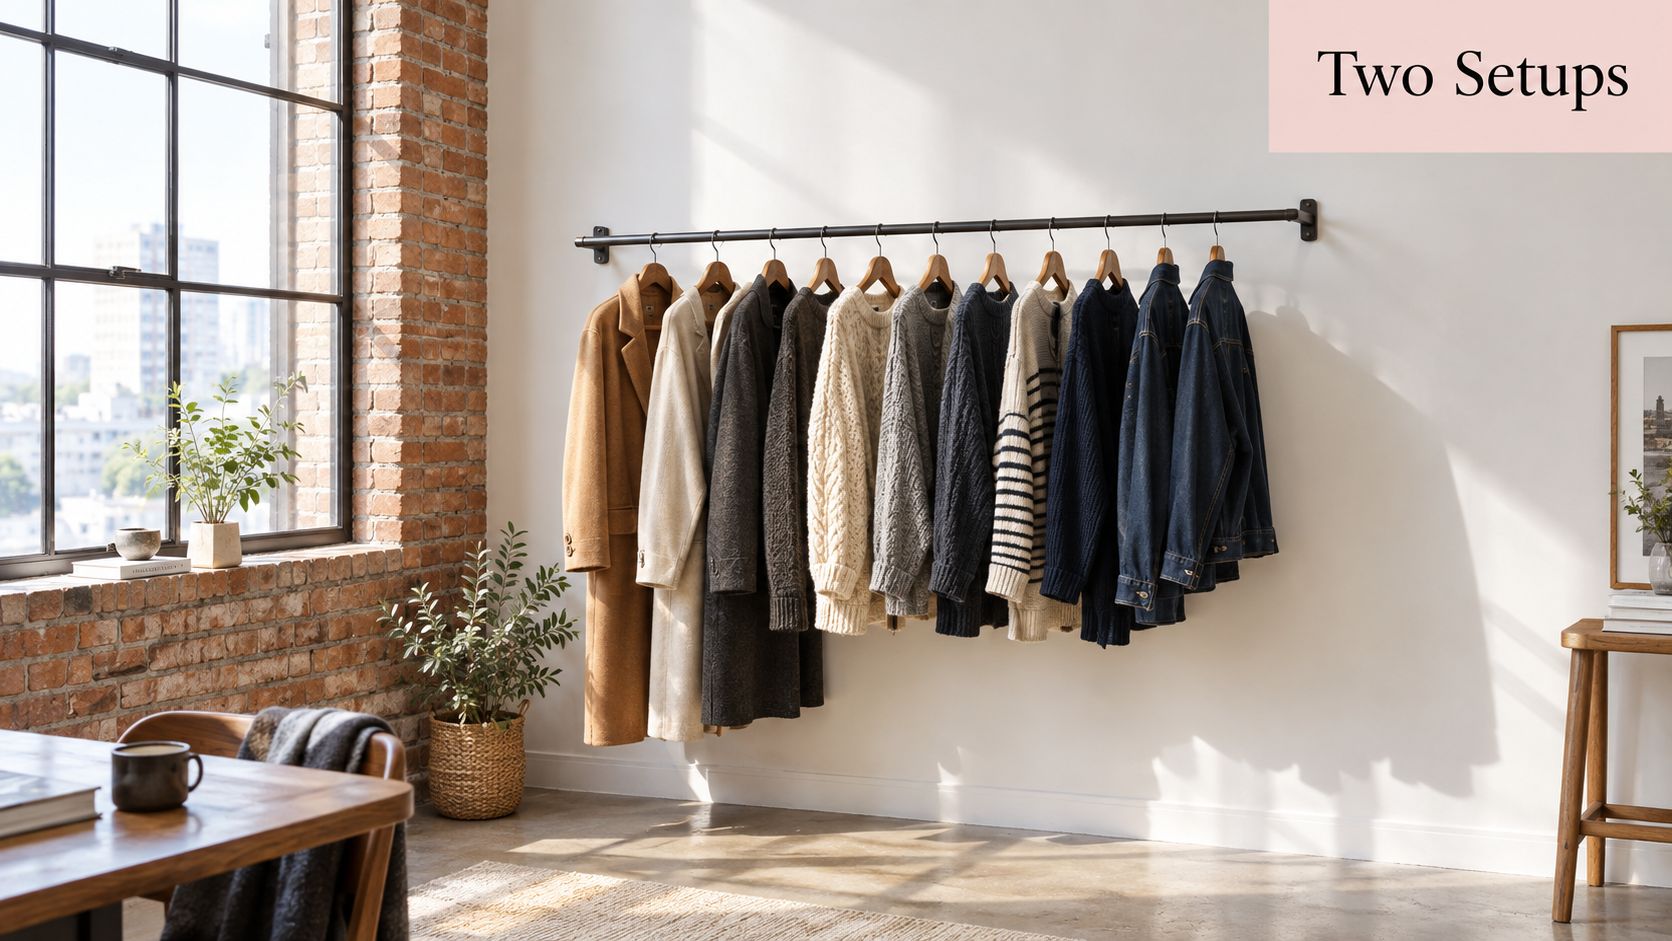
A home studio wall rail
A converted loft studio had a single long wall rail for coats, knitwear, and denim. The owner wanted a heavier tube because the middle line had dropped enough to see from across the room.
The weak point was span length, not raw bar strength. One long run was carrying mixed weight with too much distance between supports, so the main failure mode was sag. Fitting a centre bracket changed the job completely because it split the rail into two shorter sections and cut the bending demand on the tube.
That solved nearly all of it.
The remaining improvement came from load placement. Coats and dense denim went nearer the brackets, with lighter pieces between them. Same rail. Better support pattern. Better result.
A mobile retail rail
On a small shop floor, the problem looked similar at first glance. The rails were also carrying uneven weight and starting to feel wrong once stock built up. But the bar was not the first thing giving trouble.
The issue was sway and tip risk during movement. The rails sat on castors, staff loaded one side harder during merchandising, and the base did not give enough margin once the rail was pushed, turned, or stopped quickly. A thicker hanging tube would not have fixed that. A wider base, tighter upright joints, and stricter balancing of heavier garments across the width made the rail calmer and safer in use.
That is the part buyers often miss. Two rails can be the same length and have the same quoted capacity, but one needs help at mid-span while the other needs a base that resists movement.
Match the support to the failure mode. If the rail dips, shorten the working span. If it wobbles on the floor, sort the base and frame before chasing a bigger kilogram rating.
Quick Checks and When to Stop Pushing the Rating
A rail can look fine empty and still be wrong once the stock goes on. I check that before anyone orders a heavier bar or chases a bigger number on a product page.
Five checks that catch most problems
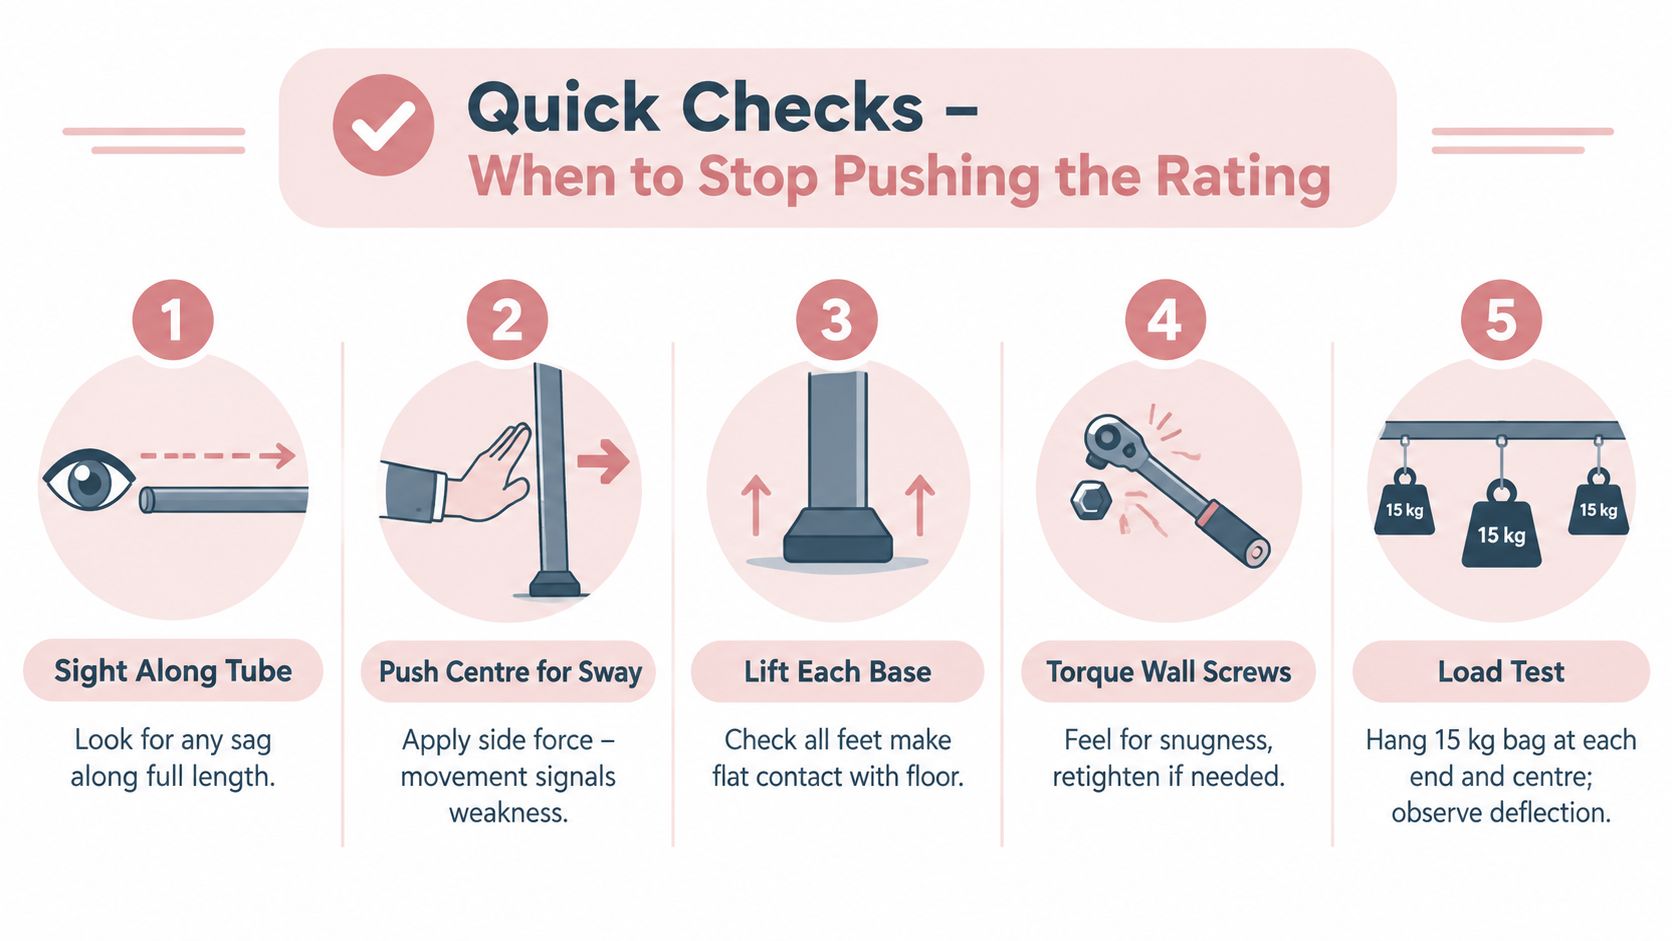
Start with the rail loaded the way it will be used, not empty on a clean floor. Then check these points:
- Sight along the tube: A shallow dip at mid-span, a twist in the tube, or one end sitting high usually shows where the load path is wrong.
- Push the loaded rail lightly by hand: Watch for sway at the uprights, movement at the joints, or a base that rocks before the bar itself shows any strain.
- Check every foot or base contact point: If one foot is off the floor or one castor is not carrying properly, the frame will always feel worse under load.
- Put a hand on each bracket or fixing: Any click, creep, or movement at the wall connection needs sorting before extra weight goes on.
- Add weight in stages: The first part that moves is usually the part that needs attention. Sag points to span. Rocking points to the base. Loosening points to fixings.
One detail is easy to miss on mobile rails. Standing capacity and moving capacity are not the same thing, especially on castors. Published buying guidance for garment rails makes that distinction clearly because movement adds stress through the base, wheels, and joints, not just the hanging bar (garment rail stability guidance).
When more capacity won't solve it
Stop pushing the rating if the weakness sits somewhere else.
- Plasterboard-only fixing carrying dense garments
- A long wall run with no centre support
- A tall mobile rail that feels lively once one side loads up
- A rail being used in harder commercial service than its frame, wheels, or fixings were built for
This is the point many buyers get backwards. They compare kilogram ratings and assume the bigger figure gives more safety. In practice, I would rather see a sensible span, a proper fixing into the structure, and a base that stays planted. Those three things decide whether the rail sags, sways, or tips. The headline rating only matters after that.
If the setup is asking the wrong wall, the wrong base, or too long a span to do the work, a higher number on the product page will not rescue it. Fix the geometry first. Then fix the support path. Only after that is it worth paying for more rated capacity.
Display Guru supplies garment rails, wall-mounted rail components, height extension options, and display equipment for studios, retail spaces, costume teams, and home sewing rooms where proper clothes rail support matters. If you're sorting out a rail that needs to carry real working loads instead of just looking tidy, have a look at Display Guru and match the setup to the way you'll use it.