


A Complete Guide to an Adjustable Mannequin for Dressmaking
Think of an adjustable mannequin as your silent, patient partner in the sewing room. It's the one tool that truly bridges the gap between a flat pattern and a perfectly fitting, three-dimensional garment. It acts as a reliable body double, giving you the freedom to drape, pin, and tweak with a level of precision that’s almost impossible to achieve on a live model.
Why an Adjustable Mannequin Is Your Most Essential Tool

Trying to fit a garment without a dress form is a bit like trying to paint on a canvas that won't stay still. The human body is all curves and contours, which makes getting a perfect fit from flat pieces of fabric a real challenge.
An adjustable mannequin for dressmaking solves this problem head-on. By providing a static, 3D replica of the torso, it lets you see exactly how fabric will hang, drape, and shape itself around the body. Suddenly, the process shifts from guesswork and endless fitting sessions to something more like precision engineering.
The Bridge Between a Pattern and a Person
A paper pattern is just a two-dimensional blueprint, but clothes are worn on three-dimensional bodies. The mannequin is the crucial go-between, translating that flat design into a wearable shape long before it ever needs to be tried on.
This is where the magic happens, allowing you to:
- Drape with Accuracy: Sculpt fabric directly onto the form to dream up new designs or see how a particular material falls.
- Pin with Precision: Make perfectly symmetrical adjustments to seams, darts, and pleats without needing someone to stand still for hours.
- Create Flawless Hemlines: Marking an even hem is notoriously tricky on a person, but it's a breeze on a mannequin.
- Ensure a Consistent Fit: Your mannequin is a patient fit model, available 24/7 to check alterations and make sure every seam is exactly right.
An adjustable dress form isn't just a luxury for professional tailors. For the home sewing enthusiast, it’s a total game-changer, dramatically improving the quality and finish of every single project. The right equipment can transform your entire creative space; check out our guide for more ideas on creating your perfect sewing room setup.
To really understand its value, let's break down the core benefits.
Key Advantages of an Adjustable Dress Form
| Benefit | Impact on Your Sewing Process |
|---|---|
| Precision Fitting | Dial in exact measurements for bust, waist, and hips to match a specific body. |
| 360-Degree View | Easily see and work on all sides of the garment without asking a person to turn. |
| Symmetry & Balance | Ensure seams, darts, and design elements are perfectly mirrored on both sides. |
| Time Savings | Catch fit issues early, drastically reducing the need for multiple fittings and alterations. |
| Creative Freedom | Drape fabric and experiment with designs directly on the form, sparking new ideas. |
Essentially, it moves you beyond guesswork and into a world of confident, professional-level construction.
No More Working Blind
Without a dress form, you're basically flying blind until the final fitting. You can pour hours into sewing, only to find the bust darts are in the wrong place or the back isn't lying flat. A mannequin lets you spot these problems early, saving you time, fabric, and a lot of frustration.
Think of it as your body double. It doesn’t complain, fidget, or have an opinion on your design choices. It simply stands ready, allowing you to focus purely on the art of construction and achieving that perfect silhouette.
Ultimately, an adjustable mannequin empowers you to create garments that not only look fantastic but also fit the intended wearer like a glove. It’s the key to unlocking a higher level of craftsmanship on your dressmaking journey.
Getting to Know Your Mannequin Inside and Out
When you’re on the hunt for an adjustable mannequin for dressmaking, you'll soon see that they aren't all built the same. What’s underneath that fabric-covered body can make the difference between a trusted creative partner and a constant source of frustration. Understanding the anatomy of a great mannequin is the secret to a smart purchase.
Think of it like any other specialist tool. A chef wouldn’t choose a flimsy knife, and a garment maker shouldn't settle for a mannequin that can't handle the job. The real quality comes down to three things: how it adjusts, how well you can pin into it, and how steady it stands.
Get these elements right, and your mannequin transforms from a simple stand-in to a precision instrument for your craft.
The Heart of Adjustability: How the Dials Work
The defining feature of any adjustable mannequin is, of course, its ability to change size. This magic happens thanks to internal dials or keys that expand and contract different parts of the torso. The two most common systems each have their own pros and cons, depending on what you need.
Multi-Dial Systems: This is what you’ll see most often. These mannequins feature 12 or more dials placed around the bust, waist, and hips. Each dial allows for tiny, precise adjustments, giving you incredible control over the final shape. They’re fantastic for fine-tuning a fit to perfectly mirror a person's unique measurements.
Key-Operated Systems: A few models use a single key to adjust several points at once. This can be quicker, but you usually sacrifice that granular control you get with multiple dials. For most dressmaking projects, being able to tweak individual measurements is far more useful.
A top-quality adjustable mannequin should expand smoothly and evenly. When you turn the dials, the panels ought to separate without creating big, unpinnable canyons between them. That’s a common flaw in cheaper models, and it makes precise work a real headache.
Whichever system you choose, the aim is always to replicate a body's specific proportions. Before you even start adjusting, you need good measurements. To get this crucial first step right, check out our detailed guide to taking accurate mannequin measurements.
Why a Fully Pinnable Surface is Non-Negotiable
What good is a dress form if you can’t securely pin fabric to it? The material of the torso itself determines how well it does this vital job. You need a surface that lets you pin both shallowly and deeply without wrecking the mannequin or blunting all your pins.
The best adjustable models have a dense polystyrene core that’s wrapped in a layer of foam and then covered with a tough nylon fabric. It’s the perfect combination. The foam gives a forgiving surface that grips pins tightly, while the solid core underneath allows for deep pinning when you’re draping heavy fabrics or securing lots of layers.
Be wary of mannequins made from a hard plastic shell with just a thin layer of fabric over the top. They might be adjustable, but trying to pin into them is next to impossible. You'll just end up with bent pins and slipping fabric, which completely defeats the purpose.
A fully pinnable surface gives you total creative freedom, whether you’re sculpting a brand-new design from scratch or carrying out meticulous alterations.
The Stand: Your Mannequin’s Stable Foundation
The stand is the unsung hero of a great mannequin. It’s what provides the stability you need to work on everything from delicate silks to heavy, multi-layered wedding dresses. A wobbly stand that threatens to topple over isn't just annoying; it’s a genuine hazard in a busy workspace.
You’ll generally find two types of stands:
- Tripod Base: Usually made of metal or wood, these three-legged stands offer a wide, stable footprint. They’re brilliant for general use and are often quite lightweight, so they're easy to move around your studio.
- Pedestal Base: A heavy, solid base—often round or square—gives you maximum stability. This is the go-to choice for professionals working with seriously weighty garments like beaded gowns or fully tailored wool coats, as it dramatically cuts the risk of tipping.
Your choice really depends on the kinds of clothes you make. For most home sewers and designers, a solid tripod base will do the job perfectly well. But if you’re regularly wrestling with heavy or off-balance projects, investing in a model with a substantial pedestal base is a very smart move. A solid foundation keeps your creative work secure from start to finish.
How to Choose the Right Size Mannequin
Getting the size of your adjustable mannequin for dressmaking right is the single most important decision you'll make. It’s more critical than the stand, the colour, or even the number of dials, because the right size is the foundation for getting a perfect fit in your garments. If you get this wrong, you'll be fighting a constant battle to make your clothes hang correctly.
Think of a mannequin's adjustment range less as a hard limit and more as its comfort zone. It performs best and holds the most natural, human-like shape when its dials are set somewhere in the middle of their range. Pushing a mannequin to its absolute minimum or maximum can start to distort its silhouette, creating strange gaps or a compressed, unnatural shape.
Your Measurements Are the Starting Point
Before you even start looking at models, you need to grab a tape measure. Taking your own accurate body measurements is the only way to know for sure that you're choosing a form that can truly become your body double.
You’ll need to measure three key areas:
- Bust: Measure around the fullest part of your chest. Make sure the tape is level all the way around and not too tight.
- Waist: Find your natural waistline – it's usually the narrowest part of your torso, often just above your belly button.
- Hips: Measure around the widest part of your hips and bum.
These three numbers are your golden ticket. We’ve put together a detailed guide on how to take accurate body measurements for clothes that walks you through every step, so you can be confident you’ve got it right.
Finding Your Mannequin's "Sweet Spot"
When you look at a mannequin's size chart, you'll see a range for each measurement, like a bust that adjusts from 84cm to 104cm. The goal is for your own measurements to fall nicely within that range, not right at the very edge of it.
Aim for the middle ground. If your bust is 92cm, a mannequin with an 84cm-104cm range is a fantastic choice. This gives you plenty of wiggle room to adjust up or down slightly without straining the mechanism or warping the form's shape.
This is a core principle for professionals, too. In the UK alone, there are 3,779 clothing manufacturing businesses that depend on precise tools like these. For them, having adaptable equipment that works within its optimal zone is essential for getting accurate fits across a huge variety of body types.
What to Do When You're Between Sizes
It happens all the time. Your measurements seem to straddle two different mannequin sizes. Maybe your bust and waist fit a size small, but your hips land squarely in the medium category. So, what do you do?
Always size down.
It is so much easier to add padding to a smaller mannequin to build up specific areas than it is to work with a form that’s just too big. You can easily use foam pads or a proper fitting system to add a bit more volume to the hips, bust, or tummy to create a perfect custom shape. You simply can’t shrink a mannequin that's bigger than its smallest setting.
Remember, a good fit isn't just about matching measurements; it's also about building in room to move. A huge part of this is understanding ease in sewing for a perfect fit. Choosing the smaller size gives you a solid, reliable base that you can then build upon for a truly bespoke fit, with just the right amount of ease.
Setting Up and Calibrating Your Dress Form
Unboxing your new dress form is exciting, but turning that collection of parts into your perfect body double is a process you can't rush. One of the biggest mistakes I see people make is rushing the setup. Taking your time here ensures your mannequin isn't just assembled, but truly calibrated to become a reliable partner in your creative work.
The first job is always the stand. A wobbly base is a dressmaker's nightmare, so make sure every fixture is tightened properly. Even a tiny lean can throw off a hemline or make a garment hang completely wrong. Get that foundation solid before you do anything else.
Once it's standing proud, the real fun begins: calibrating the form to match your measurements. This is where you transform a generic shape into your personal fitting tool.
The Art of Incremental Adjustments
The secret to getting a natural, human-like shape is to adjust the dials slowly and evenly. It’s tempting to crank one dial all the way to its final measurement, but that puts a huge strain on the internal mechanics and often results in a boxy, unnatural silhouette.
Think of it like tuning a guitar. You wouldn’t tighten one string all the way while the others are loose. You bring them all up to tension gradually, a little at a time. Do the same with your mannequin, turning each dial bit by bit and moving around the form to build up the shape cohesively.
By adjusting incrementally, you ensure the panels separate evenly. This not only preserves those all-important pinnable surfaces but also helps you create a realistic human contour, not an exaggerated, blocky one.
Following a logical sequence is just as important. Starting in the right place saves you from having to backtrack and undo all your hard work.
A Step-by-Step Calibration Sequence
For the most accurate results, I always recommend adjusting your dress form in a specific order. This method builds the body’s core structure first before fine-tuning the curves.
-
Adjust the Torso Length: Before you even think about touching the circumference dials, set the back-waist length. This is the vertical measurement from the bottom of your neck to your natural waistline, and it's critical for getting the garment to sit correctly.
-
Set the Bust Measurement: Now, start turning the bust dials. Move between the front, back, and side adjusters, adding a little dimension at each point. Keep checking with a tape measure until you hit your target.
-
Calibrate the Waist: Next, move down to the waist. Again, adjust the dials bit by bit to make sure the expansion is nice and even all the way around.
-
Finalise the Hips: Lastly, adjust the hip dials to the correct circumference. This completes the main calibration and gives you a solid base to work from.
This simple infographic sums up the thinking process you should go through before you even get to the setup stage.
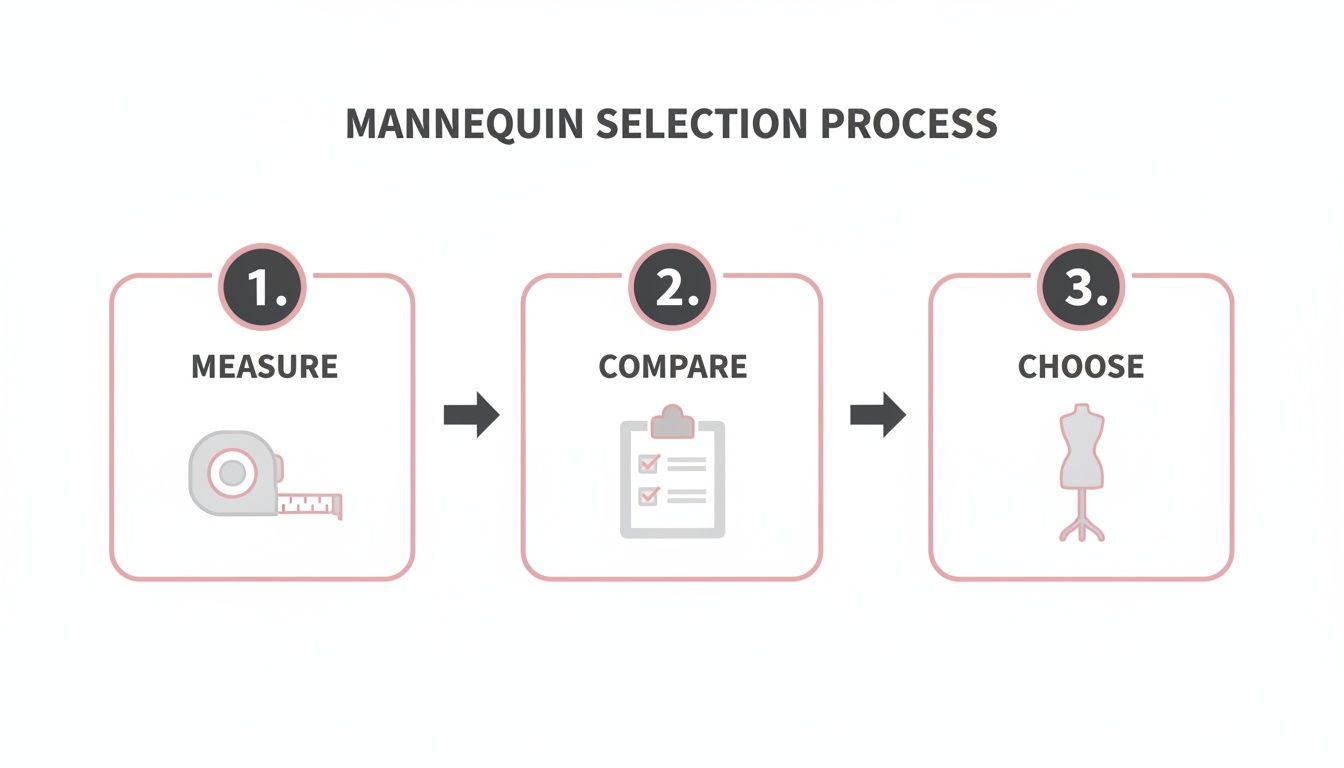
It really reinforces that taking your own measurements accurately is the foundation for choosing the right size mannequin in the first place.
Customising with Padding for a True Fit
Let's be honest, no one has a "standard" body shape. We all have unique curves, and this is where padding kits become your best friend. They allow you to go beyond the basic measurements and replicate a person’s exact contours.
Once the core measurements are set, you can get to work with foam pads to mimic specific features like:
- A fuller bust or a rounded tummy
- A sway back or prominent shoulder blades
- Fuller hips or thighs
Many dressmakers make a custom padded cover that slips right over the mannequin. That way, your unique shape is saved and ready for every new project. Getting to grips with your adjustable dressmaking dummy and taking the time to calibrate it properly turns it from a simple tool into an invaluable asset, one that will seriously elevate the fit and finish of your work.
Advanced Techniques for Draping and Fitting
 Once you've dialled in your mannequin to perfectly match a person's measurements, it stops being just a fitting aid and becomes a proper creative partner. This is where the real magic happens. You can move beyond simple pattern tweaks and start exploring the more sculptural side of making clothes.
Mastering these advanced techniques is what unlocks the true potential of your adjustable mannequin for dressmaking. It’s your silent assistant for everything from dreaming up new patterns from scratch to fitting complex, structured garments that demand absolute accuracy.
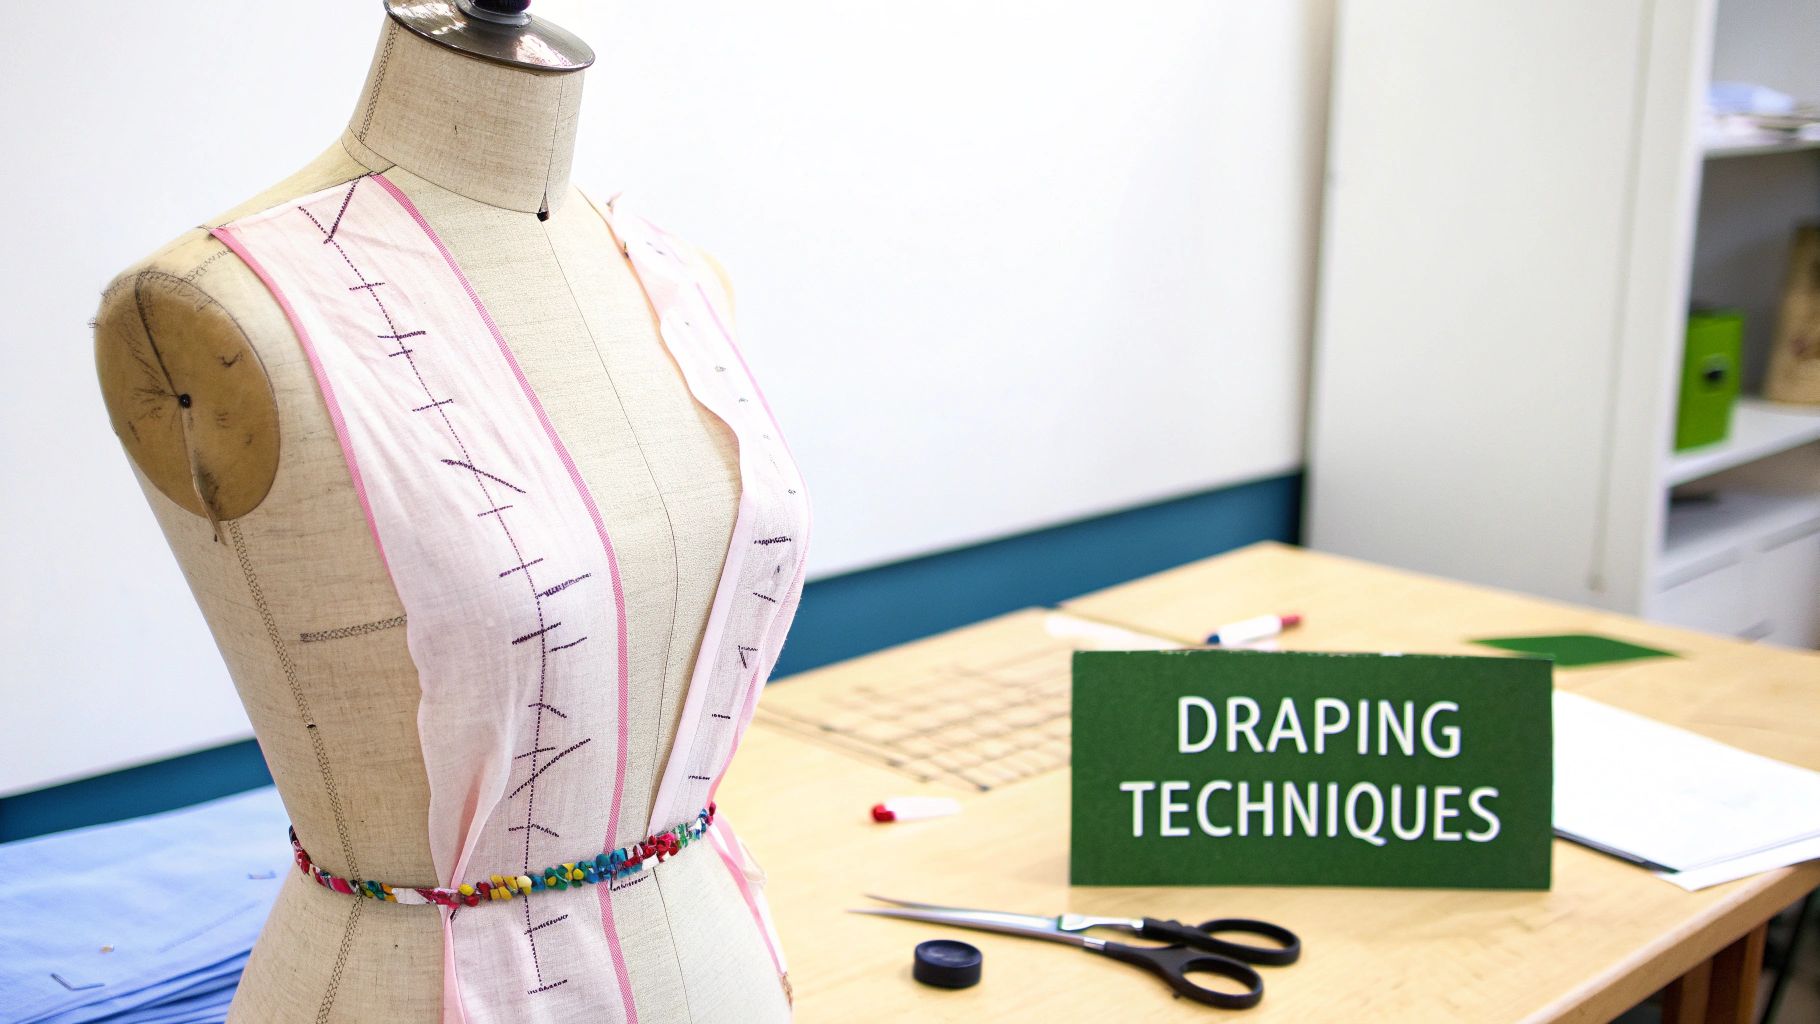
The Art of Draping Complex Designs
Think of draping as sculpting with fabric. Instead of drafting a flat pattern with a pencil and ruler, you create the garment's design directly on the form. It’s a wonderfully intuitive process that lets you see exactly how the fabric wants to move and fall, which is something a paper pattern can never quite capture.
Draping really comes into its own for designs that are tricky to visualise on paper:
- Asymmetrical Designs: Getting the balance right on a one-shouldered top or a dress with an uneven hemline is so much easier when you can see it and adjust the fabric in 3D.
- Intricate Gathers and Pleats: You can sculpt details like cowls, ruching, or fiddly pleat work, pinning everything in place to nail the placement and volume before you commit.
- Bias-Cut Garments: Draping is almost essential for bias-cut pieces. It lets the fabric hang and stretch naturally for a day or two before you mark and cut, which is key to avoiding a wonky, stretched-out final garment.
Your mannequin is your canvas here, giving you total freedom to experiment. For a deeper look into creative dressmaking, you might find our guide on sewing for a dummy useful.
Precision Tools for a Professional Finish
Many high-quality mannequins come with clever features built right in, and one of the most useful is the chalk hem marker. It’s a brilliantly simple device: a small puffer that blows a fine, perfectly straight line of chalk around the garment at your chosen height.
A chalk hem marker takes all the guesswork out of creating a dead-level hem. It's a professional trick of the trade that guarantees a flawless finish, especially on full skirts or flowing dresses where getting an even hem is notoriously difficult.
This kind of precision is crucial in the professional world. The UK garment supply sector, for instance, is seeing a real resurgence. Recent figures showed a stunning 128% average increase in sales in a single quarter, a strong sign of growth. For the tailors and designers driving this trend, having reliable tools like a versatile dress form is non-negotiable for rapid prototyping and perfect fitting.
Fitting Structured and Specialised Garments
While a mannequin is fantastic for soft, flowing designs, it’s just as vital for structured garments where the fit is absolutely everything. Think of tailored blazers, corsetry, and formalwear—pieces that rely on meticulous shaping and support.
Your dress form becomes your best friend for tasks like:
- Setting Sleeves: You can pin a tailored sleeve into the armhole and check the fit, balance, and rotation from every single angle before you even think about sewing it in.
- Building Corsetry: For corsets or structured bodices, the mannequin is perfect for checking the placement of boning channels and making sure the garment provides the right support and creates the desired silhouette.
- Testing Theatrical Costumes: Costume designers use dress forms to check how a garment will move on stage and how it looks under the lights, ensuring it’s both beautiful and functional.
Ultimately, your adjustable mannequin is so much more than a stand-in body. It's a platform for innovation, precision, and pure artistry.
Essential Maintenance and Care for Your Mannequin
A good adjustable mannequin is a serious investment in your craft, and like any quality tool, it needs a little looking after. With the right care, it will be your trusted partner for years, giving you accurate and reliable results on every project. A simple maintenance routine is all it takes to protect its performance and longevity.
Think of it this way: a few minutes of care now and then prevents the little annoyances that can become big problems later, like a dial that won't turn or a stand that wobbles at a critical moment. Let's walk through how to keep your dress form in perfect working order.
Creating a Simple Cleaning Routine
It's only natural that your mannequin will pick up dust, loose threads, and chalk dust over time. Keeping the fabric cover clean isn't just about appearances; it stops that grime from transferring onto the beautiful fabrics you're working with.
-
Gentle Dusting and Vacuuming: The quickest way to keep the surface pristine is a quick once-over with a lint roller or the soft brush attachment of your vacuum cleaner. Making this a regular habit stops dust from working its way deep into the fabric.
-
Spot Cleaning: If you get a small mark on the cover, tackle it with a damp cloth and a drop of very mild soap. Just be sure to test it on a hidden spot first—like the underside—and never soak the fabric. Too much water could seep through and compromise the foam body underneath.
A quick word of warning: stay away from harsh chemical cleaners or abrasive pads. Strong detergents can easily damage the fabric's fibres and the adhesive that bonds it to the form, causing it to weaken or peel away. When it comes to cleaning, gentle is always better.
Keeping the Mechanisms Smooth
The dials are the moving parts that make your mannequin so versatile, so they deserve a bit of attention. From time to time, just check that they all turn smoothly and that the fittings on the stand feel solid and secure.
This little bit of preventative maintenance makes sure every adjustment is as smooth as it was on day one. If a dial ever feels stiff, a tiny amount of a silicone-based lubricant can make a world of difference. Apply it carefully and directly to the mechanism itself, taking care not to get any on the fabric.
While you're at it, give the stand a quick inspection. Tighten any screws or bolts at the base and along the pole to get rid of any wobble that might have started. This ensures you always have a stable, secure foundation to work on.
Smart Storage for a Long Lifespan
Believe it or not, where you keep your adjustable mannequin for dressmaking when you're not using it is just as important as cleaning it. Proper storage is your best defence against the elements that can cause wear and tear.
Always pop a dust cover over your mannequin between projects. It’s the single most effective way to protect it from dust build-up and fading. If you can, find it a home away from a window, as direct sunlight will eventually discolour and weaken the fabric cover.
Finally, try not to leave very heavy garments on your dress form for extended periods. It’s built to be tough, but the constant strain from something like a heavily beaded wedding dress can put stress on the internal frame. By following these straightforward tips, you’ll keep your mannequin in top shape, ready to help bring your creative ideas to life for many years to come.
Your Top Questions About Dressmaking Mannequins, Answered
Getting the right answers upfront can make all the difference when you’re investing in a new piece of kit. Let’s tackle some of the most common questions sewers and designers have about adjustable mannequins, so you can start your next project with total confidence.
Can I Just Use a Regular Shop Mannequin for Dressmaking?
In short, not really. While a standard display mannequin is great for showing off a finished outfit, it just isn’t built for the hands-on work of making clothes. These forms are usually hard plastic or fibreglass with fixed, often unrealistic, proportions. The biggest problem? You can't stick pins in them, which is a deal-breaker for draping fabric, fitting patterns, and tweaking a design.
An adjustable dress form, on the other hand, is designed from the ground up for exactly these jobs, with a pinnable body and dials to match real-world measurements.
How Can I Be Sure a Mannequin is Genuinely Pinnable?
A truly pinnable mannequin will have a solid core, typically made of dense polystyrene or foam, wrapped in a tough fabric cover. This is what lets you push pins straight into the body from any angle, holding your fabric firmly in place while you work.
A word of warning: be wary of models simply described as "fabric-covered plastic." This often means there's just a thin layer of material glued over a hard, hollow shell. You won't be able to pin into it properly, which makes it pretty useless for serious dressmaking.
What's the Best Way to Pad Out a Mannequin for a Custom Fit?
The most effective approach is to use a specially designed padding kit or build up layers with polyester wadding. First, adjust the mannequin's dials to be slightly smaller than your own measurements. Then, start adding padding to the areas that need it most—like the bust, waist, hips, or tummy—until the form’s shape mirrors yours precisely.
A great pro tip is to create a custom-fitted cover that zips up over all the padding. This keeps everything secure and gives you a consistent "body double" for every project you work on.
Do Adjustable Mannequins Work for Plus-Size Figures?
Yes, absolutely. Many brands offer dedicated plus-size models that come with a much larger adjustment range for the bust, waist, and hip measurements. The key is to apply the same rule of thumb: make sure the person’s measurements sit comfortably within the mannequin's range, rather than pushing it to its absolute limit. This helps maintain a natural and well-proportioned silhouette.
The adjustable mannequin for dressmaking has become a cornerstone of the UK’s fashion industry—an industry that contributes billions to our economy and supports countless jobs. Its ability to adapt to a huge variety of body shapes is vital for creating clothes that truly fit. You can learn more about the UK fashion industry's economic impact and see just how important this is.
At Display Guru, we stock a complete range of professional-grade adjustable mannequins for everyone from passionate home sewers to established fashion designers. Take a look at our collection and find the perfect creative partner for your work at https://www.displayguru.co.uk.