


A Practical Guide to Sewing for Dummy Forms
Moving from flat paper patterns to a three-dimensional form is a real turning point for any dressmaker. It’s the moment your craft truly comes to life, letting you see exactly how fabric will hang, check the fit, and perfect a silhouette in real-time. Think of it as the bridge between a 2D sketch and a beautifully finished garment.
Why a Dress Form Is Your Secret Weapon
It’s easy to think a dress form is some advanced piece of kit only for couture designers, but honestly, it’s one of the most practical investments you can make right from the start. Your dummy becomes your personal fitting model, and it’s available 24/7. It gives you the freedom to step back and really look at your work from every angle—something that's just impossible when you're trying to fit a garment on yourself.
This is where you gain proper control over your projects. You can pin, tuck, and drape with both hands free, getting a clear picture of how a design will actually look before you’ve committed to a single stitch.
Achieve a Truly Professional Fit
The biggest advantage of working with a dress form is getting that bespoke fit that flat patterns just can't promise on their own. By padding out the form to match your specific measurements, you're essentially creating a body double that mimics your own unique posture and curves. This simple step highlights any potential fitting problems right away, saving you hours of frustrating alterations down the line.
A well-padded dummy helps you see things clearly:
- Fabric Drape: You’ll understand how different materials, say a slinky jersey versus a stiff linen, will actually hang and shape around a body.
- Silhouette and Proportion: It becomes so much easier to tell if your design elements are balanced and flattering from all sides.
- Fit Accuracy: You can instantly spot where a garment might pull, bunch, or sag.
Embracing the DIY Fashion Trend
There's no denying the resurgence of home sewing. This renewed passion is making waves in the market, with projections showing the UK sewing machine market set to grow at a CAGR of 2.6% from 2025 to 2030. This growth is all about the boom in DIY fashion and people wanting reliable equipment to bring their ideas to life. A dress form is a massive part of that modern toolkit.
A dress form transforms garment making from a flat, geometric exercise into an intuitive, three-dimensional art form. It's not just about accuracy; it's about connecting with your creation on a deeper level.
Of course, choosing the right form is the crucial first step. If you're ready to find the perfect partner for your sewing projects, have a look at our detailed guide on how to buy a dress form you'll actually use.
How to Choose the Right Sewing Dummy
Picking the right sewing dummy is probably the most important first step you'll take towards creating clothes that truly fit. Think of it as your silent partner, a perfect stand-in for your body that lets you drape, fit, and tweak patterns with precision. While there are a lot of options out there, they mostly boil down to two main types: adjustable dress forms and professional solid forms.
An adjustable form is what you'll often find in a home sewing room. They come with dials that let you expand or shrink the bust, waist, and hip measurements. This is brilliant if you're sewing for different people, or even if your own measurements tend to change. The only snag is that the gaps between the panels can sometimes make draping a little fiddly.
Professional forms, on the other hand, are the industry workhorses. They’re solid, usually made from fibreglass or a dense foam covered in linen, and come in standard dress sizes. Their durability is unmatched, and they provide a perfectly firm, smooth surface for intricate draping and pinning. The trade-off? They're fixed in size, representing just one set of measurements.
Getting Your Measurements Right
Before you even think about buying, you absolutely must have a set of accurate body measurements. This is non-negotiable. Get a flexible tape measure and carefully record your bust, waist, and hip circumferences. I'd also recommend noting your back-waist length – it’s a crucial vertical measurement that makes all the difference in achieving a great fit.
When you're looking at different dummies, getting the sizing right is everything. Make sure you select the best form by mastering international size chart conversion to align with your own measurements. This will help you translate your unique shape into the standardised sizing that manufacturers use, saving you from a costly mistake.
Here’s a golden rule that I can't stress enough: always buy a dummy that is slightly smaller than your actual measurements.
You can always add padding to a dress form to build it up to your exact shape, but you can never make a form smaller. This is probably the single most important piece of advice you’ll get when investing in a dummy.
To help you navigate the choices, here's a quick look at the most common types of sewing dummies you'll find in the UK.
Comparison of Common Sewing Dummy Types
| Dummy Type | Key Features | Best For | Average Price Range (GBP) | Pros & Cons |
|---|---|---|---|---|
| Adjustable | Dials to change bust, waist, hip measurements. Often lightweight plastic body. | Home sewers making clothes for multiple body types or their own changing shape. | £100 - £250 |
Pros: Versatile, cost-effective. Cons: Gaps can snag fabric, less durable. |
| Professional (Foam) | Solid foam body covered in linen/cotton. Pinnable surface. Standard sizing. | Students, designers, and serious hobbyists needing a durable, pinnable surface. | £150 - £400 |
Pros: Fully pinnable, very durable, smooth surface. Cons: Fixed size, requires padding for a custom fit. |
| Bifurcated (Legs) | Includes legs, allowing for fitting trousers, shorts, and swimwear. | Designers and pattern makers specialising in trousers, lingerie, or activewear. | £250 - £600+ |
Pros: Essential for fitting bottoms, very realistic shape. Cons: More expensive, bulkier. |
| Fibreglass | Hard, fibreglass shell. Often used for display but can be padded for professional use. | High-end fashion design, bespoke tailoring, and long-term professional use. | £300 - £800+ |
Pros: Extremely long-lasting, holds shape perfectly. Cons: Not directly pinnable, requires a separate cover. |
This table should give you a solid starting point, but remember to think about the kinds of projects you'll be tackling most often.
Key Features and Materials to Consider
Beyond the basic type, the little details can make a huge difference in how useful your dummy is. The material, for instance, is a big one. A foam-backed linen or cotton cover is fantastic because you can stick pins straight into it, making it easy to secure your fabric. Some professional forms are made from super-durable fibreglass that will last a lifetime, but you'll likely need a separate padded cover to make them pinnable.
The image below gives a little insight into the kind of hand-stitching you might use when making custom padding or covers for your form.
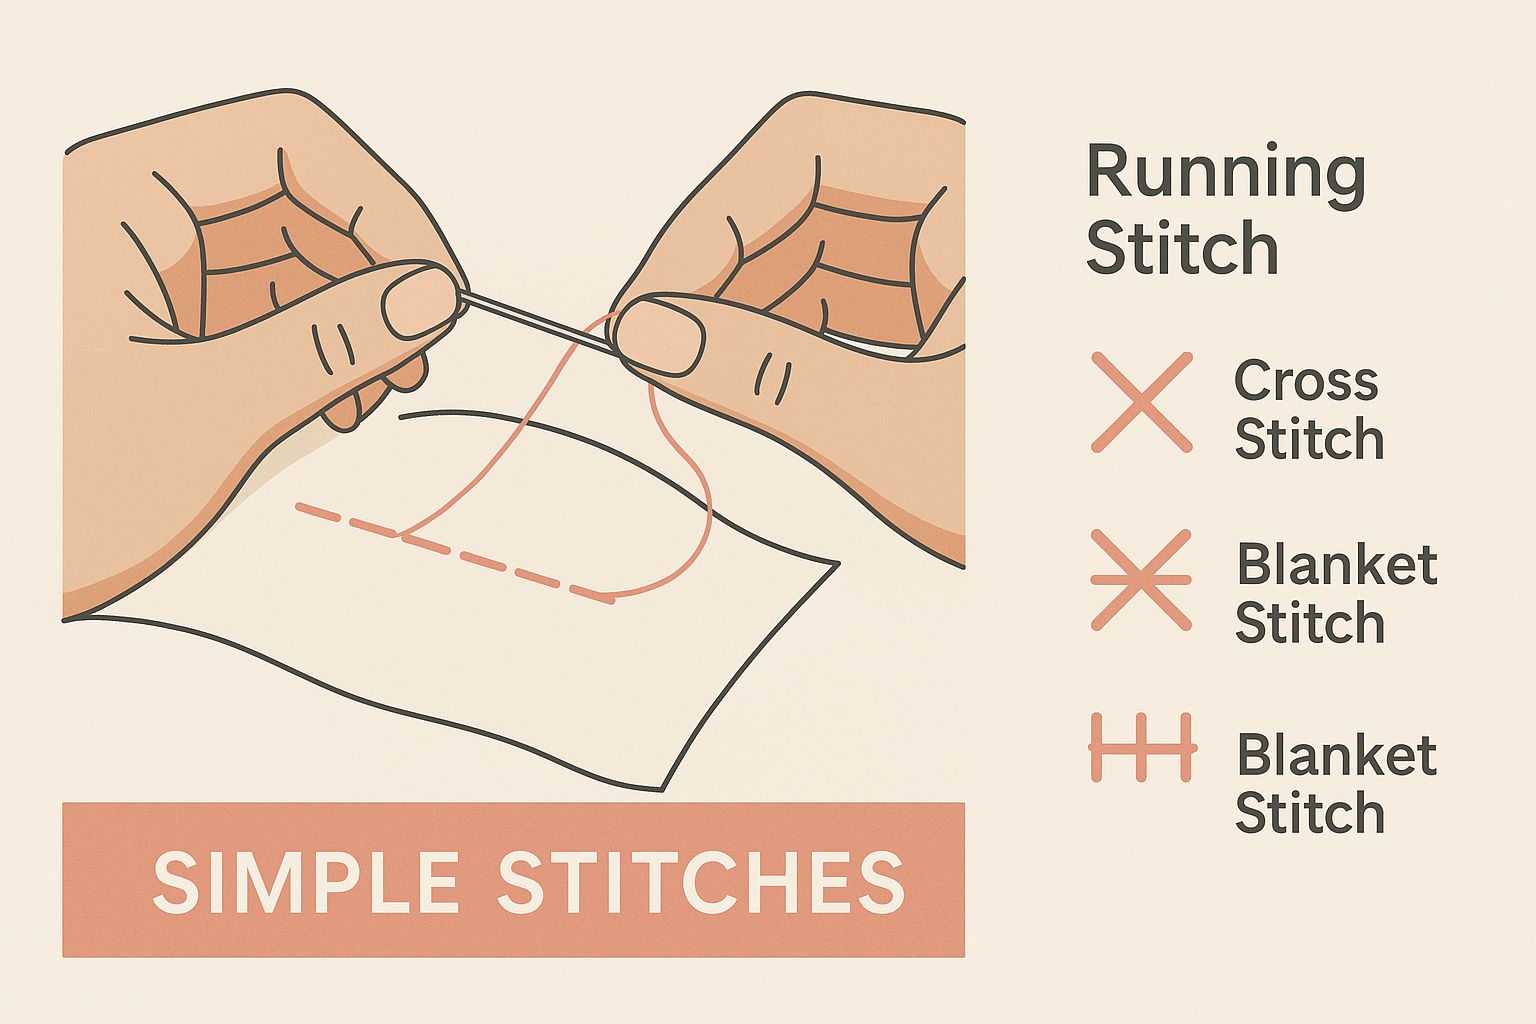
These fundamental skills are just as useful for prepping your tools as they are for finishing a beautiful garment.
Also, keep an eye out for features that will make your life easier based on what you plan to sew.
- Collapsible Shoulders: An absolute game-changer if you’re working with tailored jackets, fitted blouses, or bridalwear. This feature lets the shoulder area compress, so you can slip tight garments on and off the form without straining the seams.
- A Sturdy Stand: Nothing is more frustrating than a wobbly dummy. A heavy base, whether it’s a tripod or a solid round one, is essential for stability.
- Height Adjustment: Make sure the stand can be adjusted to match your own height. It's a small thing, but it's crucial for getting your hems perfectly level.
If you’re leaning towards an adjustable model, our guide on adjustable dress forms for sewing takes a much deeper look at their specific benefits and drawbacks. Spending a little extra time on your choice now will ensure your sewing dummy becomes a trusted and indispensable part of your creative process.
Turning Your Dress Form into Your Body Double
A dress form straight out of the box is a great starting point, but it’s never going to be a perfect replica of a real person. The real breakthrough comes when you customise it. By padding your form to match your own unique measurements, curves, and even your posture, you’re no longer working with a generic tool. You’re creating a true body double.
This is the secret to getting a genuinely bespoke fit. It lets you spot and solve fitting problems long before you touch your scissors to your good fabric. It’s an absolutely essential step that takes your sewing from looking homemade to professionally tailored. Forget twisting and turning to pin a garment on yourself in the mirror; your padded form is your patient, accurate stand-in.
What to Use for Padding
First things first, let's gather your supplies. You don't need anything fancy, and chances are you’ve got some of this in your sewing room already. The aim is to build up shape gradually with materials that have some substance but are also easy to mould.
Here are a few of the most reliable options:
- Polyester Batting or Wadding: This is the go-to for most people. It comes in sheets, so you can easily cut and layer it to build up specific areas like the bust, hips, or tummy.
- Shoulder Pads: Never underestimate old shoulder pads! Their pre-formed curves are perfect for sculpting the bust and hips, not just for building up the shoulders.
- Pre-made Pad Sets: If you want a more streamlined approach, you can buy kits with contoured foam pads for all the key areas—bust, waist, hips, and thighs. They’re designed to be pinned or stuck directly onto the form.
If you’re still exploring which type of dummy is right for you, our guide to the best adjustable dressmaking dummies is a great resource to check out.
The Art of Building Up the Shape
With your materials at the ready, it's time to start padding. This part is an exercise in careful observation and patience. I find it helps to put a close-fitting top or an old, sacrificial bra on the form first. This gives you a great base to hold the padding securely and creates a smooth surface to work over.
Start with the larger areas—bust, waist, and hips—adding layers of batting and pinning them firmly in place. Keep your tape measure handy and constantly check the form’s measurements against your own. But don't just focus on the circumference! Think about your unique shape. Got a bit of a swayback? Add a small, targeted pad to the lower back. Are your shoulders a little rounded? Build them forward with small pieces of wadding.
The real trick is to build the shape slowly. It's far easier to add another thin layer of padding than to take off a big chunk and have to start again. You're aiming for a likeness, not a caricature.
Once the overall shape feels right, it’s time to mark your key reference points with twill tape. Pin horizontal lines for your bust, waist, and hip lines. Then, add vertical lines for the centre front and centre back. These guides are absolutely invaluable for draping and pattern making, as they ensure everything you create is balanced and true.
This kind of precision is what the pros do every day. The industrial sewing market in Europe, which includes the UK, was valued at around USD 670.86 million in 2024. That market is built on industries that rely on absolute accuracy, using tools calibrated to perfection. You can read more about the growth of the industrial sewing machine market on straitsresearch.com. Bringing that same meticulous approach to padding your dress form will give your own sewing studio a truly professional edge.
Mastering the Art of Draping Fabric
Draping is that magical moment when your design jumps off the page and into the real world. It’s a hands-on, intuitive process where you shape fabric directly onto your padded dress form, watching your ideas come to life right before your eyes.
This is where you stop simply planning and start a conversation with the material. You’ll feel its weight, see how it falls, and let its unique character guide your hands. Rather than being confined to the strict lines of a flat pattern, you get to physically sculpt darts, gather fabric into soft folds, and press pleats into place. It’s a technique that opens up a world of creative freedom, and it's far more accessible than you might think.
Preparing Your Muslin for Draping
Before you even think about pinning, you need to get your fabric ready. We always start with muslin, a simple and affordable plain-weave cotton. It’s the perfect practice material because it mimics the behaviour of more expensive fabrics without the high-stakes pressure, and it’s a dream to mark up.
First, grab a piece of muslin much larger than the section you're working on. For a bodice front, for example, you'll want enough to cover from the shoulder down to the hip with plenty to spare. Don’t cut it—tear it. Tearing the fabric ensures you're working perfectly on the grain, which is absolutely crucial.
Next, give it a good press to get rid of every single wrinkle; even tiny creases can throw off the fit. Finally, take a pencil and a ruler and draw your grainlines—one lengthwise (parallel to the selvedge) and one crosswise. Think of these lines as your road map; they’ll keep your design perfectly balanced.
The grainline is the single most important guide in draping. Keeping it perfectly vertical or horizontal on the dress form ensures the final garment will hang correctly without twisting or pulling.
Core Draping Techniques
With your prepped muslin in hand, it's time to approach the dress form. This part is a delicate dance between you, the fabric, and the form. Begin by anchoring the centre grainline of your muslin to the centre front of the dummy, placing pins at key points like the bust and waist to hold it steady.
From that central anchor, you’ll gently smooth the fabric outwards over the form’s curves. The fabric will show you where it needs to be shaped. You'll rely on a few fundamental techniques to make this happen:
- Pinning and Smoothing: Your hands are your best tools here. Guide the fabric smoothly over the body, pinning as you go to secure it. The aim is to achieve a snug fit that follows the form's contours without any pulling or tension.
- Creating Darts: As you smooth the fabric over a curve like the bust or waist, you'll notice some excess material bunching up. Pinch this excess into a neat fold—this is the beginning of your dart, the key to creating shape.
- Forming Gathers and Pleats: For a design with more volume, you can gently guide the fabric into soft gathers. If you're after a more structured look, you can fold the excess material into sharp, crisp pleats.
Let's say you're draping a simple boat-neck bodice. You'd start by smoothing the muslin up over the bust and towards the shoulder, pinning along the neckline shape you have in mind. The extra fabric that inevitably appears under the arm and at the side seam gets pinned out into darts to create that beautiful, close fit.
Getting comfortable with these foundational skills will make the whole draping process feel less intimidating and much more creative. If you're looking to build your confidence, exploring a range of sewing techniques can provide an excellent base of knowledge to draw from.
From Draped Fabric to a Reusable Pattern
Your beautifully draped muslin now holds the key to your design, but it’s still just fabric pinned to a form. The next essential step is to translate that three-dimensional shape into a functional, two-dimensional paper pattern you can use again and again. This is where precision and careful marking come into play.
With the muslin still secured to your sewing dummy, grab a sharp fabric pen or chalk pencil. You need to carefully mark all of your style lines—think seams, darts, pleats, and the neckline. You want fine, clear lines that will be easy to follow later on.
This is your last chance to check proportions and make any small adjustments before committing the design to paper. Once you're happy with the lines, it’s a good idea to add notches. These are small marks that will be invaluable for aligning the pattern pieces perfectly when you start sewing the final garment.
From the Form to the Table
Once every line is marked, you can carefully unpin the muslin from the dummy and lay it flat on your work surface. Don't be surprised if some of your freehand lines look a bit wobbly. This is completely normal and exactly why pattern-making rulers, like a French curve or a hip curve, are a designer's best friends.
Use these tools to "true" your lines, which is simply the process of smoothing them out into clean, professional curves and straight edges. This is also the time to add your seam allowances. A standard 1.5 cm (5/8 inch) is typical for most seams, but you can adjust this based on the fabric or your own preference.
Remember to double-check every measurement at this stage. Ensuring your pattern pieces are accurate now prevents frustrating fitting issues when you sew the final garment. A few extra minutes here can save hours of unpicking stitches later.
The skill of turning a 3D shape into a flat pattern is fundamental to design. After mastering draping, many creatives deepen their understanding by exploring techniques for designing various geometric patterns.
Adding the Final Details
With your pattern pieces trued and seam allowances added, it's time for the final touches that make a pattern truly usable. You need to clearly label each piece—for example, "Bodice Front," "Sleeve," or "Skirt Back"—and note how many of each piece you need to cut from your fabric.
Most importantly, you must mark the grainline on every single piece. This is a straight line with arrows at each end that shows you how to align the pattern with the fabric's grain. This simple step is vital for ensuring your finished garment hangs correctly and doesn't twist out of shape. Our detailed article explains more about why this is so important when you learn how to read sewing patterns.
This level of detailed work is what separates hobby sewing from professional garment creation. The UK garment manufacturing sector is seeing a significant rise in activity, with small enterprises experiencing a 128% surge in sales in Q3 2024. This growth underscores the demand for precise sewing skills to meet production needs. You can learn more about this trend by reading about the UK garment supply chain on just-style.com. By mastering pattern creation, you're building a foundational skill for any sewing project.
Answering Your Sewing Dummy Questions
Even after you've got your dress form set up and ready to go, you'll probably have a few questions as you start draping. That's perfectly normal – think of it as part of the creative process. I've gathered some of the most common queries I hear from fellow sewers to help you get the most out of your new best friend.
Getting to grips with these little details is what takes your work from good to great. Whether you're wrangling a tricky knit fabric or just trying to figure out the difference between a dress form and a mannequin, a bit of extra insight makes all the difference.
Can I Use a Dress Form for Stretch Fabrics?
Yes, you absolutely can, but you have to change your approach. When you're working with something like a cotton jersey, you can't just pull it tight across the form. If you do, your finished garment will be far too small and constricting.
The key is to drape the fabric with gentle, even tension. You want it to skim the form in a way that honours its natural negative ease – that slight stretch it needs to fit the body comfortably. Honestly, for this reason, I often find it's better to use a dummy to check the fit of a pattern already sewn in knit fabric, rather than trying to drape a new design from scratch.
A non-negotiable tip for knits: use ballpoint pins. Their rounded tips glide between the fabric's fibres instead of piercing and tearing them. Standard sharp pins can leave you with tiny, permanent holes and snags.
What’s the Difference Between a Dress Form and a Mannequin?
It's easy to get these two mixed up, but they're built for completely different jobs. Think of them as two distinct tools in the fashion world.
A dress form (or sewing dummy) is a technical piece of kit for the person making the clothes.
- It has a pinnable surface, usually foam covered in linen or cotton, which is essential for draping.
- It’s built to specific, often adjustable, measurements to create a precise fit.
- It's all about function, not looks.
A mannequin, on the other hand, is a display tool for the person selling the clothes.
- They're typically made from hard, non-pinnable materials like fibreglass or plastic.
- Their proportions are often unrealistic and stylised to make clothing hang in an appealing way.
- Their entire purpose is visual presentation, not construction.
My Measurements Fall Between Two Sizes. Which One Should I Buy?
This is probably the single most important question you'll ask when buying a dress form, and the answer is a hard and fast rule: always choose the smaller size. This one piece of advice will save you a mountain of frustration.
Why? Because you can easily add padding to build up a dress form to your exact dimensions, but you can never, ever make one smaller. Buying the slightly smaller form gives you the freedom to pad it out to perfectly mirror your own unique curves and posture, turning it into a true body double.
If you buy a form that’s even a fraction too big in a critical area like the bust or shoulders, you'll be fighting a losing battle to get an accurate fit on anything you make. Always start smaller and build up.
At Display Guru, we know that having the right tools is the cornerstone of bringing your creative vision to life. Take a look at our extensive collection of professional and adjustable dress forms to find the perfect foundation for your sewing projects. Visit us at https://www.displayguru.co.uk to get started.