


A Clear Advantage Your Guide to the Acrylic Display Shelf
An acrylic display shelf is like a crystal-clear stage, designed to make your products the undisputed star of the show. It’s far more than just a piece of plastic; think of it as combining the refined elegance of glass with the resilience of modern materials. The result is a clean, contemporary, and incredibly versatile way to showcase anything from high-end retail goods to treasured personal collections.
Why Choose an Acrylic Display Shelf
When you’re thinking about display solutions, it's easy to default to traditional wood or glass. But acrylic shelving brings a unique set of advantages to the table, making it a smarter choice for many modern retail and home environments. It offers an almost invisible support system, guaranteeing that all eyes are on what you’re displaying, not the fixture itself.
So, what is it exactly? Acrylic is a type of plastic, technically known as Polymethyl Methacrylate (PMMA). You can think of it as a highly engineered, sophisticated cousin to the everyday plastic you know. It’s specifically designed for exceptional optical clarity, allowing up to 92% of visible light to pass right through it—that's even more than most glass. This is precisely what gives acrylic shelves that brilliant, water-clear appearance.
Unbeatable Clarity and Aesthetics
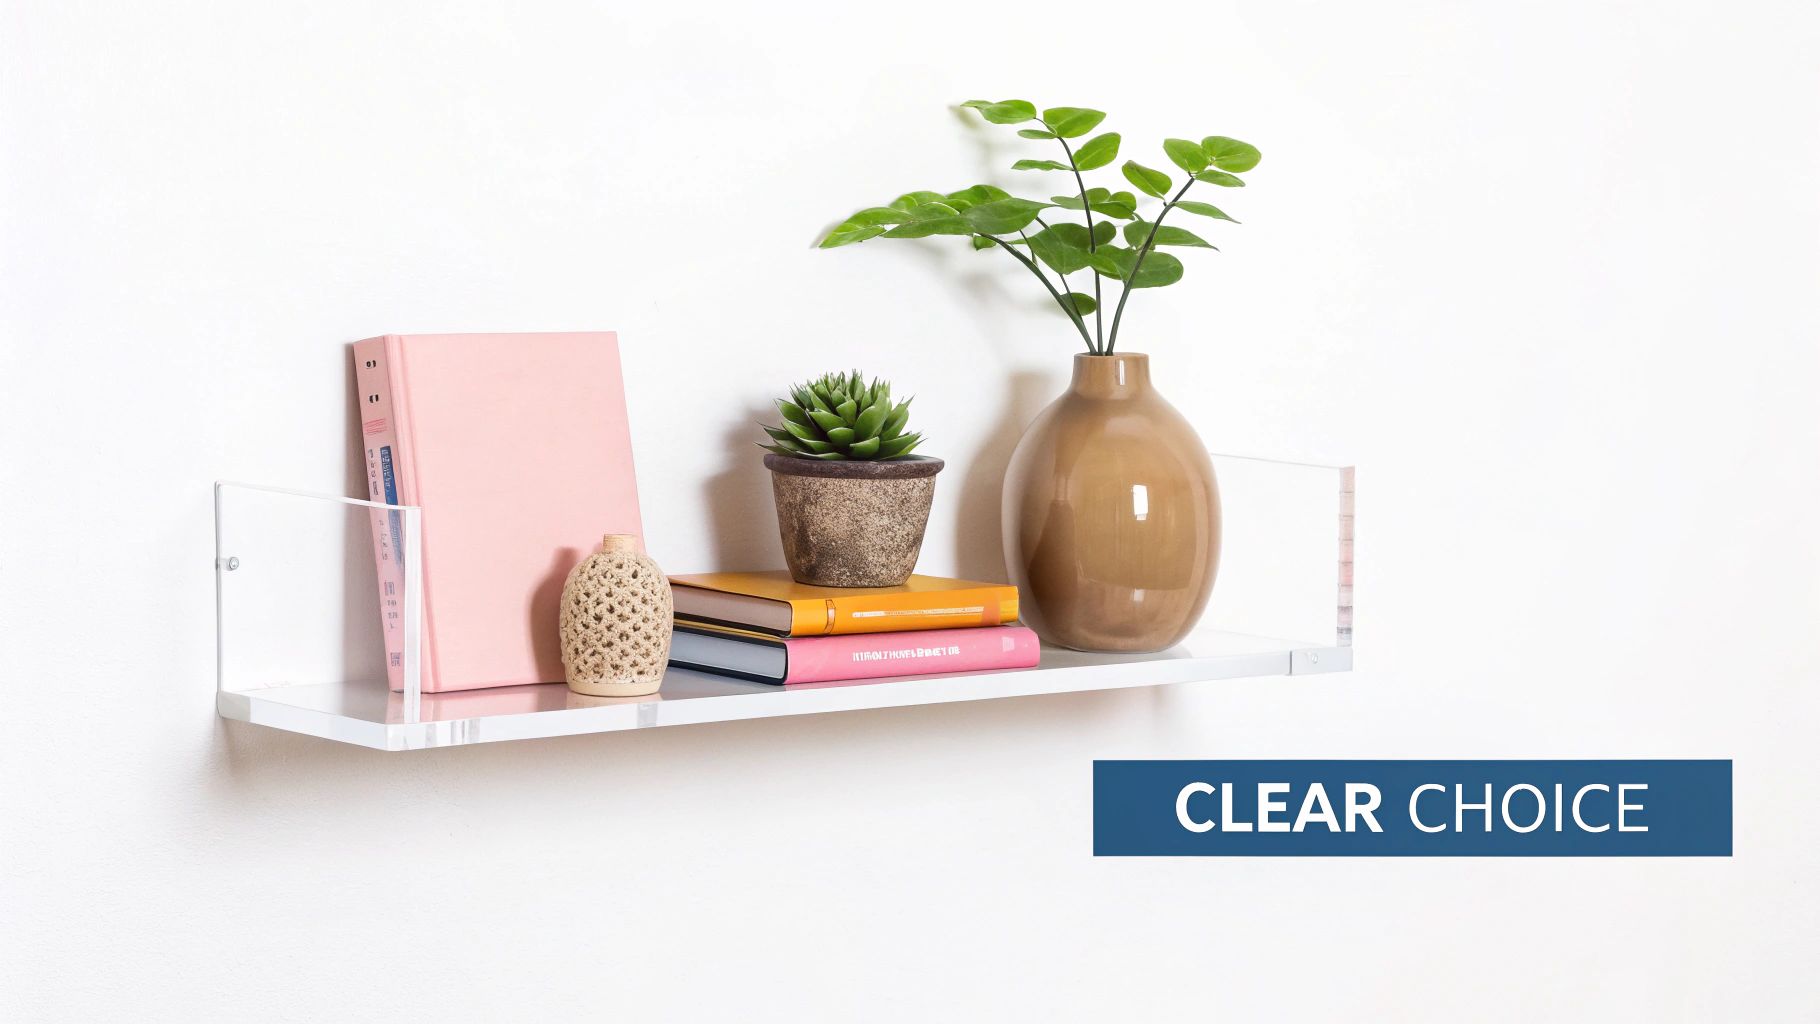
The biggest draw for an acrylic display shelf is its clean, minimalist look. Unlike bulky wooden shelves that can crowd a space or glass which often has a noticeable green tint at the edges, high-quality acrylic is completely transparent. This creates a stunning "floating" effect that makes any room feel bigger and brighter.
It’s a perfect fit for:
- Small retail boutiques where every inch of perceived space matters.
- Modern homes that celebrate clean lines and an uncluttered aesthetic.
- Museums or galleries where artefacts must be presented without any visual interference.
This see-through quality ensures your products or collectibles are the main event, presented professionally without distraction. Because it blends seamlessly into any décor, it’s just as effective in a vibrant, colourful shop as it is in a calm, minimalist living room.
Surprising Strength and Safety
Don’t let its delicate, airy appearance fool you—acrylic is incredibly tough. It's far more impact-resistant than glass of the same thickness, which makes it a much safer option all around. On the rare occasion it breaks from extreme force, it fractures into large, dull-edged pieces instead of shattering into a thousand dangerous shards.
This unique blend of lightness and strength is where acrylic truly shines. A typical acrylic shelf weighs about half as much as a glass one, making it much easier to ship, handle, and install securely on various wall types, even plasterboard.
This durability is a huge plus for both businesses and homes. Retailers can feel confident in the sturdiness of their displays, while parents get peace of mind using them in children’s rooms. For a more detailed comparison, our article on choosing a display cabinet with glass offers some great insights. Ultimately, with acrylic, you get all the aesthetic grace without sacrificing practical resilience.
Finding the Perfect Acrylic Shelf for Your Space
Choosing the right acrylic display shelf goes far beyond just what looks good. It’s really about finding the perfect match between the shelf's design and what you need it to do. You’ll find everything from sleek, minimalist floating shelves to practical, hard-working retail systems. Getting to know the key differences is the first step to making the right choice, whether you're showing off delicate collectibles at home or arranging merchandise in your shop.
The most popular style, and for good reason, is the wall-mounted acrylic display shelf. You’ll often hear these called "floating" shelves because their fixings are completely hidden, giving them an incredibly clean, modern look. It’s a minimalist approach that makes whatever you place on them the real hero, which is why they’re a favourite for art, home décor, and high-end retail displays.
Of course, in a bustling commercial space, other designs often make more sense. A multi-tiered countertop display, for instance, is brilliant for organising smaller items like cosmetics, jewellery, or sweets right at the till. For retailers who need flexibility, slatwall acrylic shelves are a game-changer, letting you switch up your layout in minutes to accommodate new stock or seasonal promotions.
Decoding the Specifications
Once you’ve got a style in mind, it’s time to look at the nitty-gritty details. The two most critical things to get right are the acrylic thickness and the weight capacity—and they're completely intertwined. Get this wrong, and you risk the shelf bowing, looking unstable, or worse, failing completely.
Acrylic sheets for shelving typically range from 3mm to 10mm, though you can find thicker options. A 3mm shelf is fine for very light, small items like a single photo frame or a few miniatures. For anything with a bit more heft—like books, small potted plants, or a collection of products—you’ll want to look at something in the 5mm to 8mm range. This thickness provides a much better balance of strength without looking too bulky. For serious, heavy-duty applications, 10mm or more is the professional go-to.
To help you visualise this, here’s a quick guide matching thickness to common uses.
Acrylic Shelf Thickness and Common Applications
| Thickness (mm) | Typical Weight Capacity | Best For | Common Use Cases |
|---|---|---|---|
| 3mm | Up to 1 kg | Feather-light decorative items | Single small photo frames, nail polish bottles, miniature figures, single greetings cards |
| 5mm | 2-4 kg | Small to medium-sized items | Small books, cosmetics, spice jars, collectibles, small framed art |
| 8mm | 4-8 kg | Heavier or multiple items | Stacks of paperbacks, small potted plants, retail product displays, bathroom toiletries |
| 10mm+ | 8 kg+ | Heavy-duty or high-traffic areas | Hardback books, boutique shoe displays, electronics, awards and trophies |
Remember that these are general guidelines, and the mounting system is just as important as the shelf itself!
Understanding weight capacity isn't just about preventing a collapse. It’s about keeping that pristine, dead-level look over time. An overloaded shelf will start to sag in the middle, ruining the clean, crisp lines that make acrylic so appealing in the first place.
And that brings us to the mounting system. While a thicker shelf can hold more weight, it’s only as strong as its connection to the wall. For heavier loads, fixing the shelf directly into solid wall studs is always going to be far more secure than relying on plasterboard anchors alone. For more ideas on sturdy installations for heavier items, our guide on wall-mounted hanging rails has some great professional tips.
Choosing Your Finish
The final piece of the puzzle is the finish. This is your chance to make sure the shelf perfectly complements your space and the items it will hold. Classic clear acrylic is the go-to for that "barely there" look, but other finishes can create a completely different mood.
- Clear: This is the standard choice for good reason. It offers maximum transparency, letting light flood through and making any space feel bigger and brighter.
- Frosted: With its matte, sandblasted-like appearance, this finish diffuses light beautifully. It gives you a touch of privacy and cuts down on glare, making it a great option for bathroom storage or for creating a softer, more ethereal display.
- Coloured: Available in a massive spectrum of shades, coloured acrylic can be a powerful tool. Use it to match your brand colours in a shop or add a fun pop of colour to a kid's room. Opaque black or white shelves create a bold, dramatic backdrop that makes products really stand out.
As our homes get smaller, clever storage has become a necessity. It’s no surprise that in the UK’s decorative shelves market, wall-mounted acrylic shelves now command a 31.6% share, thanks to how light and customisable they are. This trend is especially noticeable in cities like London, where smaller flat sizes have fuelled a 20% yearly growth in installations of these space-saving displays. You can dive deeper into the market trends and analysis if you're interested.
By taking the time to think through the style, thickness, and finish, you can find an acrylic shelf that not only looks fantastic but also performs perfectly for years to come.
Your Step-by-Step Installation Guide
Getting your new acrylic display shelf installed correctly is what creates that polished, professional finish. When it's done right, a secure and perfectly level shelf enhances the ‘floating’ effect that makes this style so appealing. It might seem a bit intimidating, but with the right tools and a little patience, it's a very straightforward job.
This guide will walk you through the essential steps for a flawless installation, from the initial prep work to the final checks. Let’s make sure your new display is both stunning and completely secure. After all, a great installation starts long before you even pick up a drill.
First things first: choose the perfect spot. You need to think about both the look and the practicalities. Where will the shelf have the biggest visual impact? Just as important, what kind of wall are you working with? A solid brick wall needs different fixings than plasterboard does.
To help you out before you even get to the installation stage, this decision tree can guide you in picking the ideal shelf for your space.
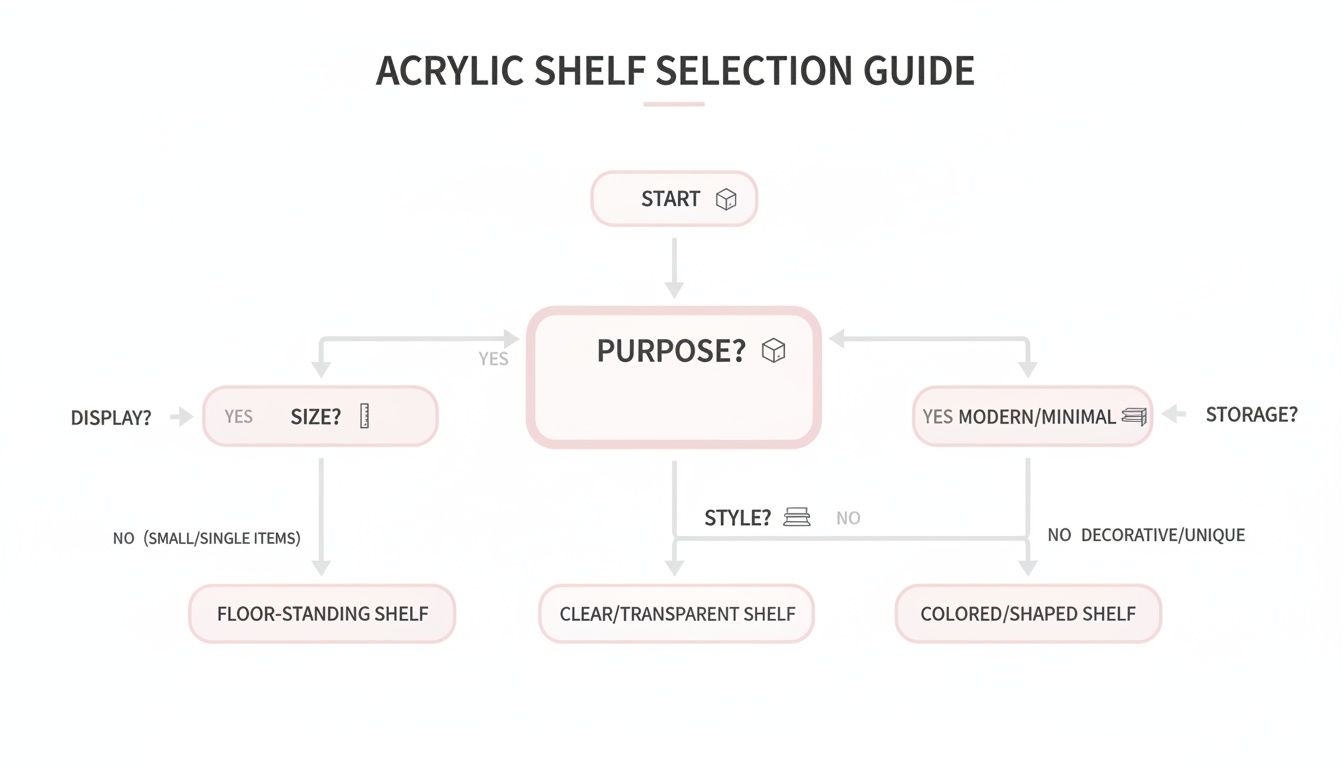
As the flowchart shows, figuring out your purpose, measuring the space, and choosing a style are the foundations for a successful display.
Gathering Your Essential Tools
Before you start, get all your equipment together in one place. Being organised makes the whole process run much more smoothly. You don't need a massive toolbox, just a few key items.
Here’s your basic toolkit for most installations:
- Spirit Level: This is non-negotiable. A wonky shelf is the quickest way to spoil the clean, modern look.
- Tape Measure: Accuracy is everything here. The old saying ‘measure twice, drill once’ really applies.
- Pencil: For marking your drilling points clearly on the wall.
- Drill: A good combi drill will handle most wall types without any trouble.
- Appropriate Drill Bit: Make sure you use a masonry bit for brick walls and a standard bit for plasterboard or wood.
- Wall Plugs and Screws: Always match your fixings to your wall type to guarantee a secure hold.
Mounting Your Acrylic Shelf Step by Step
The two most common ways to mount these shelves are with stand-off fixings or concealed floating brackets. While the general idea is the same, the actual process has a few differences. Here, we'll focus on the ever-popular floating bracket method.
-
Mark Your First Hole: Start by deciding on the shelf's height. Hold one of the mounting brackets against the wall at your chosen height, and use the spirit level to make sure it's perfectly vertical. Mark the drill hole through the bracket with your pencil.
-
Drill and Secure the First Bracket: Drill the hole where you made your mark. Gently tap the wall plug in so it sits flush with the wall surface. Now, screw the first bracket firmly into place.
-
Position the Second Bracket: Slide your acrylic shelf onto the bracket you've just fitted. Next, place your spirit level on top of the shelf. Adjust the loose end of the shelf up or down until the bubble in the level is dead centre.
-
Mark and Secure the Second Bracket: While holding the shelf perfectly level, position the second bracket underneath and mark where it needs to go. Take the shelf off, drill your second hole, and fix the final bracket securely to the wall.
-
Final Installation: All that's left is to carefully slide your acrylic shelf onto both brackets. Give it a gentle but firm press to ensure it’s pushed all the way back and is stable. That’s it—you're done!
For a really robust setup, especially in a retail shop or busy studio, finding the wall studs is a game-changer. Fixing directly into a stud gives you far more strength than relying on plasterboard fixings alone. A simple stud finder is a small investment that can save you a lot of hassle.
This method gives you a display that’s not only level but also incredibly secure. For particularly heavy items or demanding commercial displays, it might be worth getting some professional advice.
And if you’re looking for other solid wall-mounted solutions, our guide on how to install a wall-mounted hanging rail has some great complementary tips for getting a secure fit. By taking your time and following these steps, you can install your acrylic shelf with complete confidence.
Styling Your Shelf for Maximum Impact

You’ve got your acrylic shelf installed and ready to go. Think of it as a perfect blank canvas. Now for the fun part: turning that empty space into a compelling visual story that captures attention, whether you’re merchandising products or displaying your favourite collection.
Styling is where the real magic happens. It’s what transforms a simple storage solution into a powerful focal point. Because acrylic is transparent, your styling choices carry even more weight—items almost seem to float, so every placement needs to be deliberate and thoughtful.
Create a Clear Focal Point
Every great display needs a hero piece. This is the item your eye is naturally drawn to first, and it anchors the whole arrangement. Without a clear focal point, a shelf can look cluttered and confusing, leaving people unsure of where to even start looking.
For retailers, your hero should be your star product—the newest arrival or the most premium item. Place it centrally, or just slightly off-centre, to create a little visual tension. This single piece sets the stage for everything else on the shelf.
At home, your focal point might be your most prized possession. It could be the rarest figure in your collection, your most intricate model, or an object with sentimental value. Giving it pride of place immediately tells anyone who sees it that this item is special.
Apply the Rule of Thirds
The rule of thirds is a classic principle from art and photography that works wonders for shelf styling. Just imagine your shelf is divided into a 3x3 grid, like a noughts-and-crosses board. The goal is to place your key items along these imaginary lines or where they intersect.
This simple technique creates a far more dynamic and natural-looking balance than a perfectly symmetrical layout. Instead of plonking your main item dead in the centre, try positioning it one-third of the way in from the left or right. It’s a subtle shift that makes the entire display feel more considered and professionally curated.
A well-styled shelf doesn't just display items; it guides the viewer's eye. By using principles like the rule of thirds, you create a visual journey, making the display more engaging and memorable for customers and guests alike.
Group Items for Visual Storytelling
Grouping related items together is a simple yet incredibly effective technique. It helps you tell a story and creates a real sense of cohesion. Instead of scattering things randomly, think about arranging them in small, thoughtful clusters.
A great rule of thumb is to group items in odd numbers, usually threes or fives. For some reason, this is just more appealing to the human eye and feels less static than even-numbered pairs. For example:
- Retail: Display three complementary cosmetic products together—a lipstick, a matching liner, and a gloss.
- Home: Arrange a trio of small succulents, each with a different height and shape.
- Design Studio: Group three spools of thread from a similar colour palette.
This approach creates little vignettes on your shelf, making the whole composition feel much more intentional. For a deeper dive, our guide on visual merchandising guidelines offers even more strategies for creating impactful product stories.
Play with Height and Negative Space
One of the most common styling mistakes is lining everything up at the same height. This creates a flat, boring line that does nothing to capture interest. To add a bit of rhythm to your display, be sure to vary the heights of your objects. Place taller items towards the back and shorter ones in front to build a sense of depth.
Just as important is the idea of negative space—the empty areas around your objects. Don't feel you have to cram something into every single inch of the shelf. Leaving some space gives your items room to breathe and makes the entire display feel more luxurious and less cluttered.
This is especially true with acrylic, where the clear material enhances that feeling of lightness and airiness. To really get this right, it’s worth looking at the principles for modern front-of-house retail displays to see how the pros maximise impact.
The demand for clean, minimalist storage is definitely on the rise. In the UK, the market for acrylic boxes and shelves is expected to grow at a CAGR of 4.5% through 2035, thanks to trends in home organisation and luxury gifting. After the pandemic, spending on home organisation jumped by 25% in 2022. And while physical shops still lead globally, UK e-commerce platforms have already snapped up over 40% of the market for these products. By mastering these styling techniques, you can make sure your display truly stands out.
Keeping Your Acrylic Shelves Crystal Clear
One of the best things about an acrylic display shelf is its incredible, glass-like clarity. But keeping it that way means using the right care. It’s a common mistake to treat acrylic like glass, but because it's a softer material, it's far more vulnerable to scratches and chemical damage.
Grabbing a standard glass cleaner from under the sink is the fastest way to ruin your shelves. Most of these cleaners contain harsh chemicals like ammonia, which can react with the acrylic and leave a permanent cloudy haze. Likewise, abrasive cleaners or rough cloths will create a web of fine scratches, dulling that beautiful shine. Think of it like washing a new car with a scouring pad – you just wouldn't.
Simply put, the golden rule is to be gentle. Avoiding these common mistakes is the most important step in making sure your displays look as stunning as the day you installed them.
The Correct Cleaning Method
Thankfully, keeping acrylic looking brand new is actually quite simple. The best method involves nothing more than gentle materials that lift away dust and fingerprints without causing any harm. You don’t need a huge cleaning arsenal.
For routine cleaning, just follow this straightforward process:
- Dust First: Always start by gently dusting the surface with a dry, soft microfibre cloth or a feather duster. This gets rid of any loose grit that could scratch the acrylic when you start wiping.
- Mix Your Solution: A little bit of washing-up liquid mixed with warm water is all you need. If you prefer, a specialised cleaner made for plastics or acrylic will also work perfectly.
- Wipe Gently: Dampen a clean microfibre cloth with your soapy water, and be sure to wring it out well. Wipe the shelf using light, even strokes – never scrub.
- Dry and Buff: With a separate, dry microfibre cloth, gently buff the surface until it’s completely dry and free of streaks. This is what brings back that high-gloss finish.
The key takeaway is that less is more. Harsh chemicals and abrasive tools are the enemy of clear acrylic. A simple combination of mild soap, water, and a microfibre cloth is all you need to maintain that flawless, crystal-clear look.
Long-Term Maintenance and Scratch Removal
Even with the best care, minor surface scratches can appear over time, especially in a busy shop. For very light scuffs, a dedicated acrylic polish or scratch remover can work wonders. You just apply it with a soft cloth in a gentle, circular motion to buff out small imperfections and restore the surface.
For a more detailed guide, you can learn how to properly clean acrylic and get that perfect, flawless finish every time.
This gentle approach isn't just for shelves. It works for any clear display, from a full cabinet to a small riser. You can find more tips on looking after larger units in our guide on the benefits of a glass wall cabinet display. By getting into these simple habits, your acrylic displays will provide a stunning, invisible stage for your products for years to come.
Your Pre-Purchase Checklist: Getting It Right First Time
Choosing the right acrylic shelf isn’t just about picking one that looks good; it’s about making a smart investment that works perfectly for your space and your products. Before you click that 'buy' button, it pays to run through a few final checks.
Think of it as your last-minute quality control. A few minutes spent now can save you the headache of realising a shelf is too weak, too small, or just doesn't fit the vibe you were going for.
Your Essential Buying Questions
Let's walk through the key questions to ask yourself. Answering these honestly will make sure the shelf you choose is the perfect partner for your display, whether you're setting up a new retail corner or organising a personal collection.
-
What am I actually displaying? Be specific. A shelf designed for delicate jewellery has very different requirements from one holding heavy skincare bottles or a stack of hardback books. Your answer here is the single biggest clue to the thickness and strength you'll need.
-
Have I double-checked my measurements? Grab a tape measure and get the precise width, depth, and height of your intended space. Don't forget to leave a bit of breathing room around the edges – a shelf that’s too snug will look cramped and unprofessional.
-
What’s the real-world weight it needs to hold? Gather up the items you plan to display and get a feel for their combined weight. A good rule of thumb is to always choose an acrylic display shelf with a capacity that’s comfortably more than your total. This is your insurance against sagging over time.
A classic mistake we see is underestimating the weight of lots of small items. Individually they feel light, but together they add up fast. When in doubt, go for a slightly thicker, stronger shelf. You won't regret it.
- Does the style match my overall look? Think about the finish. Are you after that invisible, 'floating' look that only crystal-clear acrylic can provide? Or would a frosted or coloured shelf better tie in with your brand’s colours or home décor? The right choice will make your display feel intentional and seamless.
Answering Your Top Questions About Acrylic Shelves
Even after weighing up all the pros, it's natural to have a few nagging questions about how acrylic shelves actually hold up day-to-day. After all, you want to be sure you're making the right choice for the long run. Let’s tackle some of the most common queries we get from designers, retailers, and homeowners alike.
We'll get straight to the point, giving you the honest answers you need to feel confident in your decision.
Will Acrylic Shelves Turn Yellow Over Time?
This is easily the number one question we hear, and it’s a fair one. Many of us have seen old, cheap plastics turn that nasty yellow colour, so the concern makes sense.
The good news is that high-quality acrylic, like the Perspex or Plexiglas we use, is a completely different beast. It's specifically made with UV stabilisers mixed right in. This isn't just a coating; it's part of the material's DNA, designed to fight off the yellowing effect of sunlight. A well-made acrylic display shelf will stay crystal clear for years, even in a bright, sunny spot. The trick is to buy from a supplier who’s upfront about the grade of their acrylic. If it seems too cheap, it probably is, and discolouration is almost a guarantee.
How Much Weight Can an Acrylic Shelf Actually Hold?
There's no single magic number here. A shelf's strength really comes down to a trio of factors: its thickness, its length, and the quality of the installation. Think of it like a bridge – a short, thick one is always going to be stronger than a long, skinny one.
As a rule of thumb:
- A standard 5mm thick shelf is perfect for lighter items like nail polish, small figures, or spices, comfortably holding around 2-4 kg.
- Stepping up to a chunkier 10mm thick shelf gives you much more muscle. When it's properly fixed to solid wall studs, it can support 10 kg or more, making it great for books, boutique gin bottles, or heavier products.
A quick but crucial piece of advice: always stick to the manufacturer’s recommended weight limit. Pushing it not only risks a crash but will cause the shelf to sag over time, ruining that sleek, invisible look you were going for.
Are Acrylic Shelves a Good Idea for Kitchens and Bathrooms?
Absolutely. In fact, they’re a brilliant choice for humid spaces. Wood can swell and rot, and some metals will inevitably rust, but acrylic is totally unfazed by moisture. It’s non-porous, meaning water just sits on the surface without soaking in.
This makes it both incredibly durable and hygienic. There are no tiny crevices for germs to hide in, and a quick wipe-down is all it takes to keep it sparkling clean – a massive plus in a busy kitchen or bathroom. The only thing to watch out for is heat. Avoid installing a shelf directly above a cooker or a radiator, as intense, direct heat can cause it to warp. Keep that in mind, and it will serve you beautifully for years.
Ready to find that perfect, crystal-clear solution for your space? Explore the full range of high-quality, durable shelving options at Display Guru and elevate your display today. Visit us at https://www.displayguru.co.uk to see our collection.