



How to Cover a Dress Form Smoothly and Accurately
The form is in the corner with a tape measure still round its neck, the pattern envelope says one size, and the person you're sewing for measures something else entirely. Everything that follows depends on one decision: whether the form in front of you matches a real body or just a label on a box.
A dress form cover isn't upholstery. It's a measuring surface, and learning how to cover a dress form properly is the difference between a pattern that lands and one that fights you at the first fitting.
Get it smooth, on grain and padded to the right figures, and every dart you pin will sit where the wearer needs it. Get it wrong and the fabric still looks tidy, which is the trap. A cover can look immaculate and still be off grain, and the pattern you take from it will twist the moment you cut it in real cloth.
Fabric, Padding and Form Choices at a Glance
Start with the fabric, because it decides how everything else behaves. My default is medium-weight calico, roughly 150 to 200 g/m², over a thin layer of polyester wadding. Calico grips a pin at any angle, holds a pressed fold and doesn't creep while you're shaping a dart. A cover is a measuring surface, so that stability matters more than appearance: cloth that shifts under the hand takes the padded figure with it. Everything else on the table is a variation chosen for speed, cost or laundering.
| Fabric | Best for | Stability under pins | Washable |
|---|---|---|---|
| Calico (medium-weight cotton) | Fitted bodices and structural covers | High, holds pins firmly | Yes, pre-wash to avoid shrinkage |
| Muslin (lightweight cotton) | Quick covers and test toiles | Medium | Yes |
| Stretch jersey | Removable outer covers | Low, stretches and distorts measurements | Yes |
| Reclaimed tightly woven cotton | Budget and sustainable covers | Check the weight and fibre first, then test a scrap | Yes, after testing |
| Polyester wadding (padding) | Shaping under the cover | Not a cover, must be secured | Usually yes |
The table hides one distinction worth spelling out: padding builds the body, and the cloth is the surface you measure against. Polyester wadding pads a bust or a hip out to the wearer's actual figures, and it has to be anchored so it can't migrate while you pin. A few hand stitches through the wadding into the form, or a firm band of tape above and below, is enough. Wadding that shifts a centimetre mid-fitting takes a seamline with it, and the cover will still look tidy afterwards.
Forms matter as much as fabric. A polystyrene tailor's dummy takes a pin straight into the body at any angle. A display-only form with a hard shell and a fabric skin won't, and you'll damage both the form and your temper trying. Our tailor dummies are made from polystyrene and are designed to allow pinning of clothing and fabric, which is the property that counts when a cover is being shaped to a figure. For a fuller look at how display and working forms differ, this guide to dress forms for sewing sets out the differences.
A cover's real job is repeatability: one stable three-dimensional reference for draping, checking seam placement and judging fit before anything is cut.
Practical check: push a pin in at 45 degrees and pull gently. If it goes in cleanly and the fabric holds its line, the cloth will work.
Materials, Measurements and Choosing the Form
Gather everything before you touch the form: a pinnable tailor's dummy, cotton draper's tape rather than vinyl, long dressmaking pins, sharp shears, tailor's chalk or a fabric marker, a tape measure, pattern paper, and a pressing iron. The iron counts as a tool here. A pressed calico panel behaves completely differently from one pulled straight out of a bag.
Check the form takes pins. Run a pin into the shoulder area before you plan anything. A display form that resists pins will limit you to showing finished garments, and no amount of careful pinning will change that.
Measure the wearer, not the box. A printed size is a marketing convenience, not a measurement. The Science and Industry Museum's history of British sizing records that the first national standard for women's measurements arrived in 1957, was replaced in 1982 by British Standard ISO 3635 with its numbered range from size 8 to size 32, and was never compulsory, so manufacturers have always interpreted it differently. Bodies vary just as much: the SizeUK project of 2001–2002 scanned more than 11,000 people aged 16 to 95 and collected approximately 1.5 million measurements.
Write the differences as a short list. Take bust, waist, hip, shoulder width and back length, then compare each figure with the form's labelled size.
- Add padding at the bust.
- Remove padding at the waist.
- Note any uneven shoulder or tilted waist before you tape anything.
Check the base. A form that rocks while you pin produces a cover that rocks with it. Female tailors' dummies come in sizes 6/8, 8/10, 10/12, 12/14, 16/18 and 18/20, each with a choice of tripod stand or round base stand, so pick the size nearest the wearer's figures and the base that suits your floor. If you're unsure which landmarks to record, this walkthrough on how to take body measurements for clothing covers the tape paths.
This week's first action: measure the wearer, compare every figure with the form, pad the differences, then mark the reference lines. Nothing gets pinned before that.
How to Cover a Dress Form Step by Step
A pinned cover is a measuring instrument, not a display finish: its whole job is to record one wearer's shape, so every step below reads back to the reference lines you set for that body. Do the preparation slowly and the pinning goes quickly.
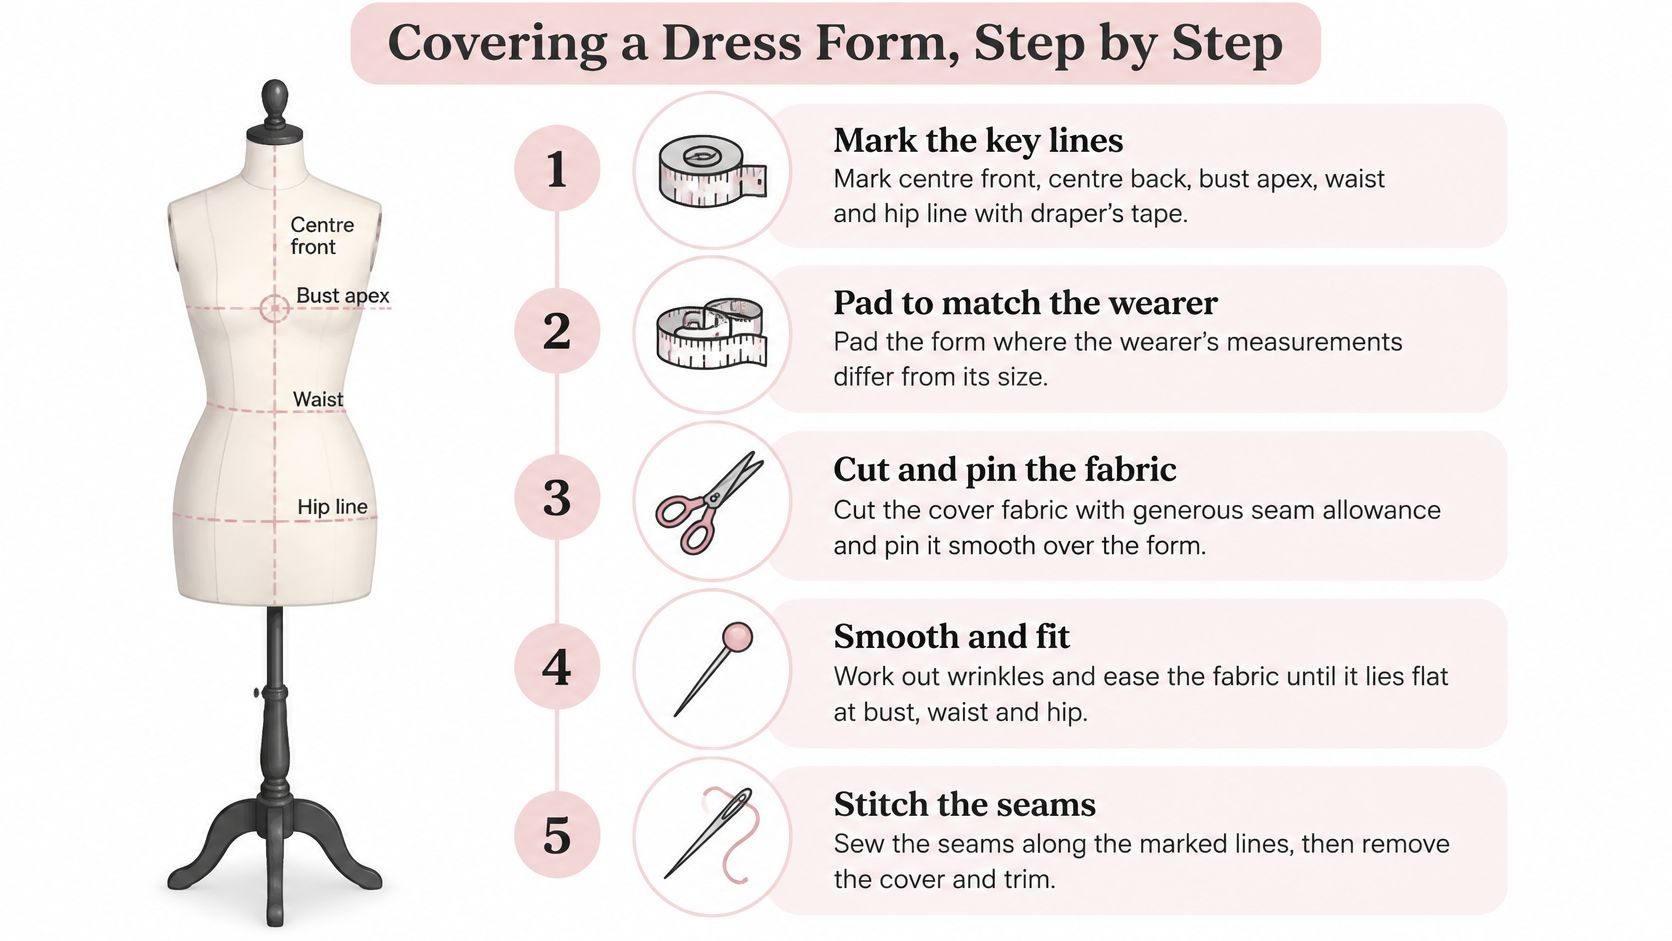
- Mark the reference lines. With the form already padded out to the wearer's figures, run draper's tape along centre front, centre back, the bust apex, the waistline and the hip line. Every later check reads from these lines, so a tape that wanders two millimetres at the waist throws the whole cover out.
- Press the calico and align the straight grain. Cut a generous rectangle and set the warp parallel to centre front. This is the step people skip, and it produces a cover that looks perfect on the stand and twists once removed.
- Anchor at the four fixed points. Pin at the neck, shoulder, bust and waist, setting each pin perpendicular to the seamline rather than along it. Pins laid diagonally across a seam hold fabric at an angle and create pull you will misread as a fitting fault.
- Clip concave curves, notch convex ones. Cut shallow snips into the inward curves at the armhole and neckline so the edge can spread flat. On outward curves such as the bust and shoulder, notch away small wedges of surplus to reduce bulk. Stop short of the seamline on both, because a cut that crosses it tears when the panel comes off.
- Shape the surplus into darts and tucks. Take the extra at the waist and under the bust as controlled darts or small tucks, placed where the wearer needs them. Stretching fabric across the form flattens the contour you are trying to record.
- Repeat on the back. Keep the cross-grain level at bust, waist and hip. If the back panel's cross-grain sits higher than the front's, the side seam will never balance.
- Check three views. Stand back and read the front, the side and the back, comparing the cover against the taped lines at every level. The SQA drape and flat pattern specification treats this checking as an assessed competency rather than an optional habit, and it earns that status: a cover that lies smoothly in one view can still be pulling in another.
- Mark before you remove. Trace every seamline, dart intake and balance mark, then trim conservatively and keep a seam allowance. Transfer the detail to paper rather than treating the pinned outline as a finished pattern.
Cover the form in small, controlled sections. Wrapping the whole body in one panel gives you a smooth surface and no idea which part of it is true.
The cover passes when the bust sits smooth with no pull from the apex, the side seams balance front to back, and the horizontal lines stay level at bust, waist and hip. A cover that fits the form yet ignores the wearer's padded differences is only the label size rendered in cloth, so judge it against the body you built, not the torso underneath.
Fixing Faults and Checking the Cover Before Cutting
Most faults appear within minutes of pinning, and each one has a cause you can name. The trick is to read the symptom before reaching for more pins, because adding pins to a stretched panel locks the error in.
| Symptom | Likely cause | Fix |
|---|---|---|
| Diagonal drag lines from the bust | Grain not aligned to centre front | Re-pin from the apex with the grain level |
| Side seams sitting forward or back | Front and back uneven, or padding shifted | Re-check balance lines and re-secure padding |
| Twisting around the waist | Bias stretched during shaping | Release tension and shape with darts, not pulling |
| Lumps over the shoulder blades | Padding bunched under the cover | Smooth the padding and re-anchor the cover |
| Wrinkles at the hip | Excess fabric not controlled | Take a conservative dart or tuck |
| Hem rising at the back | Uneven hemline or grain drift | Check the hemline in front, side and back views |
A drag line at the front and a clean side view can both be true of the same cover, so a fault seen in one view has to be re-checked in all three. Fixing the front by pulling fabric across often creates a new pull at the side seam, and you'll chase it round the form if you don't look at the whole surface.
The failure mode that catches experienced hands is false shaping. Grain drift or fabric tension produces a surface that looks smooth and still converts into a twisting pattern with an incorrect hem, which is why the London College of Fashion's pattern cutting and draping course positions draping, transferring to paper and fitting a toile as one linked sequence rather than three separate jobs. Test the design in a cloth with the same weight and directional behaviour as the final fabric wherever you can.
Before cutting anything, record grainlines, notches, apex position and seam allowances separately on the paper. Treating the pinned fabric outline as the finished pattern is how a two-millimetre discrepancy becomes a garment that hangs short on one side. And stay-stitch the curves before you handle the calico much, since a stay stitch stops a neckline stretching out of shape between the form and the table.
Then make a calico toile from the traced pattern and fit it on the wearer. Run this checklist before the final cut:
- Balance: side seams sit level front and back.
- Apex: no strain radiating from the bust point.
- Hem: level in all three views.
- Paper: grainlines, notches and seam allowances all marked.
- Toile: fits without strain on the actual body.
Adapting the Cover for Uneven or Non-Standard Bodies
A standard form modified to the client often outperforms an expensive form left at its factory settings. Fit depends on posture and how a body carries its weight, not only on three circumference figures, so a form built to an average is only a starting point for a client who isn't average.
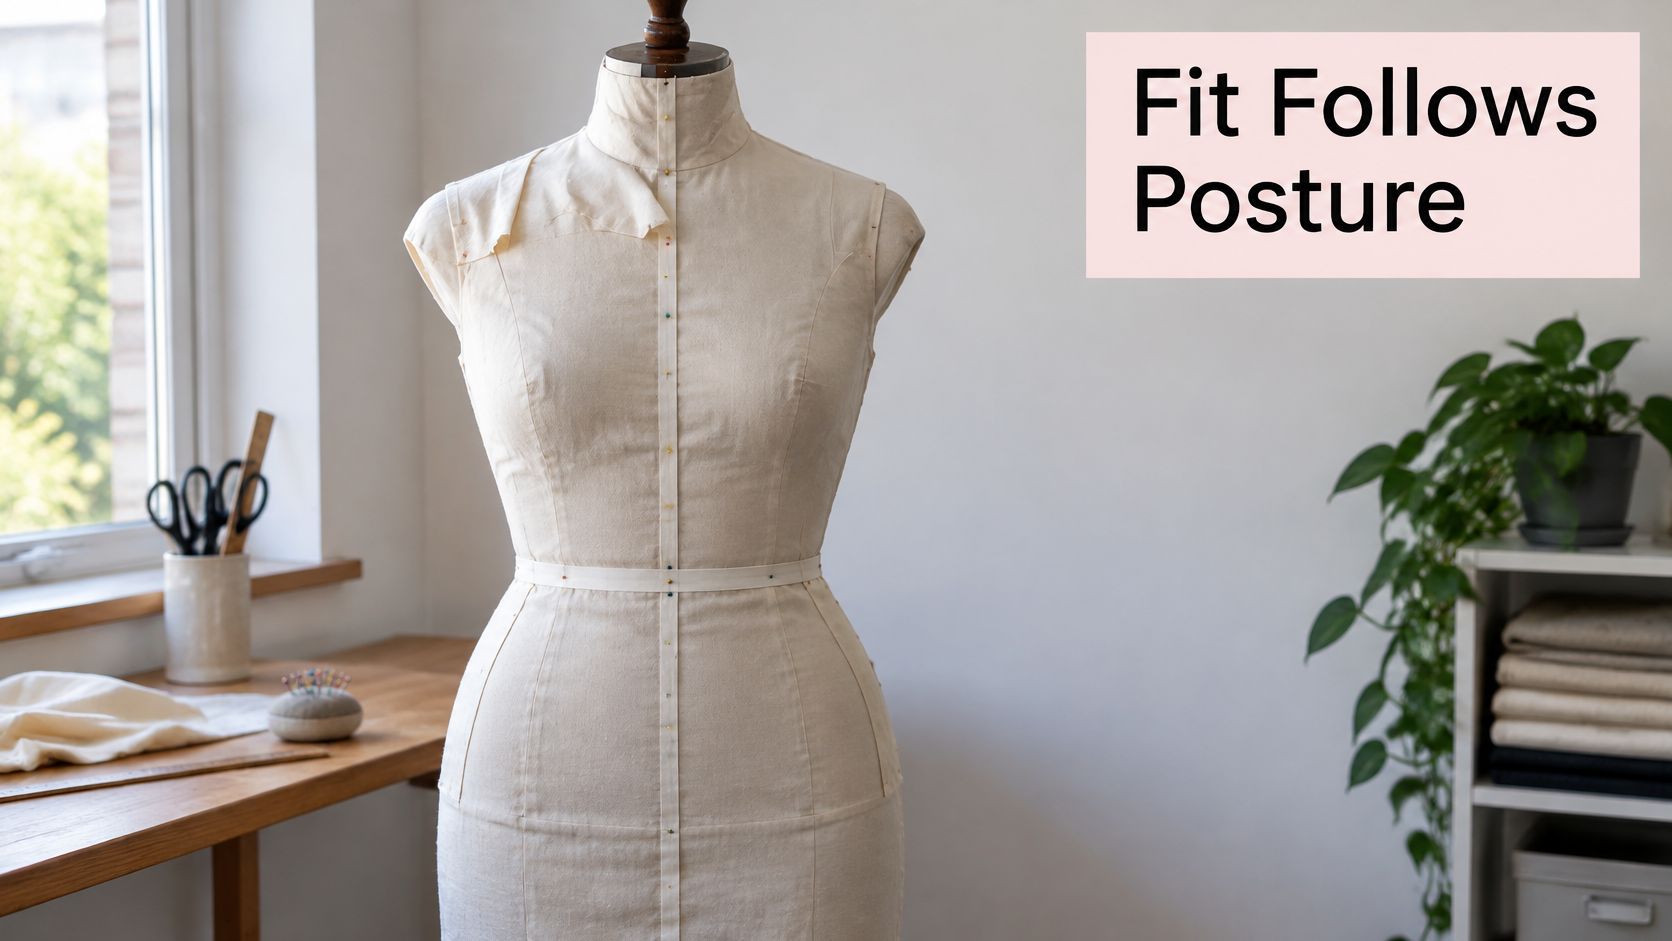
Tutorials explain how to measure a form and stitch a close cover, then stop before the hard cases: uneven shoulders, a tilted waist, different bust heights, scoliosis or prominent hips. The workable approach is to cover the form with a stable, pinnable layer over thin padding, then mark the wearer's centre front, centre back, bust apex, waistline and hip level before fitting the cover. Padding goes underneath and is secured so it can't shift while you drape, and the finished toile is always checked on the actual wearer. Treat the cover as a measuring instrument. Every mark on it should correspond to a point on the body, not to a size label.
Build the asymmetry into the cover, not into a fitting-day correction:
- Uneven shoulders: pad the lower shoulder up to the higher one, then mark both shoulder points separately so the pattern keeps the difference.
- Tilted waist: follow the wearer's waistline with the tape rather than levelling it to the floor, and note the drop at each side seam.
- Different bust heights: pad each side to its own apex and mark both, rather than averaging them into one point.
- Prominent hips: add thin wadding in layers rather than one thick pad, so the cover follows the shape instead of doming over it.
Removable padding earns its keep when a client's shape changes between fittings, and an asymmetry checklist taped inside the studio door beats trusting memory. Where the form and the body disagree, trust the body: re-measure on the wearer, mark the cover from that, and let the padding catch up. A form that mirrors the body's shape removes guesswork from fitting. If you work across a wide range of figures, an adjustable plus size dress form covers the dials-and-plates alternative.
Fitting a cover to the form proves the form. Fitting the toile to the wearer proves the garment. Only one of those answers the question you're asking.
Making a Cover That Lasts and Ends Well
A durable cover made from second-hand tightly woven cotton, designed so it can be unpicked and repaired, usually outlasts a cover sold as eco-friendly that wears out in a season or bonds together fibres nobody can separate. The Textile Think Tank's circularity reporting cites UK generation of about 1,453 kilotonnes of post-consumer textiles against roughly 34 kilotonnes recycled, and most discarded clothing never reaches a collection scheme at all. Longevity is the greener choice on any honest reckoning.
Two cover types do different jobs. A close-fitting woven cover gives stability and a surface that holds chalk and pins, which is what measuring work needs. A removable stretch cover launders easily and suits repeated alterations, so keep it as the outer layer and never let it become your measuring surface. The distinction matters more than it looks. A measuring surface that shifts by a few millimetres reappears as a bodice that pulls across the back on the actual wearer, not on the form.
Build for the strain points. Reinforce the seams at bust, waist and hip with a second row of stitching, mark with washable pencil or chalk rather than permanent ink so the cover can be re-marked for the next client, and cut replaceable panels at the side seams so one worn area doesn't condemn the whole cover. Knowing your seam allowance pays twice, once at construction and again when you unpick a panel to replace it. Avoid unstable stretch offcuts for anything you will measure from.
At end of life, reuse the cover for a fitting, pass it to a textile bank or charity shop, and check your council's collection rules before it goes in the bin. A cover that serves three clients and then becomes someone's scrap fabric has already done better than one that never quite matched the body it stood for.
If you'd rather start from a form that takes pins properly than fight a display dummy, Display Guru supplies polystyrene tailor dummies in sizes from 6/8 to 18/20, each with a tripod or round base stand, so you can pad and cover to the wearer's real measurements. Pair one with calico, wadding and cotton draper's tape, and the covering sequence above becomes a routine rather than a rescue job. Browse the full range at Display Guru and pick the size closest to the figures you're fitting.