

How to Take Body Measurements for Clothing: A UK Guide
You've got the pattern envelope open, the size 12 pieces already cut, and the bodice still gapes at the armhole while the waist pulls. The label matched a shop you trust. The cloth doesn't match the person standing in front of you.
That gap is what a careful measuring session is meant to close. How to take body measurements for clothing is a repeatable routine: landmarks first, tape second, and a written record a cutter or fitter can use next month. A UK dress size is a population guide. Your card of figures is the specification.
I would start with four core lengths and circumferences, then add only the extras the garment uses, including seated figures if the clothes will be worn in a chair. Rushing to a nominal size is the expensive mistake. Recording the body the garment has to dress is the cheaper one.
Core Body Measurements at a Glance
A home sewer cuts a size 12 because the envelope says so, then watches the bodice gape. UK size labels are population guides, not a portrait of one wearer. The country's approach shifted from a single post-war baseline, the first national sizing survey in 1951, to the SizeUK programme of 2001–2002, which used three-dimensional body scanners for the first time in a UK national survey and collected approximately 1.5 million measurements from more than 11,000 people aged 16 to 95, as UCL's account of SizeUK records. Two people with the same bust or chest can differ sharply in height, torso length, waist position or hip distribution. You still need that person's own key dimensions.
| Measurement | Where to Measure | Tape Position | Used For |
|---|---|---|---|
| Height | Crown of head to soles, barefoot, standing erect | Vertical, not tightened | Length, hem and overall proportion |
| Bust or chest | Fullest horizontal line under the arms and across the shoulder blades | Level and snug, over intended undergarments | Bodices, jackets and coats |
| Natural waist | Anatomical waistline, found by bending gently sideways | Level, abdomen relaxed | Waist shaping and darts |
| Hip or seat | Fullest part of the seat | Level, not sloping at the back | Skirts, trousers and dress hips |
These four figures are the minimum for any garment. Further points come from the garment's construction, not from a longer list taken for its own sake.
Height drives hems and overall proportion. Bust or chest drives bodices, jackets and coats. Natural waist drives shaping and darts. Hip or seat drives skirts, trousers and the hip of a dress. Take them in a natural standing posture, over the undergarments normally worn, with the tape level and neither tightened nor slack.
Write the four figures in centimetres only on a card kept with the pattern or the order form. When you later stand that card beside a dress form, our mannequin measurement notes show how a dummy's chart is read next to a body card, not instead of it.
Tools and Setup Before You Start
The tape you pick decides whether the session can be repeated. Work through the kit in this order, and don't start the figures until the room is ready.
- Flexible tape: Use a fibreglass or cloth tape at least 150 cm long. A metal retractable tape won't drape around a curve, so the reading bows out at the side seam. Our notes on sewing tape measures cover why a soft tape, not a hardware tape, belongs in a fitting kit.
- Record and pencil: A notebook or printed form beats a phone photo of a tape. Pencil lets you correct a figure without smearing the line above it.
- Full-length mirror: You, or the subject, can see a sloping tape before you write the number down.
- Chair or stool: You need a stable seat for anyone whose garment will be worn sitting, and for any subject who can't stand through the whole session.
- A helper: Back width, rise and any point the subject can't hold themselves need a second pair of hands. Self-measurement of the back is where sessions usually go wrong.
Room and clothing
Clear a wall and a level floor, and take off bulky jumpers, jeans and shoes. Ask for light underwear, or the exact undergarments the finished garment will be worn over. A structured bra or a corset changes the bust and the waist, so a figure taken over one and a toile cut for the other will not agree.
Three checks before the first reading. Shoes come off so height isn't padded. Confirm the tape reads zero at the metal end, not part-way along a worn tape. Tie a loose ribbon at the natural waist before you measure anything else, so later points share one landmark.
Practical rule: Label every line with the date, the posture, the clothing worn, and whether the figure is standing or seated.
Tick the kit, the clear floor, the undergarments, the zeroed tape and the waist ribbon. Only then pick up the tape for the core set.
How to Take the Core Measurements Step by Step
Work in one order, every time, so two sessions can be compared. The routine below matches landmark practice used in UK sizing work: light underwear, tape level and snug without compressing soft tissue, abdomen relaxed, feet together, as set out in the Wiley excerpt on clothing sizing.
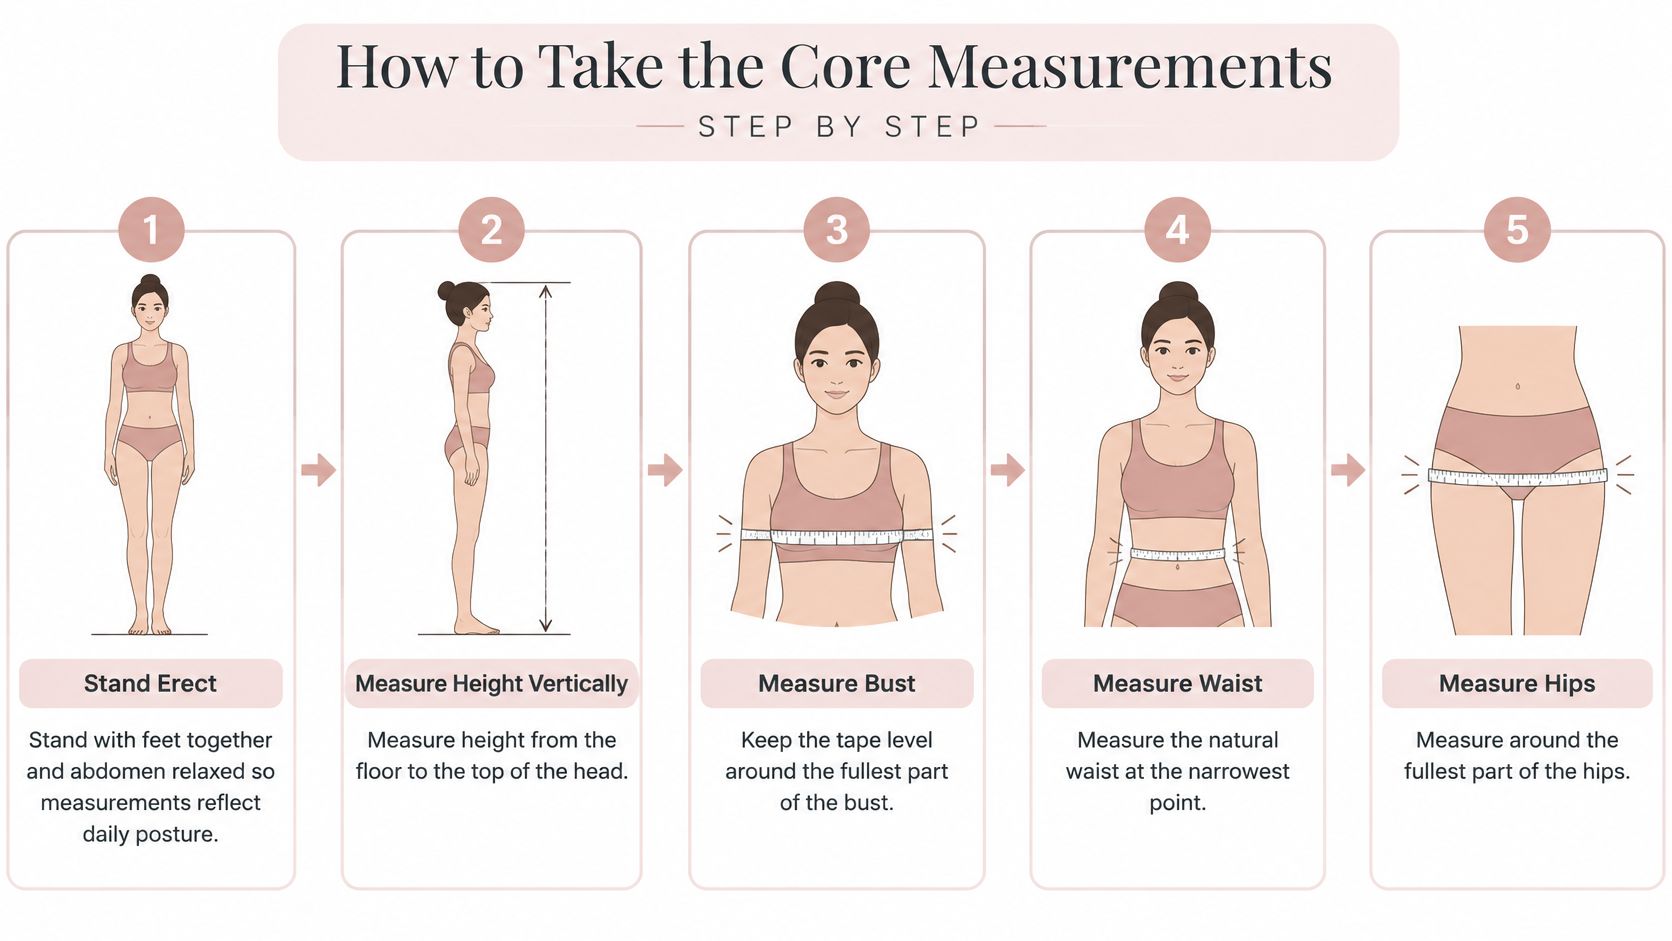
- Stand erect. Feet together, weight even, abdomen relaxed, arms down. You want the posture of an ordinary day, not a braced "photo" stance that lifts the chest and shortens the back.
- Take height. Measure vertically from the crown of the head to the soles, barefoot, against a wall or a true vertical. This figure sets hems and the proportion of bodice to skirt. Don't follow the curve of the spine.
- Mark the natural waist. Ask the subject to bend gently sideways. The crease that appears is the anatomical waist. Tie the ribbon there, level, before any circumference. A guessed "narrowest look" is a different place on many bodies.
- Take bust or chest. Run the tape around the fullest horizontal line, under the arms and across the shoulder blades, and keep it level all the way round. Read it over the undergarments the garment will sit on. For a jacket, pair this figure with shoulder and sleeve notes in our suit jacket fitting guide before you pick a block.
- Take the waist. At the ribbon, snug but not sinking into soft tissue, abdomen still relaxed. If the tape digs a groove, the toile will be tight by lunchtime.
- Take hip or seat. Around the fullest part of the seat, then walk behind and check the tape hasn't dropped. A slope here makes a skirt hem and a trouser waistband sit off level.
- Repeat each circumference at least twice. If a pair differs by more than a centimetre, remove the tape and retake both. Don't average them. Breath-holding and a sloping tape are fixed in the mistakes section, not by a third hopeful reading.
For trouser length, don't guess from height. A separate inside-leg routine, such as Cedar & Lily Clothier's guide to get accurate inseam measurements, keeps the leg figure independent of the hip.
On the card, write each figure with its posture, the date and what was worn. The next garment, or the next person at the table, should be able to reproduce the session without phoning you.
Shape Measurements Most Guides Skip
"Measure bust, waist and hip, then pick a size" fails a large share of real bodies. An analysis of 1,261 women's body scans from Manchester Metropolitan University found that only 19% matched the bust, waist and hip measurements used by high-street clothing, and that 80.88% of participants were a C cup or larger, reported by The Interline. Bust circumference alone can't describe cup size, projection or the upper torso. A correct three-point tape can still produce a poor toile.
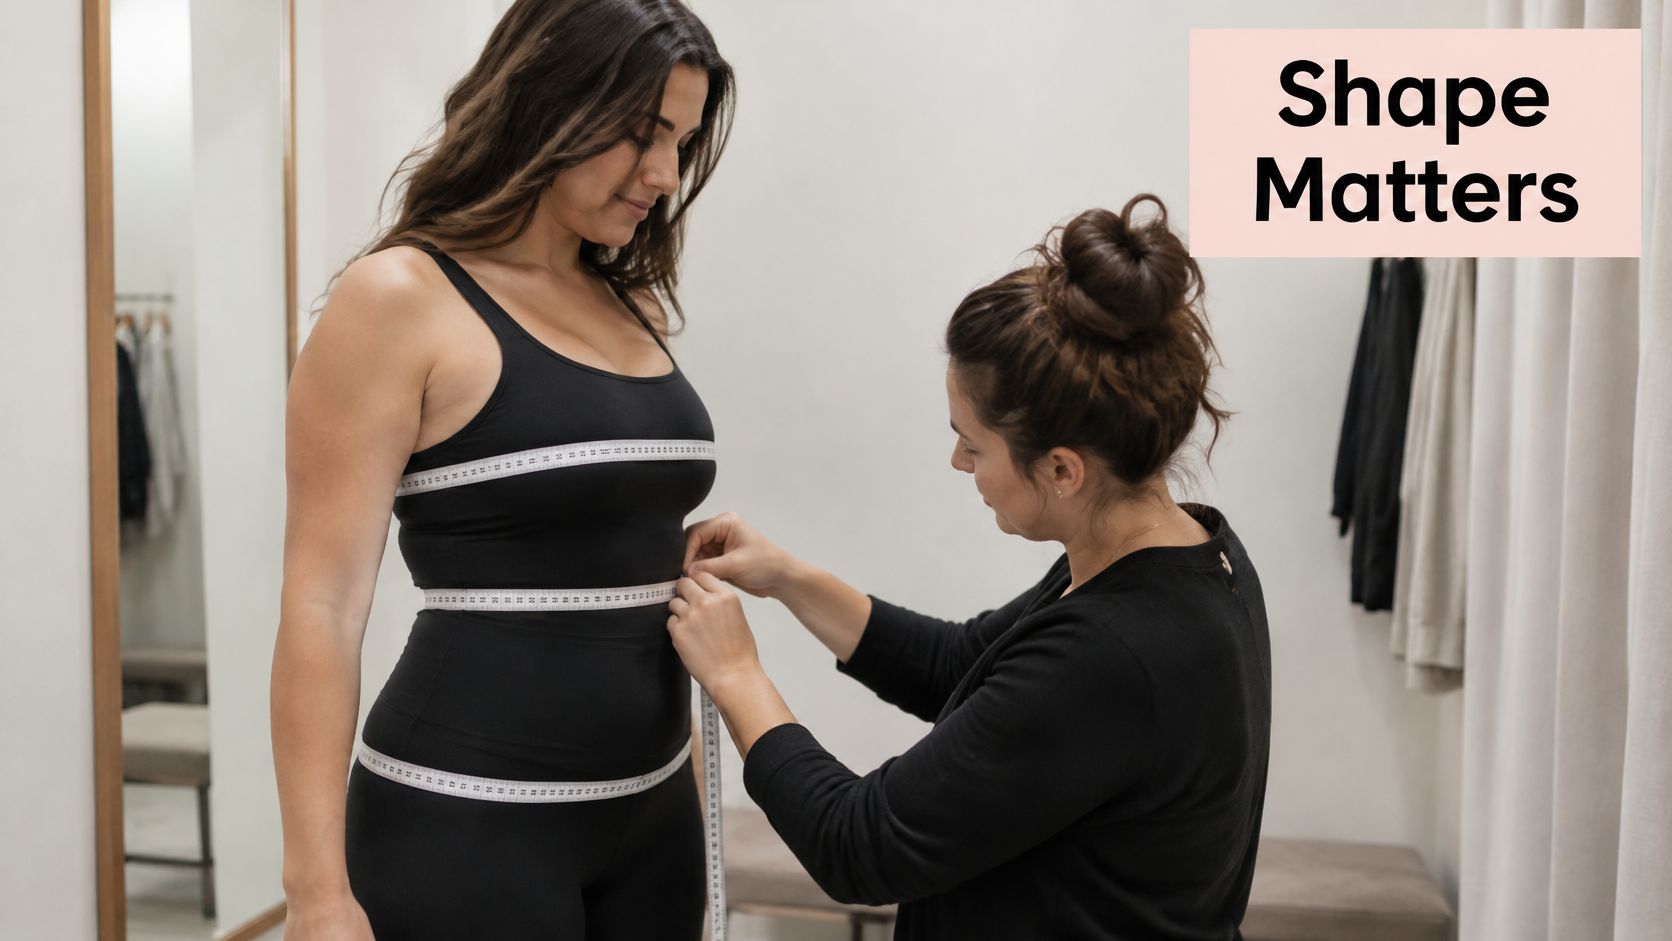
What to add, and how
Shoulder width runs across the back from shoulder point to shoulder point, arms relaxed, tape following the curve rather than a straight chord through the air. Back waist length runs from the nape, the bone at the base of the neck, down to the waist ribbon. Bust point position needs two readings: shoulder seam to bust point, and bust point to bust point across the front. Those place darts. A single bust circumference never will.
Rise for trousers runs from the crotch seam point up to the natural waist, taken with care and over the intended underwear. Torso length runs from one shoulder, down through the crotch and back up to the other shoulder, or from the shoulder point down the front to the waist if you are placing a bodice seam. Thigh and upper arm are horizontal circumferences at the fullest part, tape level, not pulled into a groove.
Front and back balance is a vertical check. Drop a plumb line from the nape and see where it falls against the waist ribbon and the seat. Swayback shortens the back waist and pools fabric above the seat. Rounded shoulders lengthen the back and leave the front neck gaping. Asymmetric hips make one side of a hem longer even when both hip circumferences were read carefully.
A technically correct circumference still fails if posture, bust prominence or an uneven hip is ignored.
Compare these figures with the garment's finished measurements, not with a dress size. The difference you allow is ease. The difference you didn't measure is a fitting problem.
| Garment | Extra Measurements | Why They Matter |
|---|---|---|
| Tailored jacket or coat | Shoulder width, sleeve length, upper-arm circumference, back waist length | Shoulder and sleeve fit depend on these figures, not the bust alone |
| Trousers | Rise, inside leg, thigh circumference | Rise sets comfort at the seat; inside leg sets length |
| Dress or top | Bust point position, front and back balance, torso length | Shows where darts and seams should sit on the body |
| Skirt | Back waist length, seat depth | Stops the hem sitting unevenly at the back |
| Blouse or shirt | Shoulder width, upper-arm circumference, back waist length | Controls drape across the shoulders and armholes |
Record only the row that matches the garment in front of you. A blouse doesn't need a trouser rise, and a skirt doesn't need a sleeve.
The short demonstration below shows bust-point and back-waist placement on a standing figure, which is the part most three-point routines skip.
Measuring Seated and Limited-Mobility Bodies
For a garment worn mainly in a chair, the standing figure is the less useful one. The accurate measurement is the position the finished garment has to work in. That includes wheelchair users, people with limited mobility, chronic pain, limb difference, swelling or a posture that isn't a neutral stand. Mainstream measuring sheets rarely mention them. A UK paper based on the 2023 "What do you wear in your wheelchair?" survey documents the practical and stylistic clothing problems people with limited mobility report, set out by Sheila Hawkins for POD-NMD. Fit changes between sitting and standing, so a standing-only card will miss the garment's real job.
Seated alternatives
Measure over the intended undergarments. Keep the tape level and don't compress soft tissue or a swollen area. Label every line seated or standing so a later session doesn't mix the two.
- Seated waist: At the same anatomical landmark, taken while the person is in the chair they use. Sitting often thickens this figure.
- Seated hip: Around the fullest seat in the chair, tape level at the back, not tucked under the cushion.
- Thigh and knee: Horizontal, where the fabric will stretch across the lap and the bend. Note swelling if one side is larger.
- Back length: From nape to waist, and from waist to the seat of the chair, because a jacket back that was fine when standing can ride up when sitting.
- Chair seat height: From floor to the compressed seat. Hem and trouser length relate to this, not to a barefoot standing inseam.
A helper is necessary for anything on the back, and for any point the subject can't hold without pain. Repeat each figure, and if the two readings don't agree, retake them in the same chair rather than averaging a tense reading with a relaxed one.
Record asymmetry as two numbers, left and right. Don't ask someone to "straighten up" into a posture they don't use. Where the garment will be worn both sitting and standing, take both sets and pattern to the larger circumference with ease, then check the shorter length so hems don't pool on the footplates.
Common Mistakes and How to Fix Them
Professional sizing work treats the tape as a controlled process. SizeUK's sampling and precision work targeted approximately 1 cm accuracy at 95% confidence, and a model using UK sizing data reached 89.66% size-prediction accuracy from bust, waist and hip, against 51.72% from height and weight alone, according to the SizeUK information paper. The gain comes from standardising posture and landmarks before you measure, not from adding points at random. Body measurements also stay separate from garment ease. A 92 cm waist is not a 92 cm waistband.
The usual failure is inconsistency between two measurers, or between Monday and Thursday, rather than one wildly wrong reading. Prioritise bust or chest, natural waist and hip or seat, then add shoulder, back, rise, sleeve and inseam only as the garment's construction needs them.
| Mistake | Effect on Fit | Fix |
|---|---|---|
| Waist taken at the narrowest visual point | Jacket or bodice sits loose at the middle | Find the anatomical natural waist by bending sideways and mark it |
| Tape pulled tight | Garment too small and fabric compressed | Keep the tape level and snug, not compressing soft tissue |
| Tape sloping at the back | Hem and waist sit unevenly | Check the tape is level all the way round before reading |
| Subject holds their breath | Waist reads smaller than it is in daily wear | Ask the subject to stand relaxed and breathe normally |
| Undergarments change between sessions | Figures do not match the earlier record | Note what was worn and measure over the same garments every time |
| Units mixed in one record | Errors of several centimetres | Record in centimetres only and label the unit on the card |
Take each circumference twice. If the pair differs by more than a centimetre, retake both. Averaging hides the bad reading and bakes it into the pattern.
A loose result isn't always a small tape. Sometimes the block's ease was never checked against the body card, which is the issue our notes on loose fitting clothes separate from a wrong landmark. Fix the landmark first. Then decide how much ease the style is allowed to add.
Check Your Numbers Before You Cut or Order
Don't cut a pattern, order a made-to-measure garment or buy a dress form until the card is complete, dated and labelled standing or seated. Compare each core figure with the finished measurements on the pattern chart or the retailer's size chart, not with the size printed on the envelope. Note the ease the garment adds on top of the body.
For a dress form, female tailors' dummies are listed in sizes 6/8, 8/10, 10/12, 12/14, 16/18 and 18/20, on tripod or round-base stands. The UK size 8/10 torso bust is polystyrene and takes pins for fittings and alterations. The size 18/20 with a brown flower on a cream torso and a light wood round base is £39.95. Choose the band whose bust, waist and hip sit closest to the card, then pad to the exact figures rather than hoping the label matches.
Three checks, in order. The card holds the four core figures plus every extra that garment needs. Each figure carries its date, posture and the clothing worn. Any gap between a body figure and the chart is no larger than the ease you intended. The same habit applies when you use a trade chart such as Caddie Uniform's sizing guide for adult caddie outfits: match the body to the finished measurement, then confirm ease. Our guide on how to read sewing patterns shows where those finished figures sit on a pattern sheet. Compare, adjust, and only then cut or order.
Display Guru supplies pin-friendly polystyrene tailor dummies, half-body forms and garment rails for the fitting room and the studio, so the figures on your card have a form you can pin to. Once the measurements are written, a dummy in the nearest size band lets you check ease and balance before the shears come out. Visit Display Guru to choose a stand and size for the body you have just recorded.