


Your Essential Guide to Cutting Table Sewing Setups
If you're serious about sewing, a proper cutting table for sewing isn't just a nice-to-have piece of furniture. It’s a dedicated workstation that completely changes the game in terms of precision, efficiency, and your own comfort. Getting off the floor or clearing the dining table for every project is a huge step up, transforming your creative corner into a far more professional and organised space.
Why a Dedicated Cutting Table Transforms Your Sewing

Let's be honest, we've all been there—crawling around on the carpet or taking over the kitchen table, trying to get a straight cut. While it shows resourcefulness, these makeshift solutions come with hidden costs. They cost you in wasted fabric, inaccurate cuts, and, most importantly, they cost your body. Investing in a purpose-built cutting table is probably the single biggest upgrade you can make to your whole sewing process.
Making that switch from improvisation to a dedicated workstation is a profound one. It's about finally having a central hub for what is arguably the most critical stage of any project: the preparation. When your cutting surface is at the right height, that nagging back and shoulder pain from hunching over disappears. That’s not a luxury; it's absolutely essential if you want to keep enjoying your craft for years to come.
The Foundation of Precision and Efficiency
Pinpoint accuracy starts the moment your rotary cutter or shears touch the fabric. A wobbly dining table or a soft carpet can easily lead to skewed lines, mismatched pattern pieces, and that heartbreaking pile of unusable fabric scraps. A dedicated cutting table gives you a solid, flat, and reliable foundation, ensuring every single cut is clean and precise. This professional approach saves you time, frustration, and money in the long run.
The real change happens when you stop seeing your cutting area as a temporary inconvenience and start treating it as the command centre of your sewing room. Everything flows more smoothly from a well-organised cutting station.
This move towards professional-grade equipment isn't just a personal choice; it reflects a wider industry trend. In the UK, the need for greater efficiency has driven a steady rise in the popularity of specialised cutting tables. In fact, the sewing machine market—which includes these essential tables—generated USD 116.7 million in 2024 and is expected to keep growing.
Beyond the Surface: A Workflow Revolution
A dedicated table completely changes your workflow for the better. No more frantically clearing away pattern pieces and pins when it’s time for dinner. It becomes a permanent, ready-to-use station that naturally encourages better habits. The logic behind choosing your perfect food prep table applies here, too; a specialised surface simply works better. It helps organise your tools, streamlines your process, and ultimately gives your creativity the dedicated space it deserves.
For more ideas on optimising your entire creative space, check out our complete guide to a better sewing room setup.
Finding Your Perfect Fit with Sizing and Ergonomics
Getting a table that fits your room is one thing, but finding one that fits you is the real secret to comfortable, pain-free sewing. Ergonomics isn't just a trendy term; it's what makes a workspace genuinely work for you. It's the difference between ending a project feeling accomplished or feeling the familiar ache in your back, neck, and shoulders.
Let's be honest, spending hours hunched over a surface that’s too low is a recipe for disaster. The most important factor to get right is the height of your cutting table. You'll often hear that a standard kitchen counter height of about 91cm (36 inches) is the way to go, but the truth is, the perfect height is entirely personal. The wrong height forces your body to compensate, whether you're reaching up or bending down, and that quickly leads to fatigue and sloppy cuts.
Finding Your Ideal Table Height
There's a beautifully simple way to figure out your ideal working height. Stand up straight with your arms relaxed at your sides. Now, bend your elbow to a 90-degree angle, almost like you're about to shake someone’s hand. Get a friend to measure the distance from the floor right up to the bottom of your elbow.
That measurement is your magic number. Your ideal cutting surface should be at, or just a smidge below, your elbow height. This position lets you apply steady, even pressure with your rotary cutter or shears without putting any strain on your shoulders or back.
If you share your sewing space, an adjustable-height table is a fantastic investment. It means every person can set their own perfect height, keeping everyone comfortable. For a closer look at different options, our overview of various cutting and sewing tables can help you compare what's out there.
Sizing Up Your Surface Area Needs
Once you've nailed down the height, it's time to think about the surface area. What you need is driven entirely by the kinds of projects you love to make. It’s tempting to think bigger is always better, but a massive table can easily swallow a small room and might be complete overkill for your needs.
Think about what you typically work on:
- Quilting and Dressmaking: These projects mean you're handling large pieces of fabric that need to lie perfectly flat. Trying to do this on a small table is a constant battle of shifting and readjusting bulky material, which is a fast track to measurement errors. A generous surface, something around 102 x 183 cm (40 x 72 inches), is pretty much essential.
- Bag Making and Small Crafts: If your passion is making bags, accessories, or children's clothes from smaller pattern pieces, you simply don't need a giant table. A more compact surface will give you plenty of room to work without dominating your space.
A good rule of thumb is to consider the standard width of a fabric bolt, which is usually 112cm (44 inches) or 152cm (60 inches). Your table should be wide enough to comfortably support at least half of that width when the fabric is folded. This stops the material from drooping off the edge, which can pull it out of shape and skew your cuts. A table that’s too small quickly turns from a tool into a source of frustration, undermining all the precision you’re aiming for.
Comparing Cutting Table Options for Every Space
https://www.youtube.com/embed/41akMqIfx1U
Finding the right cutting table really boils down to two things: what you sew, and the space you have to do it in. Thankfully, there’s a huge variety out there, from solid, professional workstations to clever solutions for a corner of the living room. It's about looking past the basic dimensions and thinking about what will genuinely make your sewing life easier.
Let’s be honest, nothing kills the creative flow faster than a wobbly table. If your rotary cutter skips or your fabric slides about, accuracy goes out the window. That’s why permanent, heavy-duty tables are so often the gold standard – they’re designed to be the rock-solid heart of your workspace.
But what if you don’t have a dedicated sewing room? Many of us are working in smaller homes or multi-purpose spaces. This is where folding tables come into their own. The modern designs are surprisingly sturdy and can be tucked away when you’re done, freeing up that all-important floor space.
Finding Your Ideal Match
The perfect table for a quilter working on a king-size quilt is probably the wrong choice for someone making small leather bags. Quilters need that vast, uninterrupted surface area to lay everything out flat. For them, a big, permanent table is a non-negotiable. On the other hand, a bag maker might get more value from a smaller table with built-in storage for tools and hardware.
Think about these points to help narrow down your options:
- Stability: This is crucial. For precision cutting, you need a table that won’t budge. Look for solid leg structures and a bit of weight, like the ones we offer at Display Guru.
- Surface Durability: Your tabletop is going to see a lot of action from pins and rotary cutters. You need a surface that can take a beating without getting easily scratched or dented.
- Storage Integration: Would built-in shelves or drawers make your life easier? Keeping essential tools within arm's reach can be a game-changer.
- Portability: Do you need to move your table around or pack it away? If so, pay close attention to the weight and how easy the folding mechanism is to use.
The best cutting table isn't just a surface; it's a core tool that actively supports your specific creative process. Choosing the right one means fewer frustrations and a much better end result.
This decision is a huge part of setting up a workspace that actually works for you. To make it a bit simpler, this flowchart gives you a quick visual guide based on the kinds of projects you typically tackle.
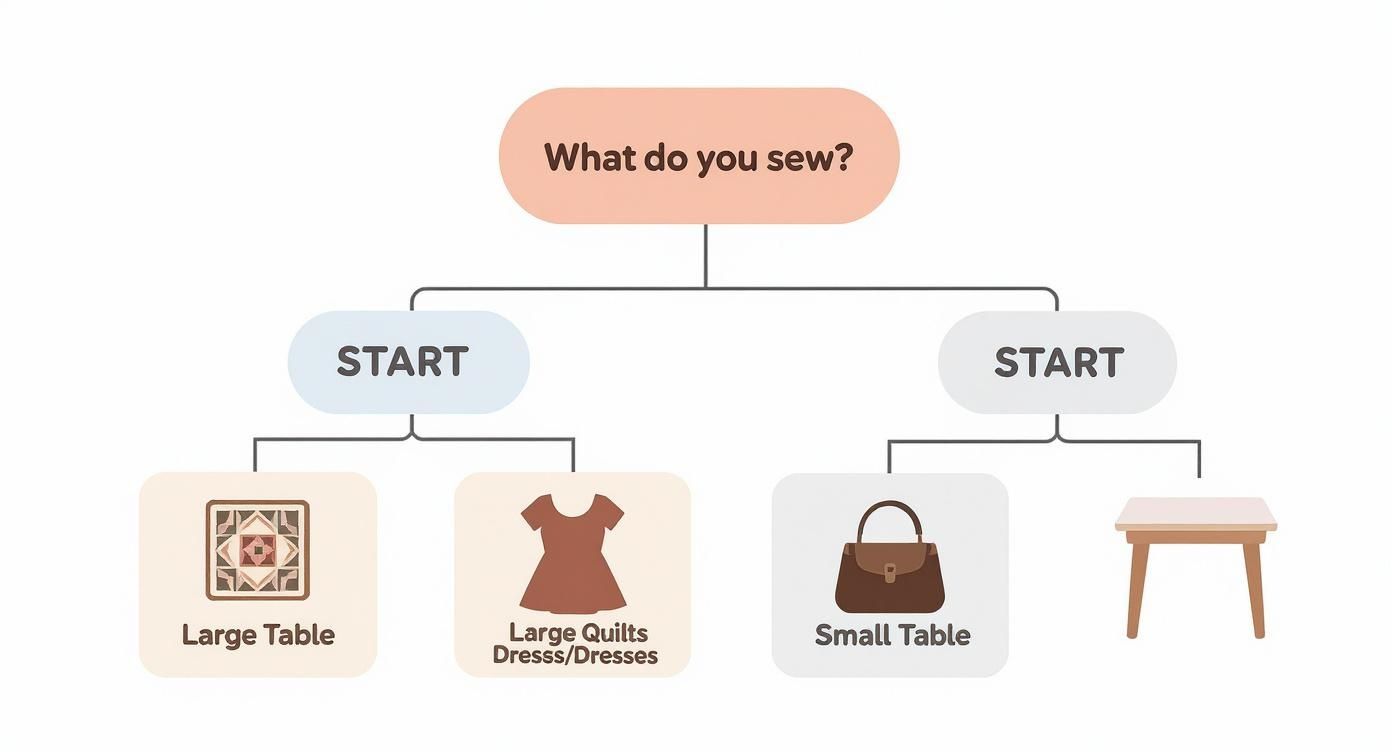
As you can see, the scale of your work is the biggest clue to the size of table you'll need. It's all about getting the support you require without overwhelming your space.
A Quick Comparison of Table Types
To help you weigh the pros and cons, I’ve put together a simple table that breaks down the most common options. It’s a great starting point for figuring out which style aligns best with your sewing habits, workspace, and budget.
Sewing Cutting Table Comparison
| Table Type | Best For | Key Advantages | Potential Downsides | Typical Price Range |
|---|---|---|---|---|
| Permanent/Heavy-Duty | Professionals, dedicated studios, serious quilters | Unmatched stability; large, durable work surface; often has built-in storage. | Requires significant dedicated space; not portable; higher initial cost. | £200 - £800+ |
| Folding/Portable | Hobbyists with limited space, renters, workshops | Space-saving design; can be stored away; lower cost; lightweight. | Can be less stable than permanent tables; smaller surface area. | £70 - £250 |
| Adjustable Height | Shared spaces, ergonomic-focused sewists, varying tasks | Promotes better posture (sit/stand); versatile for multiple users. | Can be more expensive; mechanisms add complexity and weight. | £150 - £500+ |
| DIY/Custom Built | Unique spaces, specific project needs, budget-conscious | Fully customisable size and features; can be very cost-effective. | Requires time, tools, and skill to build; stability depends on design. | Varies widely |
Ultimately, the 'best' table is the one that fits seamlessly into your creative life, removing barriers rather than creating them.
The Rise of Advanced Tables
The need for precision isn't just for hobbyists – it’s the bedrock of the professional textile industry. Here in the UK, the textile manufacturing sector has been growing steadily, with the number of businesses projected to hit 121,000 in 2025. This growth is underpinned by advanced cutting tables that give professionals the accuracy needed to work with all kinds of technical fabrics.
Whether you're sewing for fun or running a business, investing in the right equipment pays off. An adjustable-height model, for instance, is brilliant for anyone who shares a workspace or simply wants the ergonomic benefit of switching between sitting and standing.
If you want to get into the nitty-gritty, our detailed guide on what makes a great pattern cutting table is a great next step. By matching the table’s features to your personal needs, you create a workspace that not only improves your craft but also looks after your body.
How to Set Up and Optimise Your Cutting Station
Unpacking a new cutting table is always a great feeling, but the real magic happens when you turn that flat surface into a workstation that truly works for you. A little thought at this stage is the secret to a seamless workflow, saving you heaps of time and frustration before you’ve even made the first cut.
A properly optimised station is so much more than a place to lay out fabric. It’s about creating a space where every tool is within easy reach and your movements feel natural, letting you get lost in the creative process.
Mastering Your Workspace Layout
First things first, let's talk about placement. Where you put your cutting table for sewing makes a surprising difference to your accuracy. If you can, position it so that your main light source—be it a window or an overhead light—comes from the side. This simple trick stops your own body from casting a shadow right over the line you're trying to cut.
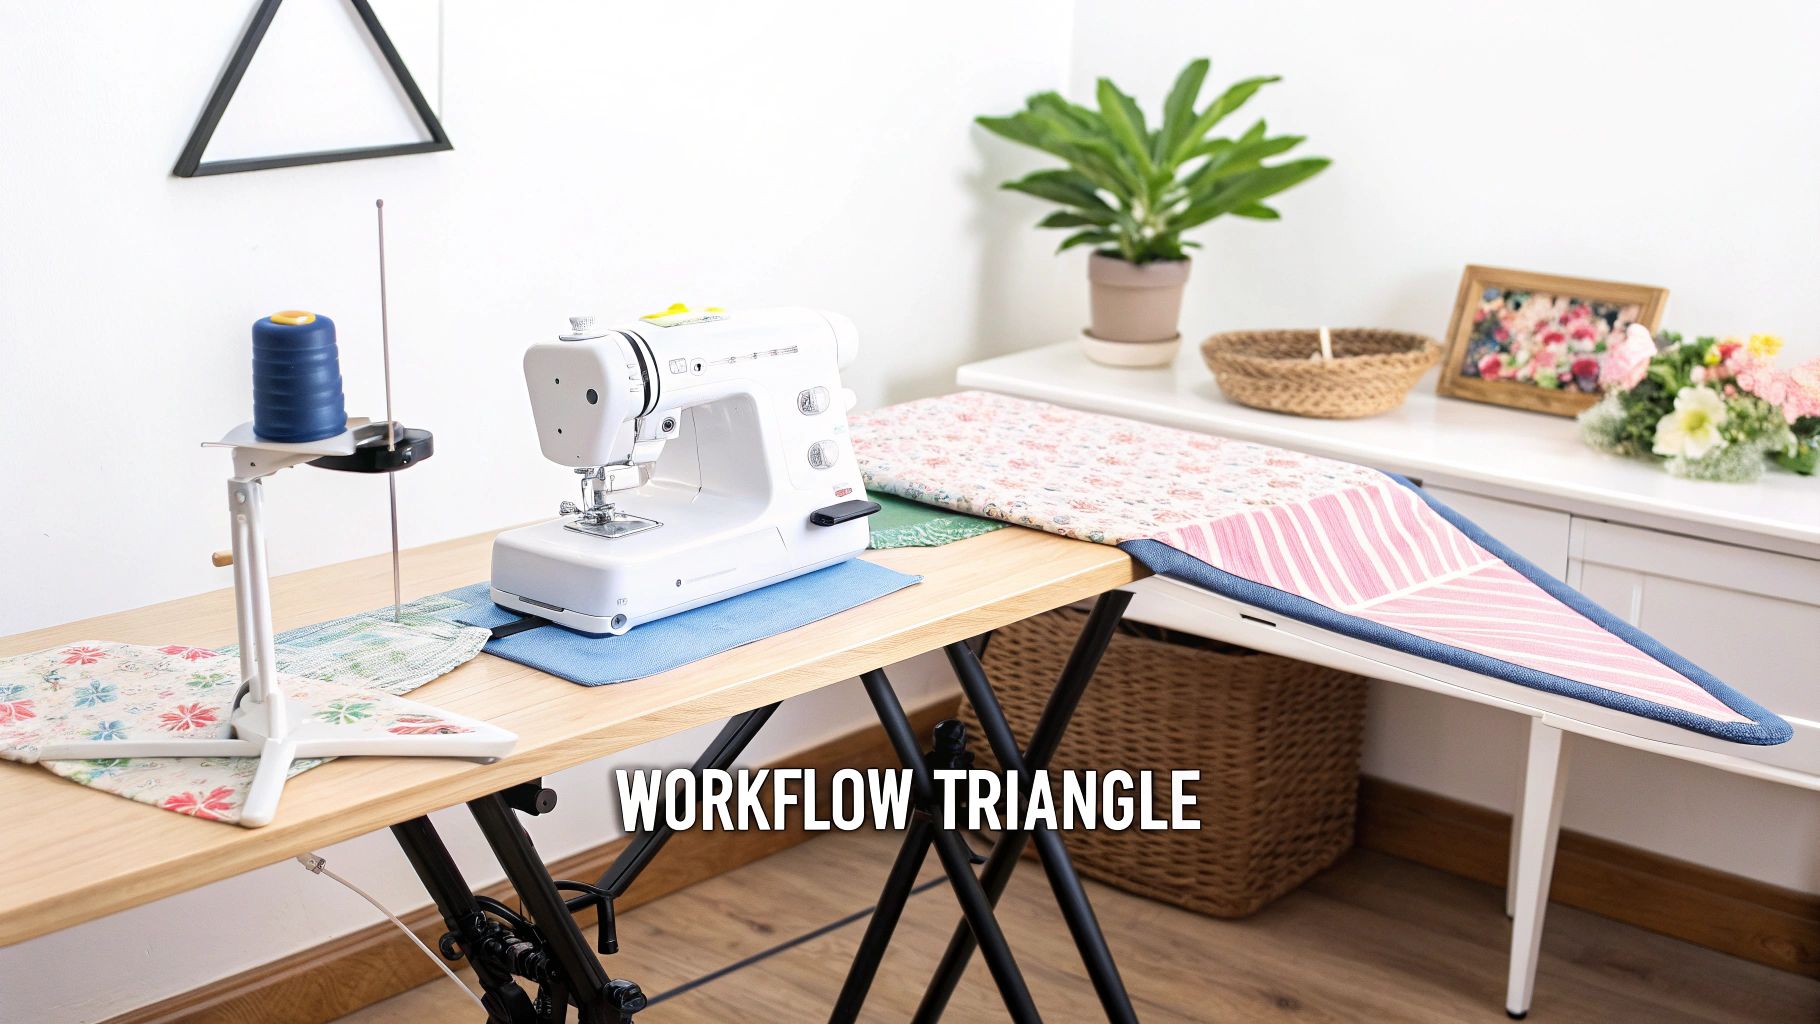
I’m a big believer in creating an "ergonomic triangle." It's a classic principle from kitchen design, but it works brilliantly in a sewing room.
- Point 1: The Cutting Table. This is where every project starts.
- Point 2: Your Sewing Machine. The heart of the operation.
- Point 3: The Ironing Board. Crucial for pressing seams as you work.
Arranging these three core stations in a tight triangle means you can pivot between them with just a step or two. It cuts down on wasted movement and makes the whole sewing process feel more fluid, especially during those longer sessions.
Your setup should feel intuitive. If you're constantly trekking across the room for your shears or a ruler, it’s a sure sign your layout could be better.
Organising Your Tools for Instant Access
Once you've got the layout sorted, it’s time to get your tools organised. The aim is to have everything you need within arm's reach, so you never have to break your concentration to hunt for something. A small rolling cart tucked beside your table is a game-changer for storing your go-to rulers, rotary cutters, and pattern weights.
Another tip I've found incredibly useful is using magnetic trays or bowls right on the tabletop. They’re perfect for keeping pins, clips, and snips from rolling away, keeping your workspace clear and tidy. A well-organised station doesn't just look the part; it genuinely makes you more productive and makes the whole experience more enjoyable.
With your station ready, the next step is prepping your fabric. Knowing how to calculate fabric yardage properly will save you both money and material in the long run. And to keep that beautiful new table in top condition, don't forget a quality mat—you can learn all about choosing the right one in our guide to sewing cutting mats.
Must-Have Accessories and Maintenance Tips

A great cutting table is your foundation, but it's the right accessories that truly transform it into a professional-grade workstation. I'm not just talking about the obvious rotary cutter and mat; there are a few other bits of kit that can genuinely refine your workflow, boost your accuracy, and make prepping fabric so much more efficient.
For instance, swapping pins for pattern weights is a game-changer, especially when you're working with anything delicate or thick. They hold everything flat and secure without leaving holes or distorting the fabric, which means a much cleaner, faster cut. It’s also worth investing in a couple of speciality rulers—a long quilter's ruler or a curved one for dressmaking can make all the difference when precision is key.
Elevating Your Workspace
Let's talk about lighting. It’s a complete non-negotiable. So many workspaces I see rely on a single overhead light, which is a recipe for shadows and mis-cuts. A dedicated task lamp, especially one you can clip onto your table, solves this problem instantly.
That focused beam of light makes your cutting lines pop, which not only saves your eyes but dramatically improves your accuracy. Getting the lighting right is probably one of the single most impactful upgrades you can make. If you want to explore this further, we've put together a detailed guide on choosing the best lamps for sewing.
The right cutting mat is another cornerstone of a professional setup. While it may seem like a simple surface, a quality self-healing mat protects your table, extends the life of your blades, and provides a stable, non-slip grip on your fabric.
These details matter more than ever. The European industrial sewing market, which includes the UK, was valued at USD 701.05 million in 2025 and is projected to climb to USD 996.96 million by 2033. This growth is partly fuelled by technical textiles that demand absolute precision. You can read more about the rise of the industrial sewing market on straitsresearch.com.
Maintaining Your Cutting Station for Longevity
A little bit of care goes a long way in making sure your cutting table and tools serve you well for years to come. Think of it as protecting your investment. Regular maintenance is simple, but it’s what keeps your setup performing consistently. A reliable station starts with good habits.
Here are a few tips I always follow to keep my gear in top shape:
- Look After Your Mat: Keep your self-healing mat clean by wiping it down with a soft cloth and lukewarm water. This gets all the tiny fibres out of the cuts. And definitely keep it away from direct sunlight or heat sources, as they can cause it to warp.
- Protect the Surface: Even if you use a mat, it's good practice to wipe down the table itself now and then with a gentle cleaner to get rid of dust and fabric scraps.
- Check the Hardware: If you have a folding or adjustable table, take a moment every so often to check that all the hinges, locks, and legs are secure and moving freely. A tiny bit of lubricant on moving parts can work wonders.
By spending just a few minutes on upkeep, you ensure your cutting table for sewing remains the dependable, accurate heart of your creative space.
Your Cutting Table Questions Answered
When you’re finally ready to invest in a proper cutting table for sewing, a few questions are bound to pop up. It feels like a big decision because, frankly, it is. This one piece of furniture is where all your creative work begins. Let's walk through some of the most common queries to help you choose with confidence.
So many of us start out on the dining room table, but it's a workaround at best. Most dining tables are only about 76cm (30 inches) high, which means you’re forced to hunch over. That’s a recipe for serious back strain after just a short time. Plus, you’re constantly worrying about damaging a nice piece of furniture with pins, scissors, and rotary cutters.
A purpose-built cutting table isn't just a luxury; it’s an investment in your craft and, just as importantly, your comfort. It gives you a dedicated, organised workspace at the right height with a surface that can take a bit of punishment.
What Is the Best Height for a Sewing Cutting Table?
The short answer? Counter-height. For most people, that’s around 91cm (36 inches). This height lets you stand and work comfortably without bending, which is absolutely vital for making accurate cuts and saving your back.
For a more personalised fit, you can find your own perfect ergonomic height. Stand up straight and bend your elbow to a 90-degree angle, as if you're about to shake someone's hand. The distance from the floor to your elbow is your ideal working height. Your table should be at or just slightly below this point to keep strain off your neck and shoulders.
If different people will be using the table, or you simply want the option to sit or stand, an adjustable-height model is a fantastic choice. It guarantees everyone gets to work in complete comfort.
What Size Cutting Table Do I Really Need?
The size of your table should be dictated by the size of your projects. It’s that simple. Take a moment to think about the largest patterns or pieces of fabric you work with on a regular basis.
- For quilters and dressmakers, a generous surface area is a must. Something in the region of 102 x 183 cm (40 x 72 inches) will allow you to lay out entire pattern pieces or large fabric sections without them hanging over the edge, which can distort the grain and lead to wonky cuts.
- For smaller crafts, like bag making or children's clothes, a more compact table will do the job just fine without taking over the entire room.
Here's a good rule of thumb: make sure your table is wide enough to support at least half the width of a standard fabric bolt (usually 112cm or 44 inches) when it's folded. This one small detail prevents the fabric from pulling downwards as you cut, which is a common cause of inaccuracies.
How Do I Stop My Fabric from Slipping on the Cutting Table?
There’s nothing more frustrating than fabric that won’t stay put. A straight cut is nearly impossible when your material is sliding around. Thankfully, this is an easy problem to solve. Your best friend here is a large, self-healing cutting mat that covers as much of your tabletop as possible. The slightly grippy surface is often all you need.
For notoriously slippery fabrics like silk, satin, or chiffon, you might need a couple of extra tricks up your sleeve. Try laying a sheet of pattern or tissue paper down first, then placing your fabric on top; the extra friction can make a huge difference.
Another great habit is to switch from pins to pattern weights. They hold the material flat and secure without piercing the fabric or distorting the weave, giving you much cleaner, more precise results. A quick wipe-down to ensure your surface is clean and free of dust or residue also helps.
At Display Guru, we provide the professional-grade equipment you need to create your perfect sewing workspace. Explore our range of durable garment rails and functional display tools to complete your setup at https://www.displayguru.co.uk.