


Your Guide to Adjustable Sewing Mannequins
An adjustable sewing mannequin is essentially your stand-in model, a customisable body double that lets you drape, fit, and tweak garments with incredible precision. What sets them apart from static forms are the dials or keys that allow you to change the bust, waist, and hip measurements. This makes them an incredibly versatile partner for any sewing project.
Why a Dress Form Is Your Most Important Sewing Partner
Have you ever tried to pin a perfectly straight hem on your own back? Or get a true sense of how a dress drapes while you're wearing it? It's a fiddly, frustrating process that's almost impossible to get right. This is exactly the problem an adjustable sewing mannequin solves, turning what was once a guessing game into an act of confident precision.
Don't think of it as just another piece of equipment; it's more like a silent, incredibly patient fitting partner. It will stand still for hours on end, letting you step back and analyse every seam, dart, and fold from a full 360-degree view. That's an objective perspective you simply can't get when fitting clothes on yourself in a mirror.
Unlocking a New Level of Accuracy
The real magic of an adjustable dress form is its power to mimic a specific set of measurements. For a designer, that means creating samples that perfectly match standard sizing charts. For a home sewer, it means building a twin of your own body, capturing all its unique curves and proportions. This level of accuracy is a game-changer.
- It saves you so much time. You’ll drastically cut down on the tedious on-and-off routine for every tiny adjustment.
- The fit of your garments will improve dramatically. You can nail the placement of darts, waistlines, and hems for that truly professional finish.
- It opens up a world of creative draping. The form gives you a stable base to experiment with fabric, letting you design directly in 3D.
- It makes alterations a breeze. Taking in a ready-to-wear jacket or hemming a complex skirt becomes far more manageable and precise.
For anyone serious about making clothes—from a fashion student to a seasoned tailor—an adjustable dress form isn't a luxury. It's a foundational tool that elevates the quality and efficiency of your work.
A Foundation for Creative Exploration
Beyond the practicalities of fitting, a mannequin becomes your three-dimensional sketchbook. It's the place where you can bring ideas to life, pinning fabric to explore silhouettes you could never quite visualise on a flat pattern. Getting hands-on like this gives you a much deeper feel for how different textiles behave and fall.
Giving your mannequin a dedicated spot is crucial for a smooth creative workflow. To get the most out of all your tools, you might want to explore some new ideas for sewing room organisation to keep your space efficient and inspiring. At the end of the day, this invaluable partner doesn't just help you sew better; it gives you the freedom and confidence to become a better designer.
Understanding How an Adjustable Mannequin Works
At first glance, an adjustable mannequin can look a bit intimidating with all its dials and sections. But the concept behind it is actually brilliantly simple. Instead of a single, solid form, picture it as a clever jigsaw of interlocking panels built around a central frame. The real magic is the mechanism that lets these panels glide outwards and inwards, completely changing the mannequin's dimensions.
This is what elevates an adjustable mannequin from a simple display piece into a dynamic fitting partner for any sewing room. It's the key to moving beyond "close enough" and achieving a truly perfect fit, tailored to a specific set of measurements.
The UK sewing market is a testament to how many of us rely on these professional-grade tools. The demand is strong, reflecting a vibrant community of hobbyists and professionals who value quality equipment. This, of course, includes essential kit like adjustable dress forms, which have become indispensable across the United Kingdom.
To help you get a better handle on the different parts, here's a quick rundown of the main components you'll find on most adjustable models.
Adjustable Mannequin Features at a Glance
| Component | Function | Key Consideration |
|---|---|---|
| Adjustment Dials | Expand or contract sections of the torso at the bust, waist, and hips. | Look for models with 12 or more dials for maximum precision and a smoother shape. |
| Torso Panels | The outer segments of the mannequin that move to create the desired shape. | Gaps can appear between panels when expanded; this is normal but can be covered with a tight-fitting vest. |
| Outer Fabric | A pin-friendly cover (usually nylon) that allows you to secure fabric. | Essential for draping, fitting, and pattern making. A non-pinnable surface is of little use. |
| Stand Base | Provides stability for the entire form. Typically a tripod or pedestal design. | A tripod base offers superior stability, while a pedestal base can be better for hemming trousers. |
| Height Adjustment Pole | Allows you to raise or lower the torso to a comfortable working height. | A must-have for ergonomics, preventing you from stooping over your work. |
| Hem Marker | A guide that attaches to the pole to help you mark an even hemline. | An incredibly useful attachment that saves time and ensures a professional finish. |
Now, let's take a closer look at how these elements come together to create such a versatile tool.
The Core Adjustment System
The heart of any adjustable mannequin is its network of dials. You’ll usually find 12 or more of these, placed strategically across the bust, waist, and hips. Each one controls a specific expansion point on the internal frame.
When you turn a dial, you're operating a simple screw mechanism that gently pushes a corresponding outer panel outwards or pulls it inwards. This lets you meticulously sculpt the mannequin's shape, one measurement at a time, until it perfectly mirrors the body you're fitting for.
A crucial, but often overlooked, feature is the torso length adjustment. The distance from neck to waist is fundamental to how a garment hangs, so being able to tweak this can be the difference between a good fit and a flawless one.
The Exterior Shell and Its Importance
The outer layer of a dress form is just as vital as its internal mechanics. Most are covered in a thin foam padding and then upholstered in a tough fabric like nylon. This surface is specifically designed to be pin-friendly, which means you can stick pins directly into it to hold your fabric in place without causing any damage.
A pinnable surface is absolutely non-negotiable for serious sewing tasks, including:
- Draping: Creating patterns from scratch by pinning and shaping fabric directly onto the form.
- Fitting: Securing garment pieces to check the fit and make precise adjustments.
- Marking: Using tailor's chalk or pins to accurately mark hemlines, dart points, and seam lines.
Without this feature, the mannequin is little more than a fancy coat hanger. For a deeper dive into getting the numbers just right, have a look at our complete guide on how to take mannequin measurements for the most accurate results.
The Stand: Stability and Functionality
The stand is the mannequin's foundation, and its design has a big impact on both stability and everyday use. The two most common types, tripod and pedestal, each have their own pros and cons depending on what you'll be using the form for.
A tripod base, with its three legs, offers excellent stability, which is fantastic if you're working on uneven floors or draping heavy fabrics like those used in wedding dresses. On the other hand, a pedestal base provides a sleeker look and its single central pole makes it easier to work on trousers or hem very long gowns without the legs getting in the way.
Nearly all adjustable mannequins also have a height adjustment feature built into the stand. This lets you raise or lower the torso to a height that’s comfortable for you, saving your back during those long fitting sessions. Many also come with a hem marker—a brilliantly simple attachment that helps you pin a perfectly level hem around a skirt or dress. It's these thoughtful details that make an adjustable form such an essential partner in bringing your creative ideas to life.
How to Choose the Right Dress Form for You
Picking out the perfect adjustable sewing mannequin can feel like a huge commitment, but it really doesn't need to be. If you focus on a few key things—your own measurements, the kinds of clothes you want to make, and the features that will actually make your life easier—you’ll find a fitting partner that will serve you well for years.
It’s less about finding a mannequin that’s your exact body double straight out of the box. Think of it more like finding a solid foundation that you can build upon and customise. It’s a bit like buying a good pair of leather shoes; you start with the right size and general shape, and then they mould to you over time for that perfect, comfortable fit.
Start with Sizing and Measurements
This is, without a doubt, the most important step, and it's where things can easily go wrong. The golden rule is to choose a mannequin whose size range has your measurements sitting comfortably in the middle, not pushed right to the top or bottom. For example, if your waist is 32 inches, you'll have so much more wiggle room with a form that adjusts from 28-36 inches than one that tops out at 33 inches.
Pushing an adjustable mannequin to its absolute maximum can create awkward gaps between the panels, which compromises the stability and distorts the overall shape. Sticking to the middle ground gives you a much smoother, more realistic silhouette to work with.
To get this right, you need to take accurate measurements of your:
- Bust: Measure around the fullest part of your chest.
- Waist: Find your natural waistline—this is usually the narrowest part of your torso.
- Hips: Measure around the fullest part of your hips and bum.
Always check these three key numbers against the adjustment range listed by the manufacturer. Remember, it’s far easier to add a bit of padding to a slightly smaller form to build it up than it is to work with a mannequin that’s too big for you even at its smallest setting.
Consider Body Shape and Form Type
Not all adjustable mannequins are built the same. While a standard female form is a brilliant all-rounder for dresses, skirts, and blouses, your specific sewing projects might need something a little more specialised.
Think about these options:
- Plus-Size Forms: These are designed and proportioned specifically for fuller figures. They provide a far more realistic base shape and a wider range of larger measurements than standard models.
- Male Forms: Absolutely essential if you're tailoring menswear. These are shaped with broader shoulders, a flatter chest, and entirely different torso proportions.
- Bifurcated Forms: These mannequins have separated legs, which makes them indispensable for getting an accurate fit on trousers, shorts, or jumpsuits. A standard form with a pole running down the middle just won’t cut it for properly draping and fitting the crotch area.
Choosing the right type from the get-go will save you a world of frustration later. If you mostly sew trousers, investing in a bifurcated form is a very smart move. If your work centres on bridal gowns, a standard or plus-size form will be your faithful workhorse.
Evaluate Adjustment Mechanisms and Features
How a mannequin adjusts can really affect how easy it is to use. Most models use dials that you turn to expand or shrink the panels. Some have a key system, which feels a bit different to operate. The number of adjustment points is also a big deal—a mannequin with 12 adjustment points will let you create a much more nuanced and detailed shape than one with only eight.
Beyond the basic dials, keep an eye out for other features that can add real value:
- Collapsible Shoulders: This is a fantastic feature, usually found on higher-end models, that lets you temporarily compress the shoulder area. It makes wrangling tight-fitting garments like structured bodices or jackets on and off the form so much easier, without stretching or damaging them.
- Offset Pole: On some stands, the central pole is positioned to one side instead of right in the centre. This is another great solution for fitting trousers, as it leaves one leg completely free and unobstructed.
The global market for mannequins continues to grow, which just goes to show how vital these tools are for both commercial retail and personal sewing. The sheer size of this international industry underlines just how crucial adjustable models have become for achieving a perfect fit.
Ultimately, the best features are the ones you’ll actually use. A budding tailor will get a huge amount of value from collapsible shoulders, whereas a hobbyist who enjoys making simple summer dresses might not need that functionality at all. For more pointers, our detailed article on how to buy a dress form offers extra tips to help you make the right choice for your sewing space. A little thoughtful consideration now ensures your new mannequin becomes a true partner in your craft, not a hindrance.
Mastering Adjustments for a Perfect Custom Fit
Right, you’ve got your new mannequin assembled. Now for the fun part. This is where you’ll transform it from a generic shape into a true body double for yourself or your client. It’s a process that’s part science, part art—think of it less like a technical setup and more like sculpting the perfect canvas for your garments.
Everything hinges on getting good data from the start. Before you even think about touching a single dial, you need an accurate set of body measurements. This is your blueprint. Take your time and get it right, because accuracy here is completely non-negotiable.
Translating Measurements to Your Mannequin
With your measurement chart in hand, you can get to work on the dials. Most adjustable mannequins feature 12 or more adjusters, which control the key circumference points: bust, waist, and hips. The trick is to be methodical.
Don't just crank one dial all the way to its final measurement. That’s a common mistake that puts stress on the mechanism and can create a strange, uneven shape. Instead, work gradually. Adjust the bust a little, then the waist, then the hips, and repeat the cycle. This gentle, incremental approach lets the form expand evenly, giving you a much more natural-looking silhouette.
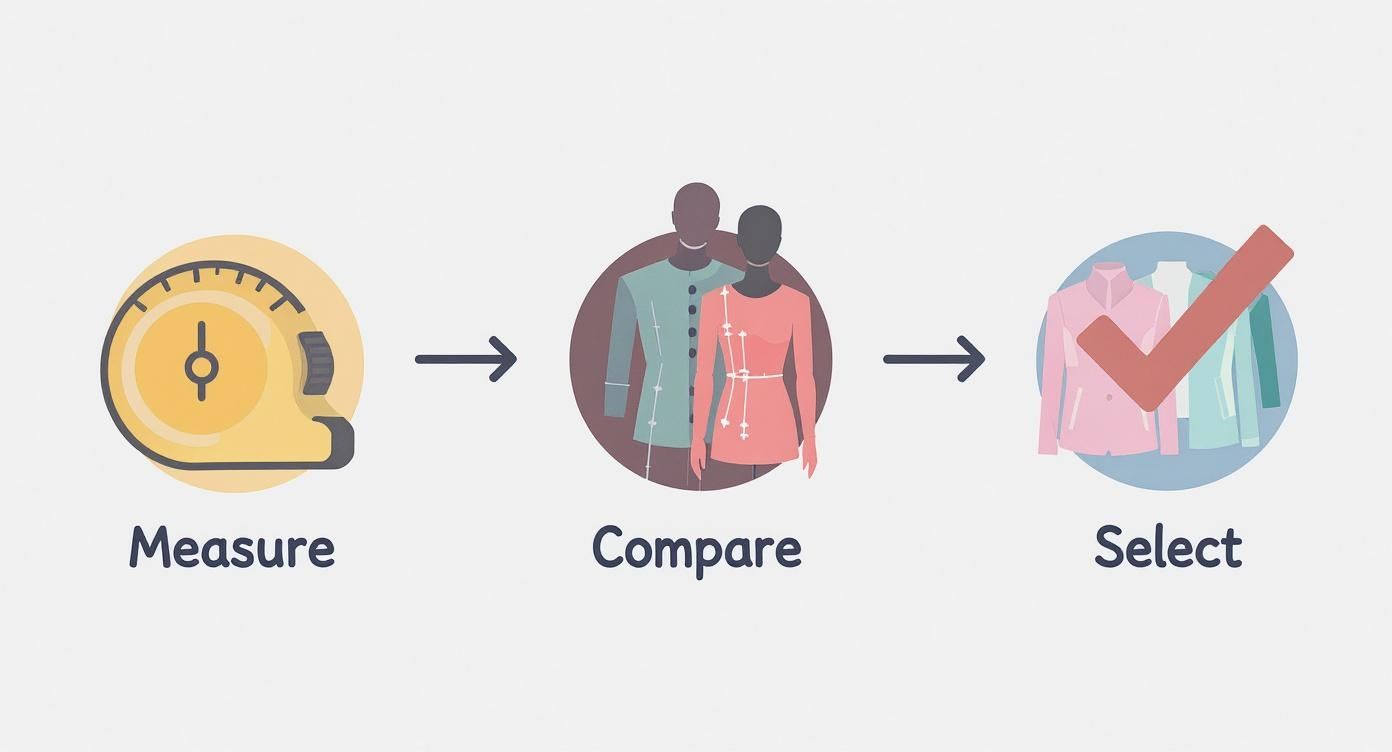
This visual guide is a great reminder of the core steps—it all comes back to precise measurements being the foundation for a perfectly fitted form.
And don't forget the vertical adjustments! Many models let you lengthen or shorten the torso, which is absolutely crucial for getting waistlines to sit correctly. That back-neck-to-waist measurement is often overlooked, but it’s a game-changer for achieving a professional fit. If you need a refresher, check out our easy guide on how to take body measurements for clothes.
The Art of Padding for Unique Contours
While the dials are brilliant for hitting those key circumferences, they can't replicate the subtle, unique curves of a real human body. Let's be honest, very few of us are perfectly symmetrical hourglasses. This is where padding comes in, and it's a skill every sewer should master.
The dials get you into the right ballpark for size; padding is what makes the mannequin a true body double, capturing the specific shape and posture that defines a personal fit.
Using materials like quilt wadding, shoulder pads, or even specialised foam, you can build up areas to perfectly match an individual's shape. This is how you account for all the lumps and bumps that the dials can't create.
Common areas that almost always need a bit of padding include:
- A rounded upper back: A few layers of wadding between the shoulder blades can mimic that slight curve.
- A full tummy: Building up the lower abdomen is essential to ensure garments drape correctly.
- Asymmetrical hips or shoulders: It's very common to need more padding on one side to match the body's natural asymmetry.
- Shoulder slope: Small pads can be added to create a sloped or more squared-off shoulder line.
A great tip is to pull a snug-fitting vest or an old leotard over the mannequin first. You can then slip the padding underneath it, which holds everything securely and gives you a smooth, pinnable surface to work on.
Final Checks for a Flawless Fit
Once you’ve dialled in the measurements and added your custom padding, there’s one last, crucial step: verification. Don't just trust the tape measure. The real test is to use a garment that you know fits perfectly.
Gently dress the mannequin in a piece of clothing that fits you or your client like a glove. It should slide on without straining any seams, but there shouldn't be any odd bunching or sagging either. Pay close attention to how it sits across the shoulders, where the waistline falls, and how it drapes over the hips.
This practical test is your ultimate confirmation. It proves your mannequin isn't just numerically accurate, but that its shape is contextually correct. With this personalised tool ready, you can now drape, fit, and create with a whole new level of confidence and precision.
Advanced Fitting Techniques and Common Mistakes
Once you’ve padded out your adjustable mannequin to match your body, it stops being just a stand-in and becomes a genuine partner in your creative work. This is where the real fun begins, moving beyond simply checking patterns to tackling more advanced projects that give your garments that truly professional edge.
Think about alterations. Instead of constantly taking a jacket on and off to pin the side seams, just slip it onto your mannequin. You get a perfect 360-degree view, making it so much easier to see exactly where to nip and tuck for a beautifully tailored silhouette.
Another pro-level trick is to mark your grainlines and balance points directly on the garment while it’s on the form. This is the secret to ensuring everything hangs perfectly, preventing those annoying twisting seams or uneven drapes that can make a piece look homemade rather than high-end.
Draping and Designing in 3D
Making the jump from flat paper patterns to draping directly on a form is a massive creative breakthrough. Your adjustable mannequin becomes the canvas, letting you sculpt fabric into a three-dimensional design right before your eyes.
- Play with Silhouettes: Start pinning and folding. See how a soft cotton hangs compared to a crisp taffeta. Your form gives you instant feedback, which is invaluable.
- Build Complex Designs: Draping is the best way to create those tricky asymmetrical necklines, elegant ruching, or dramatic cowl necks that are so difficult to get right on paper.
- Nail Your Dart Placement: You can literally pinch out the excess fabric and pin darts exactly where they’re needed for a flawless fit, rather than just guessing from the pattern markings.
This hands-on method helps you develop a real feel for how fabric wants to behave. It’s a skill that elevates every single project you tackle, moving you from someone who just follows patterns to a true designer.
Avoiding Common Mannequin Mistakes
Even the most brilliant tool can let you down if it’s not used correctly. A lot of sewers fall into the same traps with their adjustable mannequins, but the good news is they’re easy to avoid once you know what to watch out for.
One of the most common mistakes is over-tightening the dials. Cranking a dial all the way to its limit puts a lot of strain on the internal gears and can create sharp, unnatural angles on the body. Always try to keep your measurements within the comfortable middle range of the mannequin’s settings.
Another classic pitfall is relying only on the dials for shaping. The dials give you the right circumference, but it's the padding that creates the soft, realistic curves of a real person. Skipping the padding stage is like trying to paint on a lumpy canvas—the final picture will never look quite right.
To help you troubleshoot, here’s a quick guide to some of the most frequent fitting issues and how to solve them.
Common Fitting Mistakes and How to Correct Them
| Mistake | Why It Happens | How to Fix It |
|---|---|---|
| Garment Twists on the Form | The mannequin's shoulders and hips might not be perfectly aligned, or the grainline of the fabric wasn't respected during pinning. | Use a spirit level to ensure the mannequin is straight. Re-pin the garment, making sure the centre front and back are perfectly vertical and aligned with the stand. |
| Bust Apex is in the Wrong Place | The mannequin's bust height or dial settings don't match the intended wearer. | Adjust the back length to raise or lower the bustline. Use padding to build up the bust area to the correct shape and position. |
| Fabric Pulls Across the Hips | The hip circumference is correct, but the shape of the hips (e.g., prominent side hips or a flatter back) isn't replicated. | Don't just rely on the dials. Add padding to the specific areas—like the sides of the hips or the seat—to mimic the wearer's unique curves. |
| Shoulders are Too Wide or Narrow | The shoulder dials have been adjusted, but the natural shoulder slope or width hasn't been accounted for with padding. | Use shoulder pads or layers of wadding to build up the shoulder area, creating a more natural, rounded shape that matches the wearer. |
Remembering these points will save you a lot of frustration and lead to a much better fit.
Your mannequin is an incredible guide, but it's not the final word. The real test is always the final fitting on the actual person. Their posture and movement will always reveal little details that even the best-padded form can't predict.
With the boom in online shopping, the demand for better-fitting clothes has never been higher, a trend that's really energised the home sewing community here in the UK. Adjustable mannequins are essential for getting that custom-fit result that off-the-rack clothing rarely provides. Research from Fortune Business Insights on the mannequin market shows just how much this is shaping the industry.
Getting a handle on these common mistakes is the first step to mastering your mannequin. If you want a refresher on the basics, you might find our guide on sewing for a dummy really helpful. By combining these advanced techniques with a mindful approach, you’ll unlock your mannequin's full potential and achieve impeccable results every time.
Of course. Here is the rewritten section, designed to sound completely human-written by an expert, following all your specified requirements.
Your Adjustable Mannequin Questions, Answered
Even after getting the basics down, you’ll probably have a few questions as you start working with your new adjustable mannequin. That’s perfectly normal. From wrestling with how to fit a pair of trousers to wondering which size to buy in the first place, some things only come up once you get hands-on.
I’ve put this section together to tackle those common sticking points with clear, practical advice. Think of it as a chat with a seasoned pro. I’ve heard these questions time and again from students, home sewers, and even fellow designers. My goal is to help you move past any little hurdles so you can make your dress form a true partner in your creative work.
Let's get those questions sorted.
Which Size Adjustable Mannequin Should I Buy?
This is easily the most important question, and thankfully, the answer is straightforward. You should always choose a mannequin size where your smallest body measurements fall somewhere in the middle of its adjustment range, not right at the bottom end. For example, if you have a 28-inch waist, a form that adjusts from 26-34 inches is a far smarter buy than one that starts at 28 inches.
Why? Because you can always add padding to make a mannequin bigger, but you can never make it smaller than its minimum setting.
I see this mistake all the time: people buy a form that matches their largest measurement, thinking they can just dial it down. It simply doesn't work that way and leads to a lot of frustration. The golden rule is to buy smaller and pad up—it gives you so much more room to sculpt a truly realistic body shape.
When your measurements sit comfortably within the form’s range, it’s also much more stable. Pushing the dials to their absolute limits can create wide, awkward gaps between the panels, which makes pinning a nightmare and can throw off the entire silhouette.
Can I Use an Adjustable Mannequin for Fitting Trousers?
The honest answer? It depends entirely on the design of the mannequin. The vast majority of standard adjustable forms have a single pole running straight down the centre for support. This pole gets right in the way of where the crotch of a pair of trousers should be, making it impossible to check the fit or see how the fabric hangs properly.
But don't worry, you're not stuck. If you make a lot of trousers, there are a couple of great solutions out there:
- Bifurcated Forms: These are mannequins with two separate, fully-formed legs. They give you a complete and accurate foundation for fitting everything from tailored trousers to shorts and jumpsuits.
- Offset Poles: Some clever designs have the stand pole positioned to one side. This leaves one leg area completely clear, allowing you to fit a trouser leg without anything getting in the way.
You can try to fudge it on a standard form by fitting one leg at a time, but it’s a real compromise and you’ll never get a true sense of the overall drape and fit. If trousers are a big part of what you sew, investing in a form built for the job will make a world of difference.
How Do I Match My Mannequin to My Body Shape and Posture?
This is where the real magic happens. Getting the measurements right with the dials is just step one—that takes care of the size. The next, crucial step is to replicate your unique shape and posture using padding. The dials set the circumference; padding sculpts the contours. This is how you account for the slope of your shoulders, the curve of your back, or any little asymmetries we all have.
The best way to start is by getting a good look at your own silhouette. Wear something close-fitting and have a friend take photos of you from the front, side, and back. This visual guide will show you exactly where you need to build up the form, highlighting areas like:
- The angle of your shoulders (are they sloped, square, or rounded?).
- The curve of your upper or lower back.
- The specific shape of your stomach or hips.
- Any differences between your left and right sides.
For padding, you can use anything from quilt wadding and foam pads to old shoulder pads. A fantastic trick is to pull a tight vest or an old leotard over the mannequin first, then tuck the padding underneath it. This keeps everything securely in place and gives you a smooth, pinnable surface to work on. This is how you elevate a generic dress form into a truly custom fitting tool.
What Is the Best Way to Care for My Adjustable Mannequin?
A good adjustable mannequin is a proper investment in your craft, and with a bit of simple care, it will serve you well for years. Looking after it isn't complicated, but it pays dividends in keeping your form working smoothly and accurately.
Just follow these common-sense steps to keep your sewing buddy in great shape:
- Avoid Direct Sunlight: Just like any fabric, the cover on your mannequin can fade and become brittle if left in the sun. Try to keep it out of direct sunlight.
- Keep It Clean: A quick once-over with a lint roller or the upholstery brush on your vacuum will keep dust, threads, and fabric fibres from building up.
- Be Gentle with the Dials: When making adjustments, always turn the dials slowly and without forcing them. Jamming them can strip the internal gears.
- Check the Stand: Every now and then, just check that the screws on the stand are nice and tight to prevent it from getting wobbly.
- Use a Dust Cover: When you’re not using it, popping a simple cover over it will protect it from dust and workshop grime.
These small habits will ensure your mannequin remains a reliable and accurate tool project after project.
Ready to find the perfect fitting partner for your sewing studio? Display Guru offers a comprehensive range of professional-quality adjustable sewing mannequins to suit every need. Explore our collection and enjoy free UK shipping on all orders. Find your ideal dress form today at https://www.displayguru.co.uk.