


A Complete Guide to Wig Mannequin Heads for Stylists
A good wig mannequin head is more than just a place to park your wig. It's the foundation for everything you do, from styling and cutting to simple storage and display. Whether you're a seasoned stylist who needs a workhorse for daily use or a wig enthusiast who just wants to keep their pieces in perfect shape, your choice matters. Getting it right from the start will protect your investment and make your life a whole lot easier.
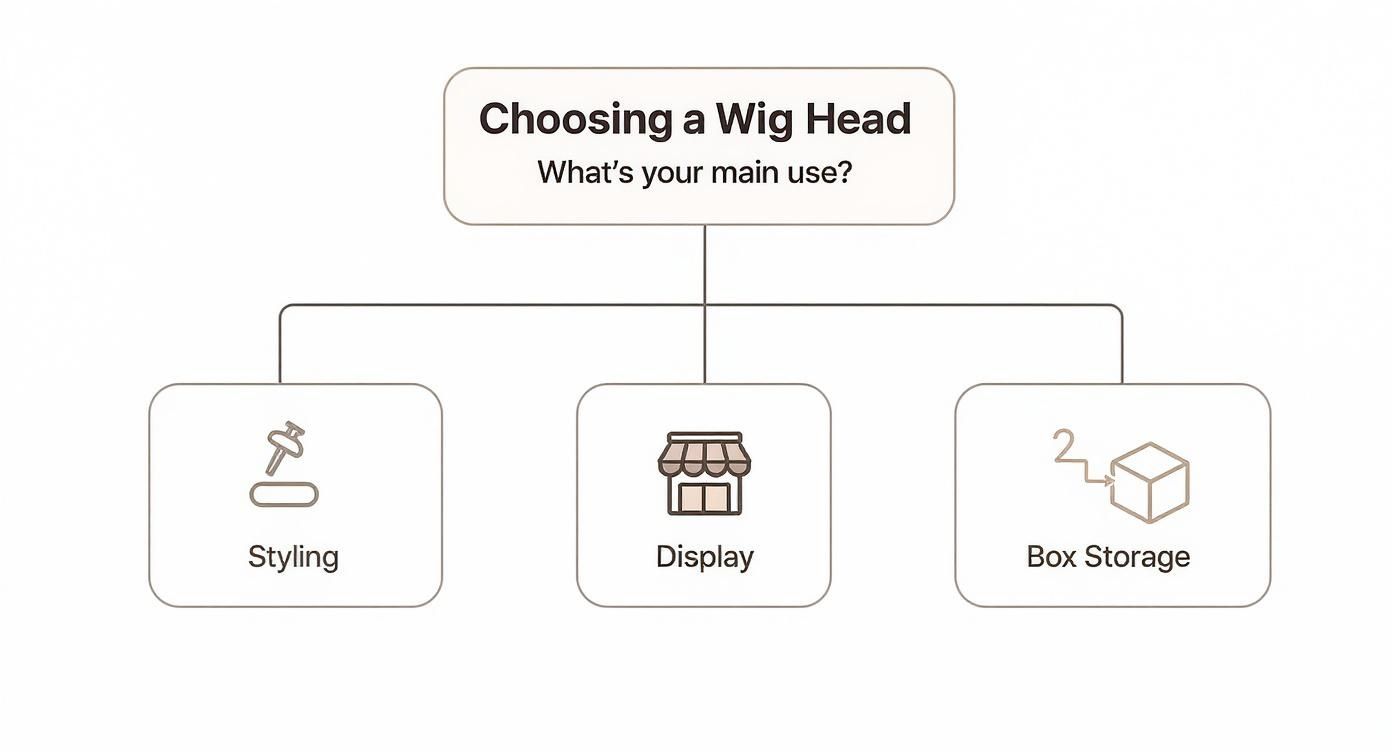
Choosing the Right Wig Mannequin Head for Your Needs
Picking out the right wig head isn't about grabbing the first one you see. It's a strategic choice that can make the difference between a frustrating styling session and a flawless finish. In the UK, where the hair wigs and extensions market was valued at around USD 342.3 million in 2021, professionals know that a quality mannequin is a non-negotiable part of their toolkit. For stylists and wig makers, this is where the magic begins.
The first thing to think about is the material, because that really dictates what you can and can't do.
Material Matters: The Foundation of Your Work
The material of your wig head directly affects its durability, what styling techniques you can use, and how long it'll last. Each type has its own pros and cons, so let's break them down.
- Canvas Block Heads: These are the industry standard for a reason. With a canvas cover over a solid cork or polyurethane base, they’re built to take a beating. You can stick T-pins in them all day long to secure a wig for heavy-duty styling, colouring, or cutting.
- Cork Mannequin Heads: Made entirely from cork, these are the toughest of the bunch. They offer an incredibly firm grip for T-pins, which is perfect if you’re ventilating a new wig from scratch or doing intricate customisation work. They last forever.
- Styrofoam Heads: You'll see these everywhere because they're cheap and cheerful. They’re fine for basic storage or a simple display, but that's about it. Don't even think about using heat on them, and be warned that T-pins will wiggle loose very quickly.
- Plastic/PVC Heads: These are your go-to for retail. They often come with realistic makeup and features, making them fantastic for showing off a finished style in a salon window. While not built for styling, they excel at presentation. If you're looking into retail, it's worth exploring the best types of mannequins for shops to create truly eye-catching displays.
Here's a quick comparison to help you weigh up the options.
Wig Mannequin Head Material Comparison
A quick comparison of common mannequin head materials to help you choose the best option for your wig styling and storage needs.
| Material Type | Best For | Heat Styling? | Durability | Price Point |
|---|---|---|---|---|
| Canvas Block | Heavy-duty styling, cutting, colouring, customisation | Yes (with caution) | High | Mid-to-High |
| Cork | Wig making, ventilating, heavy pinning, long-term use | Yes (with caution) | Very High | High |
| Styrofoam | Light storage, basic display, travel | No | Low | Low |
| Plastic/PVC | Retail display, showcasing finished styles | No | Medium | Low-to-Mid |
Ultimately, it's about matching the head to the job. If you're serious about styling, you need the stability of canvas or cork. For display and storage, styrofoam or plastic will do the trick just fine.
Getting the Size Right
One of the biggest mistakes I see people make is using the wrong size head. It seems like a small detail, but it can completely ruin your work. A head that's too big will stretch the wig cap out of shape, and one that's too small won't hold it securely enough for a precise cut.
Always measure the wig's circumference and choose a mannequin head that is the same size or slightly smaller. A 22-inch wig should go on a 21.5 or 22-inch head, but never a 23-inch one.
To get the right fit, measure your own head (from your hairline, around the back of your head, and back to the front) or check the wig's label. Most adult heads are between 21 and 23 inches. Using a mannequin that mirrors the final wearer's head size ensures that the cut, colour, and style will all fall perfectly into place.
Getting Your Wig Properly Mounted and Secured

Even the most beautiful canvas block head is pretty useless without a solid foundation. If you want to achieve any kind of precision with your styling, cutting, or colouring, you absolutely need a steady base. Any wobble or slip can lead to a wonky haircut or a patchy dye job, turning a straightforward task into a nightmare.
Securing your wig mannequin head properly isn't just a suggestion; it's the crucial first step that paves the way for professional-quality results.
How you mount it really comes down to your workspace and what you'll be doing. Not everyone has the luxury of a full studio setup, but that’s okay—sometimes a simple, clever solution is all you need to get things stable.
Choosing the Right Mounting System
The right stand is what transforms your mannequin head from a simple display form into a proper workhorse. When you're deciding, you'll need to weigh up your available space, your budget, and how intense your styling sessions usually get.
- Table Clamps: These are a fantastic option if you're short on space or if you're a stylist on the go. A good table clamp fastens tightly to the edge of a desk or workbench, giving you a surprisingly sturdy anchor for most styling jobs. They're perfect for detangling, crafting updos, or getting your braiding practice in.
- Tripod Stands: When you're getting into more serious work, like cutting a razor-sharp bob or applying a full head of colour, a heavy-duty tripod becomes essential. These freestanding mounts give you 360-degree access and let you adjust the height, so you can work comfortably from any angle without being stuck at a table.
Think about the kind of work you do most often. If you're colouring a long wig, for instance, a tripod lets the hair hang freely, which is key to avoiding splotchy, uneven saturation. But if you’re just doing a quick steam-style on a fringe, a table clamp is more than enough and won't take up half your room.
For a deeper dive into the pros and cons, our guide to choosing a head mannequin stand can help you find the perfect fit.
One of the most common mistakes I see is people not tightening the mount enough. Always give it a final check to make sure your clamp or tripod is completely locked down before you even think about putting the wig on. The last thing you want is your masterpiece taking a tumble mid-snip.
The Art of Pinning Without Causing Damage
Once your head is securely mounted, it's time to get the wig itself in place. This is where T-pins become your best friend, but there's a right way and a wrong way to use them. Used incorrectly, they can easily damage a delicate lace front or stretch out the wig cap. The goal is to create just enough tension to hold the wig firmly, without pulling or tearing the foundation.
Your pinning strategy should change depending on the wig and what you're doing. For a full lace wig, for example, you'll want to aim for the poly-strip seams or other reinforced areas to avoid poking holes in the fragile lace.
For maximum security, try this strategic pinning pattern:
- Start at the Nape: Your first move should be to place two T-pins at the very bottom edge of the wig cap at the back. This anchors the whole thing and stops it from riding up as you work.
- Secure the Sides: Next, add one pin on each side, right above where the ear tabs would naturally sit. This is crucial for stopping any side-to-side shifting.
- Pin the Front: If you’re not touching the hairline, you can place a few pins along the front perimeter. If you are working on the hairline, place the pins just behind it to keep the lace totally free.
This "four-corner" approach creates a nice, even tension that keeps the wig locked down for everything from a simple comb-through to a full heat styling session. With a stable mount and a perfectly pinned wig, your mannequin head truly becomes your most reliable assistant.
Advanced Styling and Customisation on a Mannequin
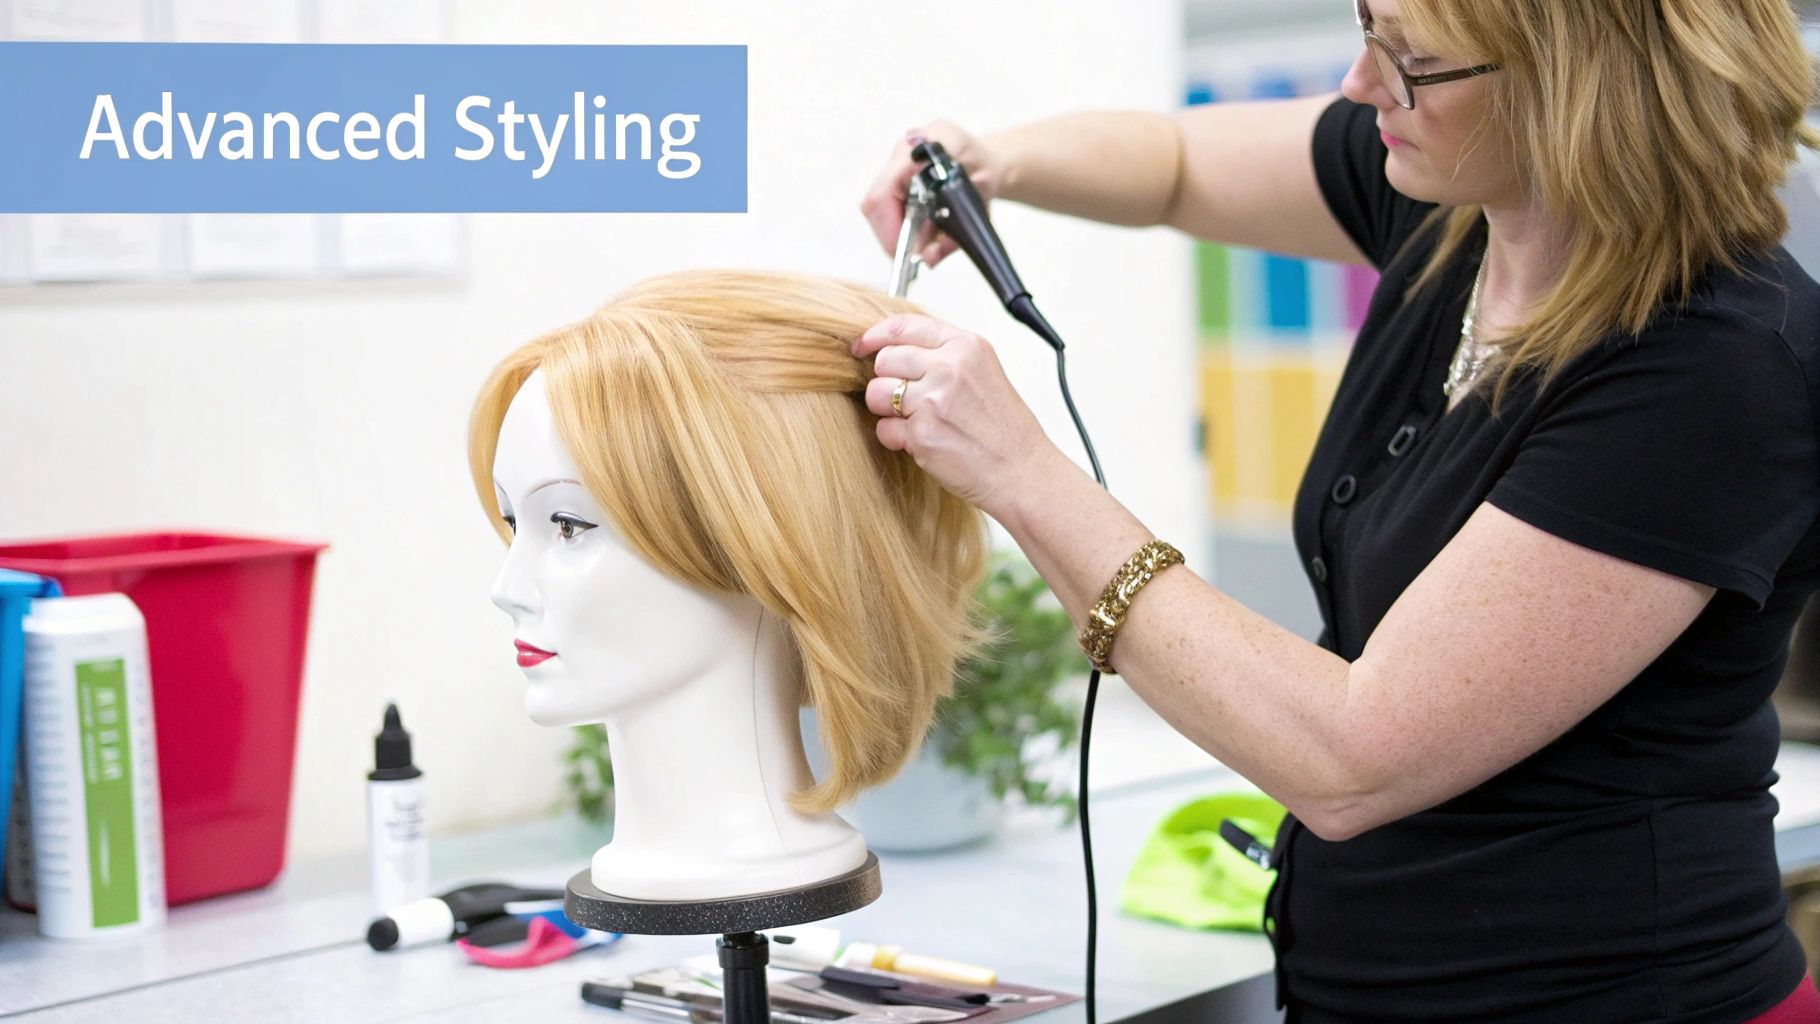
Once your wig is firmly in place, your mannequin head becomes your creative partner. This is where you graduate from basic prep and storage to true artistry, transforming a standard wig into something truly bespoke. The stability and 360-degree access you get from a properly mounted head are second to none for detailed, precision work.
Trying to style on a live model can be a challenge—they fidget, they get tired. A mannequin head, on the other hand, gives you complete control. You can take your time, perfect complex techniques, and achieve consistently professional results, every single time.
Achieving a Flawless Cut
Cutting a wig on a mannequin head is a game-changer, especially when it comes to symmetry. Whether you're aiming for a razor-sharp bob or crafting soft, cascading layers, the stationary head lets you inspect your work from every possible angle.
Think about cutting a fringe. You can get that line perfectly horizontal without having to worry about a client tilting their head. It’s the perfect setup for meticulously sectioning the hair and using techniques like point-cutting to build texture that looks completely natural when worn.
A little tip from experience: always remember where the wig will sit on the actual wearer. I make a point of measuring the distance from the mannequin’s hairline to its brow and comparing it with my client’s measurements. This ensures the fringe lands exactly where it should.
Mastering Heat Styling and Colour Application
A mannequin head allows you to create lasting curls or a super-sleek finish without feeling rushed. For human hair wigs, always start with a good quality heat protectant. Set your curling wand or straighteners to a medium heat and hold each section until the style sets. The real trick is to let the hair cool down completely on the head to really lock that shape in.
If you’re experimenting with new looks, you’ll want to keep the wig in top condition. It’s always a good idea to explore valuable heatless styling techniques to get creative without causing damage. This is especially crucial for preserving the integrity of both human hair and high-end synthetic fibres over the long run.
For colourists, a mannequin head is absolutely indispensable. It’s the perfect station for applying dye evenly and avoiding those dreaded "hot roots" or patchy areas. You can saturate every strand with total precision, making techniques like balayage or root melts so much easier to control.
- Even Saturation: Section the hair cleanly and apply your colour, making sure every part of the wig is completely covered.
- Preventing Stains: The mannequin head contains all the mess, protecting your workspace and, crucially, the wig’s delicate lace from stray dye.
- Processing Time: You can easily monitor how the colour is developing without any fuss, ensuring it processes to the perfect shade.
The value of these tools is clear when you look at the industry itself. In 2024, the wig and hairpiece design segment of the global mannequin head market was valued at an estimated USD 496.1 million. This figure alone shows just how vital these heads are for professionals.
Whether you're cutting, colouring, or styling, a reliable mannequin is like having an extra pair of hands. While we're focused on hair here, the principles of good presentation are universal. For more on that, you might find our guide on how to dress a mannequin useful. It’s this commitment to the details that will truly set your work apart.
Maintaining and Storing Your Mannequin Head
Just like any good tool, your mannequin head needs a bit of care to perform its best. Looking after it properly isn't just about keeping it clean; it's about making sure you have a reliable, pristine base for every single wig you work on. A well-maintained head prevents product buildup, pesky stains, and general wear and tear from ruining your next project.
Regular cleaning is an absolute must, particularly after you’ve finished a big styling session or a colour job. If you skip this, you risk transferring old hairspray, dye, or styling products onto a fresh wig, which can completely undo all your hard work. How you clean it, though, really comes down to what it’s made of.
Keeping Your Mannequin in Top Condition
Every material has its own cleaning needs. Using the wrong products can cause some serious, irreversible damage, so it pays to know what you’re doing.
- Canvas Heads: Your best bet here is a mild soap or shampoo mixed with warm water. Grab a soft cloth, dip it in the sudsy water, and gently scrub the canvas. Pay close attention to any areas with makeup smudges or sticky hairspray residue. To finish, wipe it down with a clean, damp cloth and let it air dry completely before using it again.
- Cork Heads: Cork is pretty tough, but it can be quite absorbent. A quick wipe with a lightly dampened cloth is usually enough. If you’ve got stubborn product spots, a tiny bit of diluted isopropyl alcohol on a cotton pad will usually lift them without soaking the cork.
- Styrofoam and Plastic Heads: These are by far the easiest to look after. A simple wipe-down with a damp cloth and a touch of mild detergent will get rid of dust and smudges on your wig mannequin heads in no time.
One of the biggest mistakes I see people make is reaching for harsh chemical cleaners. They can completely ruin the surface of a mannequin over time. Stick with gentle, simple solutions—they work perfectly and will keep your head in great shape for years.
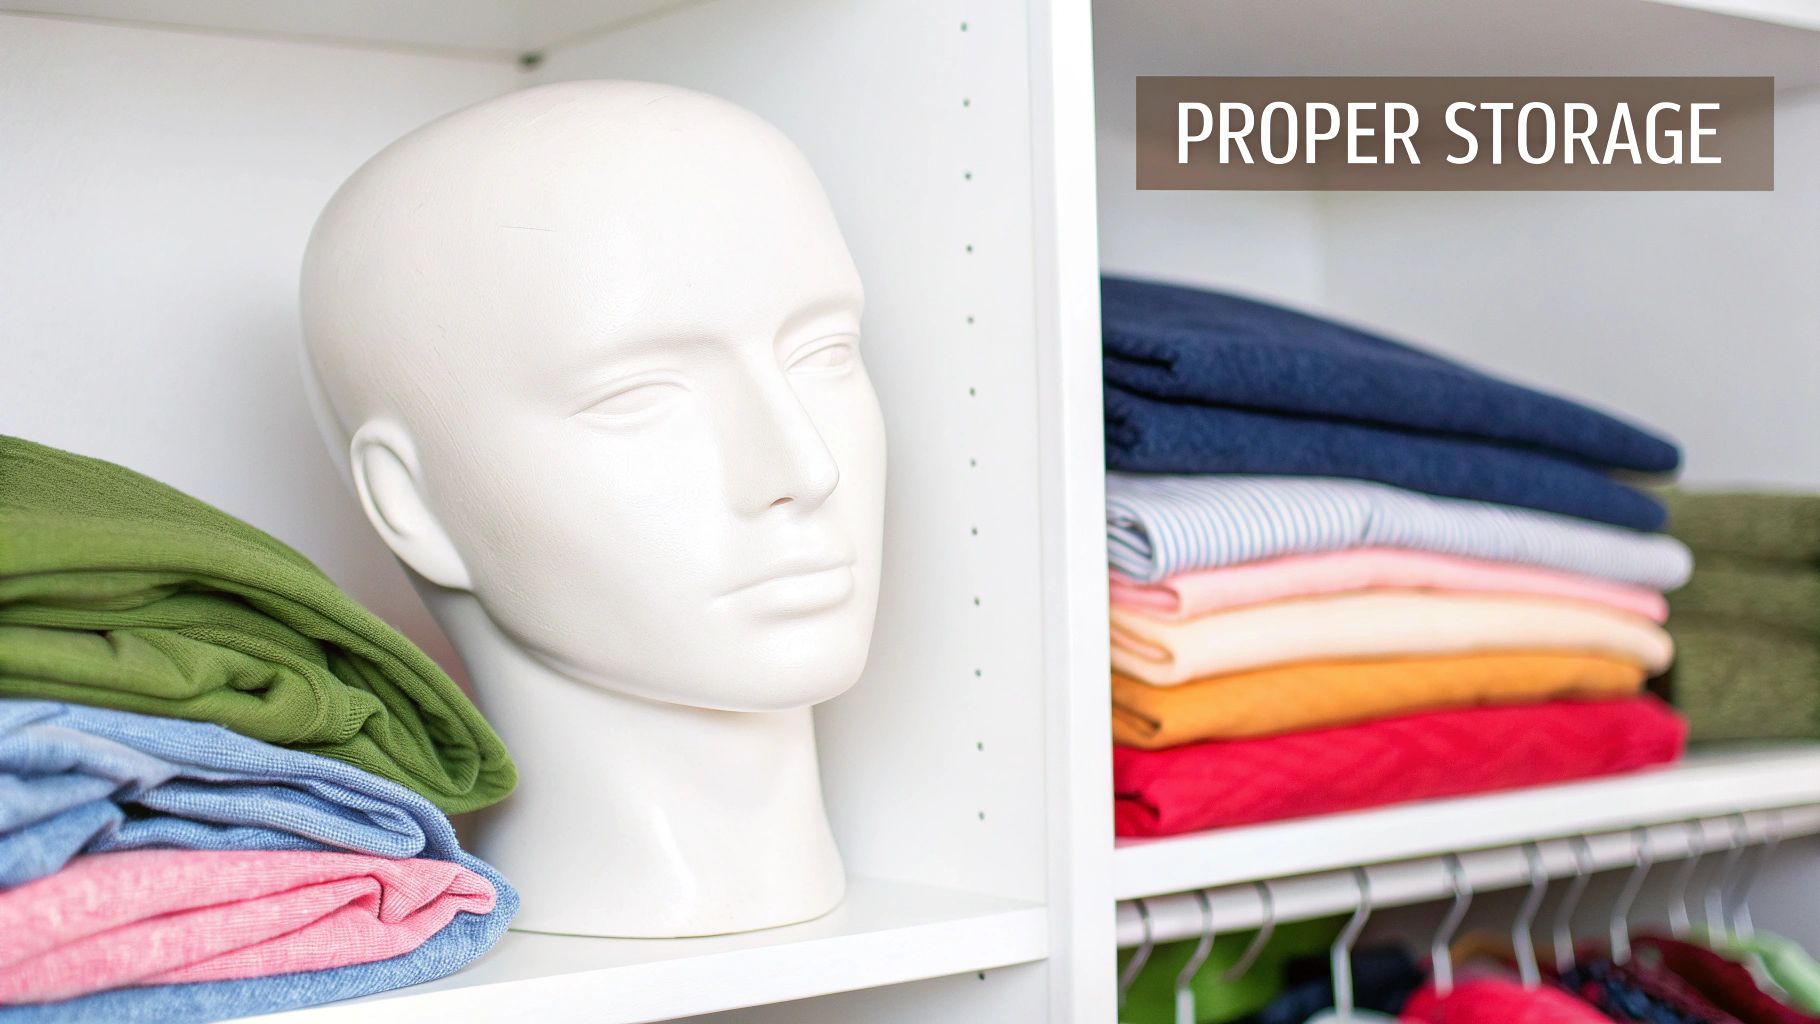
Of course, cleaning is only half the battle. Proper storage is just as vital. Leaving your mannequin head out in the open is a surefire way to collect dust, not to mention risk damage from a stray knock or even sunlight. This is especially important in a busy salon or a cluttered home workspace.
Smart Storage Solutions
When you’re done for the day, your mannequin head needs a safe place to rest. Storing it correctly stops the head from getting distorted and protects it from the elements, which can make certain materials brittle over time. And a quick but important tip: always remove every last T-pin before you put it away.
A simple silk scarf draped over the head or a dedicated storage bag works wonders for keeping dust at bay. For longer-term storage, find a cool, dry spot well away from direct sunlight to prevent any discolouration. Keeping your whole workspace tidy makes a world of difference, too. If you’re looking for ideas, you might find our guide on plastic stacking storage boxes a great source of inspiration for organising all your supplies.
Your Essential Wig Mannequin Head Buyer's Checklist
https://www.youtube.com/embed/xssMLYgsLZ4
Making the right choice from the start means your new tool will actually support your work, not hinder it. Whether you’re a professional stylist with a busy salon or a dedicated hobbyist perfecting your craft at home, this checklist pulls together all our advice to help you ask the right questions before you buy.
The demand for these tools is definitely on the rise. The global mannequin head market was valued at a huge USD 1,042.4 million in 2024 and is set to keep growing, which tells you just how vital they are in the UK beauty industry and worldwide.
What’s Its Main Job?
Before you even start browsing different wig mannequin heads, you need to be crystal clear on what you'll be using it for. The head that looks fantastic on a shop display is almost always the wrong choice for heavy-duty styling.
-
Is this for active styling? If you plan on cutting, colouring, or using heat tools, you absolutely need a durable canvas or cork block head. They’re built to take a beating, securely hold T-pins, and give you the stability needed for precise work.
-
Is it mostly for display or storage? For just showing off a finished look or making sure a wig keeps its shape, a simple and affordable styrofoam or PVC head will do the trick perfectly.
Think of it this way: you wouldn't use a delicate glass vase to hammer in a nail. Choosing the right tool for the job saves a lot of frustration and protects your investment in both the head and your wigs.
Must-Have Features vs. Your Budget
Once you know its primary role, you can start zeroing in on the features that truly matter. It’s easy to get sidetracked by all the options, but focusing on what will genuinely make your work easier is key.
Here's what to consider:
-
What size do I really need? Make sure the head’s circumference matches the wigs you use most often. Most fall between 21 and 23 inches. Getting this right is crucial to avoid stretching out the wig cap.
-
How will I mount it? A basic table clamp can work for light, occasional use. But for serious styling sessions, a sturdy tripod stand offers unbeatable flexibility and height adjustment. A solid mounting system is just as important as the head itself, much like how you'd pick the perfect dress form stand for dressmaking.
-
Do I need realistic features? For a retail setting or client consultations, a head with defined facial features and makeup can make a wig look far more appealing. For back-of-house prep work, a plain canvas head gets the job done without any fuss.
Common Questions About Wig Mannequin Heads
When you're working with wigs, a few questions always seem to pop up, especially when you're trying to get that perfect, professional finish. Whether you're a seasoned stylist or just starting, troubleshooting is part of the game. We've put together answers to some of the most frequent queries we hear about wig mannequin heads to help you get things right.
Think of this as a quick-reference guide to help you get the most out of your most essential styling tool.
How Often Should I Be Washing a Wig on Its Mannequin?
This really comes down to how much the wig is worn and what kind of products you're using. As a general guide, aim to wash a wig after about 8-10 wears. However, if you're a big fan of heavy hairsprays, gels, or mousses, you’ll probably need to wash it more often to get rid of that product build-up.
One of my top tips is to always detangle the wig thoroughly on the mannequin head before it gets wet. This simple step stops tiny tangles from becoming major matted headaches during the wash.
It's a bit of a balancing act. Over-washing can damage the fibres, whether they're human hair or synthetic. The trick is to keep the wig looking and feeling fresh without putting it through unnecessary wear and tear.
Can I Use Heat Styling Tools on Any Mannequin Head?
This is a really important one, and the answer is a definite no. You can only safely use heat on certain types of mannequin heads, and of course, on certain types of wigs.
- Canvas and Cork Heads: These are the professional standard for a reason. They're sturdy enough to handle the heat that transfers through the wig cap while you're styling, so you can work without worry.
- Styrofoam and Plastic Heads: Be very careful with these. They can easily melt, warp, or even release fumes when exposed to the heat from a curling wand or straightener. It's best to avoid direct heat styling when your wig is on one of these.
And it goes without saying, but always double-check that the wig itself is heat-friendly. While most human hair wigs can take the heat (with a good protectant spray!), many synthetic wigs will melt and be ruined instantly.
What’s the Best Way to Stop a Wig from Slipping?
There's nothing more frustrating than a wig that won't stay put while you're trying to cut or style it. The secret to a secure wig isn't just about using more pins; it's about how you pin it.
Instead of just sticking pins in at random, use a more deliberate pattern. I always start by putting T-pins into the nape, then a few along the sides right by the ear tabs. This creates a balanced tension that anchors the wig much more effectively.
If it’s still shifting around, the problem might be the mannequin itself. If your head is too small for the wig, you'll never get a truly stable fit, no matter how many pins you use. The wig cap needs to feel snug on the head before you even pick up your first pin.
At Display Guru, we stock the professional-grade tools you need to do your best work. Take a look at our collection of robust mannequin heads and sturdy stands designed to elevate your styling. Visit us at https://www.displayguru.co.uk and find the perfect foundation for your next masterpiece.