


7 Sewing Room Layout Ideas to Transform Your Space in 2025
An organised sewing room is the foundation of creative efficiency. Moving beyond generic advice, this guide explores seven distinct, actionable sewing room layout ideas designed to optimise your workflow, regardless of your space constraints. Each layout offers a fresh perspective on arranging your cutting tables, sewing stations, and storage, transforming your room into a truly functional and inspiring sanctuary. We will delve into detailed floor plans, practical implementation tips, and real-world examples to help you select and execute the perfect design for your needs.
A well-designed creative space isn't just about workflow; it's also about creating an environment that fosters inspiration. The principles of smart organisation and dedicated zones are universal. To further inspire your sanctuary, exploring design principles from other workspaces can be incredibly beneficial; many creative home office cabinet ideas translate perfectly to managing fabric, thread, and notions.
This article provides the specific blueprints needed to move from a cluttered room to a professional-grade creative hub. Whether you are a home enthusiast or a professional designer, these layouts will help you build a space that is as beautiful as it is practical, allowing your creativity to flourish without hindrance.
1. The U-Shaped 'Command Centre' Layout
For the serious sewist who values efficiency and flow, the U-shaped layout transforms a room into a dedicated 'command centre'. This design organises your primary workstations and storage along three walls, forming a convenient horseshoe shape. This is one of the most effective sewing room layout ideas for creating an immersive and productive environment.
The core principle is to minimise movement and maximise accessibility. By placing your sewing machine, cutting table, and pressing station in a 'U' formation, you can pivot between tasks in a single, fluid motion from a central rolling chair. This ergonomic arrangement is ideal for solo creators managing complex projects, as every tool, notion, and surface is kept within immediate arm’s reach.
Why It Works So Well
This layout is a popular feature in sewing room makeovers from publications like Better Homes & Gardens and is a go-to configuration for those converting a spare bedroom into a functional studio. Its strength lies in creating distinct zones for each stage of the sewing process while keeping them interconnected. The base of the 'U' typically houses the main sewing machine, the focal point, while the two arms can be dedicated to cutting and pressing or secondary machines like an overlocker.
Key Features at a Glance
This quick reference summary highlights the core benefits of adopting a U-shaped layout for your sewing space.
These features demonstrate how the layout maximises both horizontal work surfaces and vertical storage potential, creating a highly organised and efficient workspace.
Actionable Implementation Tips
To get the most out of your U-shaped command centre, consider these practical setup strategies:
- Establish Your Focal Point: Position your most-used machine at the centre of the U. This creates a primary work zone with an uninterrupted view of the room's entrance, reducing the feeling of having your back to the door.
- Optimise Corner Storage: Make the most of tricky corner spaces with pull-out shelving units or multi-tiered lazy Susans. These are perfect for organising smaller items like thread, bobbins, and notions.
- Illuminate Every Angle: Install under-cabinet LED strip lighting along all three work surfaces. This eliminates shadows cast by your body or overhead lights, which is crucial for precision work. To get this element right, consider exploring the best lamps for sewing to supplement your setup.
- Maintain a Clear Centre: The open floor space is a key asset. Keep it clear to allow your chair to move freely and to provide an area for laying out large fabric pieces or patterns.
2. The Island-Centred Layout
For sewists who work with large-scale projects like quilts or drapery, the island-centred layout provides an expansive, accessible hub for creation. This design places a large table or custom-built island at the heart of the room, serving as the primary surface for cutting and assembly. All other workstations and storage units are then strategically positioned along the perimeter walls, creating a highly functional and open-plan workspace.
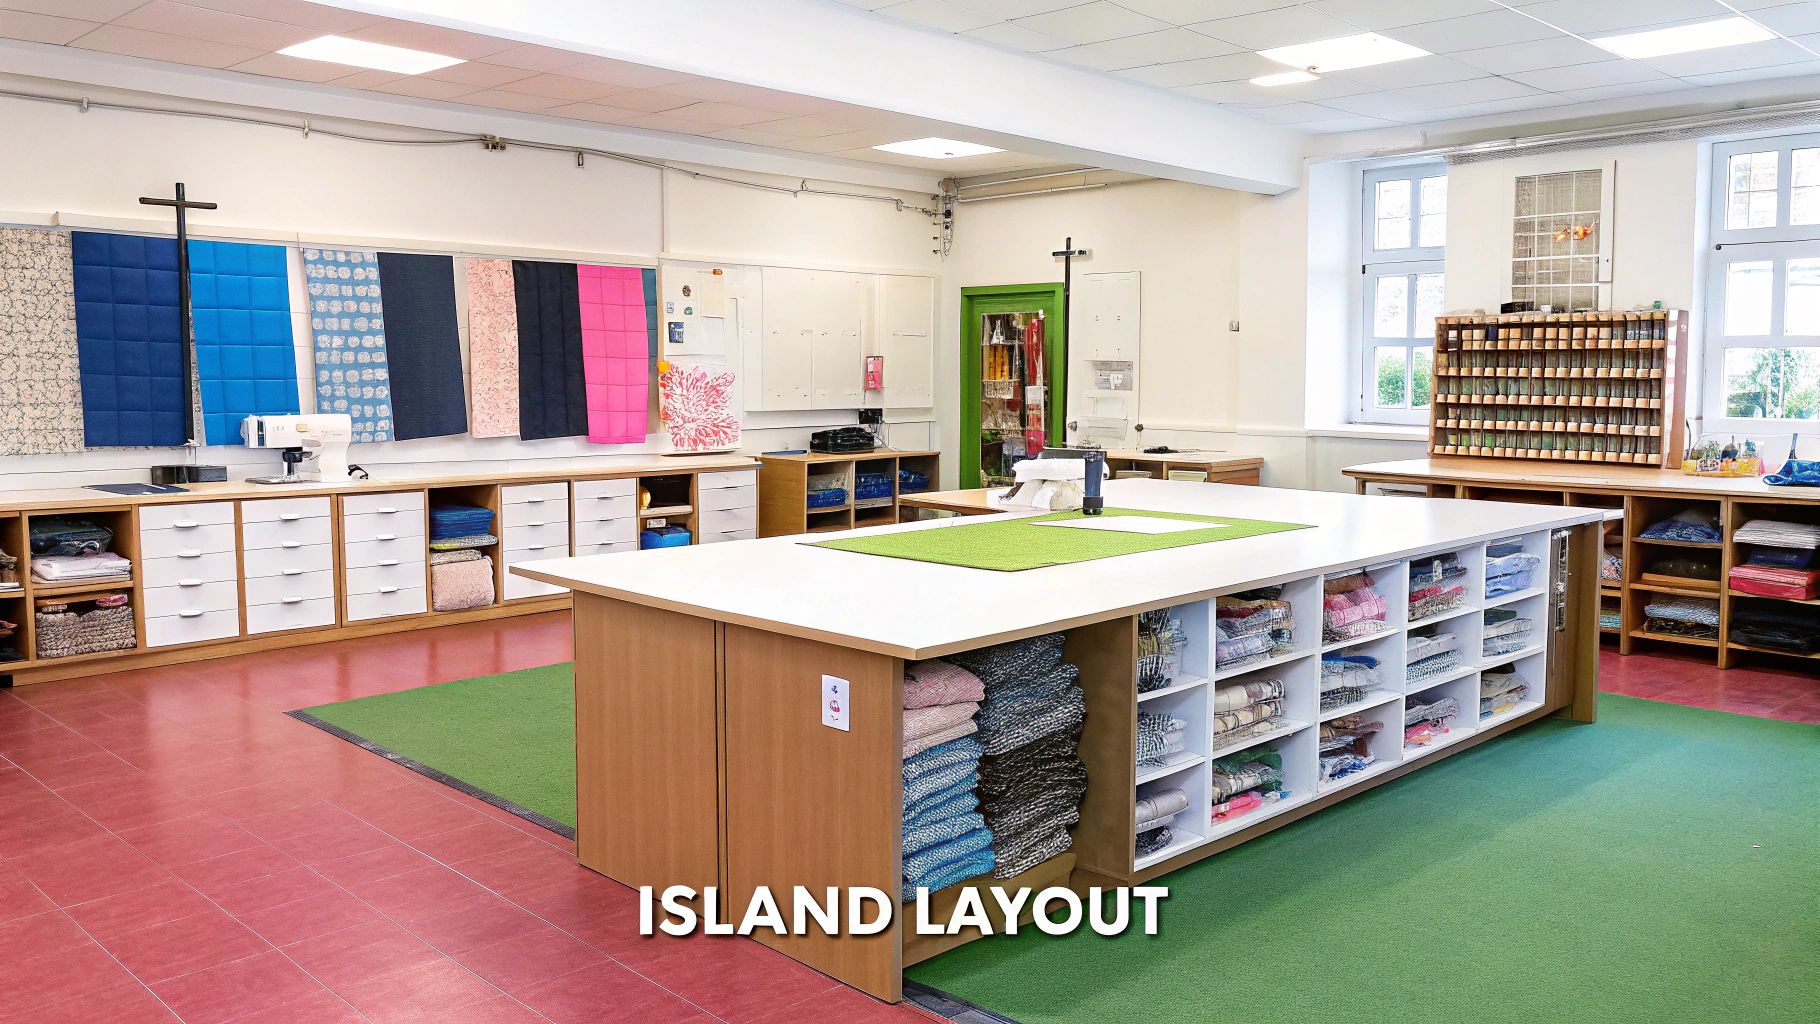
The island becomes the undeniable focal point, allowing you to walk around your project freely and access it from all angles. This approach is one of the most versatile sewing room layout ideas, especially for those who need a multi-purpose surface that can adapt from pattern cutting to project layout in an instant. It encourages a natural flow, with perimeter stations for sewing, pressing, and storing materials just a few steps away from the central work zone.
Why It Works So Well
This layout has been championed by iconic figures like Nancy Zieman of Sewing with Nancy and is frequently seen in modern quilting studios, such as those featured by Riley Blake Designs. Its effectiveness lies in dedicating the largest, most accessible surface to the most space-intensive task: cutting fabric. By moving this function to the centre, the wall space is freed up for vertical storage and dedicated machine stations, maximising the room's overall utility.
Key Features at a Glance
This quick reference summary highlights the core benefits of adopting an island-centred layout for your sewing space.
- Centralised Cutting & Assembly: A large, accessible island provides an unparalleled surface for cutting large fabric pieces, laying out quilt blocks, or assembling garment sections.
- 360-Degree Access: The ability to walk around the entire project is a significant advantage, eliminating the need to awkwardly shift and reposition large quantities of fabric on a smaller, wall-adjacent table.
- Perimeter Zoning: With the main work surface in the middle, the surrounding walls can be organised into dedicated zones for sewing, embroidery, ironing, and extensive storage without feeling cramped.
- Enhanced Flow for Large Projects: This layout is ideal for quilters and dressmakers, as it simplifies the process of moving from cutting on the island to stitching at a perimeter machine.
These features illustrate how an island-centred plan can transform a room into a dynamic and efficient studio, particularly for those whose work requires significant surface area.
Actionable Implementation Tips
To get the most out of your island-centred layout, consider these practical setup strategies:
- Ensure Adequate Clearance: Plan for at least 90-105 cm (36-42 inches) of clear walkway space around all sides of the island. This ensures you can move comfortably and open any cabinets or drawers along the perimeter without obstruction.
- Integrate Power: If possible, have electrical outlets installed directly into the island. This is perfect for powering a rotary cutter, a small portable iron, or even your sewing machine if you wish to bring it to the central table for specific tasks.
- Optimise Island Storage: Use the base of the island for built-in shelving or cubbies. This is the ideal spot to store large cutting mats, long rulers, and bolts of fabric, keeping them flat and accessible.
- Consider an Adjustable Height: An island with an adjustable or counter-height surface can be a major ergonomic benefit. This allows you to stand comfortably while cutting and then lower the surface or use a stool for seated assembly work.
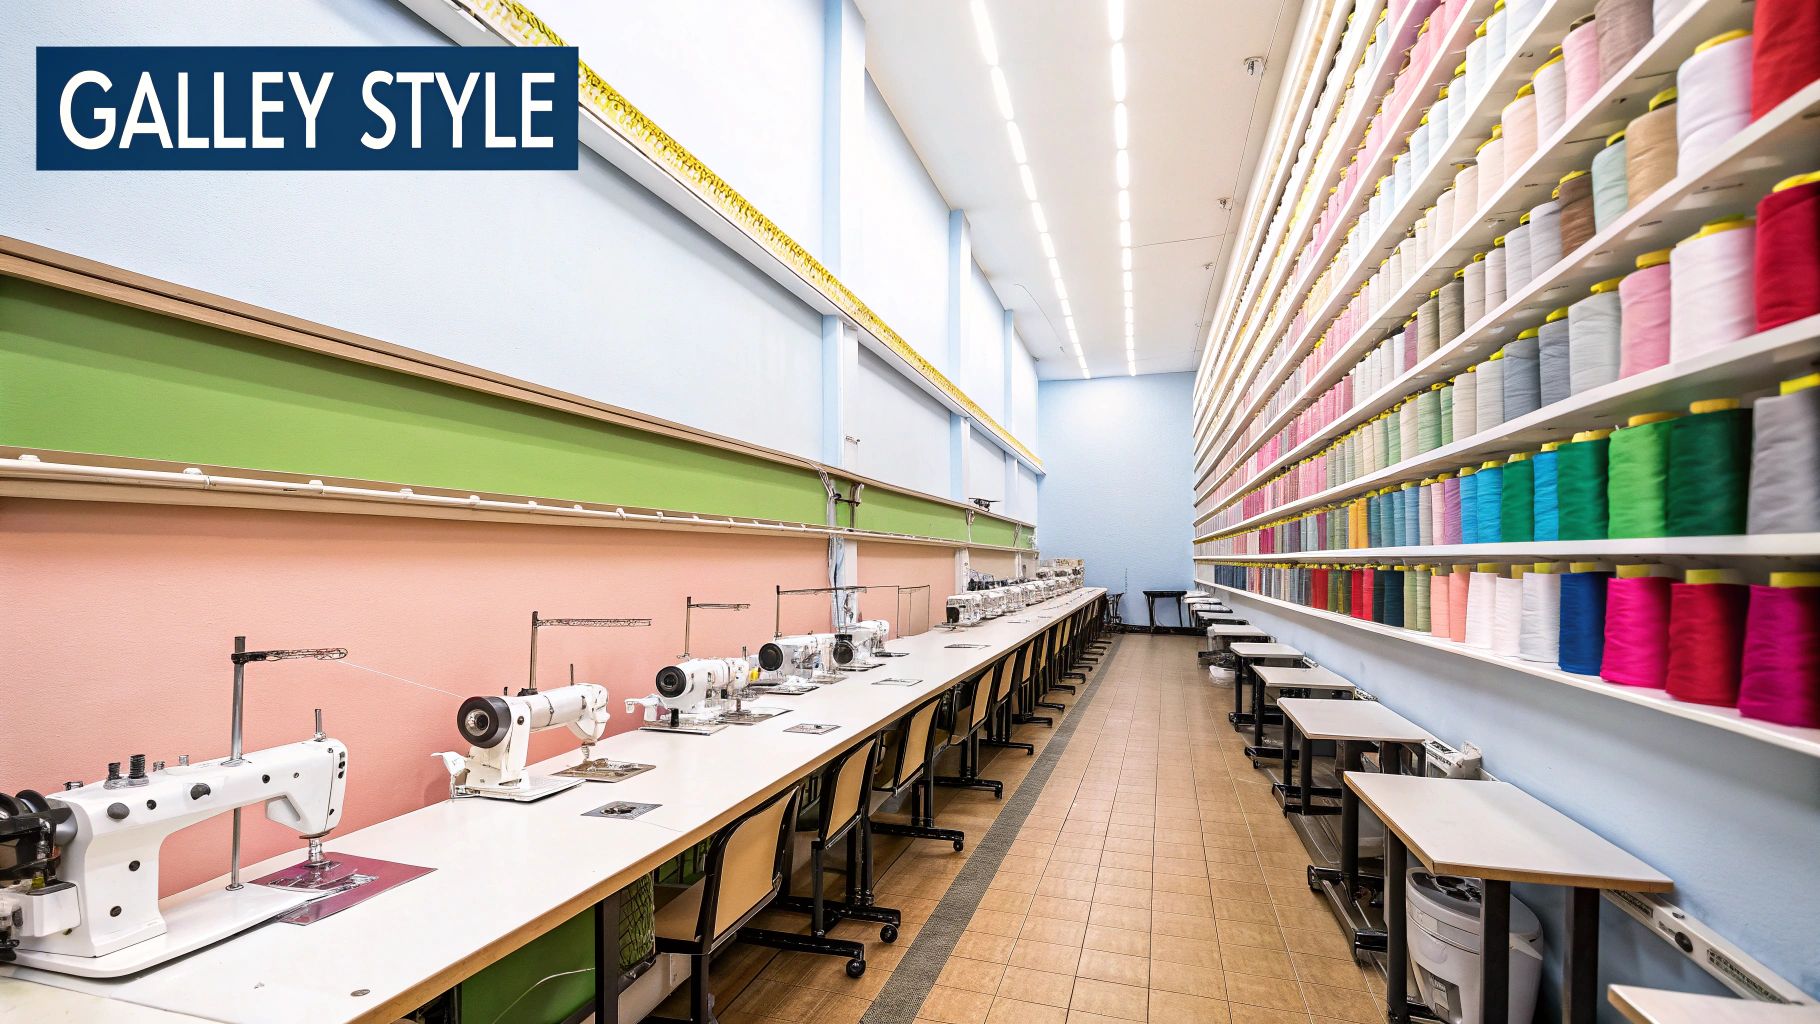
3. Galley-Style Linear Layout
Inspired by the efficient design of ship galleys and compact kitchens, the galley-style layout arranges all workstations and storage along one or two parallel walls. This linear approach is one of the most practical sewing room layout ideas for narrow rooms, hallways, or even converted closets, transforming a constrained area into a highly functional workflow.
The principle is to create a streamlined path for your sewing process, moving from one task to the next in a logical sequence along the wall. This layout is perfect for smaller spaces where a U-shaped or L-shaped design isn't feasible, ensuring every square inch is used purposefully without feeling cramped.
Why It Works So Well
This layout is a favourite among small-space design bloggers and frequently appears in Apartment Therapy makeovers. Its success lies in its ability to create a clear, organised flow in spaces that would otherwise be unusable. By aligning your sewing machine, overlocker, cutting mat, and pressing area in a line, you establish distinct zones without needing dividing walls or bulky furniture.
This configuration encourages vertical thinking. With floor space at a premium, the focus shifts to utilising wall height for storage, keeping surfaces clear and the walkway unobstructed. It’s an ideal solution for basements or spare rooms where maximising a long, narrow footprint is the primary goal.
Key Features at a Glance
This summary highlights the core benefits of a galley-style layout, demonstrating its effectiveness for compact sewing areas.
- Space Maximisation: Excels in narrow rooms, hallways, and closets.
- Linear Workflow: Creates a logical, step-by-step progression for tasks.
- Vertical Storage Focus: Encourages use of wall-mounted solutions like pegboards and shelving.
- Zoned Activities: Clearly separates cutting, sewing, and pressing stations along a single plane.
- Uncluttered Footprint: Keeps the central walkway clear for movement and larger projects.
These features make the galley layout a smart and stylish choice for sewists working with limited square footage.
Actionable Implementation Tips
To execute a successful galley-style sewing room, focus on these space-saving strategies:
- Create Zones Along the Wall: Organise your setup logically. Start with fabric storage, move to a cutting area, then your sewing machine, and finish with a pressing station. This creates an intuitive production line.
- Use Fold-Down Surfaces: Install a wall-mounted, fold-down cutting table. This provides a large work surface when needed but can be folded away to reclaim floor space instantly.
- Embrace Vertical Storage: Mount pegboards above your main work surface to keep essential tools like scissors, rulers, and rotary cutters visible and within easy reach. Floating shelves are perfect for fabric bolts and notion boxes.
- Implement a Rolling Cart: Use a slim, multi-tiered rolling cart that can be moved along your workspace. Load it with project-specific threads, bobbins, and supplies, and slide it under a desk when not in use. For more ideas on managing a compact area, explore these small sewing space ideas for inspiration.
4. Zone-Based Activity Layout
For the sewist who craves order and a systematic workflow, the zone-based layout organises a room by function, much like a professional design studio. This approach divides your space into dedicated areas for each major activity: a cutting zone, a sewing zone, a pressing zone, and a storage zone. This is one of the most effective sewing room layout ideas for creating a logical project flow from start to finish.
The core principle of this layout is to equip each station with everything needed for its specific task, preventing cross-contamination of tools and creating an efficient, assembly-line-style process. You move from one fully prepared zone to the next as your project progresses, ensuring every tool, surface, and light source is perfectly optimised for the job at hand. This methodical arrangement reduces mental clutter and streamlines complex garment construction.
Why It Works So Well
This layout mirrors the operational flow of professional tailoring studios and fashion design labs, making it a favourite among serious hobbyists and home-based business owners. Its strength lies in its scalability and adaptability; it can be implemented in a large room or cleverly adapted for smaller spaces using mobile carts. By dedicating areas to specific functions, you create a highly organised environment where every item has a designated home, promoting focus and precision.
Key Features at a Glance
This quick reference summary highlights the core benefits of adopting a zone-based layout for your sewing space.
These features demonstrate how a zone-based approach fosters an organised, efficient, and professional-grade sewing environment, regardless of room size.
Actionable Implementation Tips
To get the most out of your zone-based activity layout, consider these practical setup strategies:
- Map Your Workflow: Arrange your zones to follow a logical sequence. A common flow is from storage (fabric retrieval), to cutting, to sewing, and finally to pressing. This minimises backtracking and keeps projects moving forward smoothly.
- Use Colour-Coded Storage: Assign a specific colour to each zone. For instance, use blue bins for the sewing zone to hold thread and bobbins, and red containers for the pressing zone to store pressing cloths and hams. This visual cue makes finding and returning tools effortless.
- Create Mobile Stations: Utilise rolling carts for your pressing station or for secondary machines like an overlocker. This allows you to bring the zone to your main work area when needed and tuck it away afterwards, a perfect solution for multi-use or compact rooms. Explore more versatile sewing room ideas to see how mobile furniture can transform a space.
- Tailor Your Lighting: Install task-specific lighting in each zone. Bright, direct light is crucial for the cutting and sewing zones, while softer, ambient light may suffice for the storage area. Adjustable-arm lamps are excellent for directing light exactly where you need it.
5. Multi-Functional Convertible Layout
For those whose sewing space must also serve as a guest room, home office, or living area, the multi-functional convertible layout offers ultimate versatility. This approach relies on clever, space-saving furniture and modular systems that allow the room to be completely reconfigured. This is one of the most innovative sewing room layout ideas for urban dwellers and those with limited square footage.
The core principle is transformation. Instead of dedicating the entire room to sewing, this layout uses pieces that fold, collapse, or hide away, freeing up floor space for other activities. A sewing station might fold out from a cabinet that otherwise looks like an elegant armoire, or a cutting table could collapse to the size of a narrow console table. This ensures the room remains functional for multiple purposes without compromising on creative potential.
Why It Works So Well
This layout has been popularised by the tiny house movement and small-space living bloggers, where every square inch counts. Its genius lies in its ability to completely conceal a creative hobby, transforming a messy workshop back into a pristine living space in minutes. Furniture companies like IKEA and specialist brands such as Resource Furniture have developed entire lines dedicated to this concept, showcasing how a room can adapt to the user's immediate needs.
This video from YouTuber The Crafty Organizer brilliantly demonstrates how a small room can be transformed into a highly efficient, multi-functional sewing space.
The video highlights how strategic furniture choices are the key to unlocking a room's full potential, a central theme of the convertible layout.
Actionable Implementation Tips
To get the most out of your multi-functional convertible layout, consider these practical setup strategies:
- Invest in Quality Mechanisms: Choose furniture with high-quality, durable folding or lifting mechanisms. A murphy desk-style sewing station or a fold-away cutting table will be used frequently, so its hardware must be robust enough to withstand repeated transformations.
- Embrace Rolling Storage: Use carts and drawer units on castors that can be easily rolled under a desk, into a wardrobe, or out of the room entirely. This keeps supplies accessible when needed and hidden when not.
- Create a 'Setup Kit': Keep a small, dedicated box or caddy with your absolute essentials, like scissors, pins, and thread. This allows you to get started on a small project quickly without having to unpack your entire setup.
- Plan for Hidden Storage: Design your storage to disappear completely. For instance, consider using a custom-built cabinet where even the sewing table with storage folds neatly inside, presenting a clean, uncluttered facade when closed.
6. L-Shaped Corner Layout
The L-shaped layout is a highly versatile and space-efficient solution that uses two adjacent walls to form a productive corner workstation. This popular design anchors your sewing activities in one corner, making it one of the most practical sewing room layout ideas for multi-purpose rooms or smaller dedicated spaces. It excels at creating an integrated workflow while keeping the rest of the room feeling open.
This layout’s effectiveness comes from its ability to define a clear work zone without enclosing the user. By placing the main sewing machine at the corner junction, you gain easy access to two perpendicular work surfaces. One arm of the 'L' can serve as your primary sewing area, while the other can be dedicated to cutting, pressing, or housing a secondary machine like an overlocker or embroidery unit.
Why It Works So Well
Often showcased in craft room design magazines and home improvement TV shows, the L-shaped setup is a go-to for converting a bedroom corner or home office into a functional sewing nook. It borrows principles from efficient office design, where corner desks are used to maximise usable surface area. This configuration allows for a natural flow, letting you move from sewing to cutting with a simple swivel of your chair.
Key Features at a Glance
This quick reference summary highlights the core benefits of adopting an L-shaped layout for your sewing space.
- Efficient Corner Use: Maximises often-underutilised corner space.
- Distinct Work Zones: Creates two separate but connected work surfaces.
- Open Feel: Defines a work area without closing off the room.
- Ergonomic Flow: Allows for a smooth transition between tasks.
- Vertical Storage: Taller corner shelving can be used to great effect.
- Adaptable: Works well in both small nooks and larger rooms.
These features demonstrate how the layout provides ample workspace and storage opportunities while maintaining an open and accessible room environment.
Actionable Implementation Tips
To get the most out of your L-shaped corner layout, consider these practical setup strategies:
- Position the Machine at the Junction: Place your primary sewing machine directly in the corner. This gives you equal access to the work surfaces on your left and right, creating a commanding and ergonomic position.
- Leverage Vertical Corner Storage: Install tall, open shelving or a corner-specific shelving unit above your work surface. This draws the eye upward and provides accessible storage for fabric, patterns, or storage boxes without cluttering your desk.
- Use Lazy Susans in Deep Cabinets: If your L-shaped desk includes a deep corner cabinet, a multi-tiered lazy Susan is essential. It prevents items from getting lost in the back and makes notions, threads, and tools easily retrievable.
- Install Task Lighting on Both Arms: Fit under-cabinet LED strip lighting along the length of both walls in the 'L'. This ensures consistent, shadow-free illumination across your entire work area, crucial for accurate cutting and stitching.
- Keep Your Chair Mobile: Ensure the floor area within the 'L' is clear, allowing a rolling chair to move seamlessly between your sewing station and the adjacent work surface.
7. Pegboard Wall Organization System
For sewists who believe that a tidy space fuels creativity, the pegboard wall system offers a visually organised and highly customisable layout. This approach moves storage from cluttered drawers and boxes onto the wall, transforming it into the room's functional centrepiece. Workstations are then arranged around this vertical storage hub, ensuring every tool is visible and within easy reach.
The core concept is to maximise wall space for storage, freeing up valuable floor and desk area. A comprehensive pegboard system allows you to see your entire inventory of threads, scissors, rulers, and notions at a single glance. This layout is one of the most adaptable sewing room layout ideas, perfect for small spaces or for creatives who value having their tools on display as part of the room's decor.
Why It Works So Well
This layout has been popularised by craft bloggers, professional organisers, and maker spaces, where efficient use of shared space is paramount. Its strength lies in its modularity and accessibility. You can arrange hooks, shelves, and containers to perfectly match your workflow and tool collection, creating a system that is as unique as your sewing projects. The visual appeal also serves as inspiration, surrounding you with the colourful tools of your craft.
Key Features at a Glance
This summary highlights the core benefits of integrating a pegboard wall system into your sewing room layout.
- Ultimate Customisation: A blank canvas that you can configure with an endless combination of hooks, baskets, shelves, and holders to suit your specific tools.
- Space Efficiency: Utilises vertical wall space to dramatically reduce clutter on work surfaces and in drawers, making it ideal for smaller rooms.
- High Visibility: Keeps all supplies and tools in plain sight, eliminating the time wasted searching for a specific item.
- Scalability: The system can easily be expanded by adding more pegboard panels as your tool and supply collection grows over time.
These features showcase how the pegboard system turns storage into an active part of your creative process, blending organisation with accessibility.
Actionable Implementation Tips
To effectively implement a pegboard wall organisation system, consider these practical strategies:
- Plan Your Zones: Before installing, lay your tools on the floor to plan where each category will go. Group similar items together, such as cutting tools, measuring devices, and threads, to create logical zones.
- Ensure Proper Installation: Mount the pegboard on battens or use spacers to create a gap between the board and the wall. This clearance is essential for the hooks to be inserted and secured properly.
- Use Consistent Containers: For a cohesive and visually pleasing look, use matching containers, jars, and baskets. This creates a uniform aesthetic that reduces visual clutter.
- Incorporate Magnetic Strips: Add magnetic strips or containers to the pegboard for small metal items like pins, needles, and seam rippers. This is an excellent way to keep tiny, easy-to-lose notions secure and accessible. For more ways to organise your supplies, explore these sewing room storage ideas.
7 Sewing Room Layouts Comparison Chart
| Layout | Implementation Complexity 🔄 | Resource Requirements ⚡ | Expected Outcomes 📊 | Ideal Use Cases 💡 | Key Advantages ⭐ |
|---|---|---|---|---|---|
| U-Shaped Sewing Layout | Medium - requires careful planning | Moderate - furniture & storage | Efficient workflow, organized zones | Small to medium rooms, focused sewing | Minimizes walking, maximizes storage |
| Island-Centered Layout | High - needs large space & setup | High - custom island & perimeter | Collaborative, open, flexible workspace | Large rooms, quilting, multiple users | Excellent for large projects, open feel |
| Galley-Style Linear Layout | Low - simple linear arrangement | Low - wall units & vertical storage | Streamlined, compact workflow | Narrow/small spaces, hallways | Efficient use of small spaces, cost-effective |
| Zone-Based Activity Layout | High - complex zoning & lighting | High - specialized tools & lighting | Highly organized & professional workflow | Larger spaces, tailored workflow needs | Reduces setup time, professional quality |
| Multi-Functional Convertible | Medium - modular & fold-away setup | Moderate - convertible furniture | Versatile, space-saving | Shared/multi-purpose rooms, small spaces | Maximizes utility, easy reconfiguration |
| L-Shaped Corner Layout | Medium - corner-focused planning | Moderate - corner furniture & lighting | Compact, separated activities | Square/corner rooms, cozy workspaces | Efficient corner use, natural workflow |
| Pegboard Wall Organization | Low - wall-mounted system setup | Low - pegboard & hooks | Visible, accessible tool storage | Craft rooms, maker spaces, tailoring | Customizable, maximizes vertical storage |
Bringing Your Ideal Sewing Layout to Life
We've explored a diverse range of powerful sewing room layout ideas, from the immersive efficiency of the U-Shaped design to the sleek, space-saving nature of the Galley-Style configuration. Each approach offers a unique blueprint for transforming your creative space. Whether you're working with a dedicated studio or carving out a corner in a multi-purpose room, the principles remain the same: your layout should serve your workflow, not hinder it.
The journey to an optimised sewing sanctuary begins with a clear understanding of your personal process. Do you need expansive surfaces for cutting large fabric patterns, favouring an Island-Centred or L-Shaped layout? Or is your primary need meticulous organisation for countless notions and threads, making a Pegboard Wall System or a Zone-Based layout the superior choice? The most effective sewing room is a direct reflection of the creator who uses it.
Key Takeaways for Your Layout Strategy
To distil these concepts into actionable steps, focus on these core pillars:
- Workflow First: Map out your typical project sequence, from preparation and cutting to sewing and finishing. Arrange your stations, tools, and storage to follow this natural progression, minimising unnecessary movement and maximising efficiency. This is the foundation of all great sewing room layout ideas.
- Ergonomics is Non-Negotiable: A productive space is a comfortable one. Prioritise an adjustable chair that supports your back, set your machine at a height that prevents wrist strain, and ensure your cutting table reduces bending. Your physical well-being is paramount for long, creative sessions.
- Embrace Verticality: In any space, but especially smaller ones, walls are your greatest asset. Use pegboards, high shelving, and wall-mounted organisers to lift supplies off your precious work surfaces, keeping your primary zones clear and ready for action.
Beyond the Blueprint: Creating an Inspiring Atmosphere
Once your furniture and major equipment are in place, turn your attention to the elements that elevate a functional room into an inspiring one. Proper illumination is absolutely critical for precision work and reducing eye strain. Understanding how to plan a perfect room lighting layout with a mix of ambient, task, and accent lights will make a world of difference.
Ultimately, your sewing room should be a place you genuinely want to spend time in. Personalise it with colour, inspirational mood boards, and organised displays of your favourite fabrics and threads. By thoughtfully combining a strategic layout with ergonomic considerations and a touch of your own personality, you will build more than just a room; you will construct a haven for creativity that empowers you to bring your most ambitious designs to life.
Ready to add that professional finishing touch? A high-quality mannequin or garment rail from Display Guru provides the perfect spot for fitting, steaming, and showcasing your completed masterpieces. Explore their collection to find the ideal display solution for your new and improved sewing space at Display Guru.