


9 Inspiring Sewing Room Ideas for 2025
Embarking on a sewing project, whether it is a bespoke garment or a complex theatrical costume, demands more than just skill. It requires a space that inspires creativity and streamlines workflow. A well-organised sewing room is the foundation of efficient, enjoyable crafting, where fabric stashes transform from chaotic piles into curated palettes and every tool has its designated place, ready for the moment you need it. This guide moves beyond generic advice to deliver specific, actionable sewing room ideas tailored for both dedicated professionals and passionate hobbyists.
We will explore nine transformative concepts designed to elevate your sewing environment from a simple corner with a machine into a fully optimised studio. This curated collection details everything from intelligent storage that maximises vertical space, like pegboard systems, to ergonomic layouts that prevent fatigue during long projects. You will discover practical implementation details for dedicated cutting tables, thread displays, and portable caddies, ensuring your focus remains firmly on your creative vision. A crucial element in any professional or aspiring tailor's room is a high-quality mannequin for fitting and display. Products like the adjustable, pin-friendly polystyrene tailor dummies from Display Guru offer the perfect form for bringing your creations to life, providing a professional touch that anchors the entire space. Prepare to rethink your setup and build a sewing room that not only looks incredible but functions flawlessly, supporting every stitch of your process.
1. Pegboard Wall Organization System
A pegboard wall organisation system is a quintessential element in modern sewing room ideas, transforming unused vertical space into a highly efficient and customisable storage hub. This method utilises perforated hardboard panels, which can be fitted with a diverse array of hooks, shelves, baskets, and containers. This setup keeps essential tools like scissors, rotary cutters, and thread spools visible and within arm's reach, dramatically improving workflow and reducing project time spent searching for supplies.
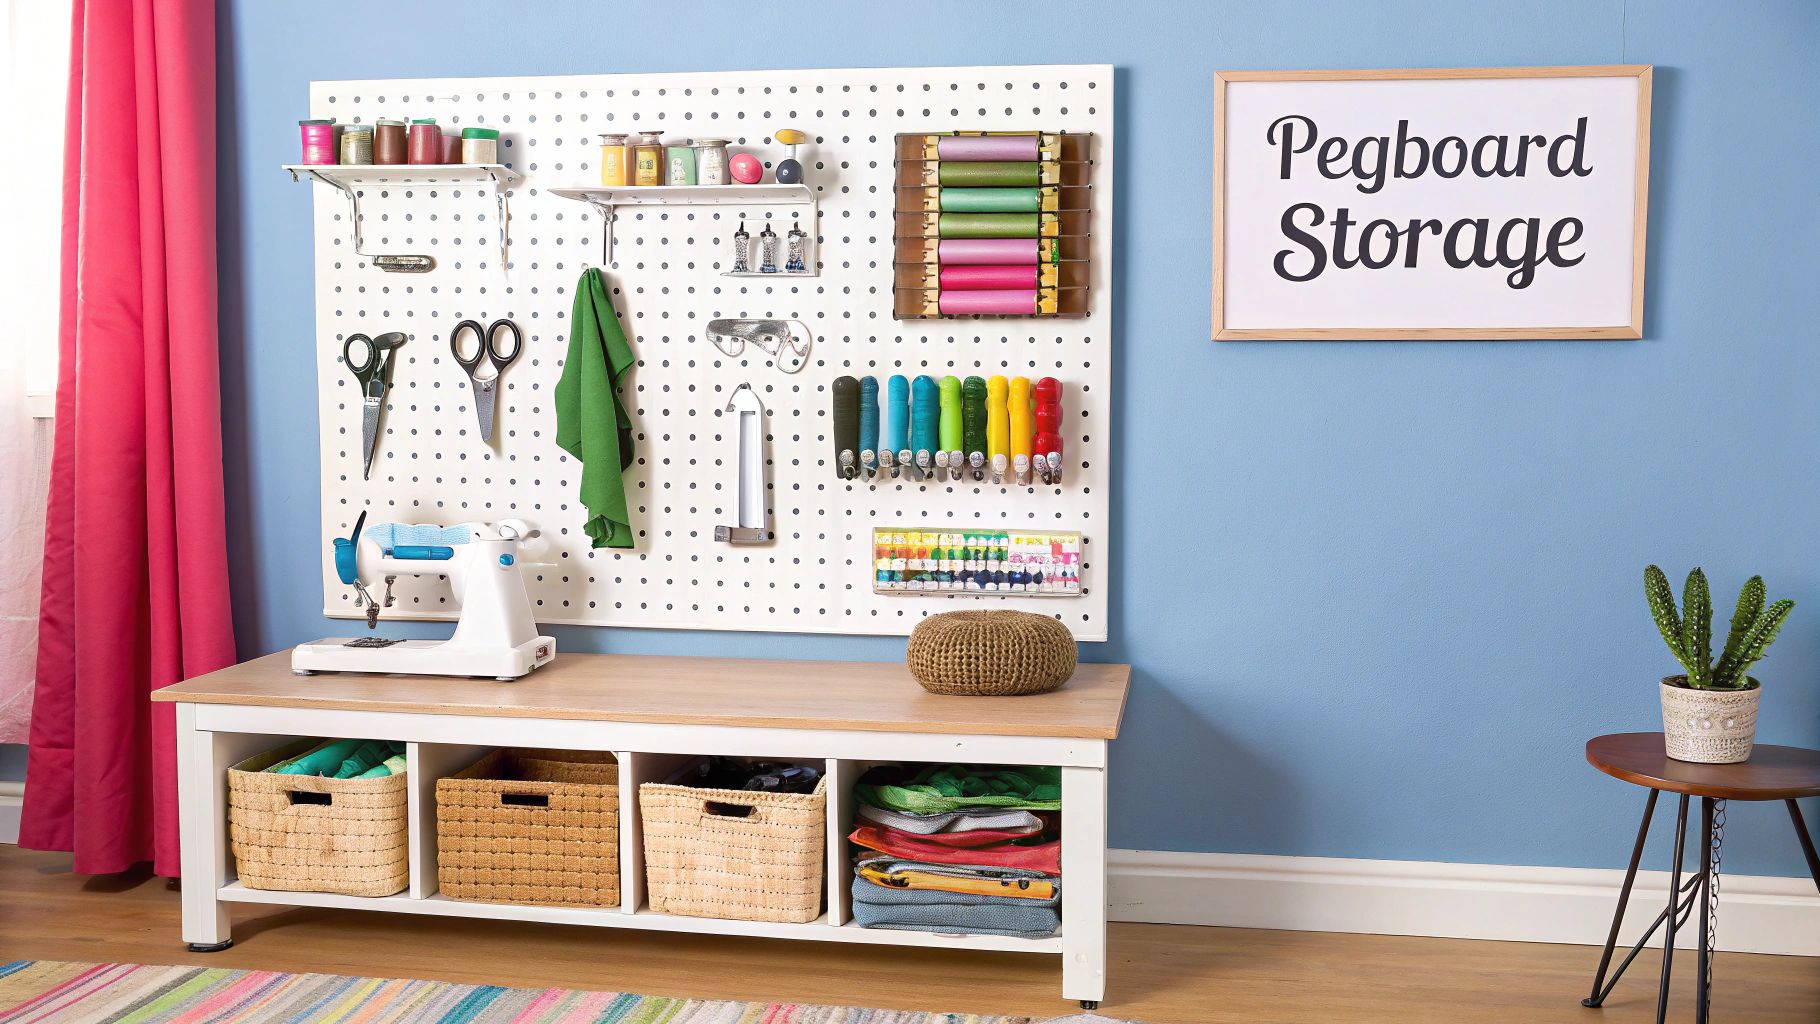
The primary advantage of a pegboard is its unparalleled adaptability. Unlike fixed shelving, a pegboard’s layout can be reconfigured in minutes to accommodate new tools or evolving project needs. This makes it an ideal solution for both seasoned professionals whose tool collections are constantly expanding and hobbyists who are just starting to build their sewing arsenal. Systems like the IKEA SKÅDIS have made this professional-grade organisation accessible to everyone, popularising the concept in homes and studios alike.
Why Choose a Pegboard System?
This approach is particularly effective in compact spaces where floor area is limited. By moving storage onto the walls, you free up valuable desk and floor space, creating a more open and less cluttered work environment. It’s a strategic choice for anyone looking to create a functional sewing station in a multi-purpose room, a small flat, or a dedicated but cosy studio.
Key Insight: The true power of a pegboard lies in its visual organisation. By keeping frequently used tools in your direct line of sight, you reduce cognitive load and minimise interruptions, allowing you to stay focused on the creative process.
Implementation Tips for Your Sewing Room
To maximise the effectiveness of your pegboard, consider these actionable tips:
- Customise the Appearance: Before installation, paint the pegboard to match or complement your room’s colour scheme for a cohesive and polished look.
- Create Functional Zones: Group similar items together. Designate specific areas for cutting tools, measuring implements, threads, and marking pens to create an intuitive layout.
- Enhance Visibility: Use clear containers or acrylic bins on pegboard shelves for small notions like buttons, bobbins, and presser feet. This keeps them contained yet easily identifiable.
- Install for Ergonomics: Mount the pegboard at a comfortable eye level and within easy reach of your main workspace to prevent unnecessary stretching or straining.
- Add Task Lighting: Install a slim LED strip light above the pegboard. This illuminates your tools, reducing eye strain and making it easier to find what you need, especially when working with dark-coloured fabrics or threads.
2. Dedicated Cutting Table with Storage
A dedicated cutting table with integrated storage is a cornerstone of professional and highly functional sewing room ideas. It provides a large, stable, and flat surface specifically for laying out and cutting fabric, a task that is often cumbersome on a standard desk or the floor. These tables are designed at an ergonomic counter height, preventing back strain during long cutting sessions, and typically feature built-in storage like drawers, shelves, or cubbies underneath to keep cutting mats, rulers, and other tools organised and close at hand.
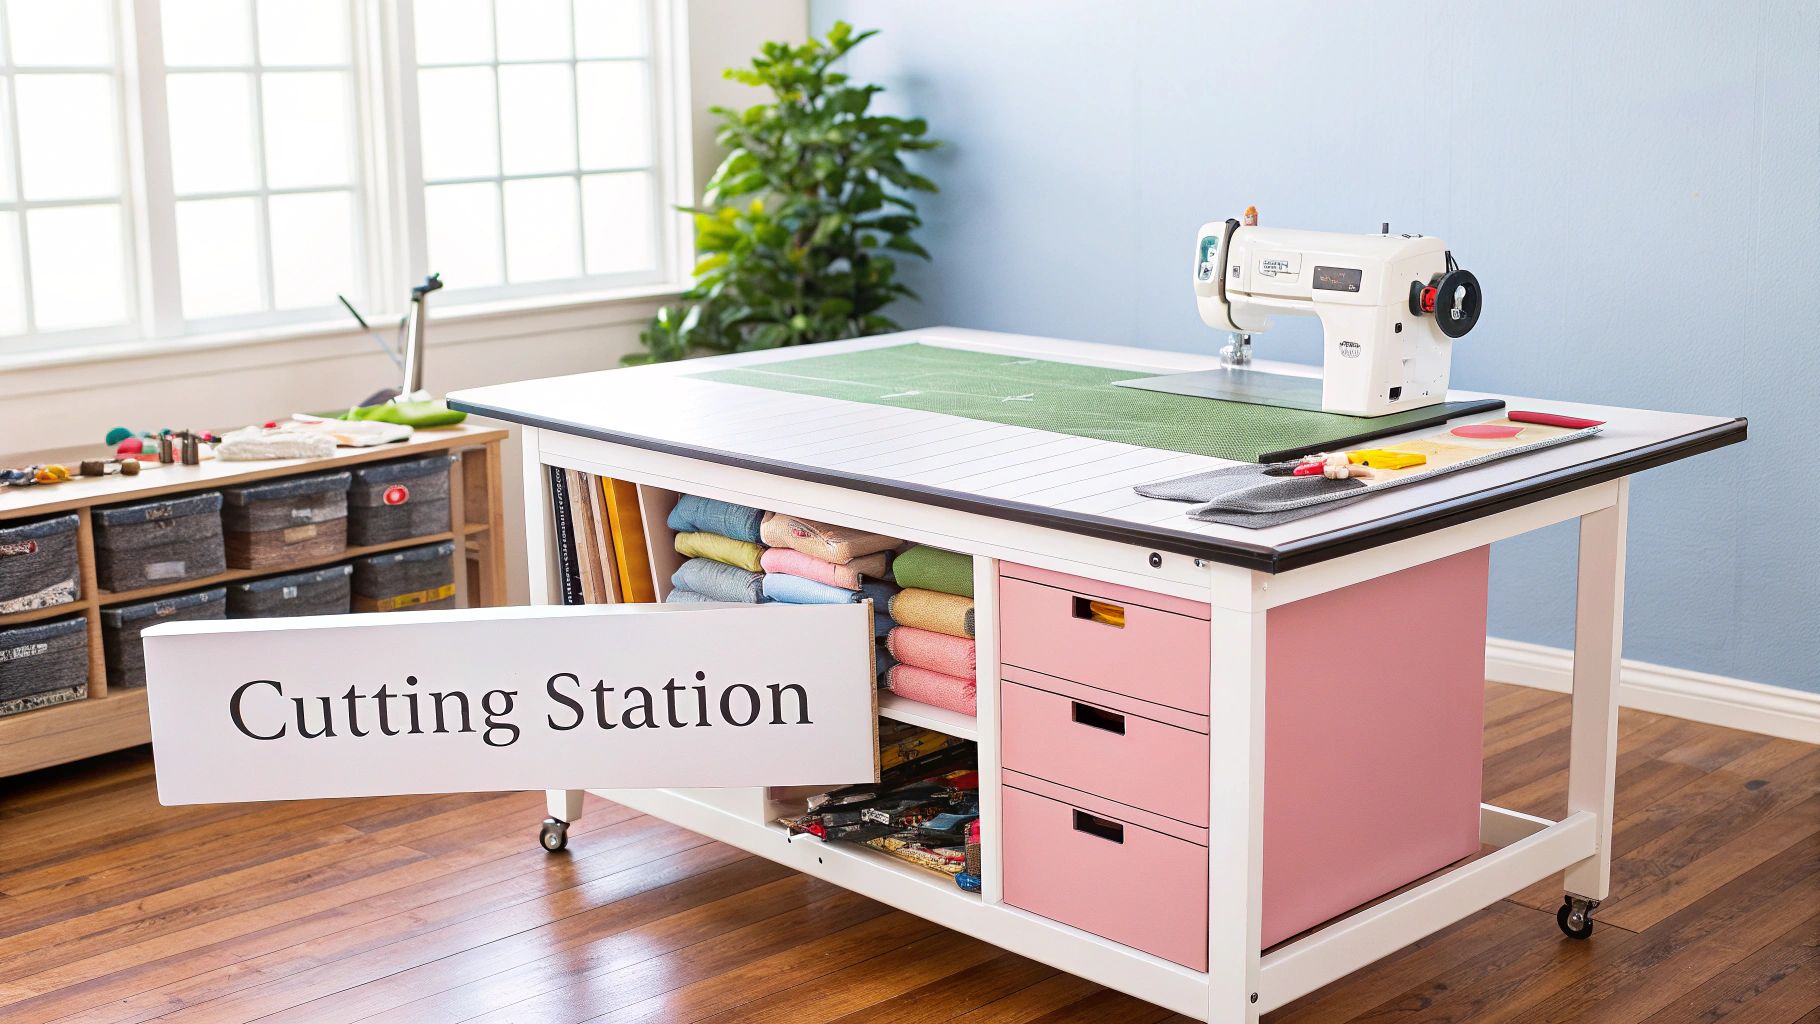
The primary benefit of a dedicated cutting table is the significant improvement in accuracy and efficiency. A large, uninterrupted surface allows for precise pattern layout and cutting, which is crucial for professional-quality garments. Popular options range from specialised furniture like the Sullivans HOME Adjustable Height Cutting Table to clever IKEA kitchen island hacks, which offer a similar level of functionality and have been popularised by sewing room design specialists.
Why Choose a Dedicated Cutting Table?
This piece of furniture is essential for anyone who frequently works with large cuts of fabric, such as quilters, curtain makers, or dressmakers. It elevates the sewing process from a hobbyist setup to a more professional and ergonomic workspace. By consolidating cutting activities and related storage into one central unit, it streamlines the entire workflow, from measuring and cutting fabric to assembling the final piece. For those who frequently take body measurements for custom clothing, having a large, clear surface is indispensable. Find out how to take body measurements for clothes with our easy guide.
Key Insight: An ergonomic cutting table set at the correct standing height (typically level with your elbow) does more than just save space; it protects your posture and reduces physical fatigue, allowing for longer, more productive creative sessions.
Implementation Tips for Your Sewing Room
To get the most out of your cutting station, consider these practical suggestions:
- Prioritise Ergonomics: Choose a table that is adjustable or fixed at your ideal standing work height. This is the single most important factor for comfort and preventing strain.
- Integrate Power: If possible, select or modify a table to include built-in power outlets. This is invaluable for conveniently using a pressing iron or rotary cutter lights directly at your cutting station.
- Consider Mobility: Opt for a table on locking castors if your sewing room is multi-functional. This allows you to easily move it out of the way or reposition it for different projects.
- Maximise Surface Area: Look for tables with a fold-down extension leaf. This provides a larger surface when working on big projects like quilts or long dresses but can be folded away to save space.
- Incorporate Waste Management: A brilliant customisation is to include a built-in slot or an attached bin for fabric scraps. This keeps your workspace tidy and makes clean-up much faster.
3. Thread Organization and Display Systems
An effective thread organisation and display system is a cornerstone of brilliant sewing room ideas, transforming a potential source of clutter into a functional and visually appealing feature. These specialised solutions range from wall-mounted racks and towers to drawer inserts with custom dividers, all designed to keep thread spools orderly, visible, and easily accessible. By organising thread by colour, type, or project, you eliminate tangled messes and the frustration of searching for the perfect shade, streamlining your sewing process significantly.
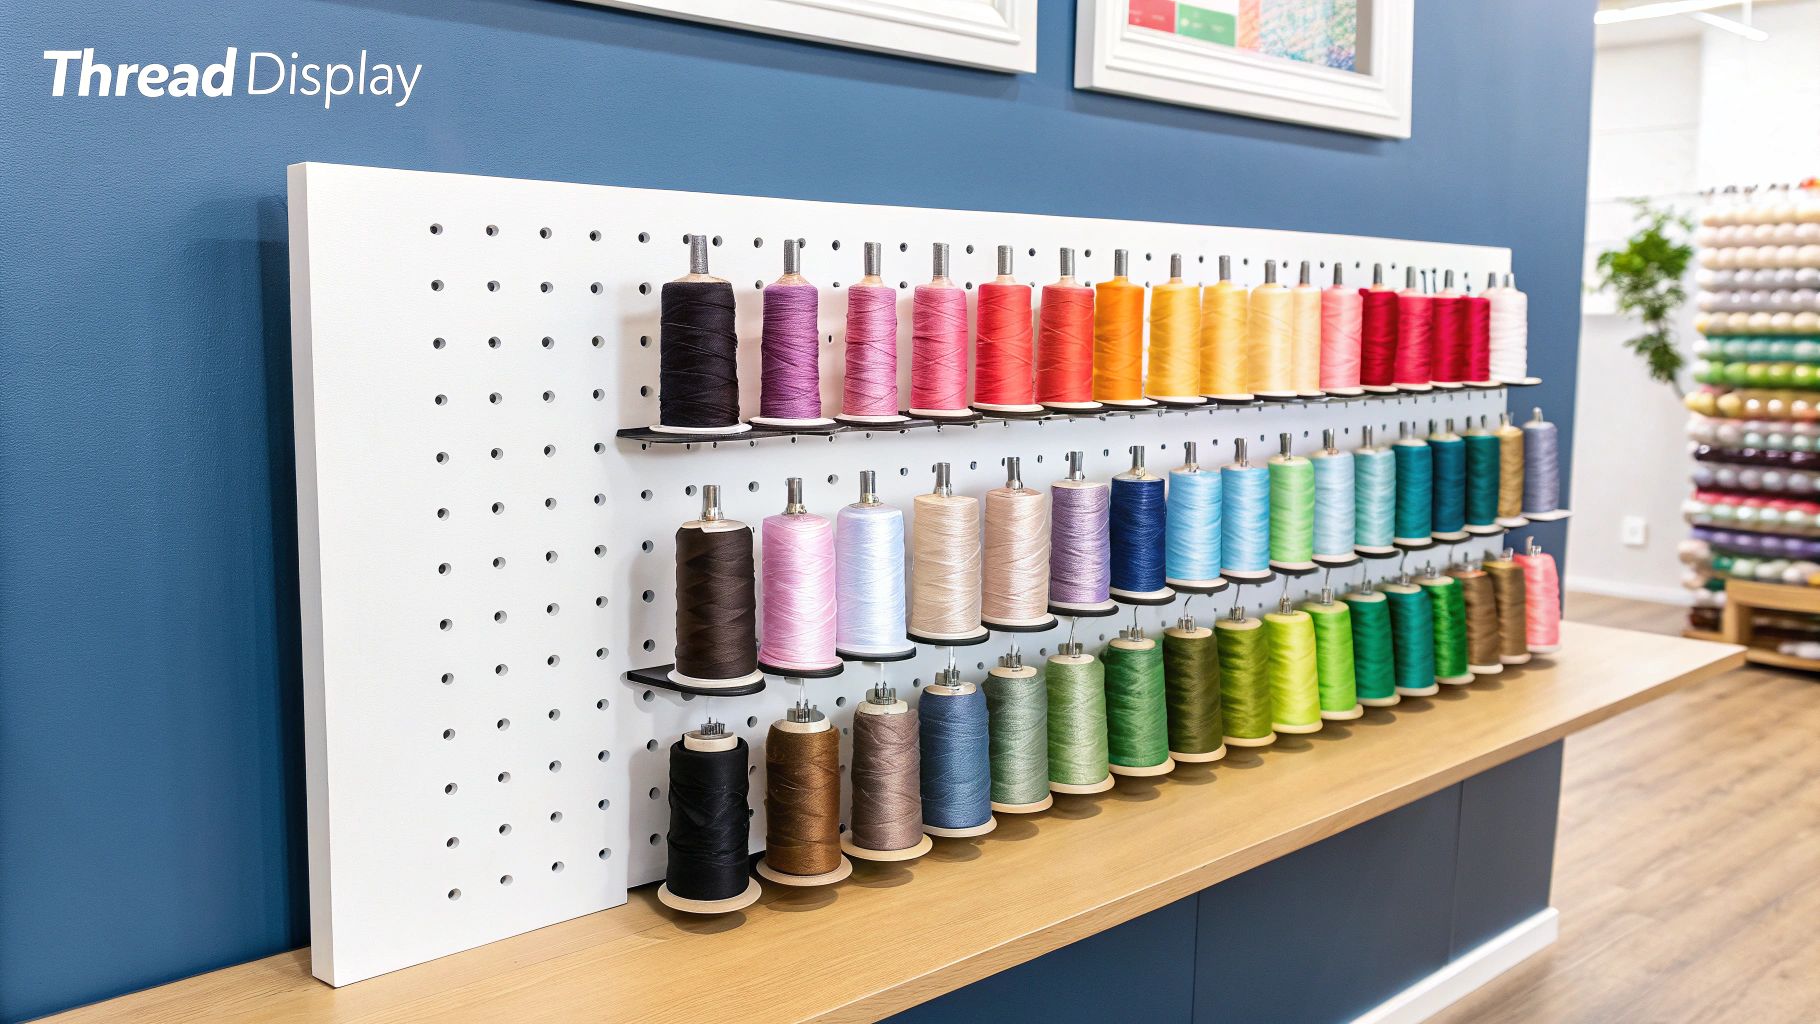
The primary benefit of a dedicated thread system is its impact on efficiency and creativity. Much like retail shop display ideas, seeing your entire colour palette at a glance can inspire new combinations and design choices. Popularised by professional embroidery shops and brands like Gütermann and Madeira, these systems bring a professional level of organisation to the home studio. Whether you choose a large wall rack that doubles as décor or a discreet set of drawers, a tidy thread collection is a must.
Why Choose a Thread Display System?
This approach is invaluable for any sewist whose collection has grown beyond a handful of spools. It is particularly crucial for quilters, embroiderers, and dressmakers who rely on a wide spectrum of colours and thread types. By implementing a system, you protect your investment in quality thread from dust, tangling, and sun damage, while also creating an inspiring and orderly workspace.
Key Insight: Treating your thread collection like a colour library not only makes it easier to find what you need but also turns it into an inspirational tool. A well-organised display can spark new creative directions simply by showing the possibilities.
Implementation Tips for Your Sewing Room
To get the most out of your thread storage, consider these practical tips:
- Organise by Colour: Arrange spools in rainbow order (ROYGBIV) or by colour families to make finding the right shade intuitive and fast.
- Plan for Growth: Choose a system that can be easily expanded. If you are starting out, leave empty spaces on your rack or in your drawers to accommodate future thread purchases.
- Protect from Light: If your sewing room gets a lot of natural light, consider storage with a UV-protective glass door or place your display away from direct sunlight to prevent colours from fading.
- Label for Specifics: For specialised threads, use small labels on the rack or drawer to denote thread weight, material (e.g., cotton, polyester, silk), and brand for quick identification.
- Prioritise Access: Keep your most frequently used colours and types, like neutral black, white, and grey, at eye level or in the most accessible drawer for maximum convenience.
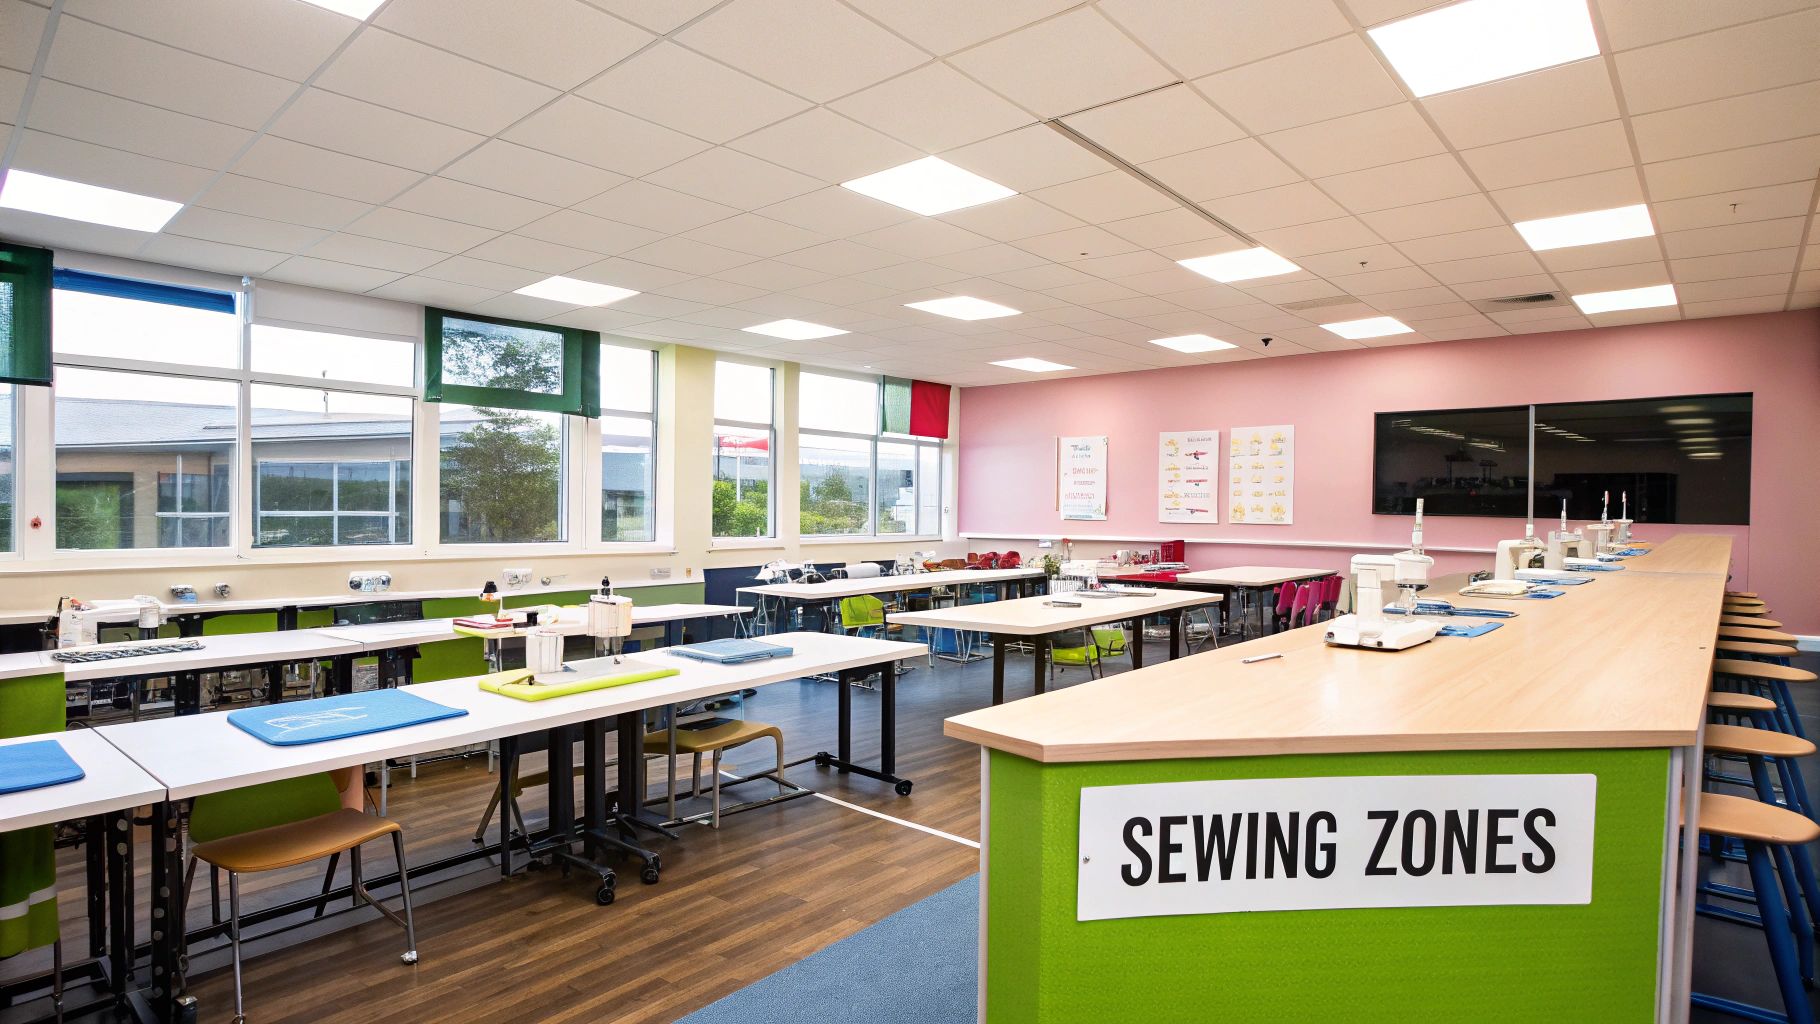
4. Multi-Station Sewing Layout
A multi-station sewing layout is one of the most effective sewing room ideas for managing complex projects, transforming a single room into a series of specialised zones. This professional approach involves creating distinct stations for different sewing activities, such as cutting, pressing, machine sewing, and hand finishing. Each area is optimised with the specific tools, lighting, and storage required for that task, streamlining the entire creative process from start to finish.
The core benefit of this layout is workflow efficiency. Instead of constantly clearing and re-setting a single worksurface, you can move seamlessly from one task to the next. This concept is standard practice in professional settings like fashion design schools and high-end tailoring shops, where productivity and precision are paramount. By adopting this model, home-based sewers can achieve a similar level of organisation and focus. The principles behind this setup share similarities with high-level retail organisation, a concept you can explore further with these visual merchandising guidelines.
Why Choose a Multi-Station Layout?
This layout is ideal for sewers who work on large or multi-step projects, such as quilting, dressmaking, or costume design. By dedicating space to each stage, you prevent bottlenecks and reduce the mental friction of switching between tasks. It is particularly valuable in larger rooms where you can physically separate stations, but the principles can be adapted to smaller spaces using mobile furniture.
Key Insight: A multi-station layout organises your physical space to mirror your creative process. This alignment minimises disruptions and allows for a more fluid, logical progression through each project, significantly enhancing both speed and quality.
Implementation Tips for Your Sewing Room
To create an effective multi-station sewing room, consider these practical suggestions:
- Plan the Workflow: Arrange your stations in a logical sequence that follows your typical project flow, for example, cutting table, then sewing machine, then pressing station. This minimises movement and creates an efficient path.
- Equip Each Zone: Ensure each station has its own dedicated set of essential tools. For instance, the pressing station should have an iron, pressing ham, and seam roll, while the cutting station needs mats, rulers, and rotary cutters.
- Utilise Mobile Carts: Use rolling carts or trolleys for tools that need to move between stations or for storing project-specific materials. This keeps your primary surfaces clear and your supplies portable.
- Ensure Adequate Power: Plan for sufficient electrical outlets at each station that requires power, especially the sewing machine and pressing areas. Use extension leads with surge protection where necessary.
- Maintain Visual Harmony: Use coordinating storage solutions like matching bins, shelves, and containers across all stations. This creates a cohesive, organised aesthetic that makes the space feel professional and uncluttered.
5. Fabric Storage Solutions
Systematic fabric storage solutions are a cornerstone of effective sewing room ideas, addressing the challenge of managing a growing collection of textiles. This approach involves organising fabric by type, size, and project potential, using methods ranging from simple shelving to specialised furniture. By implementing a clear system, you can protect your investment, easily see what you have, and find the perfect material for your next project without a time-consuming search through disorganised piles.
The core benefit of dedicated fabric storage is maintaining fabric quality and accessibility. Methods popularised by quilters and fabric shops, like wrapping lengths around comic book boards to create uniform "mini-bolts," allow for neat stacking on shelves or in bookcases. For smaller pieces like fat quarters and remnants, clear storage boxes or drawer systems keep them sorted and visible. This level of organisation transforms a chaotic stash into a functional and inspiring fabric library.
Why Choose a Systematic Fabric Storage Approach?
This is particularly crucial for sewists with diverse collections, from delicate silks to heavy-duty denims. A structured system prevents damage from improper folding, exposure to light, and pests, while also making inventory management simple. It is a vital strategy for anyone, from hobbyists to professional designers, who wants to maximise their creative time by minimising the effort spent on locating and preparing materials.
Key Insight: Treating your fabric collection like a library, with a clear cataloguing and storage system, not only preserves its value but also sparks creativity. When you can easily view your materials, you are more likely to be inspired to use them.
Implementation Tips for Your Sewing Room
To create an efficient and visually appealing fabric storage system, consider these tips:
- Categorise Your Collection: Group fabrics by colour, weight, fibre type (e.g., cotton, wool, silk), or intended project. This creates an intuitive system tailored to how you work.
- Use Comic Book Boards: For yardage, wrap fabric around acid-free comic book boards. Secure the end with a pin and label the board with fabric details like yardage, width, and care instructions.
- Leverage Clear Containers: Store fat quarters, scraps, and remnants in clear plastic drawers or bins. This keeps them dust-free and contained, yet easily identifiable at a glance.
- Incorporate Natural Protection: Place cedar blocks or lavender sachets within your storage units. This helps to naturally deter moths and other pests without the use of harsh chemicals.
- Think Vertically: Use tall shelving units, like the IKEA KALLAX or BILLY bookcase systems, to make the most of vertical space. This keeps your fabric collection tidy and accessible without taking up valuable floor area.
6. Portable Sewing Caddy and Cart Systems
Portable sewing caddy and cart systems are a game-changer for dynamic sewing room ideas, offering unparalleled flexibility and mobility. These mobile storage solutions, ranging from rolling carts to specialised tote bags, keep essential supplies organised and easily transportable. Whether you need to move from your sewing machine to a cutting table or take your projects to a class, a portable system ensures everything you need is consolidated and ready to go.
The core benefit of a portable caddy is its ability to bring order to chaos in a non-permanent way. Popular options like the IKEA RÅSKOG cart can be cleverly adapted with containers and dividers to hold everything from thread spools to fabric scissors. For those who travel, specialised solutions like Tutto rolling sewing cases provide dedicated, protected compartments for machines and notions, making them a favourite among sewing retreat organisers and travelling instructors. This adaptability makes mobile storage a cornerstone of modern, flexible workspaces.
Why Choose a Portable System?
This approach is ideal for sewists who work in multi-purpose rooms or have limited dedicated space. A rolling cart can be tucked away in a cupboard when not in use, instantly clearing floor space. It also benefits those with larger studios, allowing for the creation of project-specific carts that can be moved to different stations, streamlining workflow and minimising the time spent gathering materials for specific tasks.
Key Insight: A portable caddy transforms your sewing supplies from a static collection into a dynamic, mobile toolkit. This allows you to bring your organisation directly to your point of work, enhancing efficiency and adapting to the fluid nature of creative projects.
Implementation Tips for Your Sewing Room
To get the most out of your mobile storage, consider these practical tips:
- Prioritise Stability: Choose carts with locking wheels to ensure your caddy remains stable and stationary when you are working next to it.
- Maximise Organisation: Use a combination of drawer dividers, magnetic pots, and clear containers to categorise small items like bobbins, pins, and buttons on your cart’s shelves.
- Create Project-Specific Carts: Designate different carts for different types of projects, such as quilting, garment making, or embroidery. Stock each with the specific tools and materials required.
- Balance the Load: Store heavier items like fabric bolts or large rulers on the bottom shelf to lower the cart’s centre of gravity and prevent it from tipping over.
- Integrate Power: Attach a small power strip with a USB port to the side of your cart to easily power tools like a mini iron, a glue gun, or to charge your phone or tablet.
7. Built-in Ironing and Pressing Station
A built-in ironing and pressing station is one of the most functional sewing room ideas for achieving a professional finish on garments and projects. This approach integrates a dedicated pressing area directly into your cabinetry or wall space, creating a streamlined, uncluttered environment. It often features a fold-away ironing board, specialised storage for pressing tools like hams and clappers, and a heat-resistant surface, transforming a cumbersome task into an efficient part of the sewing workflow.
The core benefit of a built-in station is its space-saving design and immediate accessibility. Unlike a freestanding board that must be set up and taken down, an integrated system is always ready for use but remains hidden when not needed. High-end sewing furniture from manufacturers like Horn often includes these stations, but DIY fold-down installations have also become a popular solution, making this feature attainable for various budgets and room sizes.
Why Choose a Built-in Pressing Station?
This solution is ideal for sewists who value efficiency and an organised aesthetic. By dedicating a specific zone to pressing, you eliminate the hassle of managing a bulky ironing board, which often disrupts the flow in smaller rooms. It is a strategic upgrade for anyone who frequently works with delicate fabrics or tailored garments that require precise and repeated pressing throughout the construction process.
Key Insight: Integrating your pressing station near your cutting and sewing areas creates a "work triangle," a core principle of efficient workshop design. This minimises movement and streamlines the transition between cutting, sewing, and pressing.
Implementation Tips for Your Sewing Room
To create a highly effective built-in pressing station, consider these practical tips:
- Plan for Power and Safety: Install electrical outlets at a comfortable height near the station for the iron. Consider adding a timer switch for automatic shut-off to enhance safety and peace of mind.
- Use Heat-Resistant Materials: Protect surrounding cabinetry and walls by using heat-resistant materials like ceramic tile, stone, or a specialised heat-shielding board for the surfaces.
- Ensure Adequate Ventilation: Proper ventilation is crucial to manage steam and prevent moisture build-up. Plan for an extractor fan or ensure the station is near a window, especially if you use a steam-intensive iron.
- Integrate Smart Storage: Design adjacent cubbies or drawers specifically for pressing tools. Include vertical slots for a tailor's ham and sleeve roll, and a designated spot for spray starch and water bottles.
- Position for Workflow: For maximum efficiency, locate your pressing station between your cutting table and sewing machine. This logical placement supports a seamless construction sequence without unnecessary steps.
8. Sewing Machine Storage and Setup
A dedicated sewing machine storage and setup is a cornerstone of professional and ergonomic sewing room ideas. This involves specialised furniture, such as cabinets or tables, designed to house your machine securely and create an optimal working surface. Solutions like Horn sewing cabinets feature pneumatic or electric lifts that lower the machine, so its sewing bed is perfectly flush with the tabletop. This creates a large, flat surface ideal for quilting, dressmaking, and managing large fabric pieces smoothly.
The key benefit of this approach is the seamless integration of your machine into the workspace, reducing fabric drag and improving stitch quality. These units also provide purpose-built storage for machine accessories, presser feet, and even multiple machines like an overlocker. Manufacturers such as Koala Studios and Arrow have popularised these ergonomic solutions, while creative DIYers have adapted IKEA furniture to achieve similar results, making this concept accessible for various budgets.
Why Choose a Dedicated Machine Setup?
This setup is essential for anyone who sews frequently, particularly for quilters and garment makers. A flat sewing surface prevents the weight of the fabric from pulling on the needle, which can cause skipped stitches and needle breaks. It also promotes better posture, reducing strain on your back, neck, and shoulders during long sewing sessions. It is the professional standard for creating a high-functioning and comfortable sewing environment.
Key Insight: Integrating your sewing machine into a flush-mount cabinet transforms your workflow. The expansive, level surface provides superior fabric control, leading to more precise seams and a more professional finish on every project.
Implementation Tips for Your Sewing Room
To get the most from your sewing machine station, consider these practical tips:
- Measure Before Buying: Carefully measure your sewing machine’s dimensions, including its height, width, and depth, to ensure it fits the cabinet’s lift platform and aperture.
- Plan for Ventilation: Sewing machine motors generate heat. Ensure your chosen cabinet or enclosure has adequate airflow to prevent overheating during extended use.
- Organise Manuals: Designate a specific drawer or compartment within the unit to store instruction manuals, warranty information, and quick-reference guides.
- Future-Proof Your Space: If you plan to add a new machine, like an overlocker or embroidery machine, choose a setup with enough space or modular components to accommodate future growth.
- Integrate Task Lighting: Mount a bright, adjustable LED light directly above the needle area. This is crucial for accurate stitching, especially when working with intricate details or dark fabrics.
9. Notion and Small Item Organisation
Effective notion and small item organisation is the backbone of any productive sewing space, ensuring that tiny but crucial supplies are always accessible. This approach involves systematically storing small sewing items like buttons, zips, elastic, pins, and various notions using specialised containers and methods. Systems like drawer organisers, clear stackable boxes, and magnetic strips prevent these small pieces from becoming a chaotic mess, saving you time and frustration during projects.
The core principle is to give every small item a designated, logical home. Instead of rummaging through a single cluttered tin, you have a clear, compartmentalised system. This method has been popularised by professional organisers and is visible in the meticulous merchandising of craft stores. Solutions like Akro-Mils drawer cabinets, originally for hardware, and versatile 'Really Useful Boxes' have been widely adopted by the sewing community for their practicality and efficiency.
Why Choose Systematic Notion Organisation?
This method is indispensable for anyone who works with a wide variety of small components. It prevents the costly repurchasing of items you already own but cannot find and protects delicate notions from damage. For professionals and serious hobbyists, this level of organisation is a non-negotiable part of maintaining a functional and professional sewing room, reflecting a disciplined approach to the craft.
Key Insight: Organising small notions is not just about tidiness; it’s about inventory management. A well-organised system gives you an immediate visual cue of your stock levels, helping you plan projects and shopping lists more effectively.
Implementation Tips for Your Sewing Room
To create a flawless system for your notions, consider these practical tips:
- Group and Categorise: Store similar items together. Create dedicated drawers or boxes for fasteners (zips, buttons, snaps), measuring tools (tape measures, seam gauges), and marking implements.
- Prioritise Visibility: Use clear containers wherever possible. This allows you to identify contents at a glance without having to open multiple boxes.
- Label Everything: Use a label maker to clearly mark each drawer or container. For even quicker recognition, consider adding a small picture or a sample of the item alongside the word.
- Utilise Magnetic Strips: Install magnetic bars or bowls near your sewing machine for pins, needles, and small metal tools. This keeps sharp objects safely contained and readily available.
- Think Ergonomically: Store the most frequently used notions, such as your favourite thread colours or common button sizes, in drawers or containers at eye level or within easy reach of your primary workspace.
9-Item Sewing Room Setup Comparison
| Item | Implementation Complexity 🔄 | Resource Requirements ⚡ | Expected Outcomes 📊 | Ideal Use Cases 💡 | Key Advantages ⭐ |
|---|---|---|---|---|---|
| Pegboard Wall Organization System | Moderate: requires wall mounting, drilling | Low to Moderate: pegboard + hooks/accessories | Flexible, visible, and accessible tool storage | Small to medium spaces needing tool visibility | Highly customizable, inexpensive, uses vertical space efficiently |
| Dedicated Cutting Table with Storage | High: requires assembly/install, space | High: sturdy table, storage components | Ergonomic, accurate cutting with organized tools | Larger sewing rooms, frequent cutting projects | Reduces strain, large surface, integrated storage |
| Thread Organization and Display Systems | Low to Moderate: simple racks/drawers | Low to Moderate: thread holders, racks | Organized thread access, color visibility | Projects needing quick thread matching | Quick thread selection, protects thread, attractive display |
| Multi-Station Sewing Layout | High: requires large space and planning | High: multiple stations and tools | Improved workflow, multiple ongoing projects | Large dedicated sewing rooms or studios | Efficient workflow, task-specific optimization, multi-user friendly |
| Fabric Storage Solutions | Moderate: varies by system type | Moderate to High: shelving, storage boxes | Preserved fabric quality and easy access | Fabric collectors and quilters | Protects fabric, organized inventory, inspiring display |
| Portable Sewing Caddy and Cart Systems | Low: ready-made or simple assembly | Low to Moderate: mobile carts or totes | Flexible, mobile storage and project transport | Small spaces, shared rooms, travel/sewing classes | Mobility, space-saving, flexible and portable |
| Built-in Ironing and Pressing Station | High: custom installation required | High: built-in board, ventilation, power | Efficient pressing, space-saving when folded | High-end sewing rooms needing dedicated pressing | Always ready, professional results, saves space |
| Sewing Machine Storage and Setup | Moderate to High: custom cabinets/furniture | High: specialized furniture | Ergonomic sewing, protected machine storage | Frequent machine use, growing machine collections | Ergonomic, protects equipment, organized accessories |
| Notion and Small Item Organization | Low to Moderate: drawer organizers, containers | Low to Moderate: containers, labels | Neat, easily accessible small supplies | All sewing spaces needing small item management | Prevents loss, quick access, expandable system |
Crafting Your Ideal Sewing Sanctuary
The journey from a cluttered corner to a fully realised sewing sanctuary is a process of deliberate design and personal expression. Throughout this guide, we have explored a comprehensive suite of sewing room ideas, each one a building block for creating a space that is not only functional but deeply inspiring. From the high-impact visual order of a pegboard wall to the ergonomic brilliance of a dedicated cutting table, the core principle remains the same: your environment should serve your creativity, not hinder it.
By implementing these concepts, you transform your workspace from a mere collection of tools into a cohesive system. Imagine no longer hunting for that specific shade of thread because it is beautifully displayed on a custom rack. Visualise the seamless transition from cutting to sewing to pressing, all facilitated by a thoughtful multi-station layout or a built-in ironing board. These are not just aesthetic upgrades; they are strategic investments in your efficiency and creative flow.
Synthesising Ideas for a Bespoke Workspace
The true power of these sewing room ideas lies in their adaptability. No single solution fits every artist or every room. The key is to analyse your personal workflow, identify your most frequent frustrations, and select the ideas that directly address those pain points.
- For the Space-Constrained Hobbyist: A portable sewing caddy combined with a vertical pegboard system can create a highly organised, compact studio in a small footprint. You can maximise every square centimetre without sacrificing accessibility.
- For the Professional Tailor or Designer: A multi-station layout is paramount. Integrating a dedicated cutting table, a primary sewing machine hub, and a professional pressing station creates an ergonomic triangle, minimising movement and maximising productivity for client work and deadlines.
- For the Fabric Collector: Your primary focus might be on fabric storage solutions. Combining clear containers for visibility with a well-catalogued system of labels and swatches turns your collection from an overwhelming pile into a curated library of potential.
The ultimate goal is to create a space that energises you the moment you step inside. It should be a room where your tools are at your fingertips, your materials are organised and accessible, and your current projects are displayed in a way that fuels your motivation.
The Impact of a Professional-Grade Environment
Organising your notions and installing clever storage is foundational, but elevating your room to a professional standard often involves incorporating tools that reflect a commitment to the craft. A well-designed sewing room does more than just store your supplies; it actively contributes to the quality of your work. An ergonomic chair reduces fatigue, proper lighting prevents eye strain, and an organised layout saves precious time.
A truly great sewing room is a partner in your creative process. It anticipates your needs, streamlines your tasks, and provides a clear, uncluttered canvas for your imagination to flourish.
Investing in your workspace is an investment in your craft itself. By strategically applying these sewing room ideas, you are building more than just a room; you are constructing a personalised haven dedicated to skill, precision, and artistry. Each element, from the smallest labelled container to the largest piece of furniture, plays a role in fostering an atmosphere where your best work can happen effortlessly. Take these concepts, adapt them to your unique needs, and begin the rewarding process of building the sewing sanctuary you deserve.
Ready to add a professional centrepiece to your newly organised space? A high-quality tailor’s dummy is essential for fitting, draping, and displaying your creations. Explore the professional-grade collection at Display Guru to find the perfect form that will elevate your sewing room and refine your finished garments.