




Round Clothing Rail Guide: Uses, Sizing, and Placement
You've cleared a patch of floor for a new collection, but the straight rail leaves customers browsing with their backs to the doorway. In the studio, finished garments are competing with work in progress; backstage, someone needs a costume that's buried behind another production's stock. A round clothing rail can make those garments easier to reach, provided you choose and position it as working equipment rather than just a display prop.
The useful question isn't how much it holds. It's whether staff can load it safely, customers can browse it comfortably, and the surrounding space still works when the rail is full.
Why a Round Rail Belongs in Your Space
In a small boutique, the centre of the shop can be awkward territory. A table hides hanging garments, while a straight rail can create a visual barrier between the entrance and the fitting area. A circular fixture offers another approach: customers can move around a selected collection rather than work along a single frontage.
That same arrangement can suit a showroom appointment or a wardrobe room where staff approach garments from different workstations. On a market stall, though, it only helps if shoppers can reach the sides. Put the rail against a tent wall and much of the advantage disappears.
What makes the shape useful
A round clothing rail has a continuous circular hanging ring, supported by uprights and a freestanding base. It differs from an oval rail, which has an elongated outline, and a four-way fixture, which separates garments onto projecting arms. A straight rail presents stock along a linear run.
The practical advantage is access from several directions. That makes the format worth considering for shop-floor collections, pop-ups, showroom samples and costume groups that need frequent handling.
This isn't a niche requirement. The UK had approximately 11,330 clothing retail stores in 2020, alongside about 34,045 fashion and textile businesses, according to FashionUnited's UK fashion industry statistics. Rails serve a broad working environment, not just domestic wardrobe overflow.
Buying principle: Choose the circular shape because people need to move around the garments, not because an empty rail looks compact.
Where it earns its floor space
- Boutiques and showrooms: Use it for a coherent edit that deserves attention away from the perimeter.
- Fitting areas: Consider it for garments awaiting appointments, provided it stays outside the changing and circulation space.
- Studios and wardrobe departments: Give it a defined role, such as finished samples or a production's ready-to-wear costumes.
- Narrow rooms: Favour a straight perimeter arrangement when there's no useful route around a central fixture.
A round rail won't fix an unclear merchandising plan. Decide what the collection should communicate before filling the ring; these visual merchandising guidelines provide useful context for organising the display rather than merely accommodating stock.
Anatomy of a Round Clothing Rail
Read a round rail's specification as a set of connected parts. The hanging ring, uprights, joints and base all matter; a substantial-looking ring doesn't tell you whether the complete assembly suits daily commercial use.
Start with the ring diameter and usable hanging height. Diameter describes the circular support, not the entire occupied area, while height needs to suit the longest garments you intend to hang. Ask for tube material and wall thickness rather than relying on a photograph or an unexplained description such as heavy duty.
Inspect the connections and finish
Check how the ring joins the uprights and how those uprights attach to the base. Look for an identifiable assembly method, accessible fasteners and replacement-part information. Adjustable sections should have a clear locking arrangement that staff can check without guesswork.
Treat material descriptions carefully. Chrome is a finish, stainless steel is a material, and powder coating describes a surface treatment; none of those labels establishes the strength of the complete rail.
For chrome, stainless steel, powder-coated steel, brass or acrylic components, request the supplier's cleaning and handling instructions. Inspect display samples for rough joints, damaged coatings and edges that could catch delicate fabric. If the rail is intended for a clinical or assisted-living fitting environment, confirm compatibility with the premises' cleaning procedure rather than assuming a smooth surface is sufficient.
Round Rail Base Types at a Glance
| Base type | Stability profile | Best floor | Typical use |
|---|---|---|---|
| Tripod | Check all feet contact the floor and remain outside likely foot placement | Firm, level floor | Stationary studio or display position |
| Star base | Assess the spread of the legs and possible trip points | Level floor with clear surrounding space | Central retail display |
| Weighted disc | Confirm the specified load and resistance to tipping | Smooth, level floor | Fixed presentation area |
| Castor base | Depends on the complete base, wheel suitability and brakes | Floor approved for the supplied castors | Reconfigurable shop or wardrobe layout |
These are selection prompts, not stability ratings. Ask the supplier to confirm suitability for your intended load and floor.
A wider base may be inconvenient for feet even when it supports the rail effectively. A taller configuration may accommodate dresses but must still be approved for the intended garments. Check hanger-hook compatibility too: hooks should sit securely on the ring and move without needing to be forced over connections.
Before ordering, put the ring diameter, overall height, base dimensions, assembled weight, load information and castor details on the same specification sheet. Missing information is a reason to ask questions, not an invitation to estimate.
How a Round Rail Compares to Other Rail Types
There's no useful universal winner between round, straight and four-way rails. Compare them against the job: how customers approach, how much floor you can spare, whether the fixture serves fittings, and how often staff rearrange it.
Access and footprint efficiency aren't the same thing. A fixture can be easy to browse yet unsuitable for a narrow shop, or accommodate stock neatly while offering little visual presentation.
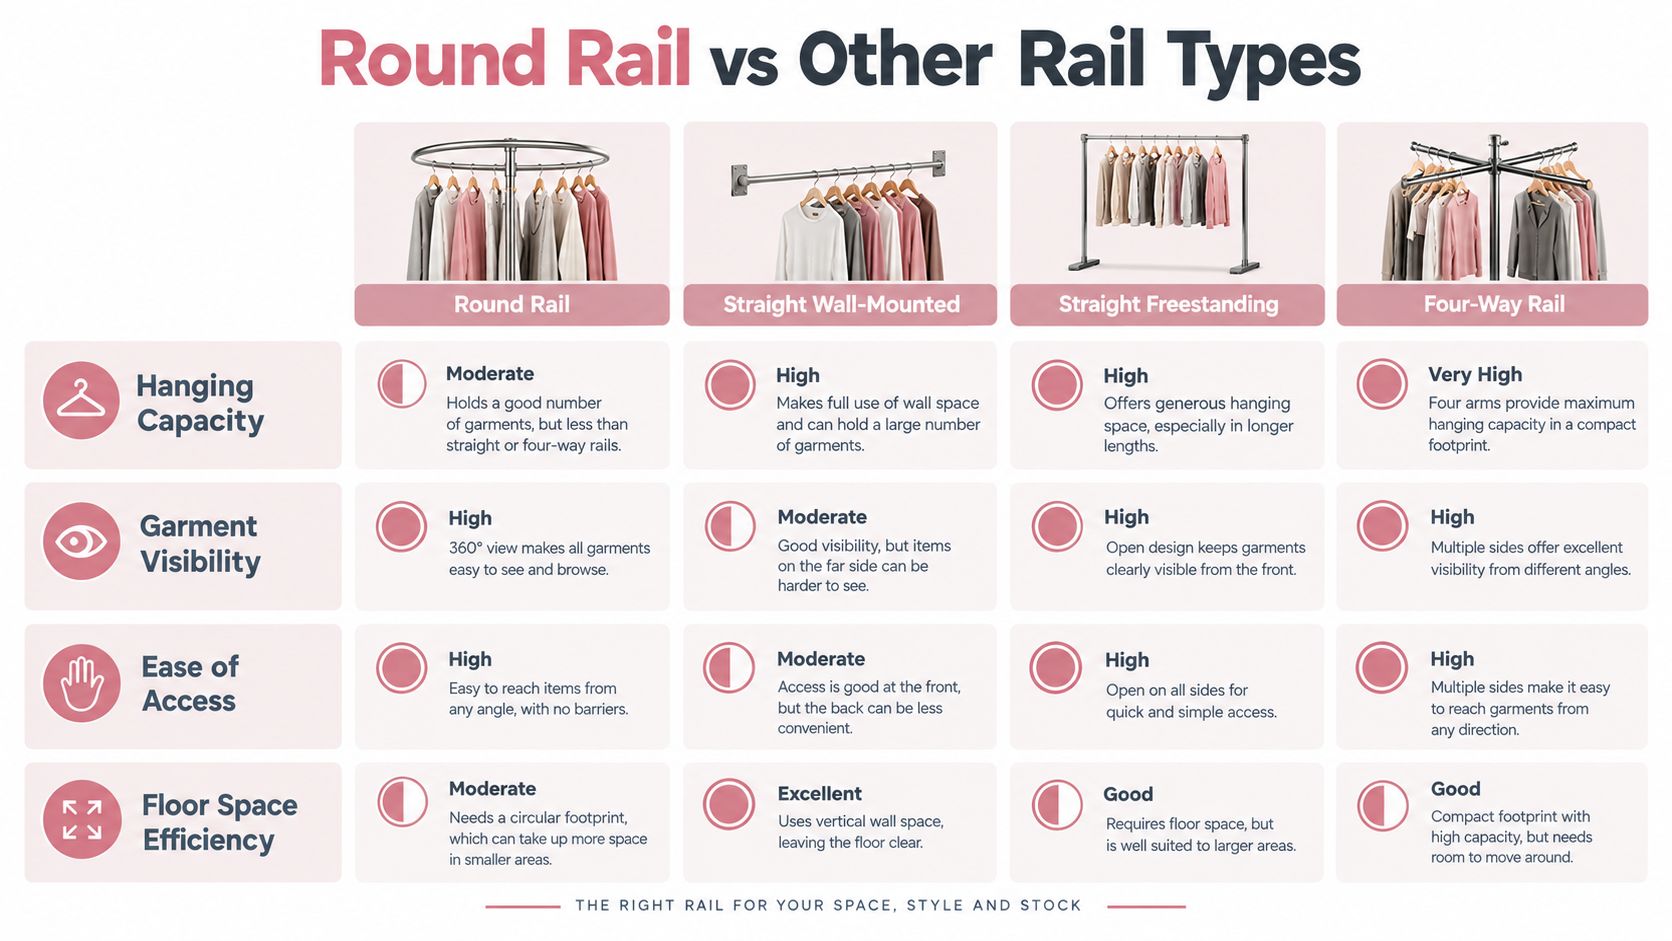
Treat the chart as a layout comparison, not a substitute for a supplier's load rating or a test with your own garments. Product configuration and browsing density can change the result substantially.
Match the fixture to the task
| Rail type | Access | Footprint judgement | Fitting-room suitability | Reconfiguration |
|---|---|---|---|---|
| Round | Approach from around the ring | Useful central fixture when surrounding space is available | Better for an adjacent holding area than a confined cubicle | Depends on base and handling requirements |
| Straight wall-mounted | Browse from the room-facing side | Uses the perimeter rather than the centre | Useful where the wall and fixing arrangement permit | Requires changes to the installation |
| Straight freestanding | Approach along either side if space allows | Practical for linear stock organisation | Useful for appointment batches outside cubicles | Depends on assembly and mobility |
| Four-way | Browse separate projecting arms | Useful for distinct product groups | Usually a merchandising choice rather than fitting support | Configuration depends on the particular fixture |
For a boutique's central collection, a round rail is a sensible candidate because customers can browse without following one long frontage. For a sewing studio with a clear wall and a crowded cutting area, a wall-mounted rail may be the more disciplined choice.
In a wardrobe department, straight freestanding rails can make it easier to maintain a visible sequence of costumes. A four-way fixture suits a shop that wants distinct garment groups presented separately, particularly where staff need to replenish each group without reorganising a whole ring.
Choose the rail that fits the working sequence. Don't reorganise the whole department just to justify a preferred fixture.
For market work, consider transport and assembly alongside the display shape. The guidance on choosing a portable clothing rack helps frame that decision: a convincing shop-floor arrangement may be cumbersome to pack, carry and rebuild at an event.
Placement That Respects Fire Safety and Flow
A rail's listed width isn't its working footprint. Sleeves, hanger ends and garment bags project beyond the structure, while a browsing customer occupies additional space. Near a checkout, that combination can turn an apparently tidy display into a pinch point.
For premises covered by the relevant legislation, the responsible person must keep emergency routes and exits clear under the Regulatory Reform (Fire Safety) Order. Rail placement therefore belongs within the premises' fire-risk assessment, not just the merchandising sketch.
Plan with the rail loaded
- Measure the occupied outline. Set up representative garments, including the bulkiest pieces and any covers. Mark their outermost projection on a floor plan or with temporary floor tape.
- Check the complete route. Follow the journey from entrance to browsing area, checkout and exit. Test the arrangement with doors open and someone handling garments, not only with an empty shop.
- Separate display from hazards. Keep the rail and associated stock away from heaters and electrical equipment. Confirm that emergency equipment remains visible and accessible.
- Give overflow another home. Allocate a dedicated stockholding area so bags, returns and deliveries don't accumulate beneath or beside the display.
- Review after changes. Recheck the arrangement when a lightweight collection is replaced by coats, when a queue changes position, or when another fixture is introduced.
The clearance needed must follow the assessment and applicable premises requirements. Don't adopt a generic walking-space figure as proof that a particular layout is safe.
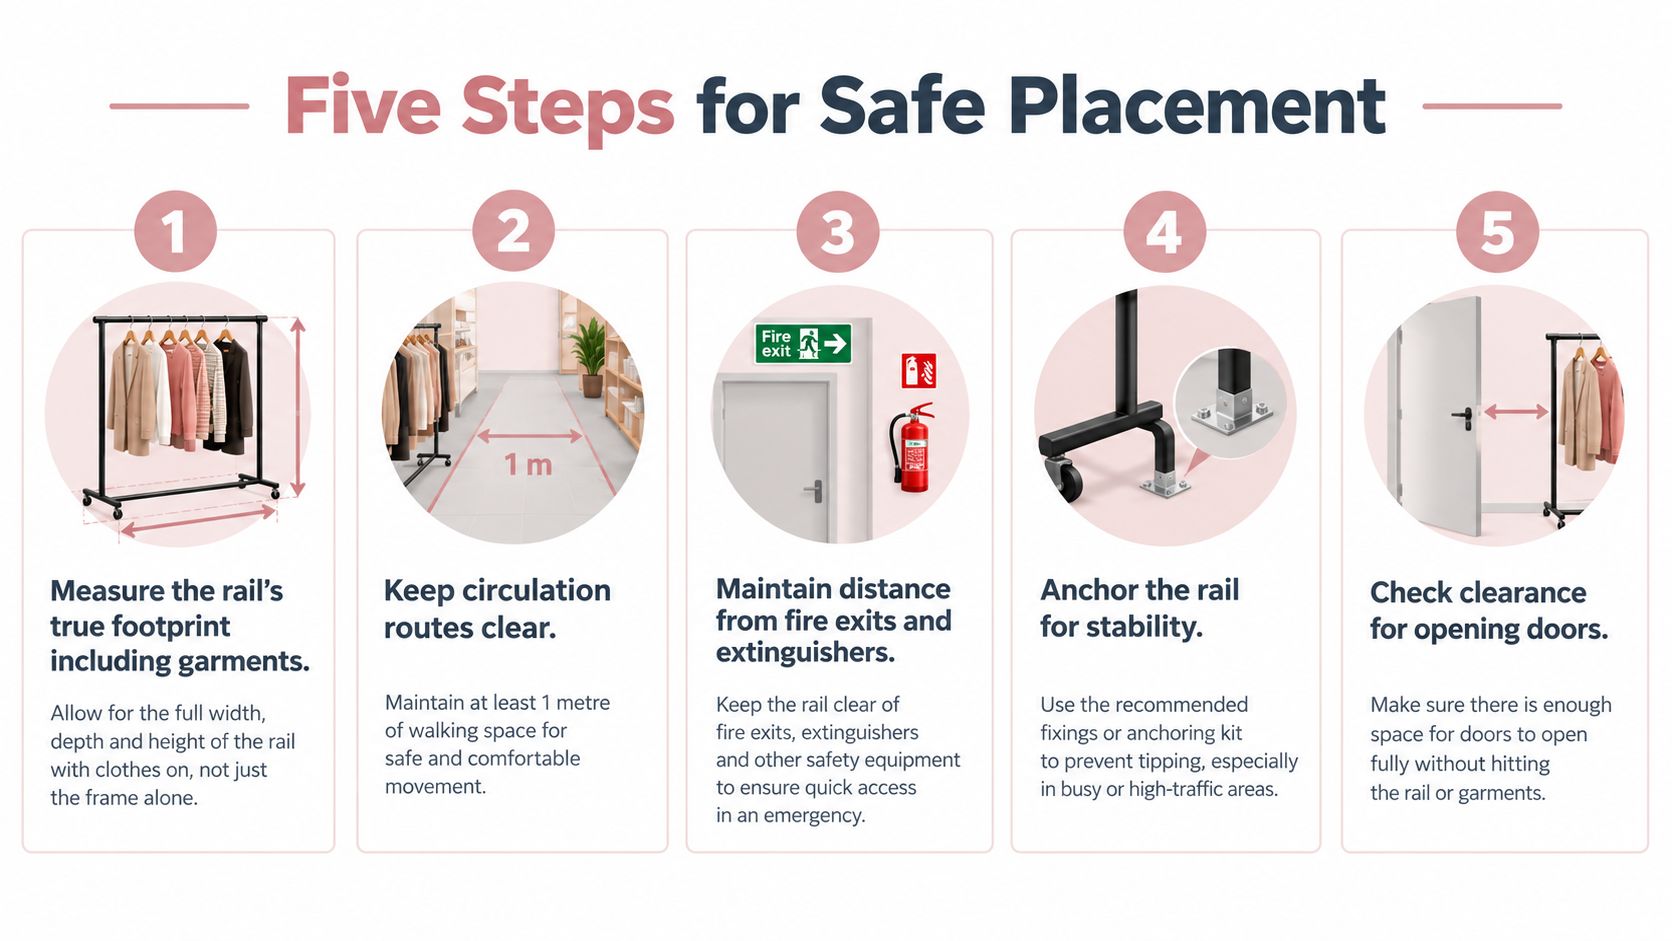
Use the illustration as a reminder of the checks, rather than a universal clearance or anchoring specification. Any restraint must be compatible with the product and the supplier's instructions.
Separate merchandising from stockholding
A planned display has a defined collection and replenishment process. Temporary stockholding tends to expand unless someone owns the task of clearing it.
Layout check: If staff have to move garments or bags before a route can be used, the arrangement needs changing.
Record the agreed rail position on the shop plan and make it clear who can alter it. These retail store layout best practices are a useful companion for considering customer movement alongside the safety review.
Installing and Loading a Round Rail Safely
Don't begin assembly with garments already waiting on the ring. Clear a working area, identify the components and follow the supplier's sequence. Keep the instructions available for the person who will later dismantle or relocate the fixture.
The relevant benchmark is sound construction, adequate strength and a defined safe working load. HSE guidance on warehousing and storage states that storage and racking should be installed and maintained according to manufacturers' instructions, with the maximum safe working load and permitted configuration displayed conspicuously.
Establish a safe first-use routine
Fit the specified feet or castors before loading, and check that all intended floor-contact points are properly seated. On an uneven floor, use only the adjustment method the supplier permits. A folded piece of packaging isn't a reliable levelling solution.
Inspect the assembled joints and locking mechanisms before testing the empty rail for unwanted movement. Tighten fasteners as instructed, rather than assuming that more force is always better. Where the rail has brakes, confirm their operation in the intended position.
Record the safe working load, model identification and approved configuration in the equipment file. If the supplier gives only a garment count, ask for clarification before using the rail for dense coats or costumes.
- Load progressively: Add garments around the ring rather than filling one section first.
- Check mass, not just quantity: Heavy garments and their hangers need to be considered together against the supplier's limit.
- Keep the arrangement balanced: Don't cluster bulky items on one side because they belong to the same collection.
- Stop if behaviour changes: Unexpected leaning, movement or joint noise warrants unloading and investigation.
Even distribution matters because concentrated weight creates uneven loading and can increase the risk of overturning. Don't use the stated limit as a target that staff must reach.
Document faults and changes
After relocation or repeated heavy handling, inspect for loosened joints, deformation, cracked welds and unstable feet. Remove a suspect rail from use until the fault has been assessed and resolved; concealing it beneath stock only passes the problem to the next shift.
If you're considering a fixed alternative, guidance on a clothing rail bracket can help identify the installation questions. It isn't a reason to improvise extra supports on a freestanding rail without approval.
Choosing for Garments, Customers and Circular Workflows
Maximum hanging density is a poor buying target when customers can't separate the garments. A rail that's packed tightly may accommodate the collection, but it leaves shoppers wrestling with hangers and staff struggling to inspect individual pieces.
Judge capacity by the garments people can comfortably find, remove and return. That's a more useful practical measure than filling every available part of the ring.

Test the browsing experience
Network Rail's retail design guidance stresses adequate clearance for people to approach, interact with and leave retail fixtures. Although written for station retail, it provides a useful accessibility lens for evaluating a shop display.
Test reach and movement with representative users, including wheelchair users and shorter customers. Check whether someone can remove a garment without reaching across the base, and whether another person can pass without forcing them to abandon browsing.
- Reachable stock: Provide a clearly accessible section, rather than putting every desirable garment at an awkward height.
- Readable presentation: Keep labels visible and provide lighting that helps customers examine colour and condition.
- Suitable hangers: Match shoulder shape and garment weight; consider heavy-duty hangers where the garment requires stronger support.
- Usable spacing: Leave enough freedom to inspect a sleeve, open a jacket and return the hanger without force.
Give resale and repair a defined process
For second-hand collections, keep items awaiting inspection separate from approved sale stock. Use a nearby sorting surface for condition checks and repair decisions, so staff aren't using the customer-facing rail as an unfinished-work queue.
Complete-outfit presentation can also help shoppers understand how unfamiliar pieces fit into their wardrobe. House of Saint's outfit formulas for every piece offer styling context for building those combinations without cramming the fixture.
The circular shape is useful only if the workflow stays legible. Clear categories and a manageable edit are more valuable than a full ring of mixed returns, repairs and ready-to-sell garments.
Care, Inspection and a Seasonal Routine
A presentable rail needs a maintenance routine that staff can sustain. Set a named owner, keep the supplier's care instructions nearby and record faults where the next shift will see them.
As a practical starting schedule, use a weekly visual check, a monthly stability and fastener review, and a quarterly stock-and-condition audit. These are suggested housekeeping intervals, not prescribed inspection frequencies; increase checks after relocation, unusually heavy use or any reported problem.
Clean the fixture without damaging it
Remove garments before cleaning and follow the finish-specific instructions. Don't assume the same cleaner suits chrome, powder-coated surfaces and acrylic components, or use an abrasive product because a mark is stubborn.
Check concealed contact points while the rail is empty. Look beneath the base, around castor attachments and at ring connections, where dirt or damage may be harder to spot during trading.

Protect the garments through seasonal changes
ICON's costume and textile care guidance identifies relative humidity above 65% as a condition that promotes mould growth and recommends keeping textiles clean, dry, dark and accessible for inspection. It also warns that heat can make textiles brittle.
Check for damp near external walls, condensation and changes caused by seasonal heating. Keep stored garments away from direct sunlight and radiators, and preserve air circulation rather than compressing stock tightly. Appropriately shaped, padded hangers help support garments without concentrating pressure at the shoulders.
- After a damp spell: Examine vulnerable garments and the surrounding wall or floor.
- When heating changes: Review the storage position and look for excessive warmth.
- For valuable costume stock: Consider a temperature and humidity data logger near the rail to establish actual conditions.
Cleaning the fixture and caring for its contents are separate jobs. For newly sewn everyday garments, More Sewing's guidance to wash your makes without ruining them is a useful companion to fabric-specific care instructions; fragile historic costumes need a conservation-led approach.
Display Guru supplies garment rails, hangers, tailor dummies and body forms for retail displays, sewing studios and costume work. Visit Display Guru with your garment types, available floor space and loading requirements to hand, and ask for the specification details you need before choosing your rail.