




White Wooden Wall Shelves: A Practical UK Guide
A dressmaker has cut sample pieces for a new collection and now needs a place to keep fabric rolls, pattern books and a few display objects within reach. The wall looks clear, the white wooden shelf seems straightforward to fit, and the temptation is to choose a size and start drilling. But the right shelf depends on more than the board: the wall, fixings, expected load and room conditions all have to work together.
That applies just as much to a small shop display or a rented bedroom. A shelf that's safe on timber studs may be a poor choice for hollow plasterboard, while a well-painted board can still suffer if it's installed against a damp wall. Start with the conditions behind the shelf, then choose the dimensions and finish to suit.
Why the Wall Behind the Shelf Matters Most
A shelf can look solid on the bench and still fail at the point where it meets the wall. The board, brackets, screws and wall form one supporting system, so the weakest part sets the limit. Knowing whether you're dealing with masonry, timber studs, dot-and-dab or hollow plasterboard matters more than choosing between a floating profile and visible brackets.

Consider a dressmaker in a converted loft, weighing a shelf against the fabric and pattern books it needs to hold. If the brackets land between studs, the apparent convenience of a long board doesn't help; the fixing needs a route into sound structure. A small boutique owner has a different pressure. The shelf may carry folded garments and display pieces, but customers will also reach towards it, so the installation must tolerate ordinary handling without relying on the board alone.
A renter might be tempted to use adhesive strips to avoid drilling, then place heavy ceramics on the shelf. That's a mismatch between fixing method and load, not a problem with the shelf's colour or styling. Don't assume that a product described as strong can safely support books or breakable objects on an unknown wall.
Start with the wall, not the finish. Confirm the wall type, what the shelf needs to carry and whether the room has damp or condensation concerns before buying.
The furniture category is substantial, but the available figures don't isolate white wooden wall shelves as a product. UK furniture-manufacturing turnover reached £11.35 billion in 2022, and official product classifications include shelves within wooden office furniture, alongside cupboards, cabinets and bookcases (FIRA Statistics Digest). That's useful market context, not a shelf sales estimate.
Once the wall and purpose are clear, style can follow. If the shelf will sit above a sofa alongside framed pictures, this guide to how to arrange music and football prints can help you plan the wall as a whole.
Measuring for Length, Depth and Clearance
Measure the space before you choose the board. The useful length is the uninterrupted run between obstacles, not the full width of the wall. Check for door frames, window trims, pipes, switches and any projecting furniture that could make a shelf awkward to use.
Take the measurements that shape the choice
Measure length first, then use masking tape to mark the outline of the intended shelf on the wall. Step back and check it from the room's main viewpoints. This simple mock-up catches a shelf that would crowd a doorway or sit out of line with nearby furniture before you've drilled or ordered a board.
Next, measure depth against the objects you'll place on the shelf. Pattern books, folded stock and shallow display pieces don't need the same projection as storage boxes. A deeper board offers more room, but it also projects further into the room and calls for careful attention to the support system.
Finally, measure the clearance above the shelf. Allow enough space for the tallest intended item, such as a storage box, hat block or display piece, and consider whether you'll need to lift objects off easily. Also mark bracket positions and centres against the wall, checking that they can align with suitable fixing points.
| Length | Typical depth | Best suited to |
|---|---|---|
| 60 cm | Shallow to medium | A compact work area, bedside display or small product grouping |
| 80 cm | Medium | Pattern books, folded fabric or a modest retail feature |
| 100 cm | Medium to deeper | A studio run with several useful storage zones |
| 120 cm | Medium to deeper | A longer display or wall run, provided the wall and supports suit it |
Treat these as practical starting points, not load ratings. Board material, thickness, bracket layout and the wall behind them all affect what's suitable. For the range of board options and finishes, compare white shelf boards for different interiors after taking your measurements.
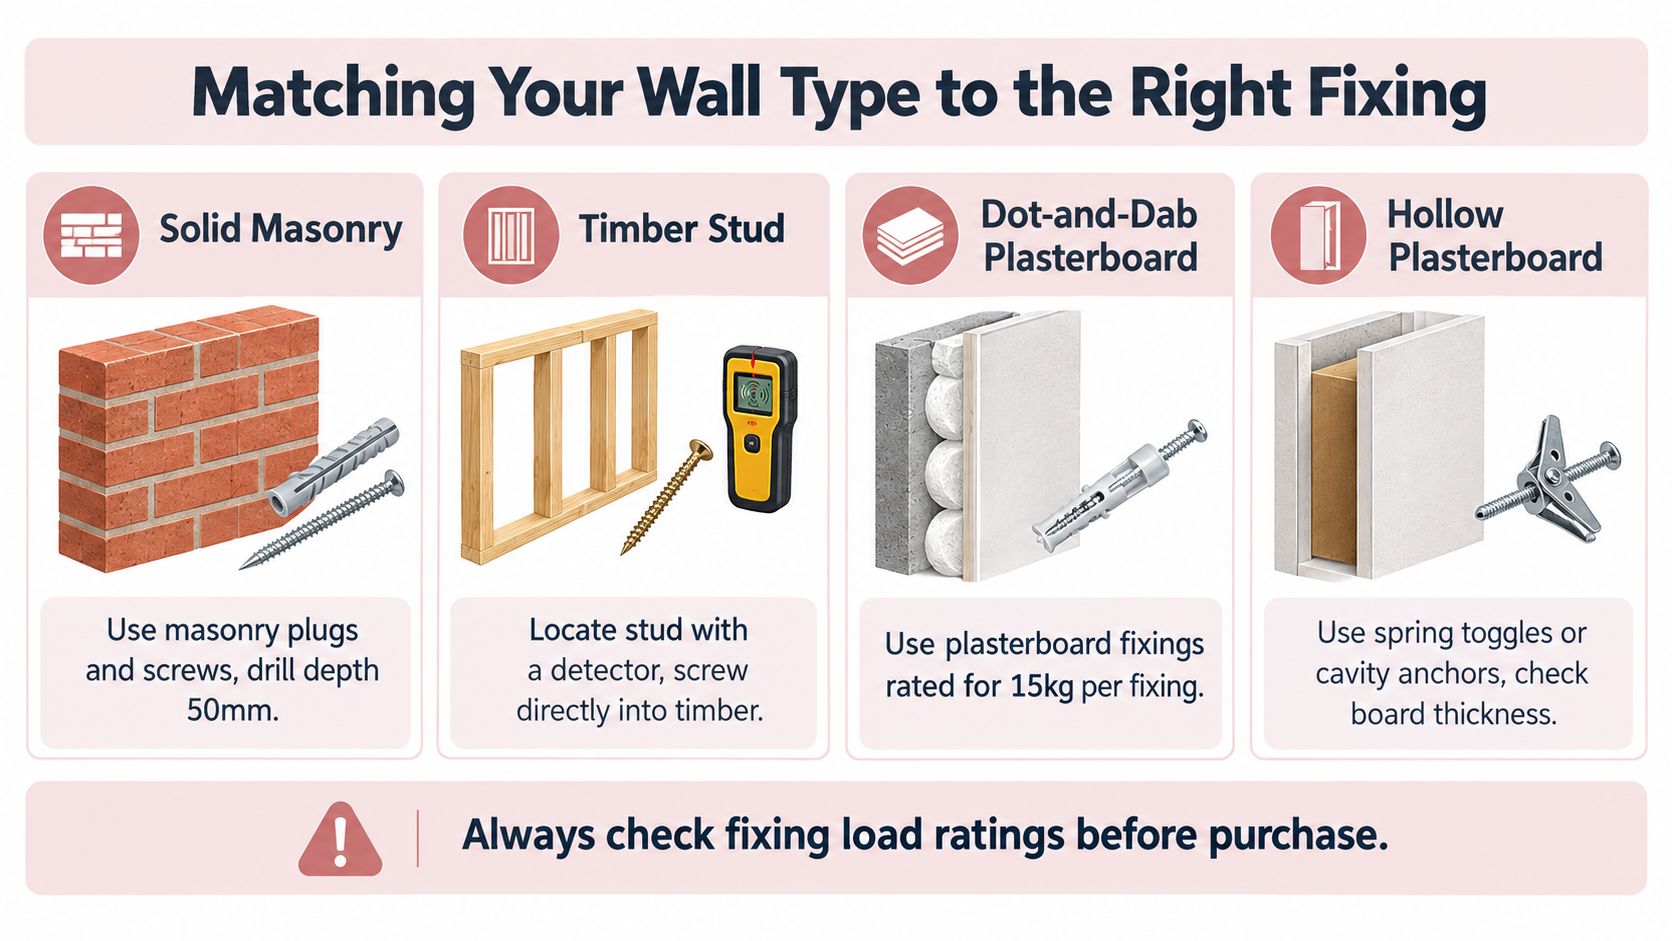
Matching Your Wall Type to the Right Fixing
A knock test gives a rough first clue, but it isn't enough to choose fixings. A detector can help locate timber studs and services, while the sound and feel of a small test hole may reveal what lies behind the surface. If you're uncertain about concealed pipes or cables, stop and investigate before drilling.
The practical rule is to plan fixings for two to three times the expected working load, then check the lowest-rated component in the whole system. That benchmark doesn't override the rating of the wall, fixing, bracket or shelf. A nominal bracket capacity is irrelevant if its screw is only held by weak plasterboard.
Use the wall type to choose the fixing
| Wall type | What to check | Fixing approach |
|---|---|---|
| Solid masonry | A consistent, hard drill response suggests brick or block, but check for loose mortar and avoid services. | Use suitable masonry plugs and screws that transfer the load into sound masonry. |
| Timber stud | Locate the studs with a detector and confirm their positions before marking bracket points. | Screw directly into sound timber; a horizontal rail fixed across multiple studs can help when bracket positions don't align. |
| Dot-and-dab plasterboard | The board is separated from masonry by a cavity, so surface-only fixings may compress the board or leave the shelf unsupported. | Use through-fixings that carry forces into the masonry rather than relying on the plasterboard face. |
| Hollow plasterboard | Check board thickness and whether the cavity is clear enough for the chosen fixing. | Select a cavity fixing appropriate to the board and load, and keep expectations modest for heavier storage. |
For a timber stud installation, use screws with at least 35 mm penetration into sound timber. If the bracket layout doesn't meet the studs, a timber rail fixed into multiple studs provides a better attachment point than moving the brackets to unsupported positions. On dot-and-dab walls, choose a fixing that bridges the gap and anchors into the masonry.
There's no universal safe shelf weight. Capacity depends on the combined performance of the wall, fixings, bracket spacing and shelf, and plasterboard-only fixing isn't suitable for significant loads. For a comparison of bracket styles and uses, see slotted shelving bracket options.
Installing a White Wooden Shelf Step by Step
A sound installation starts with a clear fixing plan, not with the drill. Lay out the board, brackets and fasteners first, then check that the planned support points suit both the wall and the shelf.
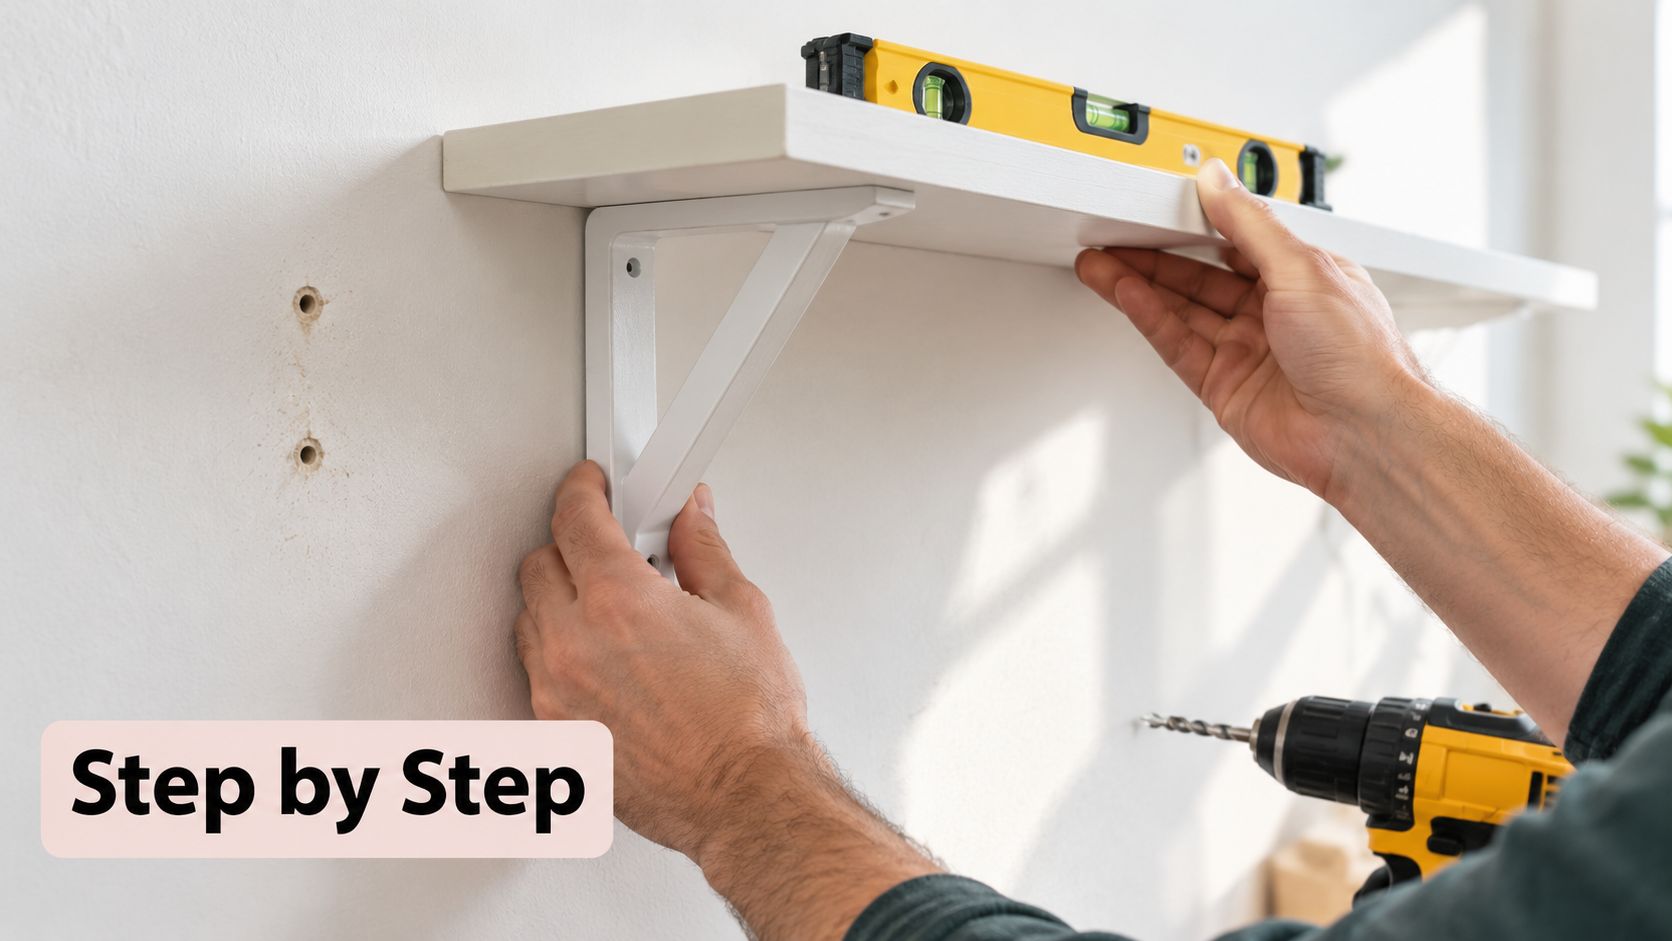
Mark, drill and fit
- Check the wall and services. Use a suitable detector to locate studs, pipes and cables. Mark the safe bracket positions and confirm the wall construction before selecting the drill bit and fixing.
- Mark the bracket line. Use a level to draw the shelf line, then mark each fixing point. On masonry, a bradawl or a small centre mark helps stop the drill bit wandering at the start. Drill to suit the chosen fixing, and clear dust from the hole before inserting it.
- Secure the brackets. Fix into the structure identified earlier. In sound timber, make sure the screws penetrate at least 35 mm. If the brackets can't line up with studs, use a rail anchored into multiple studs rather than relying on unsupported plasterboard.
- Level twice. Check the brackets before tightening fully, then set the board in place and check the shelf itself. A shelf can look level on its own while sitting unevenly on brackets that weren't aligned.
- Test before loading. Pull firmly on each fitted bracket to check for movement, then add weight gradually. Keep the load within the lowest rating of the wall, fixings, brackets and shelf. Place dense objects over or near the bracket line and towards the back of the board. Items near the front edge create more strain and can increase pull-out forces.
Leave a small air gap behind the shelf where the design allows it, and keep the board's rear edge clear of persistent moisture. That helps with inspection and airflow, but it doesn't make a damp wall suitable for installation.
A shelf system with adjustable positions can suit a studio where storage needs change; the twin-slot shelving guide is a useful comparison when deciding whether fixed brackets or a configurable layout better suits the job.
Watch the installation sequence below, then adapt the fixing choice to the wall you've identified rather than copying a fastener from someone else's setup.
Finishing White Wood Without Future Regret
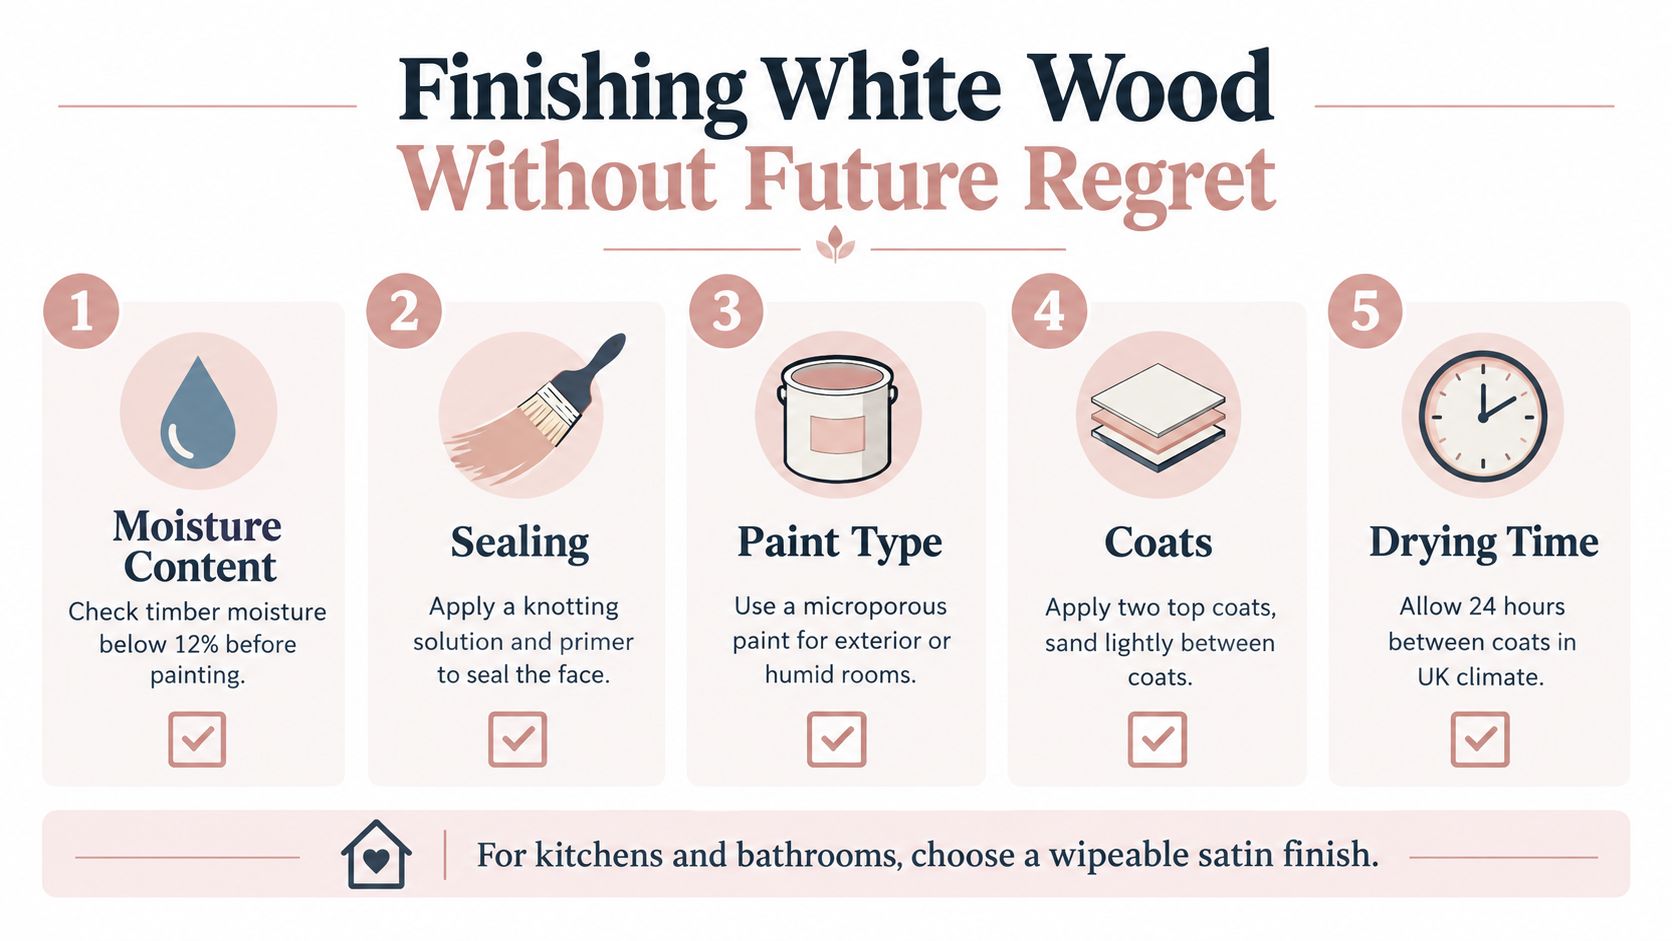
Paint is part of the shelf's protection, not just its appearance. Timber moves as its moisture content changes, and a coating applied before the board has adjusted to the room can crack at joints or reveal movement along the grain. Measure moisture at several points with a calibrated meter, not only at the ends, and let the timber condition in the room before machining or painting.
Match the timber to the room
For joinery in intermittently heated interiors, BS 1186-3 guidance cited for UK conditions puts timber at approximately 13–17% moisture content. Continuously heated rooms at 20–24°C are associated with approximately 8–12%, while a separate TRADA-based UK summary gives 9–13% for heated buildings at 12–21°C (English Woodlands Timber's wood and water guide). Choose the range that fits the room's heating pattern rather than treating one target as universal.
Seal all faces, including the underside, and pay particular attention to end grain, which takes up moisture readily. Follow the coating system for the timber you're using; where knots or tannin-rich wood may bleed through, use an appropriate stain-blocking primer before white top coats. A well-prepared, wipeable finish is easier to care for than bare or unevenly coated timber.
a white finish shows every flaw, which is exactly why it rewards careful preparation.
Distinguish condensation from a building defect
Condensation forms when moisture in the room meets a cold surface. Penetrating or rising damp has a different cause, and paint won't correct the underlying problem. If staining, mould or a persistent damp patch appears behind a shelf, inspect the wall and address the source rather than recoating the board.
Common mistakes include painting only the visible face, finishing timber straight after delivery and loading the shelf before the coating has cured. Each can leave the board vulnerable to seasonal movement, marks or a finish that feels soft under everyday handling. For board choices that suit a painted shelf, compare MDF shelving board options.
Moisture, Mould and Renter-Friendly Choices
A white shelf can look crisp on installation day and still become a nuisance if it sits in a damp corner. In England, 30% of households reported condensation, damp or mould problems in 2024, and serious condensation affected 3% of homes, according to the English Housing Survey housing-quality findings. These figures make moisture a practical consideration for shelving, especially where fabric, paper patterns or garments are stored.
Avoid placing timber against a persistently cold external wall or immediately above a poorly ventilated bathroom if condensation regularly forms there. Leave an air gap where possible, and check behind the board and around the brackets for spots, staining or a musty smell. Wipe a painted surface gently with a suitable cleaner, following the coating manufacturer's care guidance so you don't dull or damage the finish.
Treat the cause, not just the shelf
Surface condensation and penetrating or rising damp aren't interchangeable. Ventilation can help with condensation, but persistent damp patches may point to a building issue that needs attention. Among households reporting damp or condensation, opening windows was the most common response at 83%, followed by extractor-fan use at 42% and trickle vents at 20%, as recorded in the same housing survey. Those responses aren't a substitute for diagnosing the source, but they show why airflow matters.
Renters also have to weigh storage against the terms of their tenancy. A removable system may suit light display items if its instructions and the wall surface allow it; a narrow freestanding unit avoids drilling altogether. For heavier objects, ask the landlord about approved installation rather than assuming adhesive strips will hold books or ceramics securely.
White doesn't automatically mean low maintenance. Dust, mildew and water marks can show more clearly on a pale finish, so keep the shelf accessible for inspection and don't cover a suspect wall with storage. Which? reports that 43% of its members surveyed in June 2024 had tried to increase home storage (Which? storage ideas). Making space is useful, but a safe freestanding or landlord-approved solution is better than a shelf attached to a wall that isn't ready for it.
Styling for Studios, Shops and Living Rooms
In a sewing studio, place frequently used patterns and reference books within easy reach, with heavier stock lower and close to the support points. Group fabric by colour or project, and leave clear working space below so the shelf doesn't crowd the table or mannequin.
For a shop, use staggered heights to create a readable display, but keep sightlines open and put tactile products where customers can reach them. Leave headroom for signage and don't let decorative props displace the merchandise. The same principle applies at home: anchor heavier books near the bracket line, then use lighter objects at the ends. These shelf styling tips from Slone Brothers Furniture offer further ideas for balancing useful storage with display.
If the wall layout has a corner to use, consider whether corner shelving for storage will make better use of the room than extending a straight run. The right white wooden wall shelves have measurements suited to the space, fixings matched to the wall, a finish suited to the room and a layout built around what they need to hold.
Display Guru supplies display tools for sewing professionals, retailers and visual merchandisers, including tailor dummies, garment rails and dump bins. If you're planning a studio, shop floor or home sewing space, visit Display Guru to find equipment that supports practical storage and clear presentation.