


How to Read Sewing Patterns Without Confusion
Before you even dream of unfolding that first crinkly piece of tissue paper, stop and spend some quality time with the pattern envelope. I like to think of it as the project's blueprint, holding every piece of critical information you need to make something you’ll love to wear. Honestly, getting the hang of how to read sewing patterns begins right here, with the packaging.
Your Guide to the Pattern Envelope
The glossy, styled photo on the front is meant to sell you the dream, showing off the finished garment in the best possible light. While it's great for getting a feel for the overall vibe, the real story is told in the simple, black-and-white technical drawings. We often call these ‘flats’ in the industry, and they show you every single seam, dart, and design line without any distracting styling.
Always cross-reference the photo with these drawings. They make it easy to spot the different design options included, known as ‘views’. For instance, a single pattern might offer a dress with long sleeves (View A) alongside the same dress with short sleeves and a different neckline (View B). The line drawings lay out these variations with perfect clarity.
Finding Your Size and Fabric
Flip the envelope over, and you’ll find the real nitty-gritty: the sizing chart and fabric recommendations. It's so tempting to just grab the size you’d buy on the high street, but I can't stress this enough—pattern sizing is a world of its own. You absolutely must take your current bust, waist, and hip measurements and compare them to the chart to find your true pattern size.
Equally important are the fabric recommendations. These aren't just vague suggestions; they're based on how the garment is engineered to hang and fit. A sharply tailored blazer demands a sturdy fabric like wool or twill, whereas a floaty sundress needs something with beautiful drape, like a viscose challis or silk. Choosing the wrong fabric type can completely ruin the intended silhouette.
Right next to the fabric types, you’ll see the fabric quantity chart. Here’s how to decipher it:
- Locate your size along the top or side of the chart.
- Note the fabric width, which is typically 115cm (45") or 150cm (60"). Fabric comes in various widths, and you'll naturally need more of a narrower cloth.
- Follow the lines to where your size and chosen fabric width meet. That number is the exact length of fabric you need for your specific view.
Gathering Your Notions
The last crucial bit of intel on the envelope is the ‘notions’ list. Think of this as your essential shopping list for all the extras. Checking it beforehand saves you that sinking feeling of realising you’re missing a vital zip halfway through your project.
To help you get started, here's a quick breakdown of what you'll find on the envelope and why it matters.
Quick Guide to Pattern Envelope Information
| Element | What It Tells You | Why It's Important |
|---|---|---|
| Front Image | The idealised, styled look of the finished garment. | Provides inspiration and shows the garment's potential style. |
| Line Drawings (Flats) | Unstyled technical sketches of all included views. | Clearly shows seam lines, design details, and variations without distraction. |
| Sizing Chart | Body measurements (bust, waist, hip) corresponding to pattern sizes. | Ensures you cut the correct size for a good fit, as it differs from shop sizing. |
| Fabric Recommendations | Suggested fabric types (e.g., cotton, wool, viscose). | Critical for achieving the intended drape, structure, and overall look. |
| Fabric Quantity Chart | The amount of fabric needed, based on size and fabric width. | Guarantees you buy enough material to cut out all your pattern pieces. |
| Notions List | A checklist of all other required items (zips, buttons, thread, elastic). | Helps you gather all necessary components before you start sewing. |
This upfront preparation makes the entire sewing process smoother and far more enjoyable.
A well-organised project starts with having all your materials ready before you cut your fabric. This includes not just the fabric, but every button, zip, and spool of thread listed under notions.
Common items you'll find on a notions list include:
- Zips (with the exact length and type specified)
- Buttons (with the size and quantity needed)
- Matching thread
- Elastic, interfacing, or bias tape
- Hooks and eyes
Having an organised sewing space makes gathering these supplies so much easier. If you're looking for ways to set up your creative haven, you might find some great inspiration in our guide to fantastic sewing room ideas.
This focus on getting the details right is a hallmark of the sewing community. In fact, the UK sewing thread market alone was valued at approximately £125 million in a recent year, with apparel being the biggest driver. This figure highlights just how many people are invested in the craft and the skills needed to construct garments beautifully.
Getting the Right Fit and Preparing Your Pattern
Before you even think about laying fabric out, there's a vital step that every experienced sewer knows is non-negotiable: getting the fit right. One of the most common pitfalls for newcomers is grabbing a pattern size that matches their usual high street clothing size. Sewing patterns follow their own set of standards, and they are all about your specific body measurements, not a shop's label.
To get started, you'll need a flexible tape measure. Take your key measurements—usually bust, waist, and hips—keeping the tape snug but not uncomfortably tight. Make sure it's parallel to the floor to get a truly accurate number. If you're a bit fuzzy on the exact points to measure, our guide on how to take body measurements for clothes is a brilliant resource to walk you through it.
From Measurements to Size Selection
With your measurements in hand, turn your attention to the sizing chart printed on the pattern envelope or instruction sheet. Now, don't be alarmed if your measurements don't fit neatly into one single size column. It’s incredibly common to find you’re a size 14 at the bust but a 16 at the hips, for example. This is perfectly normal and just reflects the beautiful variety of human shapes!
For now, you'll need to choose a primary size to work from. A good rule of thumb is to focus on the most crucial measurement for the garment you’re making. If it's a dress or a blouse, the bust measurement is your priority. For trousers or a skirt, the hip measurement is usually the one to go by. You can always blend between sizes later.
Understanding Garment Ease
Another piece of the puzzle is a concept called 'ease'. Ease is the difference between your body measurements and the final garment's measurements. It’s what gives you room to breathe, move, and sit down without your seams screaming for mercy. There are two kinds of ease to know about:
- Wearing Ease: This is the absolute minimum extra room you need for a garment to be wearable. A skin-tight catsuit would have very little wearing ease.
- Design Ease: This is the extra volume the designer adds to create a particular style. Think of billowy sleeves, a floaty trapeze dress, or an intentionally oversized jacket—that’s all design ease.
Look for the 'finished garment measurements' on the pattern, which are sometimes included. Comparing these to your own measurements gives you a brilliant insight into how much ease is built in. This can help you decide if you want to stick with the recommended size or perhaps go down a size for a more fitted look.
My best advice? If you're ever unsure, always choose the larger size. It is infinitely easier to take a garment in at the seams than it is to try and add fabric where there is none.
To Trace or To Cut?
Once your size is selected, you arrive at a classic sewing crossroads: do you cut directly into the delicate pattern tissue, or do you trace it first? You'll find passionate advocates in both camps.
Cutting the Pattern Directly
- Pros: It's the fast lane. You get straight to the satisfying part of cutting your fabric and starting to sew.
- Cons: It's a one-shot deal. The pattern is now only that single size. If you need a different size later, or if you make a mistake, you're out of luck.
Tracing the Pattern
- Pros: This is my recommended method, especially for beginners. It preserves the original multi-sized pattern, so you can use it again and again. It's also essential if you want to grade between sizes (like blending that size 14 bust to a size 16 hip).
- Cons: It's an extra step that takes time and a few more supplies, like tracing paper and a pen or tracing wheel.
Honestly, that little bit of extra time spent tracing is a fantastic insurance policy. It protects your original pattern and gives you so much more flexibility down the road. Before you do anything, gently press the pattern tissue with a dry iron on a very low heat. Getting those deep-set creases out is the first step to ensuring your pieces are perfectly accurate, setting you up for a brilliant result.
Understanding the Language of Pattern Markings
Right, you’ve got your pattern sized and ready to go. The next part is where the real magic begins: learning to read its unique language. Every line, symbol, and tiny marking on that delicate tissue paper is a specific instruction, telling you exactly how to cut, shape, and assemble your garment. Honestly, getting to grips with this visual language is a huge step in learning how to read sewing patterns properly. It's the secret to taking your projects from 'homemade' to 'handmade'.
At first glance, it can all look a bit cryptic, like some ancient code. But trust me, there’s a consistent logic to it. Think of it as your map to a beautifully finished garment. Let’s break down the most essential markings you'll come across.
Decoding Lines and Grainlines
The most obvious things you'll see on any pattern piece are the lines. You’ll immediately notice the cutting lines for the different sizes, usually drawn in various dot-and-dash styles. When you figured out your size earlier, you were essentially picking which of these lines to follow.
This is a great visual for seeing how to select and trace your specific size from all the options on the sheet.
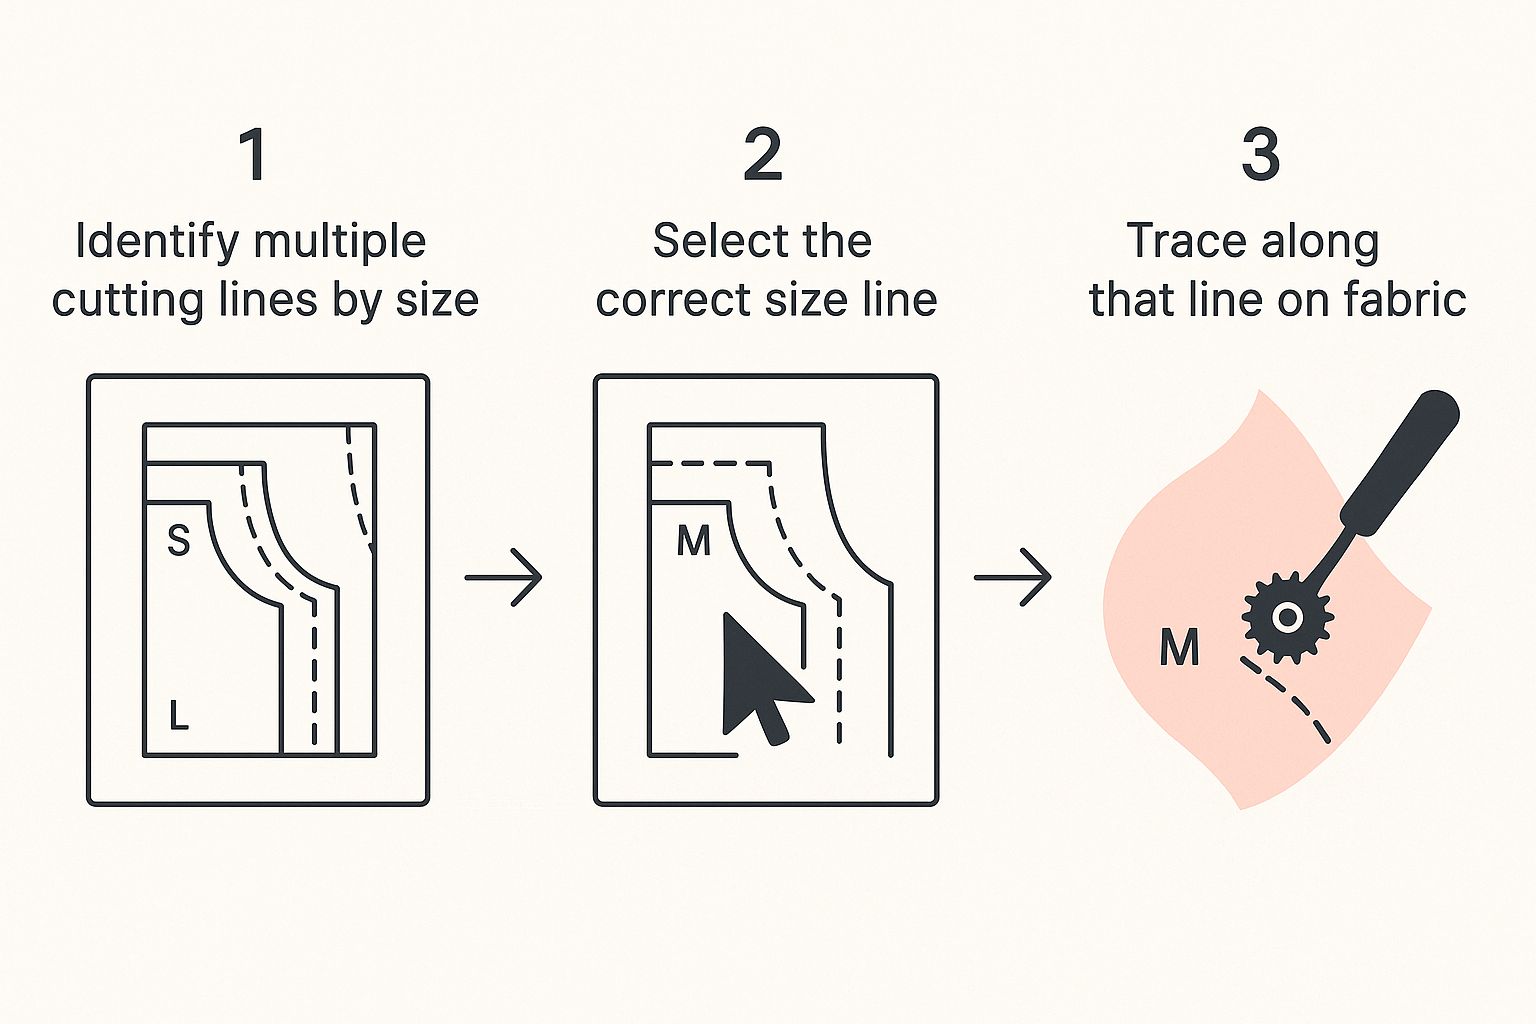
It really highlights why it’s so important to carefully trace your specific line before you even think about putting scissors to fabric.
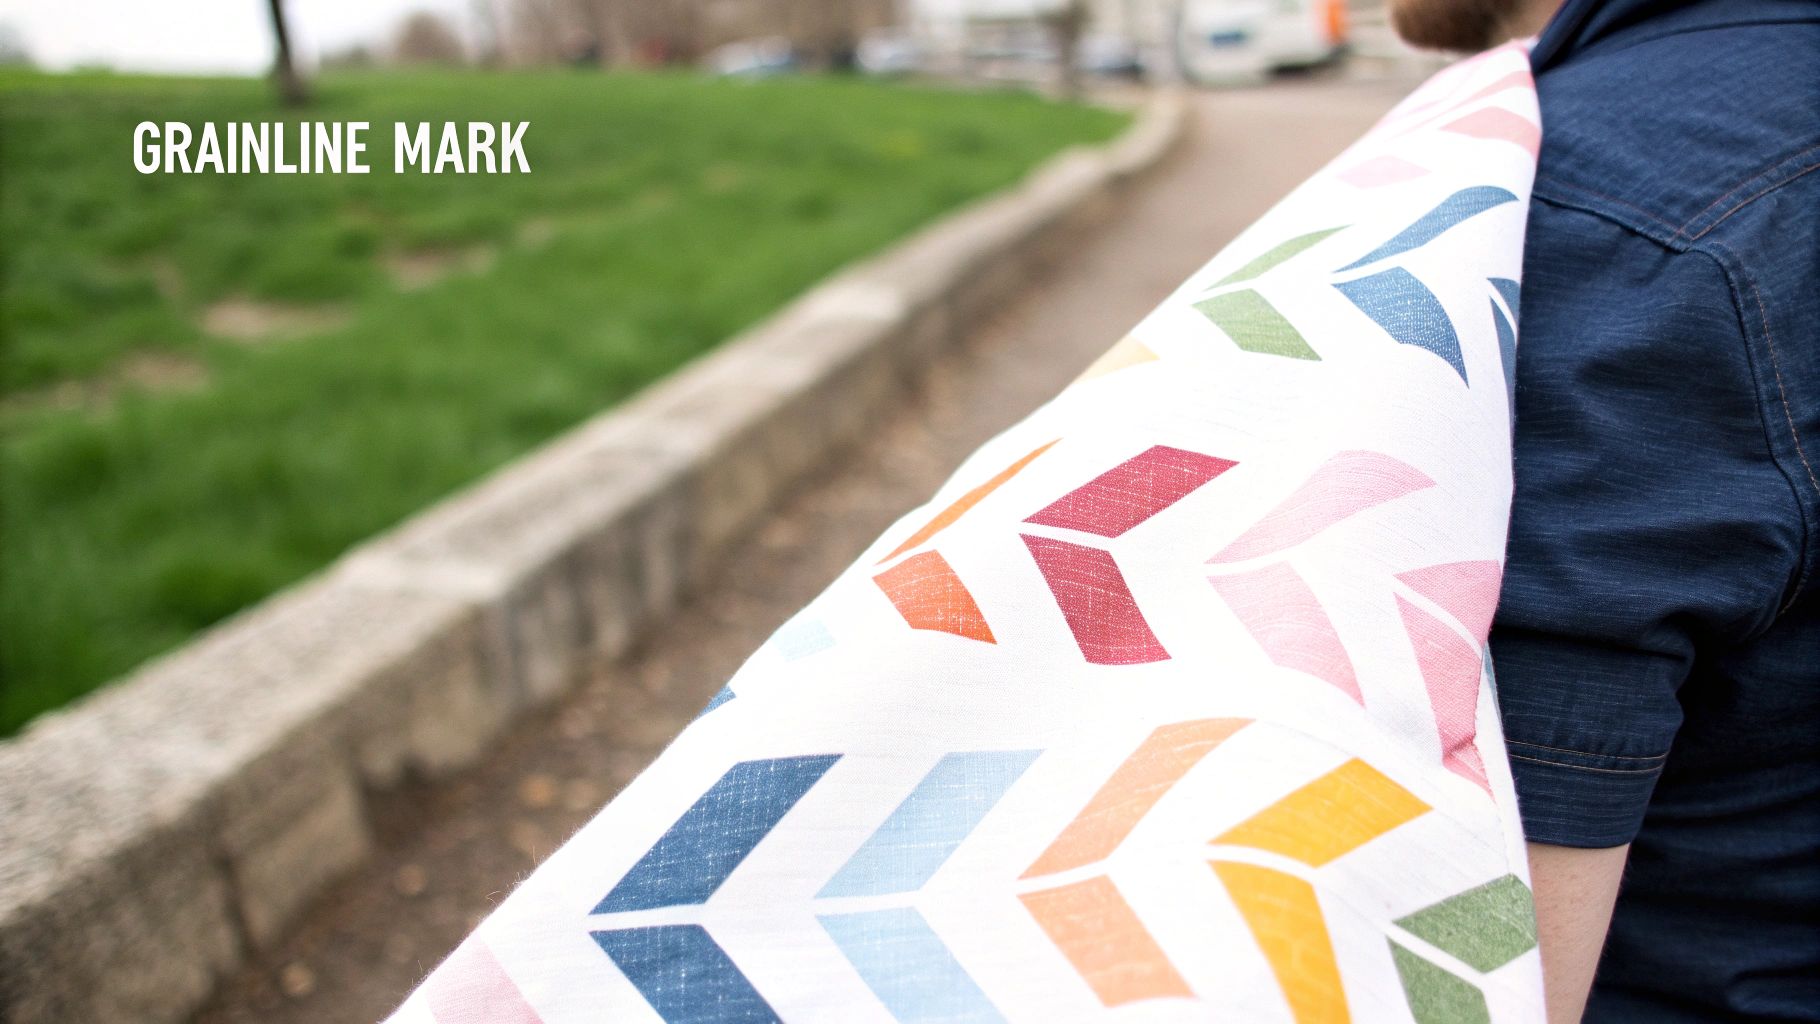
Now, let's talk about arguably the most crucial line on any pattern piece: the grainline. This is a long, straight line, usually with arrows at one or both ends. Its entire purpose is to show you how to orient the pattern piece on your fabric, making sure it aligns perfectly with the fabric's grain. The 'grain' simply refers to the direction of the threads woven together to create the fabric.
- Lengthwise Grain (or Straight Grain): This runs parallel to the selvedges (the neat, non-fraying edges of the fabric bolt). For stability and a proper drape, most pattern pieces are cut along this grain.
- Crosswise Grain: This runs from one selvedge to the other, perpendicular to the lengthwise grain. It often has a bit more give or stretch.
- Bias Grain: This is the 45-degree angle between the lengthwise and crosswise grains. Fabric cut on the bias has the most stretch, which creates that beautiful, fluid drape perfect for slinky dresses or cowl necklines.
To get it right, you have to make sure the grainline marking on the pattern is perfectly parallel to the fabric's selvedge. I always use a tape measure for this, checking the distance from each end of the grainline arrow to the selvedge. If the measurements aren't identical, I adjust the piece until they are. It’s a small step that makes a huge difference.
Another key marking is the place-on-fold line. This looks like a bracketed line with arrows bent at a 90-degree angle, all pointing towards one edge of the pattern piece. This tells you to place that specific edge directly on the fold of your fabric. When you cut it out and open it up, you get a perfectly symmetrical, single piece—think of the front of a T-shirt or a bodice.
A crucial tip: You never, ever cut along the place-on-fold line itself. That edge of the pattern represents the centre of your garment piece and it needs to stay intact as a fold.
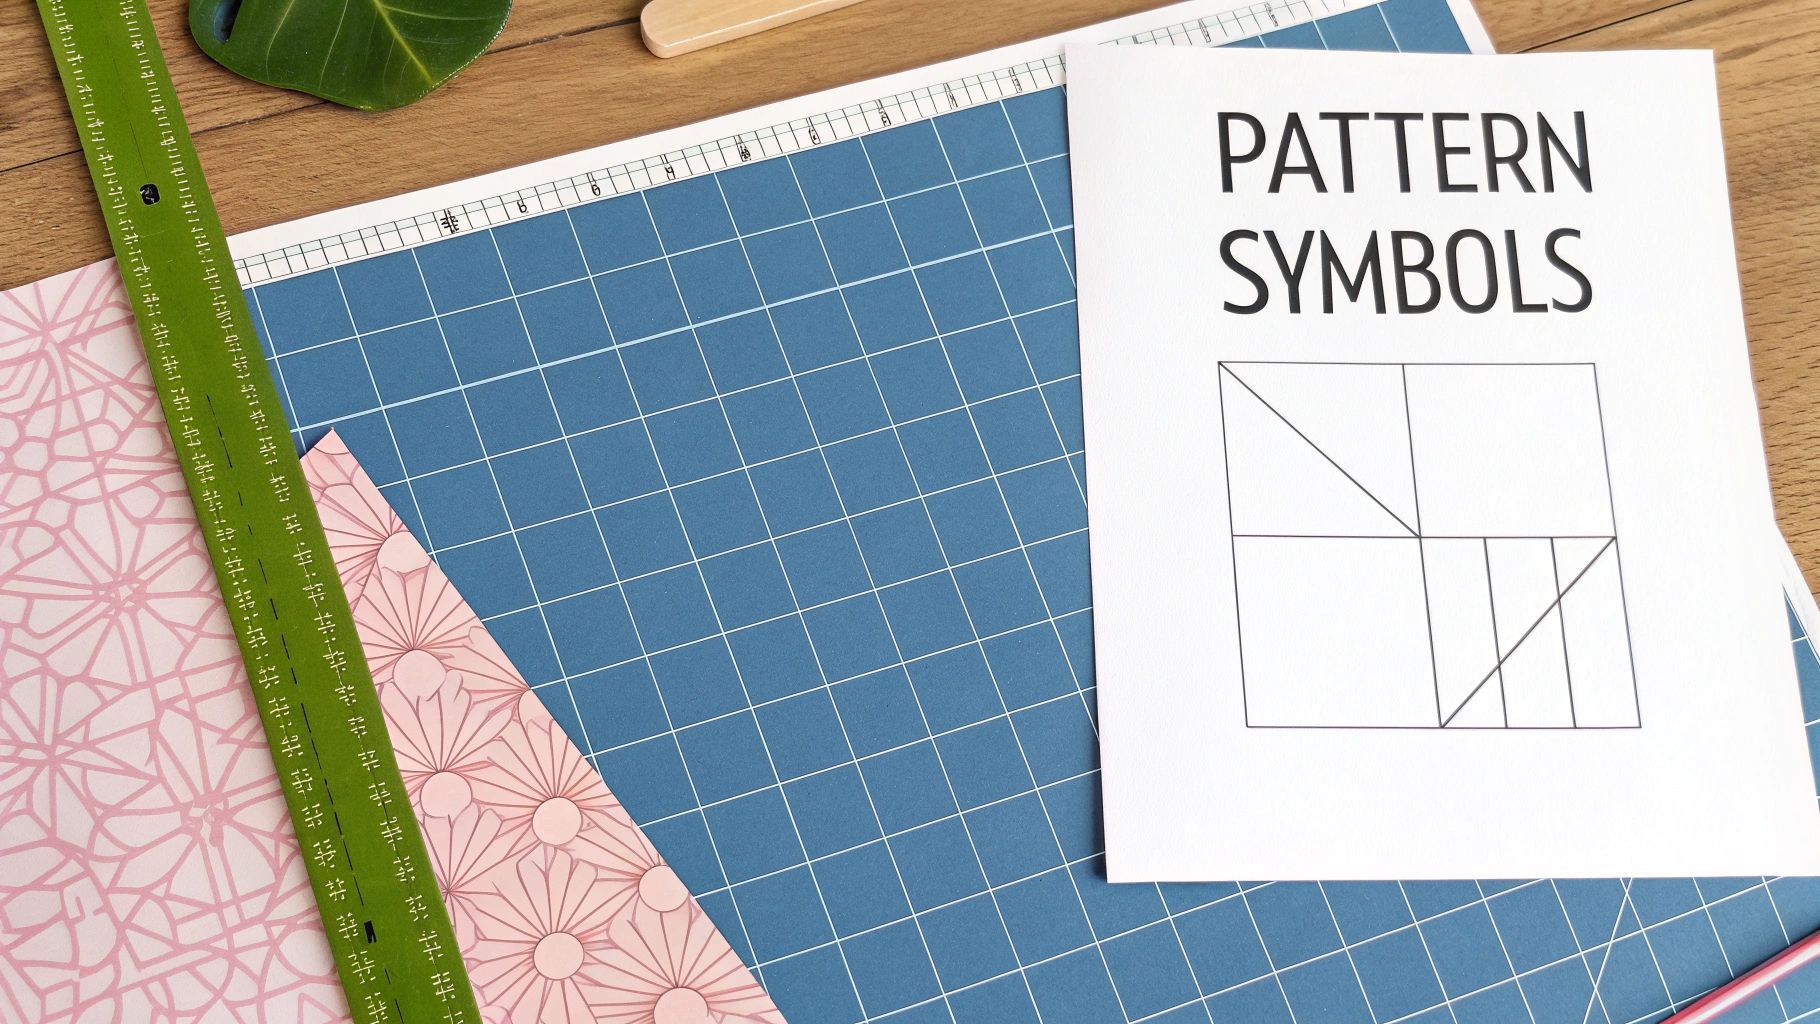
Interpreting Notches, Dots, and Darts
Beyond the main lines, your pattern is peppered with smaller, but no less important, symbols. These are your alignment guides, the little helpers that let you join different pattern pieces together with absolute precision.
Notches are little triangles or diamond shapes sitting along the cutting line. Their job is to help you match seams accurately. For example, the notches on a sleeve cap will line up perfectly with corresponding notches on the bodice armhole, ensuring the sleeve is set in correctly without any twisting. You'll often see single, double, or even triple notches.
- Single notches typically mark the front of a piece (like the front of a sleeve).
- Double notches almost always indicate the back.
This simple system is a lifesaver, preventing you from sewing a sleeve in backwards—a frustrating mistake I’ve definitely made in the past! When you're cutting your fabric, you can either snip outwards from the pattern to create a tiny triangle or make a small clip (no more than 5mm) into the seam allowance.
You'll also spot dots, squares, or triangles floating inside the pattern piece. These are placement markers. They might show you where to attach a pocket, where a zip should end, or the exact point to pivot your stitching at a sharp corner. It's vital to transfer these markings to your fabric using tailor's chalk, a disappearing-ink fabric pen, or traditional tailor's tacks.
Making Sense of Common Markings
To help you get familiar with these symbols, here is a quick-reference table that covers the most common ones you'll find on commercial sewing patterns.
Common Sewing Pattern Symbols Explained
| Symbol | Name | Function |
|---|---|---|
|
Grainline | Align this line parallel to the fabric's selvedge edge. |
|
Place on Fold | Place this edge directly on the folded edge of the fabric. Do not cut this line. |
| △ or ▽ | Notches | Used to align two pattern pieces together accurately. Single notches usually mean 'front', double notches mean 'back'. |
| ● or ■ | Dots/Squares | Markings for placement, such as for pockets, buttonholes, or gathering points. Also used as pivot points for corners. |
|
Dart | A triangular fold sewn into the fabric to add shape and contour, typically around the bust or waist. |
| ---- | Stitching Line | A dashed line inside the cutting line that indicates where you will sew your seam. Not always present on modern patterns. |
| [ ] | Button/Buttonhole | Shows the placement and length for a buttonhole (as a marked rectangle) or a button (often marked with an 'X'). |
Keep this guide handy, and soon you'll be reading these symbols without a second thought.
Finally, you have the markings that create shape and dimension. Darts, which are those triangular folds sewn into fabric, are essential for building curves around areas like the bust, waist, or shoulders. They are drawn as two lines meeting at a point (the dart apex). You simply sew from the wide end to the point to create that beautiful contour.
Similar markings indicate pleats (structured folds of fabric) and gathers (fabric bunched up to create fullness). These are often marked with dots or small lines that show where to start and stop your gathering stitches, or where to fold the fabric for a pleat. Understanding these shaping marks is how you transform a flat piece of fabric into a three-dimensional garment that actually fits a human body.
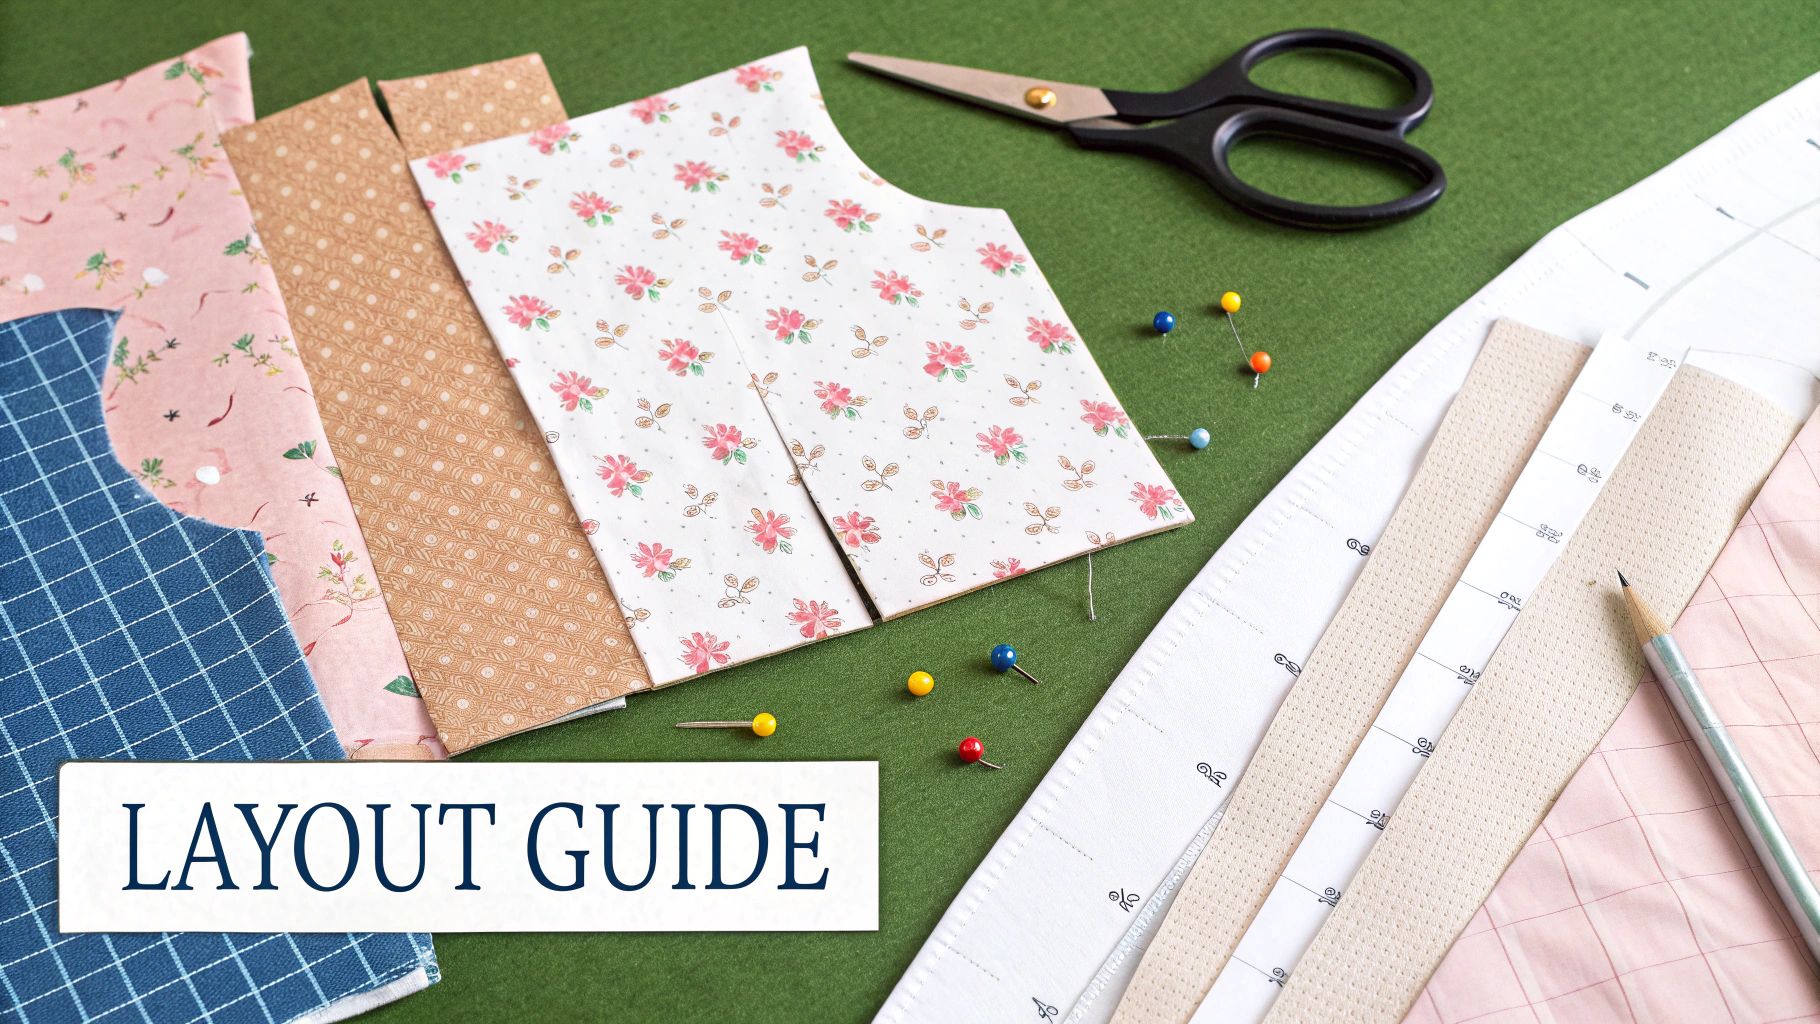
Mastering Your Fabric Layout and Cutting
With your pattern pieces sized and understood, you’ve reached one of the most satisfying stages of sewing: cutting the fabric. It’s where your project starts to feel real. But before you even think about picking up your shears, there are a couple of preparation steps that are absolutely non-negotiable. They truly are the bedrock of a well-made garment that will look great for years.
First things first, you have to pre-wash and dry your fabric exactly how you plan to launder the finished item. Almost all fabrics, especially natural fibres like cotton, linen, and viscose, are prone to shrinking on their first wash. Skipping this step is a classic mistake that can turn your perfectly fitted creation into something unwearably small after its first trip through the machine.
Once it's dry, give your fabric a thorough press with the iron. You want to get rid of every last wrinkle and crease to ensure your pattern pieces lie perfectly flat. Trying to cut wrinkled fabric is a fast track to distorted, inaccurate pieces, so take your time and create a beautifully smooth surface to work on.
Consulting the Layout Diagram
Now, open up your pattern’s instruction booklet and find the layout diagram. Think of this as your treasure map—it shows the most efficient way to arrange your pattern pieces on the fabric to minimise waste. You’ll usually find different diagrams for various fabric widths (like 115cm versus 150cm) and for the different views or styles included in the pattern.
These diagrams are invaluable. They show you precisely how to fold your fabric—sometimes it’s lengthwise with selvedges together, other times crosswise, and occasionally not at all for a single-layer layout. Always find and follow the diagram that matches your size range, chosen view, and fabric width.
I’ve seen it happen time and again: a sewer tries to squeeze pieces onto the fabric without following the layout diagram to save a few inches. This often ends in disaster, with a piece accidentally cut off-grain, which completely ruins the drape and structure of the final garment.
Speaking of the grain, this is where you need to be meticulous. As you place each piece according to the diagram, double-check that the grainline marking on the pattern is perfectly parallel to the fabric's selvedge. I always use a tape measure to check the distance from each end of the grainline arrow to the selvedge—the two measurements must be identical.
A well-organised workspace makes this whole process so much easier. If you’re constantly battling for space on the dining table, looking into a dedicated sewing table with storage can be a game-changer. It gives you that large, flat, stable surface you need for truly accurate cutting.
Handling Napped and Directional Fabrics
Some fabrics need a bit of extra thought. Napped fabrics like velvet, corduroy, or faux fur have a pile that lies in a specific direction. If you brush your hand one way, it feels smooth; the other way, it feels rough.
For these textiles, you must lay out every single pattern piece facing the same direction. If you don't, different parts of your garment will catch the light differently and appear to be different shades of colour. Your pattern's layout diagram will almost always have a specific 'with nap' layout to guide you. The exact same rule applies to fabrics with a directional print, like a floral design that only grows upwards.
Pinning and Cutting with Precision
Once every piece is positioned correctly, it’s time to secure them. I recommend using plenty of sharp pins, placing them perpendicular to the cutting lines with the heads pointing outwards. This holds the delicate pattern tissue firmly in place and stops it from shifting. Pattern weights are also a brilliant alternative, especially for slippery or thick fabrics where pins might leave marks or cause distortion.
When it comes to the actual cutting, you have two main tool choices:
- Fabric Shears: A high-quality pair of shears used only for fabric is a must-have. You'll get a much cleaner edge by using long, smooth strokes rather than short, choppy snips.
- Rotary Cutter and Mat: This combination is fantastic for achieving incredibly precise cuts, particularly around curves. It takes a little practice to get the hang of it, but it’s a firm favourite for many sewers.
As you cut, follow your chosen size line meticulously. Remember to snip your notches outwards or make tiny clips (no more than 5mm) into the seam allowance. This accuracy at the cutting stage is what sets you up for a smooth and successful sewing experience down the line.
Making Sense of Your Pattern Instructions
Now that your fabric is cut and marked, the instruction sheet is your new best friend. Think of it as the script for your sewing project, turning those flat pieces of fabric into a garment you can actually wear. It can look a bit overwhelming at first glance, but with a methodical approach, that wall of text becomes a clear, step-by-step roadmap.
Before you even think about touching your sewing machine, do yourself a favour: read the whole instruction sheet from start to finish. Seriously. Just taking five minutes to get a feel for the entire construction process is a game-changer. It gives you a bird's-eye view, so you’ll understand why you’re staystitching a neckline now, long before you attach the collar. It’s all about seeing the bigger picture.
Applying good reading comprehension strategies can make a huge difference in how intuitively the process feels. A tidy workspace also helps you focus purely on the instructions. If your sewing corner needs a bit of a sort-out, our guide on sewing room organisation has some great, practical tips.
Getting the Seam Allowance Right
One of the very first things you need to find on your instruction sheet is the seam allowance. This is simply the space between the edge you cut and the line you'll be stitching on. For most big-name commercial patterns—think Simplicity, McCalls, or Butterick—this is a standard 1.5cm (5/8 inch), unless the instructions specifically tell you otherwise.
Independent pattern designers sometimes prefer a different standard, like 1cm (3/8 inch), but they will always make this crystal clear right at the start of the instructions.
So, why does this matter so much? The fit of the final garment is designed around that exact seam allowance. If you sew with a wider or narrower seam, even by a few millimetres, you’ll change the garment's finished size. It could end up being too tight or frustratingly loose.
Learning the Lingo: Sewing Shorthand
To save space, pattern instructions are packed with abbreviations. They might seem like a secret code at first, but you'll pick them up quickly because they’re used in almost every pattern out there. Think of it as the universal language of sewing.
Here are the most common ones you’ll encounter:
- RST (Right Sides Together): This means placing your two fabric pieces so the 'pretty' sides—the printed or outer-facing sides—are touching each other. You'll be sewing on the 'wrong' side, hiding the seam inside the finished garment.
- WST (Wrong Sides Together): You won't see this as often, but it's essential for techniques like French seams. For these, you place the 'wrong' sides of the fabric together, so the 'pretty' sides are facing out.
- SA: This is just a simple shorthand for Seam Allowance.
Being able to read a pattern is a genuinely valuable skill. It's not just for home sewers; recruitment data from a recent January showed 2,369 UK job postings for Textile Process Operatives and 288 for clothing and fashion roles, where pattern proficiency is often a key requirement. Mastering these basics really does open doors. You can explore more about this UK employment trend.
Let the Diagrams Be Your Guide
Often, the illustrations in your instruction booklet are far more helpful than the text. Instructions usually pair a numbered step with a matching diagram. If you're scratching your head over a phrase like "Attach the pocket to the front bodice, matching the dots," the picture will show you exactly how the pieces should look.
Always glance at the diagrams to confirm what the words are telling you. They are a lifesaver for visual learners and can help you catch a mistake—like putting a piece on upside down—before you've made a single stitch. When you combine the text, the diagrams, and your own markings, you have a complete toolkit to bring your project to life successfully.
Common Questions About Reading Sewing Patterns
https://www.youtube.com/embed/sgubgWmk9yE
Even once you've grasped the basics of a sewing pattern, some questions inevitably pop up time and time again. I've been there! Let's walk through some of the most common sticking points that can trip up even experienced sewers, so you can get back to your project feeling confident and clear.
What is Pattern Ease, and How Much Do I Need?
One of the first hurdles is understanding ease. In simple terms, it's the extra room built into a garment beyond your exact body measurements, and it comes in two flavours:
- Wearing Ease: This is the non-negotiable bit. It’s the minimum space you need to breathe, sit, and move without feeling like you're in a straitjacket.
- Design Ease: This is where the designer’s vision comes in. It's the extra volume added to create a specific look, whether that's a billowy, oversized shirt or a sleek, body-skimming dress.
Not sure how much ease your pattern has? Look for a chart of "finished garment measurements." By comparing these numbers to your own, you'll see precisely how much room you'll have. This is a brilliant way to decide if you want to stick with your size or maybe go down one for a more fitted look.
To Trace or To Cut? That Is the Question
Ah, the great debate: trace the pattern onto fresh paper, or cut straight into the original tissue? Cutting is definitely quicker, but I almost always advocate for tracing, especially if it’s a pattern you love or if you're still finding your feet.
Tracing keeps your original multi-sized pattern intact. This is a lifesaver if you think you might make the garment again in another size, or if you need to blend sizes—a common adjustment is using a size 12 for the bust and grading out to a 14 at the hips. It’s a few extra minutes of work that pays off hugely in the long run.
My best tip for tracing: Use proper tracing paper over a smooth, hard surface. It stops the delicate pattern tissue from shifting or tearing and gives you a much more accurate copy.
Why Does My Seam Allowance Matter So Much?
The seam allowance, which is a standard 1.5cm (5/8 inch) on most commercial patterns, is absolutely fundamental to getting the right fit. It might not seem like much, but if you’re not consistent, it can completely throw off your final garment.
Just imagine this: if your seam allowance is off by a mere 3mm on each seam of a six-panel skirt, you'll end up shaving off over 3.5cm (nearly 1.5 inches) from the total circumference! That small error could be the difference between a perfect fit and a skirt that's too tight to wear. Always double-check your machine’s guide marks and sew with precision. Keeping organised is a huge help, and a dedicated sewing project planner is perfect for noting down key details like this for every project.
Can I Just Use a Different Fabric?
For the best results, sticking to the fabric types suggested on the pattern envelope is your safest bet. The designer chose them for a reason—their weight, drape, and amount of stretch are all integral to how the finished garment will hang and fit.
That said, you can absolutely substitute fabrics once you have a good feel for how different materials behave. Just be aware that swapping a stable cotton lawn for a slinky, stretchy jersey will radically alter the final product and the techniques you'll need to use. If you're going to experiment, I always recommend making a muslin—a test version in a cheap fabric—first. It’s the best way to spot any potential issues before you take your scissors to that beautiful fabric you’ve been saving.
At Display Guru, we understand that precision and quality tools are the cornerstones of brilliant dressmaking. From adjustable mannequins that help you perfect the fit to durable garment rails that keep your projects organised, we provide the professional equipment you need to bring your sewing creations to life. Explore our collection at https://www.displayguru.co.uk.