

Best Fitting Dress Shirts: How to Choose the Right Fit
Sizing issues accounted for more than 60% of approximately £7 billion in annual UK clothing returns, according to 2025 figures cited by Tellar from Barclaycard Payments. That's a costly reminder that a size label is a starting point, not a fitting verdict.
Why Size Labels Fail to Predict Fit
A UK dress-shirt size expressed in inches or centimetres usually identifies the collar. It doesn't tell you whether the shoulder seam will land correctly, whether the sleeves will reach your wrists, or whether you can sit comfortably with the shirt tucked in.
Brands build different bodies beneath the same collar label. Some allow more room across the back; others narrow the waist, shorten the body or use a higher armhole. Moving up a size might release a tight chest while leaving you with an oversized collar and dropped shoulders.
Separate size from shape
The best fitting dress shirts match your proportions rather than your usual size. Record these dimensions independently:
- Collar: The neck measurement and the allowance needed for comfortable fastening.
- Chest: Circumference around the fullest part, without lifting or expanding the ribcage.
- Waist: Circumference at the level where the shirt needs room, including any fuller abdomen.
- Shoulder width: The distance between the shoulder points across the back.
- Sleeve length: The length measured using the retailer's stated method.
Ease is the room beyond the body measurement that allows breathing, movement and the silhouette you want. A body measurement and a finished garment measurement aren't interchangeable. Check which kind a retailer publishes before comparing either with your notes.
Slim, fitted and regular describe approaches to shaping, not universal standards. They trade waist suppression against room through the torso, but none guarantees correct shoulders or a comfortable collar.
Practical rule: Choose the shirt's underlying proportions first. Use alterations to refine them, not to rebuild them.
Take your measurements before shopping. A flexible tape, a mirror and someone to check the tape across your back will give you a more useful benchmark than the size of an old shirt whose fit you've never questioned.
Quick Pick for Slim, Tailored or Regular Fit
Quick pick: fit category by build and use
| Fit category | Shaping between chest and waist | Best build | Best use | Main risk |
|---|---|---|---|---|
| Slim fit | Pronounced waist suppression; check the actual chest and waist chart | Narrow or athletic, provided the upper body has room | Trim look under a jacket | Pulls across the midsection if chosen by chest alone |
| Tailored fit | Moderate shaping, between slim and regular | Average or mid-sized frame | Suits and office wear | Shoulder seam sits too far out on some cuts |
| Regular fit | Generous ease, little waist shaping | Broader chest or fuller build | Long days seated and layering | Billows at the waist if not tailored |
Match the cut to the job
Slim fit works when your torso follows the pattern's taper. It can sit neatly beneath a close-fitting jacket without folds collecting around the waistband. Athletic doesn't automatically mean slim, though: developed shoulders, upper arms or lats can make a narrow shirt restrictive even when the waist looks excellent.
Fitted fit is a sensible starting point for office shirts because it offers definition without requiring a tightly fitted torso. The label still needs scrutiny. A retailer may achieve a relaxed appearance by widening the shoulder rather than adding useful room through the chest, leaving the sleeve hanging below your natural shoulder point.
Regular fit gives a fuller frame somewhere to go when seated. It also accommodates an undershirt more readily than a close cut. However, excess cloth at the waist can collect beneath a jacket, so a regular shirt with selective tapering may be a better purchase than an untouched regular cut.
Use build descriptions as a shortlist
A guide to men's body types can help describe your proportions, but it shouldn't become another label you have to fit. Look at the relationship between your shoulders, chest and abdomen rather than deciding that a particular build must wear a particular cut.
For example, a wearer with a broad chest and narrow waist may need more upper-body room than a slim pattern provides. A shirt with additional waist shaping can preserve that room without leaving a loose torso.
Equally, someone with narrow shoulders and a fuller abdomen shouldn't automatically buy a larger regular shirt. That can solve the waist while creating an expensive shoulder problem. A different pattern is often the cleaner answer.
Choose the category that suits your build and working day, then compare actual dimensions. The cut is your shortlist; measurements decide whether the individual shirt belongs on it.
Collar and Chest Sizes Compared in UK Sizing
A collar label does not tell you whether the chest will fit. The Primark UK shirt chart pairs collar sizes with chest measurements as follows. Treat these as chart-specific comparisons, not a formula for deriving one measurement from the other.
UK collar and matching chest sizes
| Collar size (in) | Collar (cm) | Matching chest (in) | Note |
|---|---|---|---|
| 12 | About 30 | 31–33 | Traditional label size 12 |
| 14–14.5 | About 36–37 | 35–36 | Includes traditional label size 14 |
| 15 | About 38 | 36–38 | UK chart pairing |
| 15.5 | About 39 | 38–40 | UK chart pairing |
| 16 | About 41 | 41–43 | UK chart pairing |
| 17½ | 44–45 | 44–46 | Traditional label size 17½ |
Traditional equivalents for collar sizes 12, 14 and 17½ are approximately 30 cm, 36 cm and 44–45 cm. Metrication UK's clothing guide advises allowing at least 1 cm of neck comfort. The intermediate centimetre figures in the table are rounded conversions of the inch labels, not additional chest recommendations.
Measure the body without shaping it
Stand naturally in a light layer, arms relaxed. Breathe normally and let the tape follow your body without compressing it.
- Chest: Measure around the fullest part, level across the back and beneath the arms.
- Waist and abdomen: Record your natural waist and, if different, the fullest area the shirt must cover. Label each measurement clearly.
- Shoulders: Measure across the back between the shoulder-tip bones. Note any slope or asymmetry that may affect the yoke.
- Sleeves: For a centre-back measurement, start at the back of the neck, go across the shoulder and down to the wrist, with the elbow slightly bent. If the chart measures from the shoulder seam, record that separately.
Follow the body-measurement guide for clothes to keep your measuring position consistent. Always record the units. A centre-back sleeve measurement cannot be compared directly with a shoulder-to-cuff chart.
Fasten the collar before judging the torso
Measure around the base of the neck, just below the Adam's apple, with the tape resting comfortably. Allow for wearing ease, unless the sizing tool already includes it.
Fasten the collar and try it with the tie you plan to wear. You should be able to swallow and turn your head without pressure, and the collar stand should sit evenly. A tight collar can pull at the fastening; a loose collar leaves a gap beneath the tie knot that tightening the tie will not fix.
Use ClothME's guide to avoid common shirt collar sizing mistakes, especially when distinguishing a body measurement from a finished collar measurement. Keep collar, chest and sleeve measurements separate. A matching chest figure does not guarantee a comfortable collar.
How Each Fit Category Fails in Practice
The BOSS UK menswear chart gives the following slim-fit chest, waist and sleeve measurements in centimetres. Treat them as a brand-specific reference, not a universal definition of slim fit.
Slim-fit chest, waist and sleeve by size
| Size | Chest (cm) | Waist (cm) | Sleeve (cm) |
|---|---|---|---|
| XS | 96–98 | 90–92 | About 65 |
| M | 106–108 | 102–104 | About 66 |
| L | 112–114 | 108–110 | About 66 |
| XL | 118–120 | 114–116 | About 67 |
The chest and waist ranges show why you must compare both dimensions. They also show that sleeves change relatively little as torso sizes increase, so buying a larger body isn't a dependable way to obtain more sleeve length.
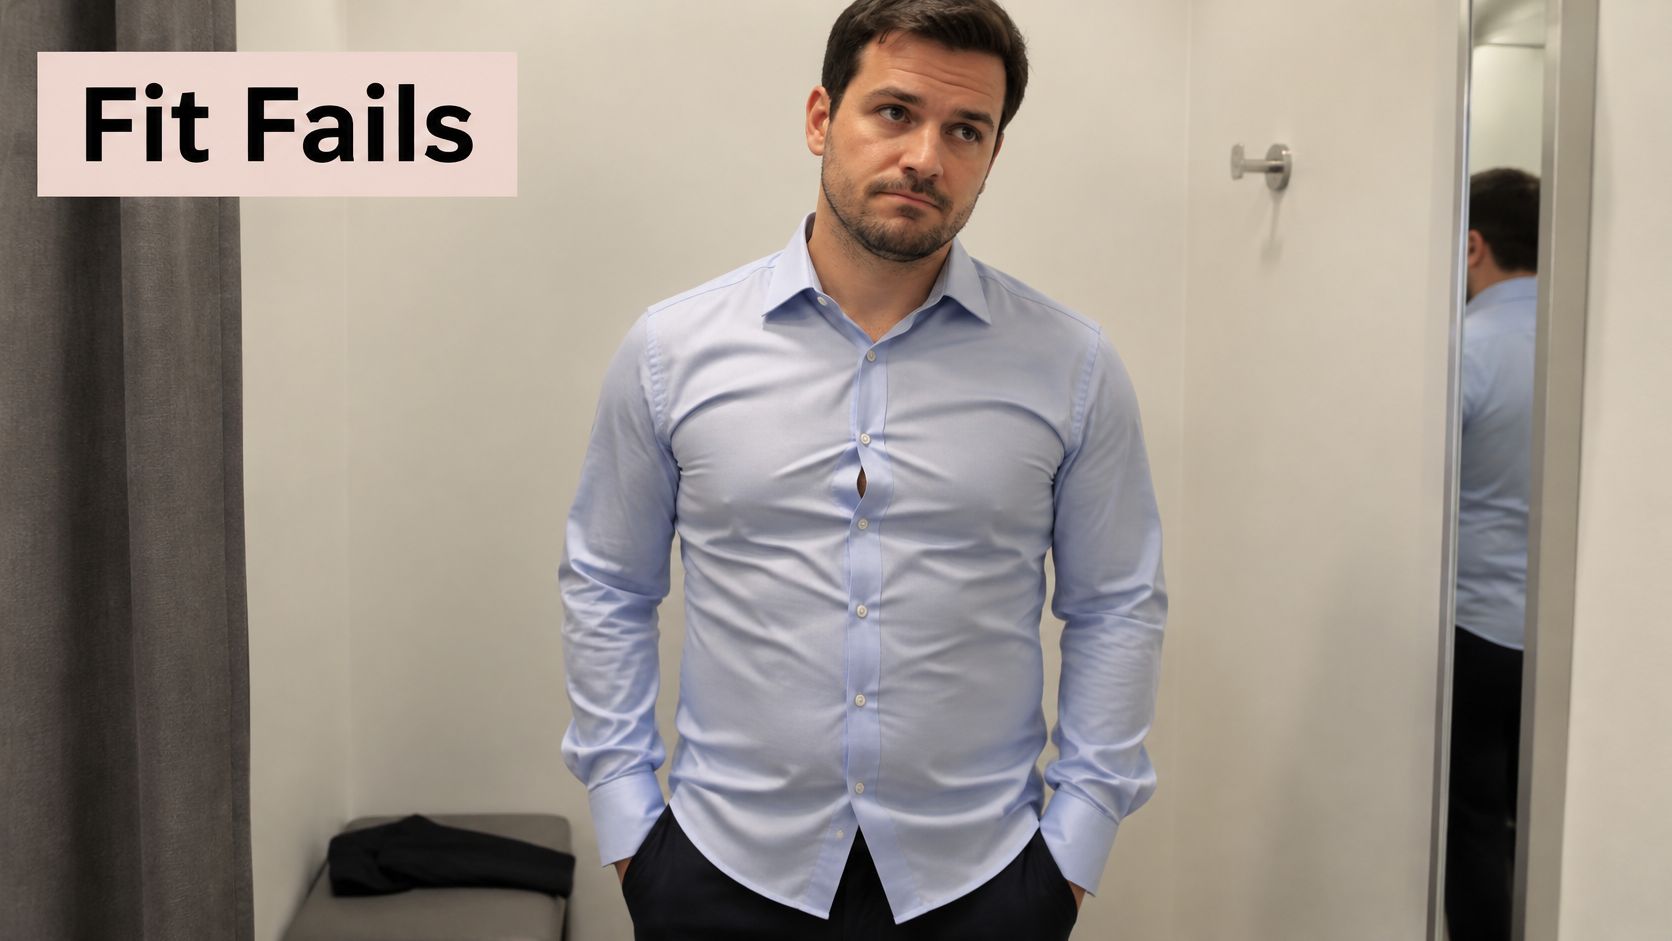
Look for tension across the chest rather than judging only the outline.
Slim and tailored cuts reveal different faults
A slim shirt can look tidy while standing and fail as soon as you reach forward. Horizontal strain at the waist indicates insufficient circumference; tension around the upper arm may mean the sleeve itself is too narrow. Stretch fabric can soften the sensation, but it doesn't correct a pattern that's too small.
Don't assume every diagonal crease means the torso needs releasing. A sleeve pulling against the front armhole may be hanging at the wrong angle for your posture. Taking in the waist won't solve that and may make the pulling more obvious.
Well-fitted shirts often fail less dramatically. The front can look clean while the shoulder seam extends beyond the shoulder, or surplus fabric forms a fold beneath the arm. Check the back and side views before accepting a good-looking front.
Regular fit needs controlled volume
A regular shirt should have useful space, not a loose pocket of fabric above the belt. If the chest and back are comfortable but the lower body balloons, controlled waist shaping may improve it without sacrificing movement.
Excess under a jacket isn't always a waist problem. A low armhole or wide sleeve can push fabric into the armpit, making the jacket feel tighter than it is. Don't remove torso ease to compensate for bulk coming from the sleeve.
Use a movement demonstration to focus on what changes when the wearer bends and reaches.
Test the sleeve as a moving assembly
Let your arms hang and check that the cuff reaches the wrist fold. Bend your elbow and reach forward naturally; a substantial retreat above the wrist suggests insufficient length, restricted upper-arm room or an armhole that drags the body upwards.
Check cuff fastening too. A cuff that slides onto the hand can make an otherwise suitable sleeve appear too long, while a very tight cuff can exaggerate pulling when you bend your arm.
The best-fitting shirt isn't always the closest cut. Functional ease lets you sit, reach and wear a jacket without either strain or unnecessary fabric.
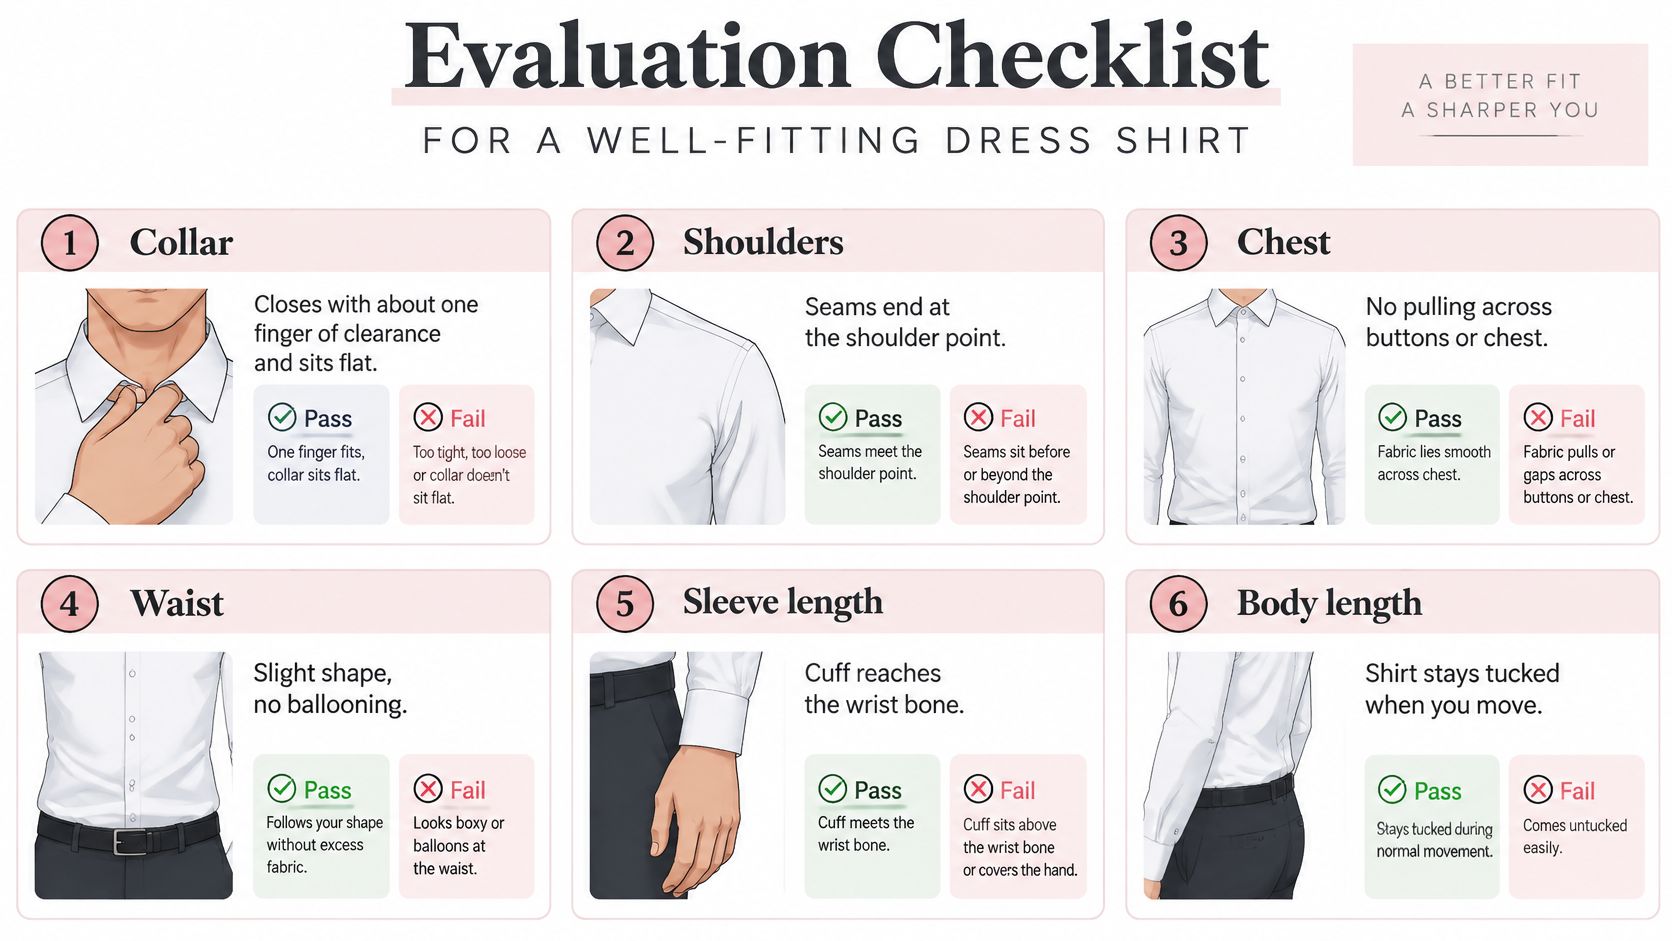
Evaluation Checklist for a Well-Fitting Dress Shirt
Judge the shirt untucked first, then tuck it into the trousers you'll wear. Fasten the cuffs, settle the shoulder seams and let the garment hang without pulling it down to manufacture a cleaner appearance.
Run the pass-or-fail checks
- Collar: Close it comfortably, swallow and turn your head; pass only if the stand sits evenly without pressure or a conspicuous gap.
- Shoulders: Check that the seams end at the shoulder edge rather than dropping down the upper arm.
- Chest: Button the front and breathe normally; reject gaping buttonholes, strained openings or persistent diagonal pulling.
- Waist: Sit down and check that the shirt follows your shape without gripping the abdomen or ballooning above the belt.
- Sleeves: Let the cuffs settle at the wrist fold, then bend your elbows and check for excessive withdrawal.
- Body length: Raise your arms naturally and sit down; the tails should remain securely tucked without constant adjustment.
- Front balance: Check that the centre-front line hangs vertically after buttoning rather than twisting towards a side.
- Collar points: Put on your jacket and confirm that the points lie flat rather than curling or fighting the lapels.
Use this visual checklist alongside the movement checks, not instead of them.
Reject structural problems before refining details
Start with collar and shoulders because correcting them can involve remaking connected parts of the shirt. Then judge the chest and waist, followed by sleeve and body length. Don't let an easy hem correction distract you from an unsuitable upper-body pattern.
A mirror can conceal back tension if you twist to inspect it. Ask someone to check the rear view while you stand normally, or take photographs without changing your posture.
For a preliminary static assessment, place the shirt on a suitably proportioned half body form. Align the centre front and yoke before using light anchoring pins, and check that the collar stand sits evenly rather than being pulled into position.
Our half body form mannequins are suited to dresses, tops, jewellery, accessories and other clothing garments. They can help assess presentation and balance, but a display form isn't a substitute for the wearer's neck shape, posture or movement.
Finally, test the complete outfit using the suit-jacket fitting guide. If the shirt behaves well alone but bunches beneath the jacket, identify which garment restricts movement before changing either.
A pass doesn't mean the fabric remains perfectly smooth in every pose. Soft cloth folds when you move; the concern is sustained tension, misplaced seams or excess that prevents the shirt from settling back naturally.
How to Alter a Dress Shirt for a Better Fit
Alterations work best when the shirt already has the right basic structure. Before cutting, establish whether the problem is surplus fabric, inadequate room or poor balance; only the first is straightforward to remove.
Diagnose and pin before sewing
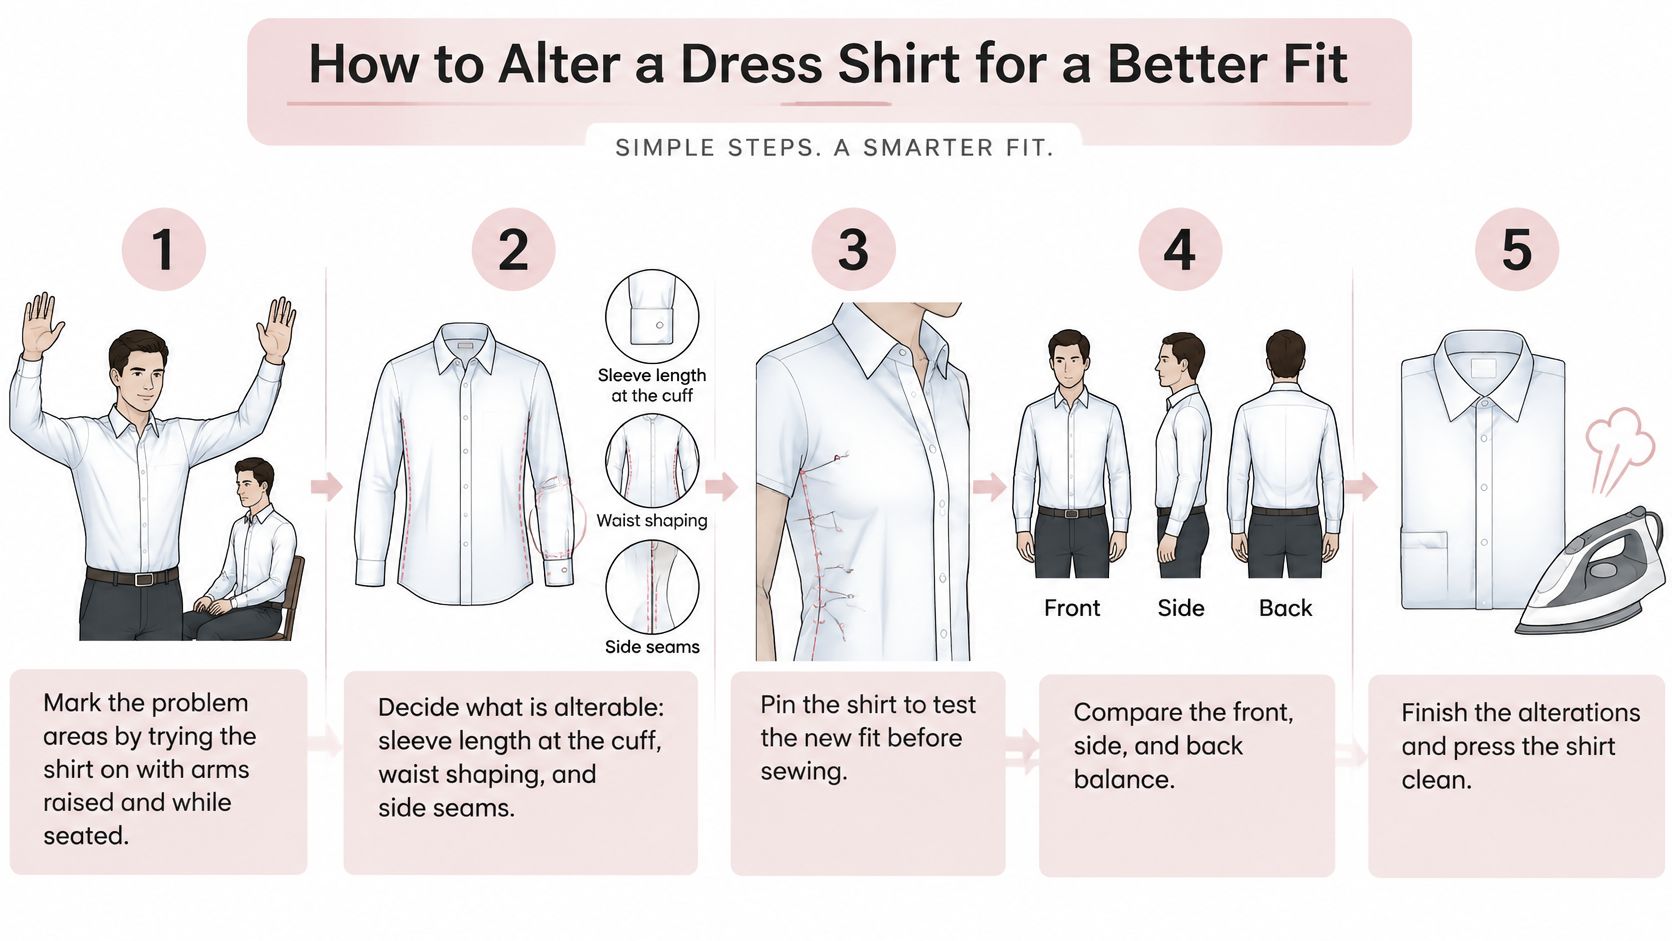
- Mark the problem while wearing the shirt. Try it seated, reaching forward and with your arms raised naturally, then mark the areas that pull or collect excess. Use tailor's chalk or removable thread marks rather than relying on a pin position that may shift when you take the shirt off.
- Decide whether the repair is proportionate. Sleeve shortening, hem shortening and side-seam taper are usual candidates; collar and shoulder changes generally aren't reliable routine alterations. Shortening from the shoulder is specialist work because it affects sleeve-head and placket relationships, while letting out a tight shirt is limited by the available seam allowance.
- Pin the torso with the upper body settled. On the wearer or a suitably matched tailor's torso, remove excess gradually along the side seams, blending towards the underarm and hip while keeping the grain straight. Our tailor dummies are made from durable polystyrene and allow secure pinning of clothing and fabric for precise fittings and alterations.
- Mark and baste the proposed seam. Transfer the pin line with tailor's chalk, compare the front, side and back balance, and use a temporary basting seam for the movement test. Don't machine-stitch beside pins or trim the allowance until the wearer has approved the shape.
The sequence below keeps diagnosis ahead of irreversible cutting.
Finish without losing useful length
- Shorten sleeves at the cuff where practical. Unpick the cuff, establish the new sleeve edge and preserve the original pleat arrangement and cuff proportions when reattaching it. Check that the remaining placket will still open properly; the guide to shortening sleeves helps distinguish a straightforward adjustment from one requiring more reconstruction.
- Reduce body length conservatively. Mark the hem while the wearer has the intended trousers on, then preserve the curved tails and a smooth transition through the side seams. A shirt intended for tucking needs enough length below the waistband to remain secure when seated, so don't use an untucked-shirt silhouette as the target.
- Press and refit the finished shirt. Press seams without stretching them, remove temporary marks and check that the front buttons remain aligned. Repeat the seated and reaching tests before deciding whether further taper is necessary.
Pinning priority: Set the waist only after the collar and shoulders have settled. Aggressive early suppression can hide an upper-body fault rather than correct it.
Inspect the construction before promising an invisible result. Flat-felled side seams may need unpicking and rebuilding, while darts can offer an alternative where the design suits them. A quick seam taken through the existing finish can leave a bulky interior and an awkward transition beneath the arm.
Give the tailor a target finished waist or taper and sleeve length in centimetres, with the measuring method written beside them. Add what must remain unchanged, such as upper-back movement or tuck length, so a request for a sharper shape doesn't become permission to remove all the ease.
Choose Your Fit by Situation
The right decision is the one that addresses the failed measurement without spoiling the dimensions that already work.
Keep, alter or return
- The collar and chest pass, but the waist billows. Compare a more shaped cut, or retain the comfortable upper body and request a side-seam taper. Choose the option that leaves the back comfortable when reaching.
- The shoulder seam extends down the arm. Don't buy the shirt as an alteration project unless a specialist has assessed the reconstruction. Try a different pattern rather than assuming the next smaller size will preserve chest room.
- Only sleeve or body length is wrong. Ask for a construction check before committing to shortening, particularly around the sleeve placket. Proceed when the alteration preserves cuff function, hem shape and movement.
- A slim shirt grips a fuller abdomen. Try regular fit with controlled shaping rather than forcing the waist closed. A smooth front with breathing room looks more composed than strained buttons.
- The collar fails when fastened. Return the shirt or compare another collar size and pattern. Moving the button slightly isn't a dependable cure for a unsuitable neck opening.
Shoulders decide whether a shirt is worth altering.
Know when to change the buying method
Repeated compromises can justify a different approach. If every ready-made shirt forces you to choose between neck comfort and torso shape, understanding bespoke tailoring helps clarify what a pattern made for the wearer can address.
The best fitting dress shirts don't require you to hold a particular posture to look correct. Choose a shirt that settles naturally, accommodates your working day and needs refinement rather than rescue.
Display Guru offers pin-friendly polystyrene tailor's dummies and body forms for assessing garment balance and testing alterations. Visit Display Guru to choose a fitting or display form suited to your shirt-making workspace, and check its proportions against the garments you intend to work on.