


9 Essential Display Ideas for Craft Fairs in 2025
Welcome, creative entrepreneurs! In the competitive world of craft fairs, an exceptional product is only half the battle. The other half is won before a single customer speaks to you – it's won by your display. An inviting, professional, and thoughtfully organised booth not only attracts attention but also tells the story of your brand and justifies the value of your handcrafted goods. Stale, flat layouts can leave your brilliant work overlooked, blending into the background of a busy market hall.
This guide moves beyond the basics, offering nine innovative and strategic display ideas for craft fairs designed to captivate visitors, encourage interaction, and ultimately, convert browsers into loyal customers. We will explore how to leverage everything from dynamic backdrops and mannequins to clever product groupings, providing actionable steps to help you create a standout presence at your next event. For comprehensive guidance on transforming your space, consider exploring resources on creative design, such as celebrity-inspired venue decoration ideas, to truly captivate your audience. Let's build a booth that truly reflects the quality of your craft and makes a lasting impression.
1. Multi-Level Tiered Display
A multi-level tiered display is a foundational technique for creating a professional and engaging craft fair stall. This method moves beyond a flat, single-plane layout by using shelves, risers, crates, and platforms at varying heights. The primary goal is to guide the customer's eye upwards and across your entire product range, maximising the use of vertical space and preventing items from getting lost on a crowded table. This strategy creates visual interest and makes your booth appear more organised and dynamic.
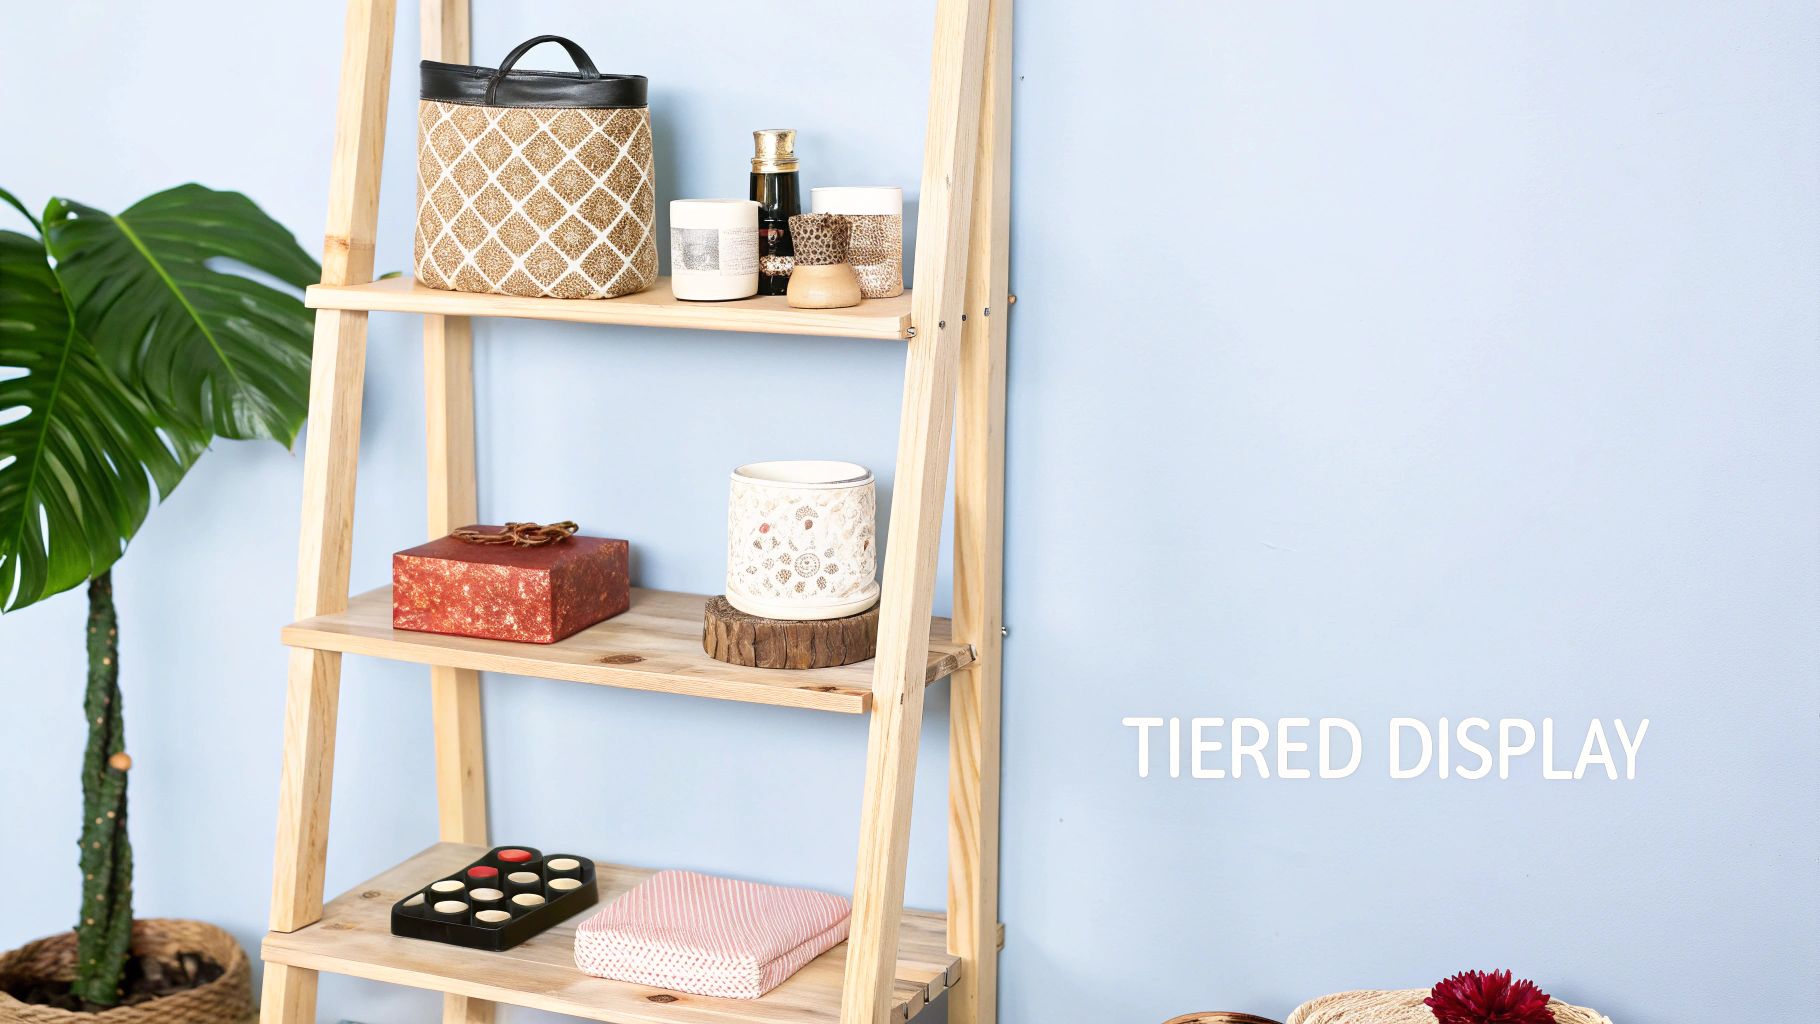
By layering your products, you immediately boost their visibility. A customer can scan multiple items at a glance, from the front of your table to the back. This approach is one of the most effective display ideas for craft fairs because it works for nearly any product type.
Practical Implementation
For example, a jewellery maker might use a set of three graduated acrylic risers to showcase necklaces at different heights, while a potter could stack rustic wooden crates to create robust platforms for mugs, bowls, and vases. Even something as simple as fabric-draped boxes can create elegant, stepped levels for candles or soaps. You can learn more about the variety of retail display stands at Display-Guru.co.uk that can help achieve this effect.
Key Tips for Success
To execute this effectively, follow a few core principles:
- Create a Focal Point: Place your most compelling items at or slightly above eye level to draw shoppers in.
- Prioritise Stability: Ensure all risers and platforms are secure and have a stable, weighted base, especially in a busy outdoor market environment.
- Maintain Access: Leave sufficient space between tiers so customers can easily pick up and examine products without disturbing the entire display.
- Use Odd Numbers: Grouping items or levels in threes or fives is often more visually appealing and balanced than using even numbers.
2. Interactive Demo Station
An interactive demo station transforms your booth from a static retail space into a dynamic, engaging experience. This approach involves setting aside a dedicated area where you demonstrate your craft live, allowing potential customers to see the skill, care, and process behind your products. Moving beyond simple product display, this strategy captures attention, builds trust, and creates a memorable connection that encourages sales and fosters brand loyalty.
By showing your creative process in action, you add significant perceived value to your work. A customer who watches a potter shape clay on a wheel or a jeweller set a stone is far more likely to appreciate the craftsmanship and be willing to invest in a finished piece. This method is one of the most powerful display ideas for craft fairs because it tells your brand’s story in an authentic and captivating way.
Practical Implementation
For example, a woodworker could demonstrate carving techniques on a small, intricate piece, allowing shoppers to smell the wood and see the shavings fly. A soap maker might create custom-scented bars on the spot, engaging customers’ sense of smell, while an artist could offer quick, live sketches or portraits. Even a textile artist can set up a small loom to showcase the weaving process, drawing in an audience with the rhythmic, hands-on nature of the craft.
Key Tips for Success
To make your demonstration a success, consider these essential points:
- Schedule Demonstrations: Plan specific times for your demos to manage your energy and draw a crowd. Announce these times on a small chalkboard.
- Keep it Brief and Engaging: Aim for short, 5-10 minute demonstrations that hold attention without requiring a long commitment from shoppers.
- Prepare Finished Examples: Have completed versions of the demonstrated item available for immediate purchase to capitalise on the interest you generate.
- Involve the Audience: When it is safe and practical, let customers participate. This could be as simple as letting them choose a colour or scent.
3. Themed Lifestyle Vignettes
A themed lifestyle vignette goes beyond showcasing individual products by creating a complete, curated scene that tells a story. This approach sets up a small, realistic environment, such as a cosy reading nook or an elegant dinner party setting, to help customers envision how your items would look and function in their own homes. It’s a powerful method for selling not just a product, but an entire aspirational lifestyle, making your stall incredibly memorable and immersive.
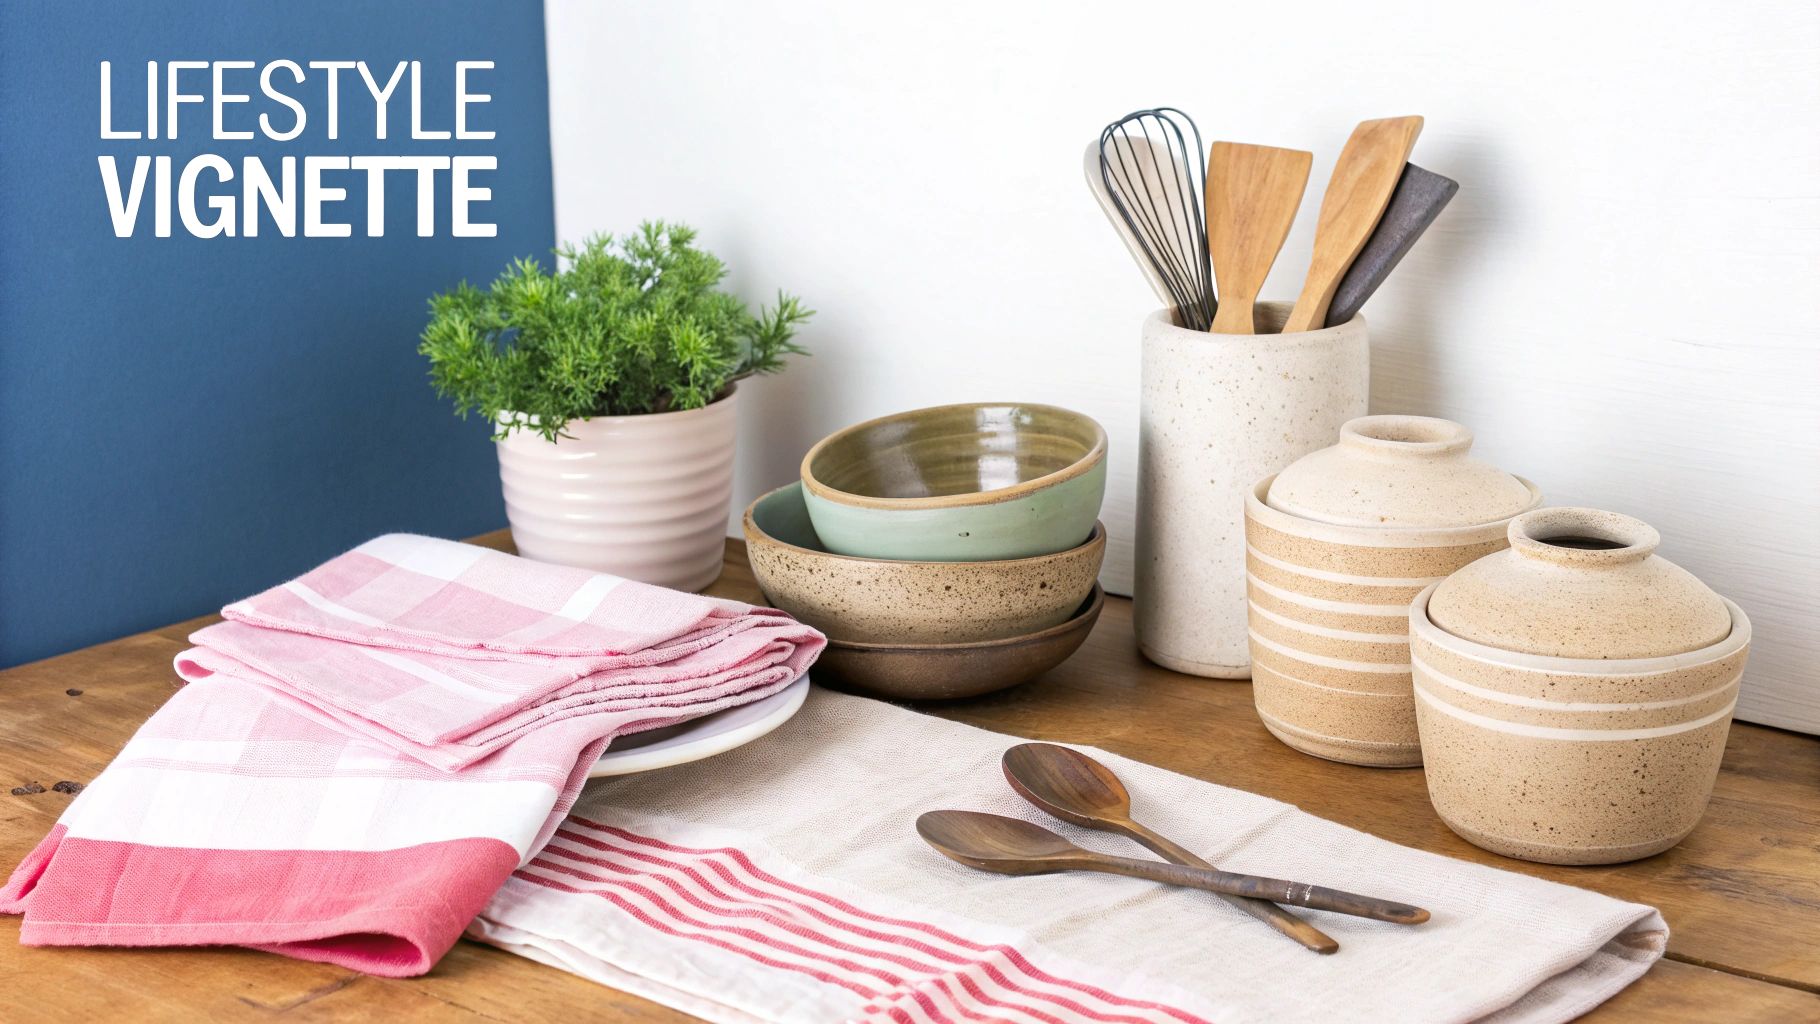
By contextually displaying your work, you help bridge the gap between seeing an item on a table and imagining it in a personal space. This is one of the most effective display ideas for craft fairs because it evokes emotion and builds a stronger connection with potential buyers, encouraging multiple purchases to recreate the look.
Practical Implementation
For example, a home decor vendor could set up a small living room corner with a comfortable chair, showcasing their cushions, throws, and wall art together. Similarly, a kitchenware creator might arrange a rustic farmhouse scene with their handcrafted cutting boards, artisan pottery, and embroidered tea towels. You can find more inspiration for cohesive setups by exploring other retail display ideas at Display-Guru.co.uk.
Key Tips for Success
To create a compelling vignette, focus on these details:
- Choose a Relevant Theme: Select a theme that resonates deeply with your target customer, whether it's minimalist, bohemian, or traditional country.
- Use Mood Lighting: Incorporate small battery-powered lamps or fairy lights to enhance the atmosphere and draw attention to the scene.
- Clearly Price Everything: Ensure every item within the vignette, from the main product to smaller props, is clearly and individually priced.
- Keep it Fresh: Rotate your themes seasonally or for different events to give repeat customers something new to discover.
4. Vertical Wall Display System
A vertical wall display system is a highly efficient technique for maximising your booth's footprint without cluttering your main table space. This method uses pegboards, gridwall or mesh panels, and hanging systems to showcase products against a backdrop. The core benefit is drawing the customer's eye upwards, creating an immersive, shop-like atmosphere. It is one of the most practical display ideas for craft fairs, especially for vendors with flat or hangable items, as it keeps valuable table surfaces clear for transactions and customer interaction.
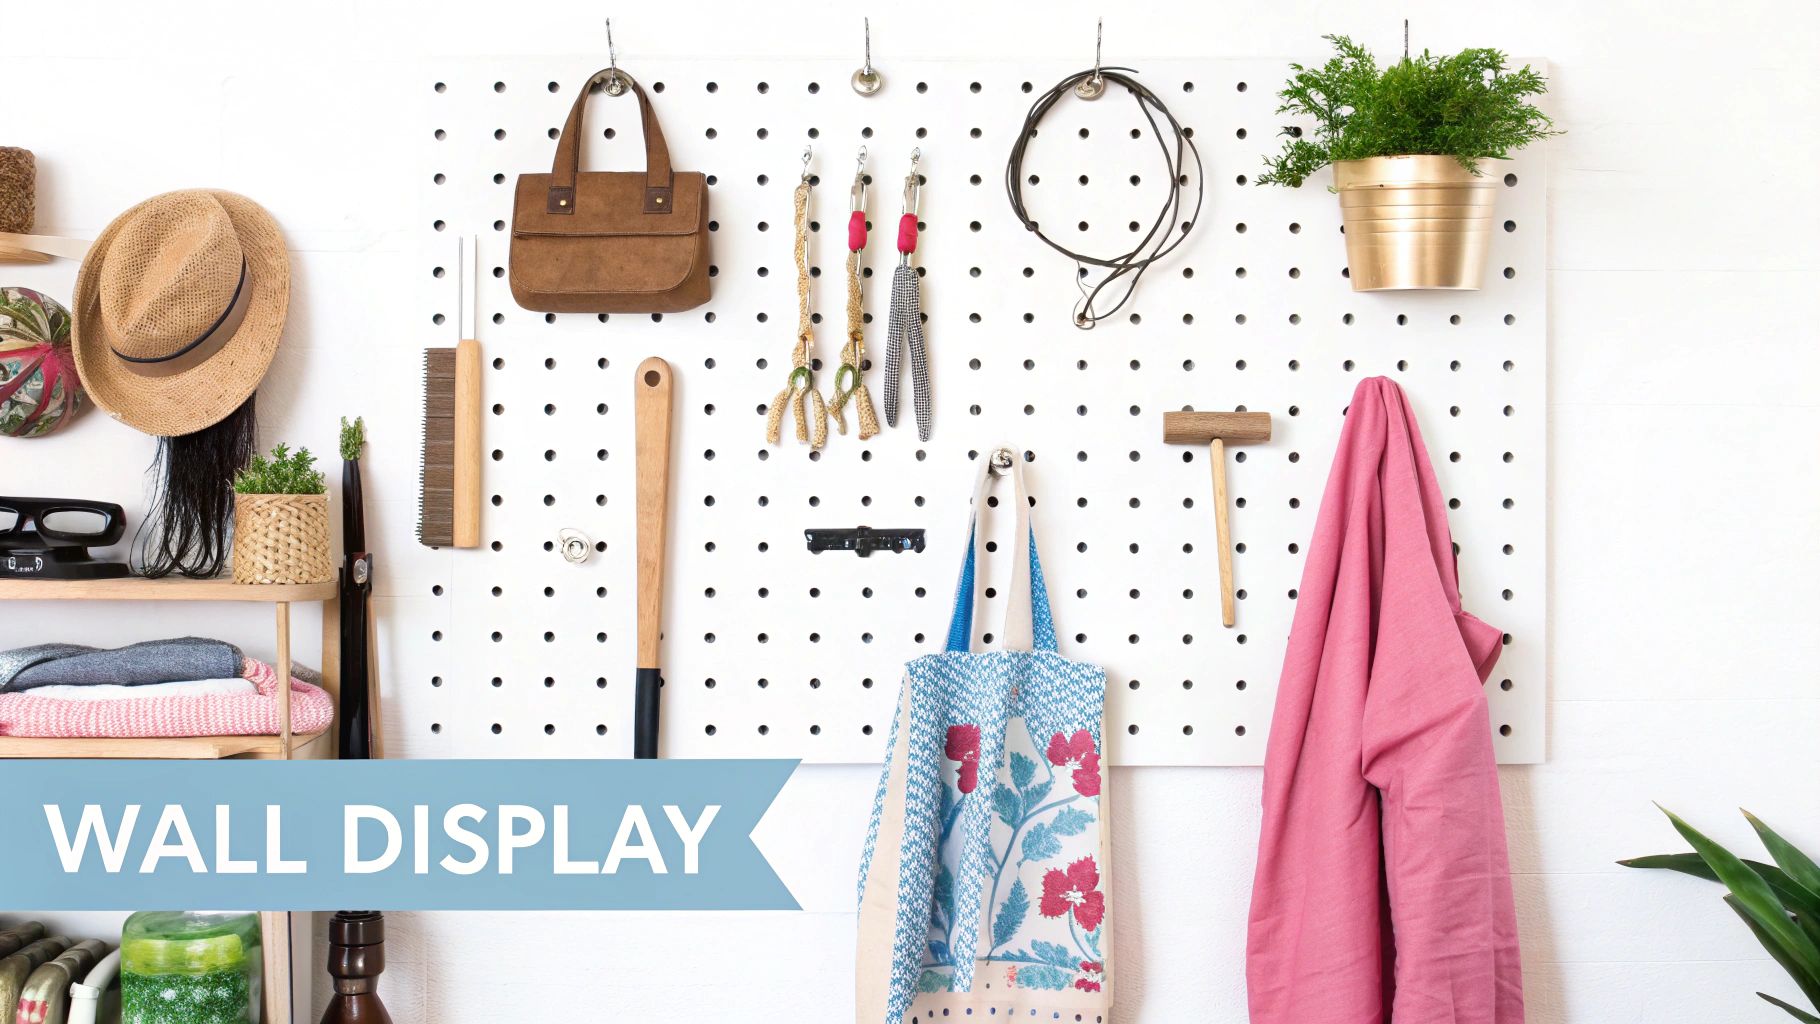
By utilising the back or side walls of your stall, you create a professional, organised backdrop that tells a story about your brand. This approach is exceptionally versatile, transforming a standard pop-up tent into a curated gallery or boutique environment that encourages browsing and engagement.
Practical Implementation
For example, an artist can use a set of black mesh panels to easily clip and display prints and original paintings, allowing customers to view a full collection at once. A woodworker selling handcrafted tools could create a functional and rugged display with a stained pegboard, using hooks to artfully arrange hammers, chisels, and saws. For fabric crafters, a simple rod system can be used to hang quilts, weavings, or even clothing items. When designing your layout, it's helpful to explore innovative vertical display concepts to find fresh ideas that make your products stand out.
Key Tips for Success
To make your vertical display effective and safe, consider these principles:
- Ensure Stability: The entire system must be securely anchored or weighted. Use heavy-duty cable ties or clamps to attach panels to your tent frame and consider sandbags for base stability.
- Group for Cohesion: Arrange similar items together, such as grouping jewellery by colour or prints by series. This creates a more organised and visually pleasing effect.
- Use Consistent Hardware: Employ uniform hooks, clips, and hangers for a polished, professional appearance. Mismatched hardware can look messy and distract from your products.
- Light It Up: Vertical displays often sit at the back of a booth and can be dark. Use clip-on spotlights or string lights to illuminate your products and draw attention.
5. Colour-Coordinated Product Groupings
A colour-coordinated product grouping is a powerful visual merchandising technique that arranges items by colour harmony rather than by product type. This method creates a striking, aesthetically pleasing display that leverages colour psychology to influence mood and capture attention instantly. By organising your stall into cohesive colour blocks or gradients, you create a visually stunning and memorable experience that encourages customers to stop and browse.
This strategy transforms a simple collection of products into a deliberate, artful presentation. The clean, organised look makes your booth appear more high-end and curated, which is one of the most effective display ideas for craft fairs aiming to attract discerning buyers. The visual impact is also highly shareable on social media, turning your stall into an Instagram-worthy photo opportunity.
Practical Implementation
For example, a soap maker could arrange their products in a vibrant rainbow gradient across the length of their table, drawing the eye from one end to the other. A yarn vendor might create beautiful ombré displays, transitioning from light to dark shades within a single colour family. Similarly, a potter could group pieces by their glaze, creating distinct collections of earthy greens, deep blues, or warm terracotta, making it easier for customers to find pieces that match their home decor. You can explore the principles behind this approach in these visual merchandising guidelines at Display-Guru.co.uk.
Key Tips for Success
To make this method work for your stall, consider these key points:
- Study Colour Theory: Use a colour wheel to create harmonious combinations, such as complementary, analogous, or monochromatic schemes.
- Use a Neutral Backdrop: A neutral-coloured tablecloth or background (like white, grey, or natural wood) will make your product colours pop and look more vibrant.
- Maintain Colour Blocks: As products sell, consolidate the remaining items to ensure the colour groupings remain distinct and impactful throughout the day.
- Incorporate Accent Colours: Use small pops of a contrasting colour within a larger colour block to add interest and break up monotony without disrupting the overall flow.
6. Rotating Display Mechanisms
Introducing movement into your stall with a rotating display is a clever strategy to capture attention and showcase your products from every angle. This dynamic technique uses lazy susans, motorised turntables, or carousel-style stands to add a subtle yet captivating element of motion. The primary benefit is efficiently displaying multiple facets of a three-dimensional item or a variety of small products within a compact footprint, drawing the customer's eye and encouraging them to pause and watch.
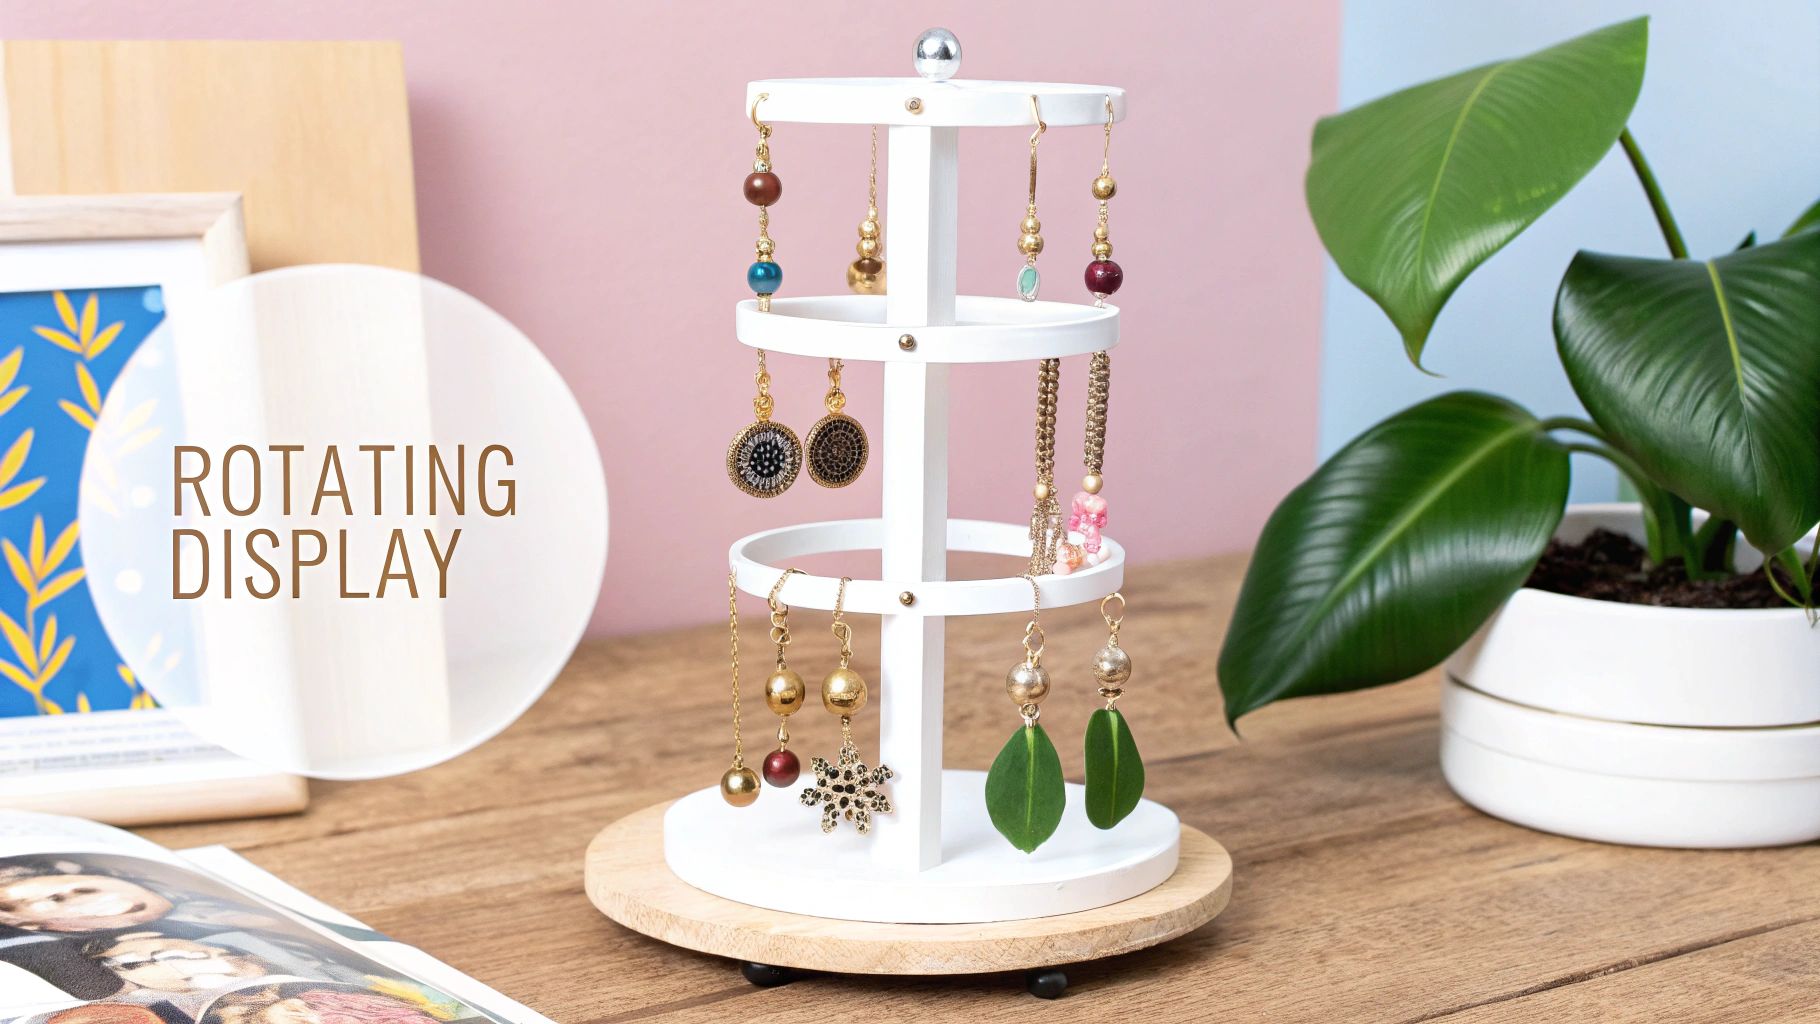
This method is one of the most effective display ideas for craft fairs selling intricate, detailed items. A gentle rotation allows shoppers to appreciate the full craftsmanship without needing to handle every piece, making your stall more interactive and engaging.
Practical Implementation
The application of rotating displays is versatile and highly effective for various crafts. For instance, a jeweller could use a small, slow-turning stand to exhibit a collection of delicate rings or earrings, allowing each piece to catch the light. A potter might place a signature vase or sculptural piece on a motorised pedestal to highlight its unique shape and glaze from all sides. Similarly, a woodworker can show off the beautiful grain of a hand-turned bowl on a simple manual lazy susan, inviting customers to interact directly.
Key Tips for Success
To integrate movement successfully into your display, consider these key principles:
- Control the Speed: Ensure the rotation is slow and steady. The goal is to be eye-catching, not dizzying or distracting.
- Secure Your Products: Use museum wax, non-slip mats, or custom holders to ensure items remain firmly in place as the display turns.
- Consider Power-Free Options: Manual lazy susans are an excellent choice to avoid the need for batteries or access to a power source, which can be limited at outdoor events.
- Enable Examination: If using a manual turntable, ensure it moves smoothly so customers can easily stop it to get a closer look at a specific item.
7. Texture and Material Contrast Displays
A texture and material contrast display is a sophisticated technique that enhances the tactile and visual appeal of handmade goods. This approach involves strategically pairing items with opposing finishes and materials to create a dynamic, multi-sensory experience. The goal is to highlight the unique qualities of each product, making your stall more intriguing and encouraging customers to physically interact with your wares, a key step in the path to purchase.
By creating deliberate contrasts, you draw attention to the craftsmanship and material choices that make your items special. This is one of the more subtle yet powerful display ideas for craft fairs because it appeals to a customer's sense of touch and elevates the perceived value of your products, helping them stand out in a crowded market.
Practical Implementation
For instance, a textile artist could drape a smooth, shimmering silk scarf over a rough, rustic burlap-covered block to accentuate the silk's luxurious feel. A woodworker might place a highly polished, dark-stained bowl next to an item with a natural, raw-edge finish. Similarly, a potter can create a compelling arrangement by positioning glossy, glazed mugs alongside unglazed, matte terra cotta planters, highlighting the distinct finish of each piece.
Key Tips for Success
To master this display method, concentrate on the sensory details:
- Use Strategic Lighting: Position a spotlight or directional lamp to cast shadows that emphasise the unique textures of your items.
- Encourage Interaction: Arrange products so that customers can easily touch them without fear of disrupting the display. A small sign saying "Please Touch" can be very effective.
- Balance Contrast: Group similar textures together, but introduce a single, contrasting piece to act as a focal point and create visual excitement.
- Consider Your Backdrop: The material of your tablecloth or background wall should also play a role. A smooth velvet cloth, for example, can make rough-hewn ceramics pop.
8. Storytelling Display Boards
Storytelling display boards are visual narrative systems that go beyond simply showing a product. They combine items with photos, text, and graphics to tell the story behind the craft, the maker's journey, or the intricate creation process. This approach educates customers about the value and uniqueness of your handmade products, building an emotional connection that justifies premium pricing and encourages brand loyalty. It transforms a simple transaction into a memorable experience.
By revealing the "why" and "how" behind your work, you give shoppers a reason to invest in your brand, not just your product. This technique is one of the most powerful display ideas for craft fairs because it forges a deeper connection and helps your stall stand out in a crowded market.
Practical Implementation
For example, a woodworker could create a small board showing photos of a piece of reclaimed timber being transformed into a polished table. A fibre artist might document the sheep-to-shawl process, from shearing and dyeing the wool to the final woven piece. Jewellery makers can feature images of ethically sourced gemstones alongside shots of the meticulous setting process. You can learn more about how to integrate these visual narratives into your space by exploring crafting display strategies at Display-Guru.co.uk.
Key Tips for Success
To execute this effectively, focus on clarity and emotional impact:
- Keep Text Concise: Use short, impactful text and bullet points. Let high-quality images do most of the talking.
- Show Transformation: Before-and-after photos are incredibly effective for demonstrating the skill and labour involved.
- Highlight Your Craftsmanship: Draw attention to any unique or traditional techniques you use that set your work apart.
- Enhance with Lighting: To truly make your products and story pop, consider how to incorporate accent lighting to guide the customer's eye.
- Weatherproof Your Display: If participating in outdoor events, ensure your boards are laminated or protected from the elements.
9. Modular Grid System
A modular grid system is a highly organised and flexible display framework built from standardised, interchangeable components. This systematic approach allows you to reconfigure your stall for different events, product lines, or seasons with remarkable efficiency. The core principle is to use uniform units, like identical boxes, panels, or pedestals, that can be stacked and arranged in countless ways, providing both consistency and adaptability. It creates a cohesive, professional look that can evolve with your brand.
This method is one of the most strategic display ideas for craft fairs because it streamlines setup and takedown while ensuring a polished aesthetic. By investing in a core set of modules, you create a versatile toolkit that can be adapted to any space or product mix, making it a sustainable, long-term solution for your business.
Practical Implementation
For example, a print artist could use a series of identical square frames to create a dynamic gallery wall that is easy to rearrange. A potter might invest in a set of uniform wooden pedestals of varying heights that can be clustered together to showcase a collection or spread out to highlight individual pieces. Similarly, a jewellery maker could use uniform display cards that slot perfectly into modular holders, creating a clean, grid-like presentation that is easy for customers to browse.
Key Tips for Success
To make a modular system work effectively, consider these key principles:
- Invest in Quality: Choose durable, high-quality components that will withstand the rigours of transport and multiple events.
- Plan for Flexibility: Purchase around 25% more modules than you think you need. This extra capacity allows for greater creative freedom and future product expansion.
- Vary Heights: Incorporate modules of different heights, such as risers or stacking boxes, within your system to create visual interest and avoid a flat layout.
- Maintain Cohesion: Use consistent colours, materials, and finishes throughout your modules to reinforce your brand identity and create a unified look.
- Document Configurations: Take photos of successful layouts. This creates a valuable reference library, making it easy to replicate your best displays at future events.
Display Ideas Comparison Matrix
| Display Type | Implementation Complexity 🔄 | Resource Requirements ⚡ | Expected Outcomes 📊 | Ideal Use Cases 💡 | Key Advantages ⭐ |
|---|---|---|---|---|---|
| Multi-Level Tiered Display | Medium - requires setup time, materials | Moderate - risers, shelving, platforms | Increased product visibility and organized look | Small to medium-sized items like jewelry, pottery, candles | Maximizes vertical space; professional appearance |
| Interactive Demo Station | High - continuous demo and vendor attention | High - materials, tools, energy | Strong customer engagement and memorable experiences | Live demos, workshops for craft shows and artisan markets | Builds connection and justifies premium pricing |
| Themed Lifestyle Vignettes | High - significant setup and props | High - props, space, setup time | Emotional connection and multiple-item sales | Lifestyle product displays in home/garden exhibitions | Helps customers visualize product use; Instagrammable |
| Vertical Wall Display System | Medium - setup varies with system complexity | Moderate - pegboards, panels, hooks | Maximizes display capacity and frees table space | Flat or hanging products like artwork, tools, jewelry | Dramatic visual impact; flexible and cost-effective |
| Color-Coordinated Product Groupings | Low - organization by color | Low to Moderate - inventory in multiple colors | Stunning visual impact and encourages cross-selling | Products benefiting from color appeal like soaps, yarn, pottery | Attractive, simplifies choices, marketing-friendly |
| Rotating Display Mechanisms | Medium - requires hardware and maintenance | Moderate - rotating stands or motorized systems | Full 360° visibility and draws customer attention | Small 3D items like jewelry, pottery, miniatures | Space-efficient; kinetic interest attracts customers |
| Texture and Material Contrast Displays | Medium - careful curation and lighting | Moderate - diverse materials and lighting | Highlights craftsmanship and tactile engagement | Handmade products emphasizing material quality | Sophisticated presentation; encourages touch and purchase |
| Storytelling Display Boards | Medium - requires design and content creation | Low to Moderate - printing/display materials | Builds emotional connection and brand loyalty | Makers telling craft stories via photos, text, and graphics | Educates customers; differentiates products |
| Modular Grid System | Medium - initial planning and investment | Moderate - interchangeable modules | Flexible, professional displays adapting to needs | Events requiring adaptable, uniform display setups | Efficient setup; scalable and consistent brand image |
Bringing It All Together: Your Blueprint for Success
Mastering your craft fair display is a journey of continuous refinement, blending strategic planning with creative expression. The nine distinct display ideas for craft fairs we have explored, from dynamic multi-level tiered displays to immersive themed vignettes, are not isolated tactics but interconnected components in a larger toolkit. The real power lies in how you combine and customise them to tell your unique brand story and showcase the exceptional quality of your products. Your goal extends beyond merely showing what you sell; it is about crafting an unforgettable experience for every visitor who steps into your space.
Think of your booth as a three-dimensional portfolio. A vertical wall display system might establish a powerful backdrop and maximise your use of space, while a thoughtfully arranged lifestyle vignette at the forefront can give customers a tangible vision of how your products fit into their lives. An interactive demo station, where you showcase your skills, becomes even more compelling when supported by storytelling boards that illuminate your process, materials, and inspiration. This strategic layering transforms a simple stall into an engaging, multi-faceted destination.
From Concept to Execution: Your Action Plan
The transition from concept to a successful, sales-driving display requires intentional effort. The most effective vendors arrive prepared, having moved beyond abstract ideas to a concrete plan. Before your next event, dedicate time to the following steps:
- Sketch Your Layout: Draw a bird's-eye view of your booth space. Experiment with different configurations, placing your key elements like the modular grid system or rotating displays to optimise customer flow and visual impact.
- Curate Your Props: Gather all the elements you will need, from tablecloths and lighting to props that enhance your theme. A well-organised prop kit ensures a smooth and stress-free setup on the day.
- Practise a Mock Setup: If possible, do a trial run of your display at home or in your studio. This allows you to identify any potential issues, refine your product placement, and perfect the overall composition without the pressure of the event itself.
- Think Like a Customer: Walk through your mock setup and view it from different angles. Is it inviting? Is the pricing clear? Is the most important product at eye level? This customer-centric perspective is crucial for identifying areas for improvement.
By investing this thoughtful effort into your presentation, you communicate professionalism and a deep respect for your own craftsmanship. This dedication resonates with discerning customers, building the trust and connection that lead to sales and lasting brand loyalty. The best display ideas for craft fairs are not just about aesthetics; they are powerful business tools that drive engagement, celebrate your unique talent, and ultimately, define your success in a competitive marketplace.
Ready to elevate your apparel and accessory displays to a professional, retail-quality standard? Explore the premium range of adjustable mannequins, sleek garment rails, and versatile display solutions at Display Guru. Visit Display Guru today to find the perfect tools to bring your creative vision to life and make your booth the star of the show.