


Your Guide to a Mannequin Head for Wig Styling
A good mannequin head for a wig is one of the most versatile tools in your kit. For serious work like washing, colouring, and heat styling, nothing beats a canvas block head. But if you just need something for simple storage or display, a basic styrofoam head will do the trick. The right choice gives you a stable base, keeps your wig in perfect shape, and makes styling so much easier.
How to Choose the Right Mannequin Head for Your Wig
Picking the perfect mannequin head is more than just finding a place to park your wig. Think of it as an investment in a tool that will protect your other, much bigger investment—the wig itself—while making your styling routine a breeze. You’ll find plenty of options out there, but they mostly fall into a few key categories, each designed for different jobs.
Your choice directly affects how well you can handle everything from washing and colouring to styling and even creating wigs from scratch. So, where do you start? The best way is to think about what you'll be using it for most. Are you a professional stylist who needs a durable workhorse for daily use, or are you a casual wearer who just needs a simple storage solution?
This visual guide can help you decide based on your main goals.
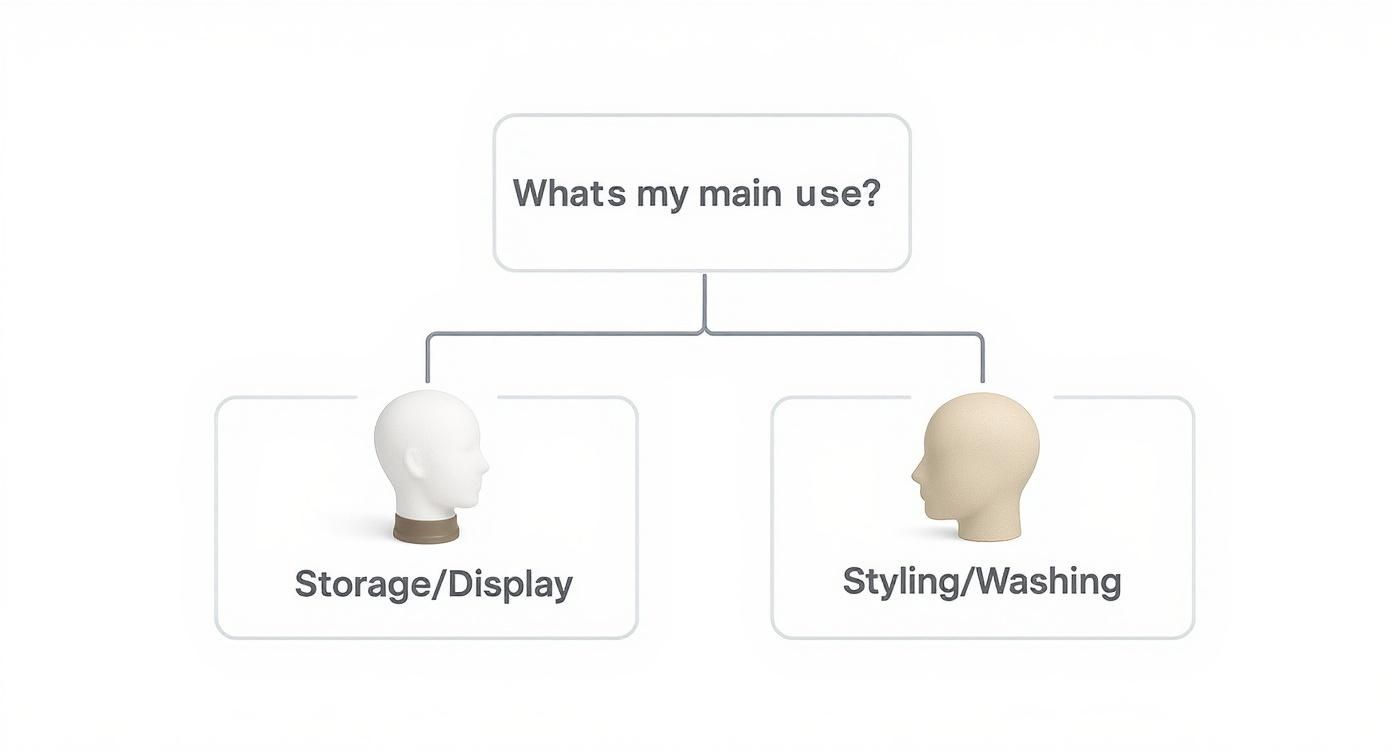
As you can see, what you plan to do with the wig is the biggest factor. It's what will point you towards either a simple display stand or a more robust, professional-grade styling tool.
Understanding the Different Head Types
Let's dive into the most common options you'll come across.
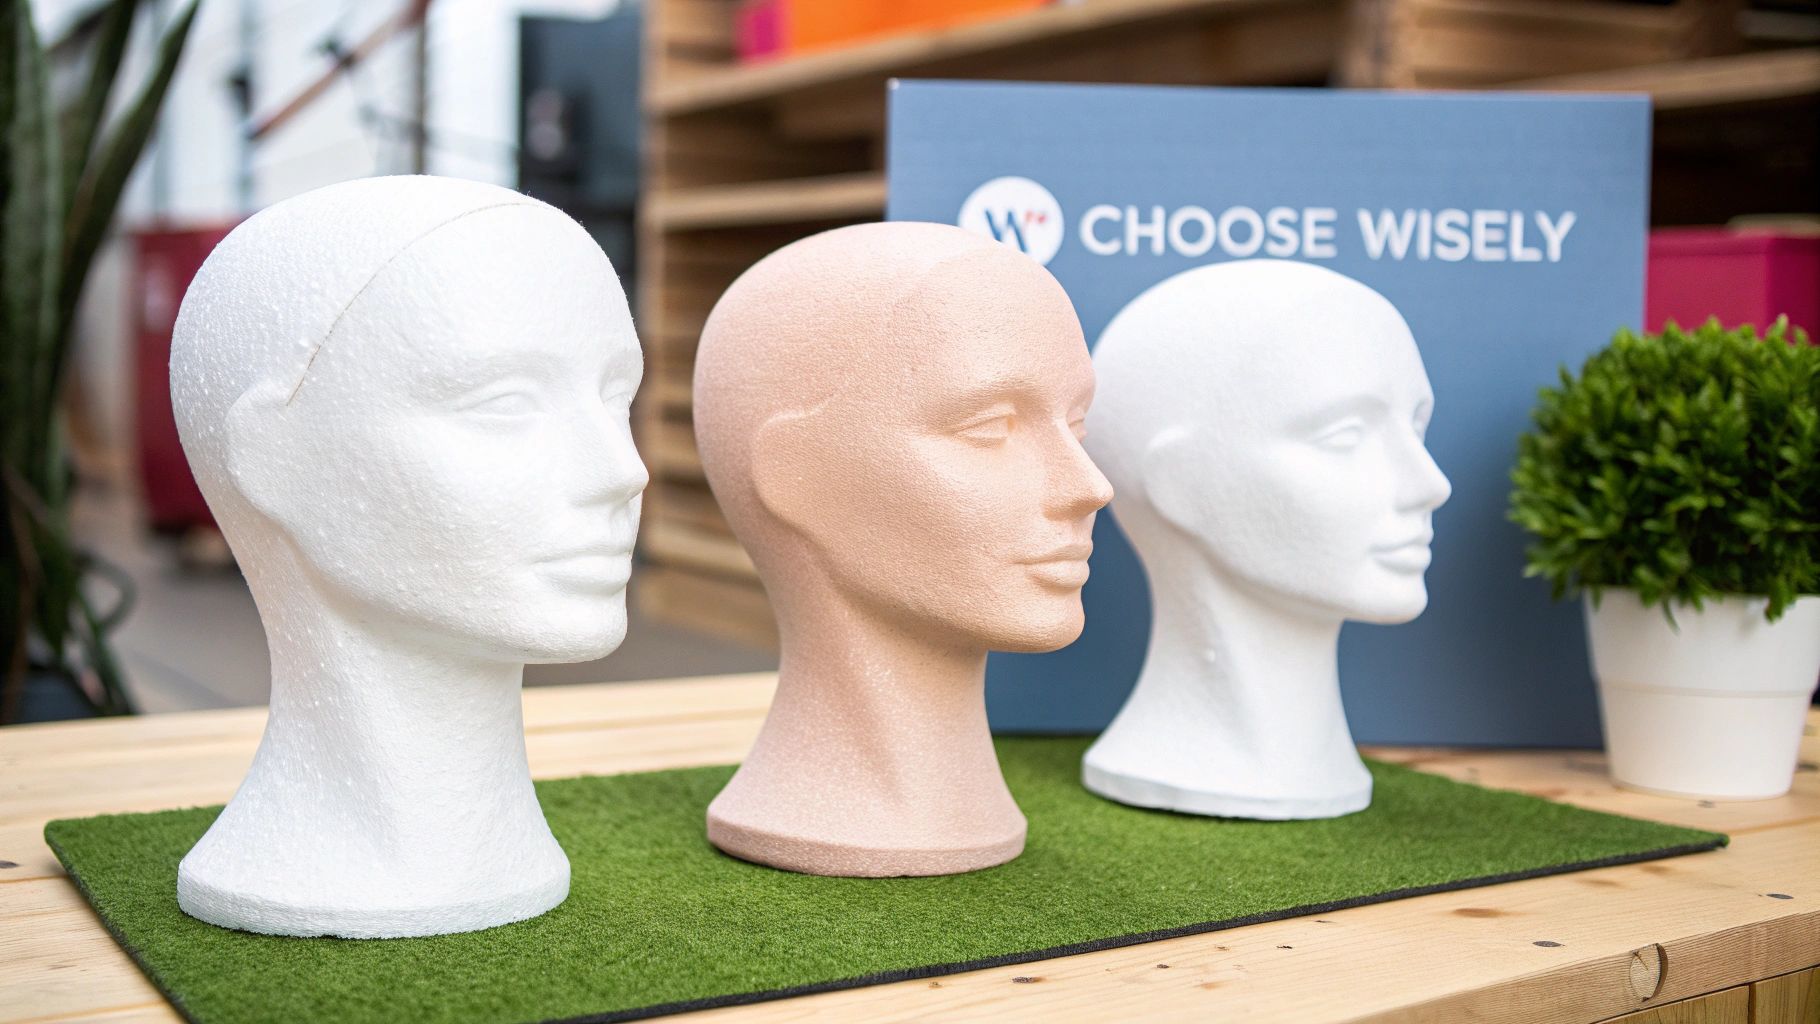
The styrofoam head is probably the one you've seen the most. It's cheap, lightweight, and perfectly fine for displaying a wig or letting it air dry after a gentle wash. But there’s a big trade-off: durability. Keep sticking T-pins into it, and you'll quickly find the styrofoam starts to crumble. They're also so light that any vigorous brushing or heat styling will have them toppling over.
For anything more intensive, you’ll want to graduate to a canvas block head. This is the industry standard for a reason. They feature a tough canvas cover over a solid base, which is usually made from either cork or polyurethane.
- Cork-filled heads are fantastic because they're firm but still surprisingly lightweight. They provide the perfect surface for pinning a wig down securely, whether you're styling or making one from scratch.
- Polyurethane heads are the heavier, more resilient option. This makes them a brilliant choice for salon professionals or anyone who will be using their head frequently for washing and heavy-duty styling.
The real game-changer with a canvas block head is its ability to be mounted securely. When you pair it with a clamp or a tripod stand, you create a stable, 360-degree workstation. For achieving a truly professional finish, this is absolutely non-negotiable.
Choosing the right kind of mannequin head is the first step in setting up a proper styling station. This table breaks down the main types to help you see at a glance which one might be the best fit for your projects.
Mannequin Head Type Comparison
| Head Type | Material | Best For | Key Features |
|---|---|---|---|
| Styrofoam | Expanded Polystyrene | Basic storage, air-drying, light display | Lightweight, affordable, widely available |
| Canvas Block (Cork) | Canvas over Cork | Professional styling, wig making, heat styling | Firm pinning surface, lightweight yet sturdy |
| Canvas Block (Poly) | Canvas over Polyurethane | Heavy-duty styling, washing, salon use | Extremely durable, heavy and stable |
| PVC / Plastic | Polyvinyl Chloride | Display in retail, basic brushing | Realistic features, easy to clean, durable |
As you can see, your primary use case—from simply keeping your wig's shape to performing intricate styling—will guide you to the right material and design.
Why Size and Stability Are Crucial
Beyond the material, getting the size right is absolutely essential. Mannequin heads are sold in a range of circumferences, usually from 21 to 24 inches. For the best results, you need to choose a head that’s a close match to your own head measurement. When you style a wig on a correctly sized head, you can be confident the final fit will be perfect on you, not too tight or uncomfortably loose.
This kind of precision is more important than ever. The UK hair wig and extensions market is booming, with revenues hitting USD 342.3 million in 2021 and projected to climb to nearly USD 694.2 million by 2030, according to Grand View Research. With wigs being such a popular and sometimes costly investment, using the right tools to care for them is just smart.
To explore a wide variety of options for every need, check out our detailed guide on wig head mannequins.
Securing Your Wig for Effortless Styling
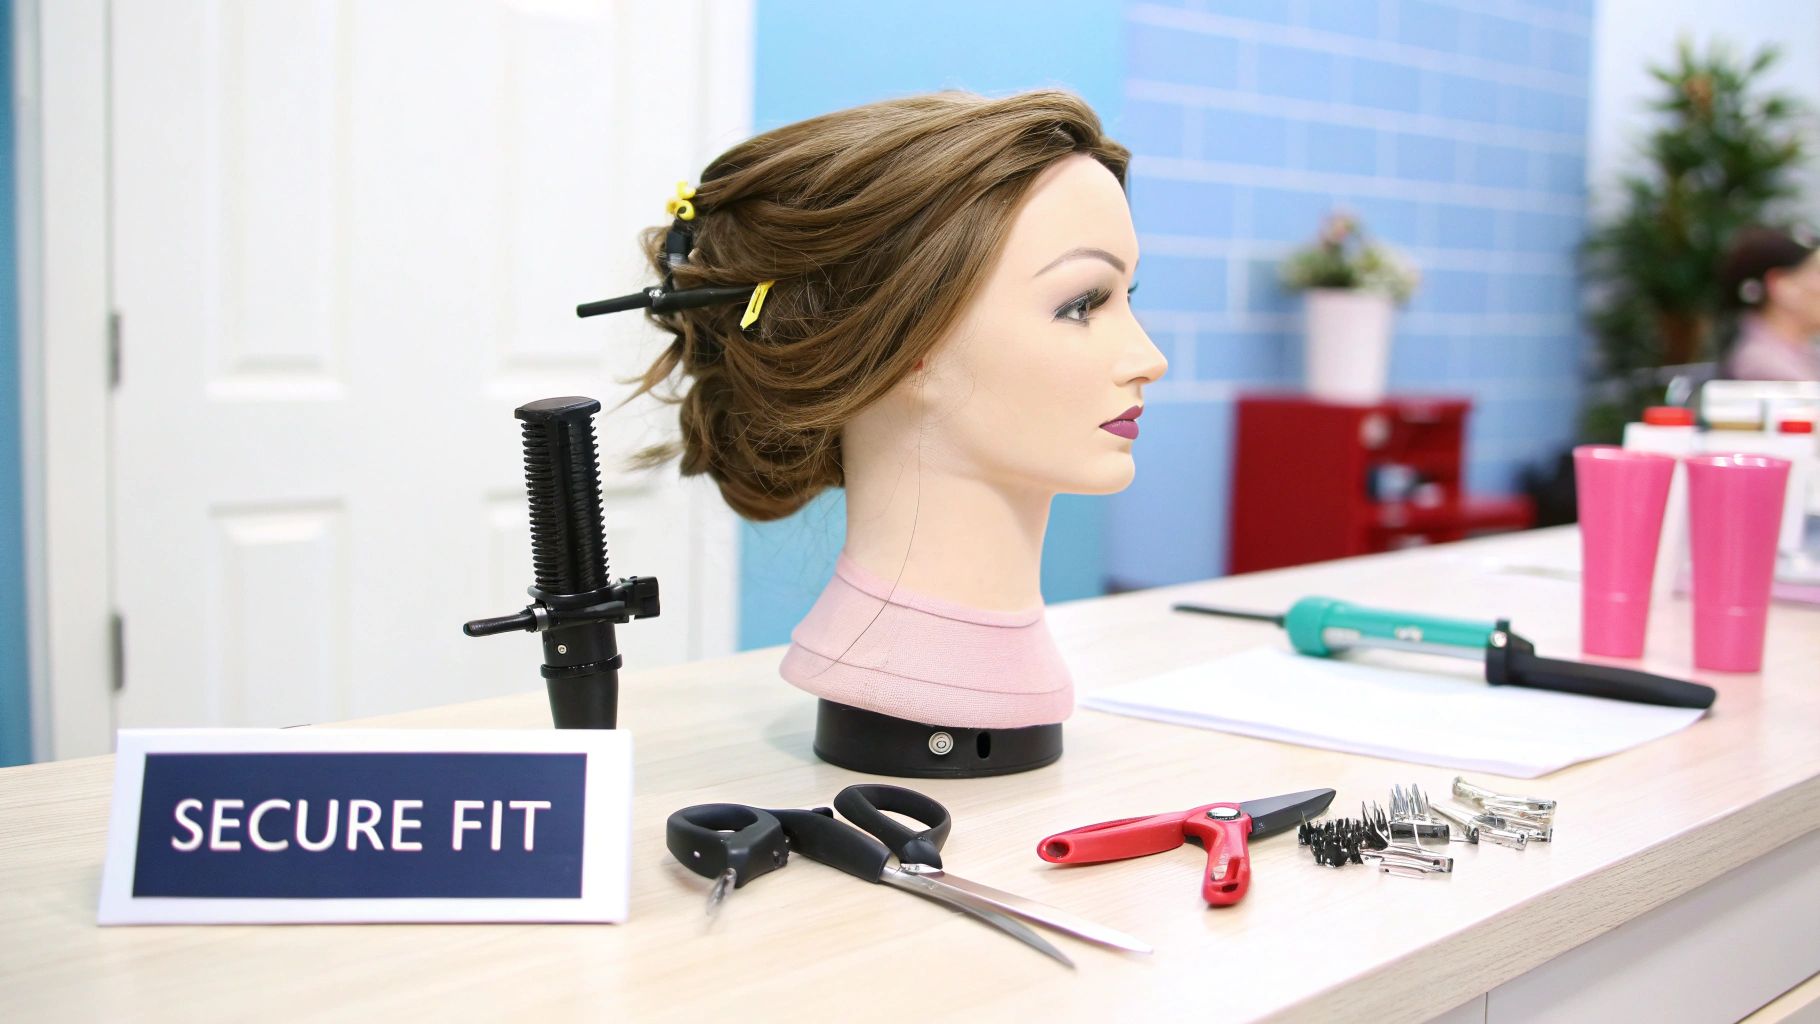
You’ve picked out the perfect mannequin head, and now it’s time to create a solid, reliable workstation. There’s nothing more frustrating than trying to style a wig on a wobbly base; simple tasks like brushing or curling quickly turn into a battle. The first and most important job is to give your mannequin head a stable foundation by mounting it securely.
Most professional canvas block heads come with an opening at the bottom, perfectly designed to fit onto a clamp or tripod stand. A desk clamp is a fantastic, space-saving choice that fastens right onto a table edge, giving you a rock-solid setup. If you need more flexibility, a tripod stand lets you adjust the height and work from any angle—an absolute game-changer for cutting layers or styling longer wigs. You can learn more about finding the right support by looking into different types of head mannequin stands.
Attaching Your Wig Without Damage
Once your head is firmly mounted, it's time to place the wig. The aim is to get it secure enough that it won’t shift an inch, but without stretching the cap or damaging the delicate lace front. Your approach will really depend on the type of head you’re working with.
For canvas block heads, T-pins are the industry go-to. But there's a definite art to using them correctly. Never, ever pin directly through the lace, as this can cause permanent rips and tears. The trick is to insert the pins through the more durable parts of the wig cap, like the ear tabs and the nape.
- Ear Tabs: Slide a T-pin through each ear tab, angling it slightly downwards into the canvas for a firm hold.
- Nape: A pin or two at the back will stop the wig from riding up while you work.
- Parting Area: For extra security at the front, only pin through the thicker polyurethane strips that sometimes line the parting—stay well away from the delicate lace.
If you're using a slippery PVC or styrofoam head where pins are a no-go, a wig grip band is your best friend. These clever velvet-like bands create enough friction to hold the wig firmly in place, completely pin-free.
Pro Tip: Before you start colouring or applying heavy styling products, wrap your canvas mannequin head in a layer of cling film. This simple trick creates a barrier that prevents dye from staining the fabric, keeping your professional tool looking clean and pristine for years.
It’s a small step, but this protective measure makes a huge difference in the longevity of your equipment. Taking a moment to prepare your station properly means you can focus entirely on the creative side of things, confident that your tools and your wig are both safe and secure.
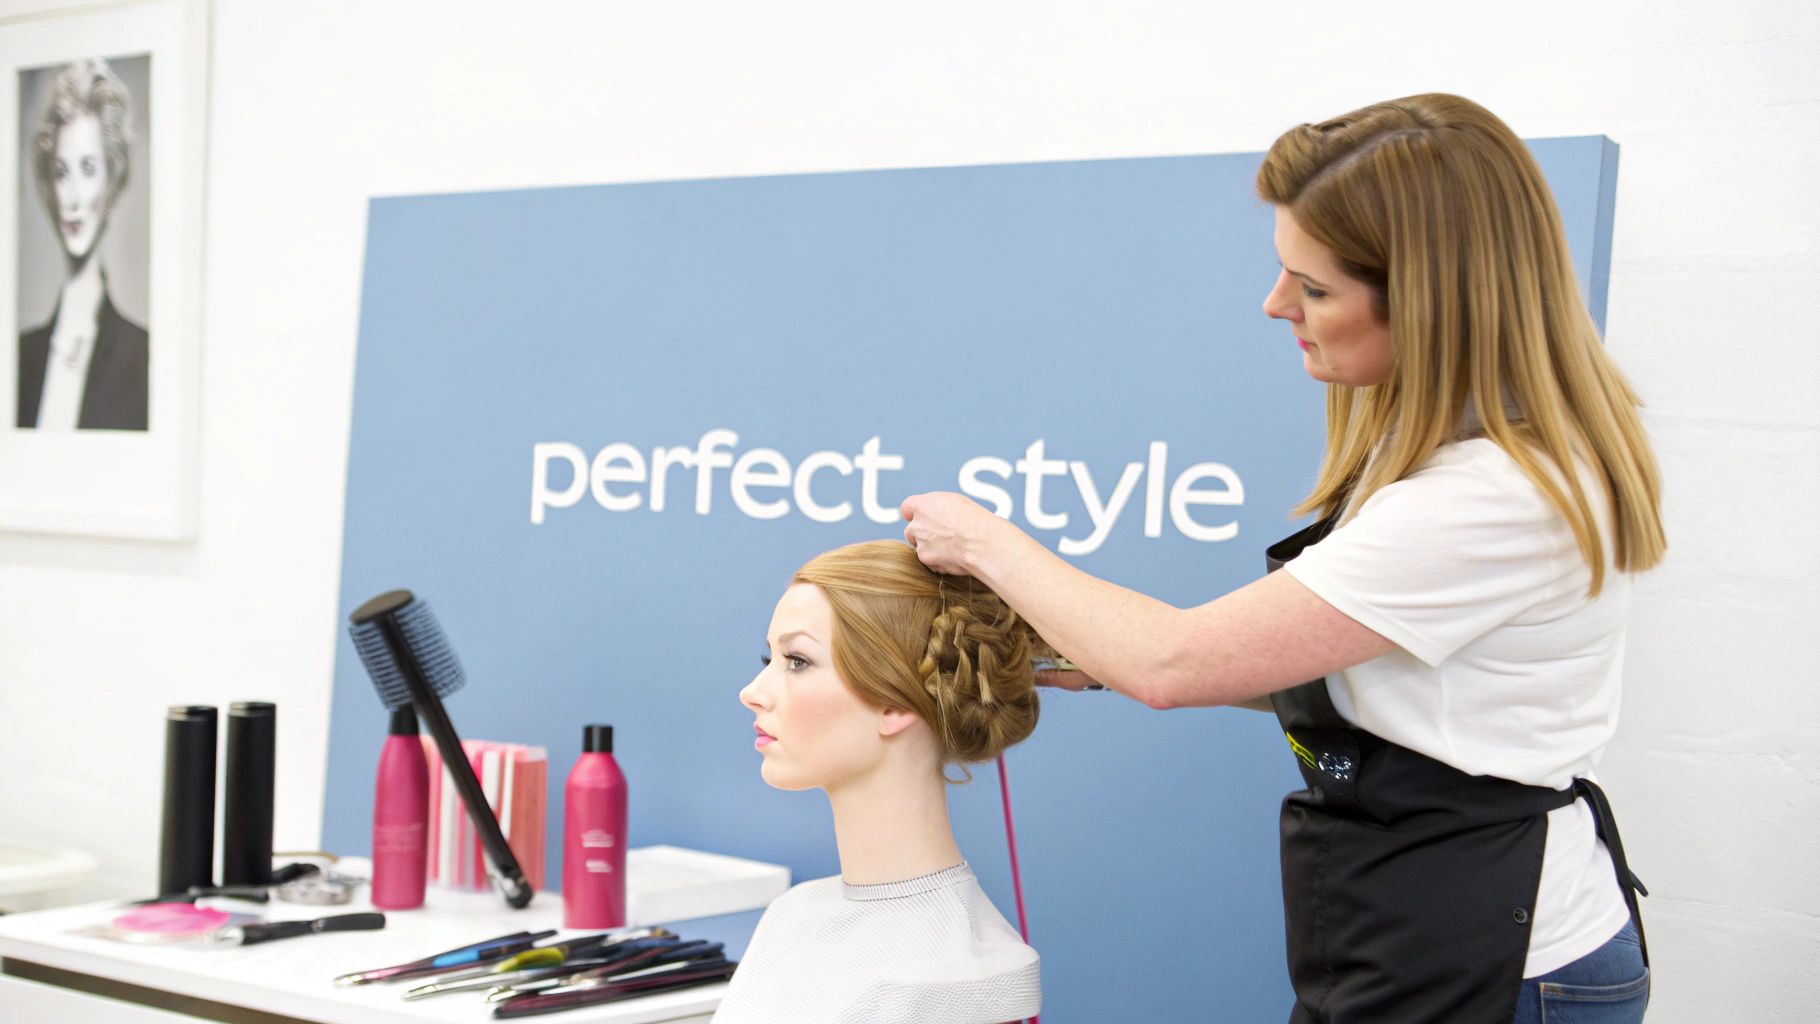
Mastering Styling Techniques on Your Mannequin
With your wig firmly in place, it's time for the fun part: styling. This is where a good mannequin head for a wig really pays for itself, transforming what can be a clumsy, frustrating task into a genuinely creative process. Think of it as your silent partner, holding the wig steady so you can focus all your attention on getting the look just right.
Even the fundamentals, like brushing, become so much simpler. When the wig is mounted at a comfortable height, you can use both hands to gently detangle with a wide-tooth comb. I always start at the tips and work my way up to the roots—it’s the best way to prevent unnecessary shedding and breakage. This controlled approach is far gentler on the fibres than trying to brush a wig while you're holding it.
Heat Styling With Confidence
Applying heat is where a mannequin head truly shines. Let's be honest, trying to curl or straighten a wig while it’s on your own head is not only awkward, it's a recipe for disaster. Having a stable base allows you to be precise with your heat tools, ensuring an even application and a polished finish without risking damage.
Before you even plug in your tools, double-check that your wig is heat-friendly. While most human hair wigs are fine, synthetics demand a bit more caution.
- For Human Hair Wigs: You've got more freedom here, but I’d still recommend starting with a medium heat setting. Always, always use a good heat protectant spray to shield the hair.
- For Heat-Resistant Synthetic Wigs: Keep the temperature low. As a rule of thumb, stay below 150°C. Anything hotter can permanently melt or frizz the synthetic fibres, and there's no coming back from that.
The 360-degree access you get from a stand is a game-changer. You can finally create perfectly uniform curls or achieve that sleek, straight look all the way around, banishing those tricky, hard-to-reach spots at the back for good.
Precision Cutting and Colouring
If you’re thinking about giving your wig a trim or a completely new colour, a mannequin head isn't just helpful—it's essential. It provides the stable canvas you need to get those clean lines and professional results you’re after.
When it comes to cutting, being able to rotate the head means you can create a perfectly even fringe and symmetrical layers. You can step back, look at the shape from every angle, and make tiny, precise adjustments. This is something that's practically impossible to do while you're wearing the piece. For more on creating a well-balanced presentation, our guide on how to dress a mannequin shares some great principles that also apply here.
When you're colouring a wig, the mannequin head becomes your third hand. It holds everything securely, freeing you up to apply colour evenly from root to tip, making sure you don't miss any sections or end up with a patchy finish. This controlled environment is absolutely crucial for a saturated, salon-quality result.
The demand for quality wigs and the tools to care for them is booming. In fact, the UK female hair piece, wig, and extension market is projected to hit around USD 1,185 million by 2027. This really underlines how important proper styling and maintenance tools have become for everyone, from professionals to everyday wearers.
Ultimately, a mannequin head gives you the freedom to experiment and hone your skills without pressure. I often use mine to try out a new braiding technique or practise an updo before a big event. It gives me the confidence to know I can recreate the look perfectly when it really matters.
Practical Wig Washing and Maintenance Routines
Want to keep your wig looking flawless for years to come? The secret isn't just about the products you use; it's about your routine. Using a mannequin head for wig care turns what can feel like a chore into a simple, effective process that truly protects your investment. It gives you a stable base to work from, letting you be thorough without putting any stress on the delicate fibres or cap.
Before you even think about turning on the tap, get your wig properly secured. I always recommend a canvas block head for washing, specifically one with a polyurethane core that can handle getting wet without falling apart. Pin the wig securely, then give it a gentle brush, starting from the tips and working your way up to the roots to ease out any tangles.
The Cleansing Process
Once your wig is sitting securely, it's time to wash. Stick to cool or lukewarm water—never hot—and use a sulphate-free shampoo made for wigs. A little goes a long way.
Gently smooth the shampoo through the hair in a downward motion, following the natural fall of the fibres from root to tip. Whatever you do, don't scrub or rub in circles! That's a one-way ticket to a tangled mess and can damage the delicate knots at the base.
Rinse the shampoo out completely, letting the water run down the hair shaft in the same direction. Then, apply a good moisturising conditioner, focusing on the mid-lengths and ends. Be extra careful to avoid the cap, as conditioner can loosen the knots holding the hair in place.
Using a mannequin head is a game-changer because it lets the wig air-dry in its natural shape. This completely avoids the cap stretching or getting misshapen, which happens all too often when wigs are left to dry flat or hung up incorrectly. It's honestly the best way to maintain the wig's original fit and style.
Drying and Smart Storage
After a final rinse, gently blot the wig with a microfibre towel to soak up the excess water. Never, ever wring it out. Just leave it on the mannequin head in a well-ventilated room, away from direct sunlight or heat, and let it air-dry completely.
For long-term storage, a clean, dry wig should go right back on its mannequin head or another proper stand. This is the key to preventing tangles and keeping the style looking fresh between wears. A cool, dark cupboard is the perfect spot. If you've built up a collection and need some organisational ideas, our guide on plastic stacking storage boxes has some great tips.
Washing and maintaining your wig on a mannequin head does more than just get it clean; it dramatically extends its life, ensuring it looks vibrant and ready to wear whenever you are.
Advanced Applications for Professionals and Hobbyists
Once you move beyond basic styling, a professional-grade mannequin head for a wig becomes one of the most crucial tools in your kit. For serious wig makers and theatrical artists, its most important job is in the painstaking process of ventilation.
Ventilation is the intricate art of hand-tying individual hair strands onto a wig cap or lace foundation to build a custom piece from scratch. This is skilled, time-consuming work that demands a rock-solid, accurately sized canvas block head that can put up with hours of detailed handling. The head essentially becomes your client, letting you create incredibly natural hairlines and partings with absolute precision.
Elevating Professional Skills and Training
In the world of professional hair and beauty, the mannequin head is the bedrock of education. Trainee hairdressers and cosmetology students log hundreds of hours practising elaborate updos, tricky colouring techniques, and sharp cuts on these heads long before they work on an actual client. There's simply no substitute for this kind of hands-on practice for building confidence and muscle memory.
This same idea holds true for high-stakes hairdressing competitions. Competitors will often dedicate weeks, sometimes months, perfecting their masterpiece on a mannequin head. It gives them a consistent, reliable canvas to bring their vision to life, making sure every single hair is perfectly placed before it goes in front of the judges.
The ability to work on a stable, 360-degree platform is non-negotiable for both training and competitions. It's what allows for the symmetry and perfection that separates a good stylist from a true artist, making the mannequin head an absolute essential.
The Mannequin Head in Retail and Display
The value of a good mannequin head doesn't stop at the workbench; it’s a powerhouse in the commercial world of retail, too. Whether in a salon or an online store, a realistic mannequin head does far more than just hold a wig—it sells an entire look. When a potential customer sees a wig beautifully styled on an attractive display head, they can instantly visualise how the hair flows, how the colour plays in the light, and how the cut might frame their own face.
This kind of visual merchandising is an incredibly effective sales tool, turning a product on a shelf into an aspirational style. We delve deeper into this in our guide on the role of a mannequin in shops.
This is particularly true in the UK's booming hair and beauty industry, which was valued at an impressive £5.8 billion by 2023. With a massive 60.5% of professionals in this sector being self-employed, compelling product presentation is everything. You can read more fascinating statistics about the UK hair and beauty industry on PolicyBee.co.uk.
Your Wig Styling Questions Answered
Even with the best tutorials, getting hands-on with wig styling always throws up a few questions. That's completely normal. Getting solid, practical answers is what turns that initial frustration into real confidence. Let's tackle some of the most common things people ask when they start using a mannequin head for their wigs.
Stepping into the world of wig care can feel a bit overwhelming, particularly when you’re figuring out where to spend your money. Making the right choice from the get-go saves you hassle and cash down the line, ensuring you have gear that grows with you.
What’s the Best Mannequin Head for a Beginner?
If you're just starting out, my top recommendation is always a canvas block head. It's tempting to grab a cheap styrofoam one, but trust me, they just don't last. They crumble with repeated pinning and can't handle wet styling.
A canvas head, on the other hand, gives you a firm, pinnable surface that’s sturdy enough for washing, blow-drying, and heat styling. It’s an investment you won't regret or outgrow. Just be sure to pick one that’s close to your own head size so the wig fits you perfectly once you’re done.
How Can I Stop My Wig Slipping Off a Plastic Mannequin Head?
This is a classic problem! Those smooth plastic or styrofoam heads are notoriously slippery. Luckily, there are a few easy fixes.
The best trick in the book is to wrap a wig grip band around the mannequin head before putting the wig on. The velvet texture creates friction and holds everything securely in place. If you're in a pinch, wrapping the head in cling film can also work wonders. You can also use pins, but be very careful not to pierce or tear the wig’s lace or cap.
A word of caution: while you might be tempted to use double-sided tape, I’d strongly advise against it. It leaves a horrible sticky mess on both the head and your wig cap, which is a nightmare to clean and can cause damage over time.
Can I Use a Regular Hairdryer on a Wig?
Absolutely, but you need to be careful. First things first: check if your wig can actually take the heat. Human hair wigs are fine, but most synthetic wigs will melt unless they are specifically labelled 'heat-resistant'.
When you do use a hairdryer, always stick to a low or medium heat setting. It’s also crucial to keep the dryer moving constantly to distribute the heat evenly and prevent scorching one spot. Using a mannequin head is brilliant for this, as it frees up both of your hands – one for the dryer, one for the brush – giving you far more control for a sleek, professional finish. For those considering wigs more broadly, it's useful to look at all the options, like understanding wigs as a hair loss solution.
At Display Guru, we provide the professional-grade tools you need to care for your wigs with confidence. Explore our collection of durable mannequin heads and stands today.