


Choosing a Cutting Mat for Sewing Your Expert Guide
A cutting mat is one of those pieces of kit you don’t realise you need until you have one. It’s the unsung hero of the sewing room, quietly providing a safe, reliable surface that makes every cut a hundred times better. Think of it as the foundation for your entire project; it protects your table, keeps your rotary cutter blade sharp, and makes precise cuts possible.
A good mat is what stands between a jagged, frustrating mess and a clean, professional finish.
Why a Quality Cutting Mat Is Your Most Important Sewing Tool
Have you ever tried slicing a fresh loaf of bread on a glass chopping board? It’s a terrible experience. The knife slips, you can’t get a clean cut, and you’re just one wrong move away from damaging both the board and your blade. That’s pretty much what it’s like cutting fabric on an unprotected surface.
This is why a dedicated cutting mat for sewing isn’t just an accessory; it’s an absolute necessity for anyone who takes their craft seriously.
A top-quality mat gives you the perfect amount of grip, holding the fabric steady so it doesn’t shift around while you cut. At the same time, it’s smooth enough for your rotary cutter to glide across effortlessly. This trio—the mat, the cutter, and a good ruler—is the secret to modern, accurate sewing.
The Magic of a Self-Healing Surface
The defining feature of a proper cutting mat is its 'self-healing' surface. So, what does that actually mean? These mats are made from a clever composite PVC material. When your rotary blade slices into it, the blade doesn’t actually remove a sliver of material. Instead, it gently parts the fibres.
Almost instantly, the material’s natural memory takes over, and it closes back up, leaving the surface smooth and ready for the next cut.
This self-healing technology is a genuine game-changer. It means your mat can handle thousands of cuts without developing deep, blade-catching grooves that can throw your lines off. It’s what guarantees a consistently smooth cutting experience for years to come.
Here you can see a close-up of a self-healing mat, showing how the gridlines and the material itself guide your cuts.
This image really shows off the dense, resilient nature of the material, which is key to both its long-term durability and that all-important ability to reseal after a cut.
An Essential for the Modern Sewer
With the boom in home sewing and crafting, the cutting mat has rightfully earned its place in every creator’s toolkit. The UK sewing machine market, valued at nearly USD 5.59 billion, is set to keep growing, which tells us that the demand for quality accessories is rising right alongside it. As more people invest in better machines, the need for precise fabric preparation becomes even more critical.
Ultimately, putting your money into a good cutting mat is an investment in your entire creative process. It organises your workspace, builds your confidence, and lays the groundwork for projects you can be proud of. For more tips on creating a brilliant craft space, have a look at our guide on creative sewing room ideas. A well-chosen mat truly is the first step toward a more professional and enjoyable sewing journey.
Getting to Grips with a High-Quality Cutting Mat
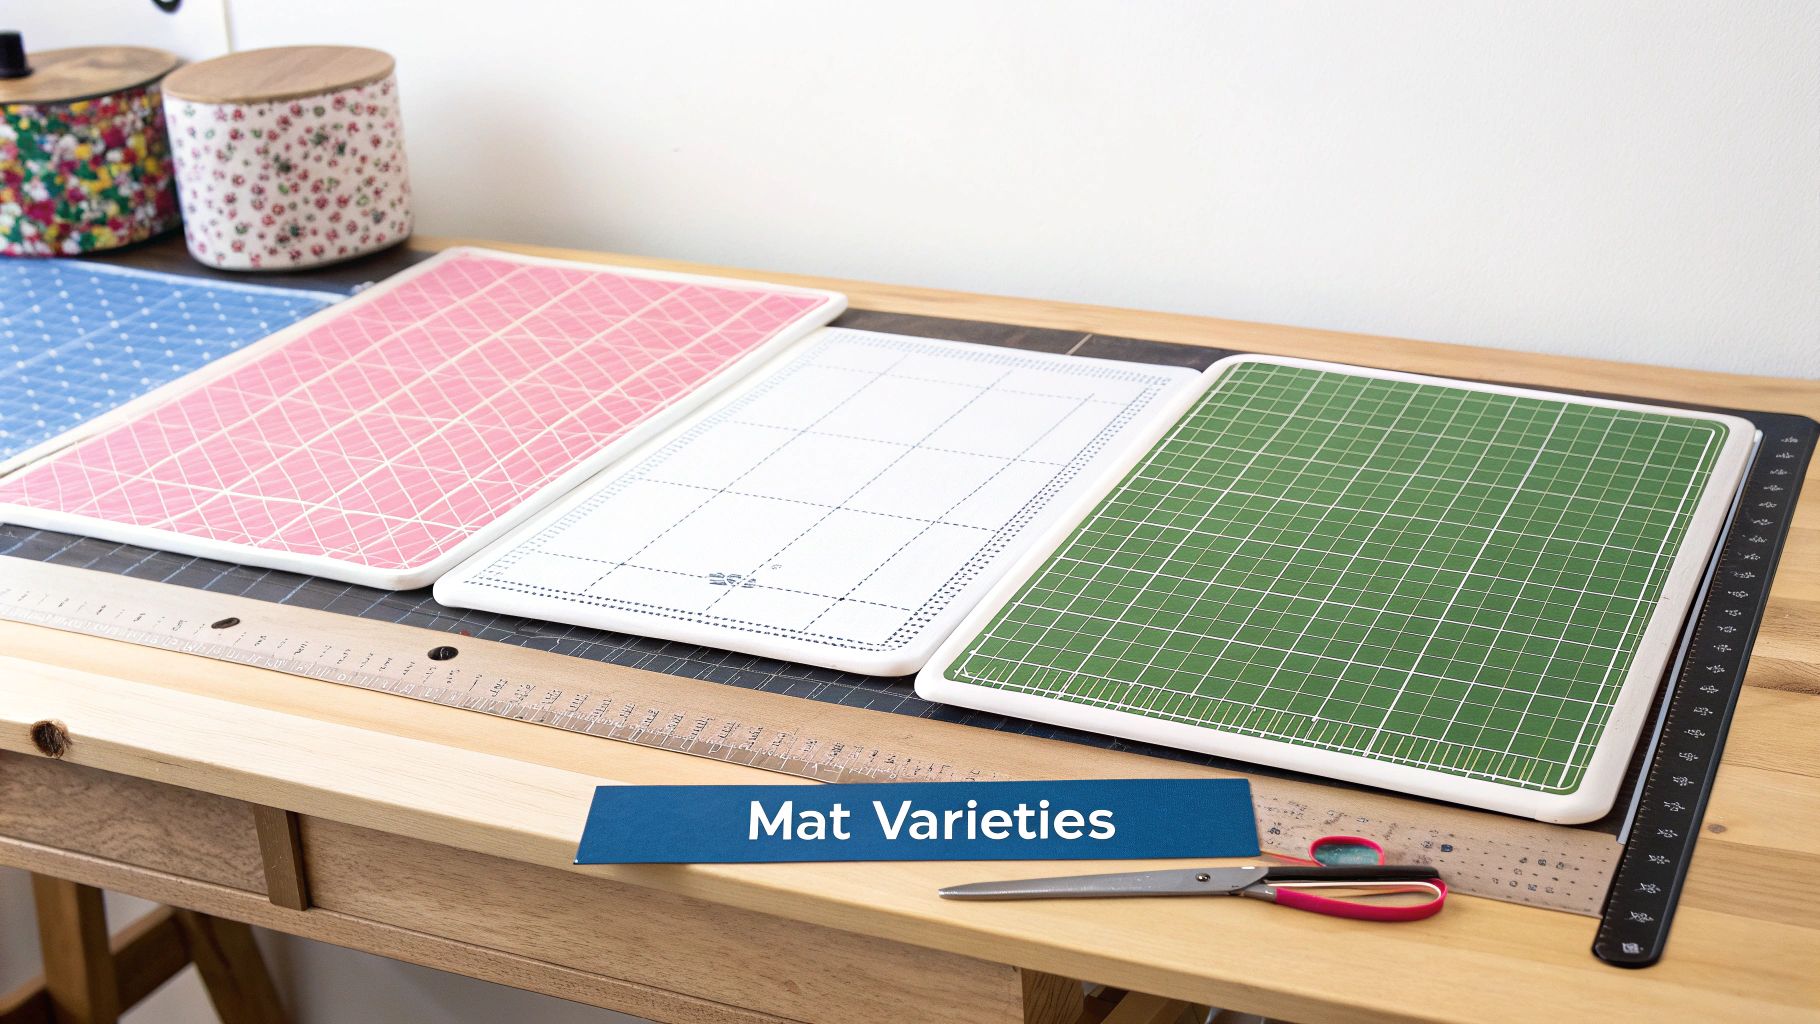
So, what separates a genuinely brilliant cutting mat from one that's just… okay? On the surface, they all look pretty similar, but the real magic is in the details. A top-tier cutting mat for sewing is built with specific features that are all about making your work more accurate, easier, and frankly, more enjoyable.
Think of it this way: a cheap mat is like a flimsy bit of cardboard. It’ll do the job once or twice, but it will quickly get chewed up and become useless. A high-quality mat, on the other hand, is designed to take a beating. It can absorb cut after cut and still look and feel smooth, ready for the next project. This incredible resilience is its most important feature.
The Secret of the Self-Healing Surface
You’ll see the term ‘self-healing’ thrown around a lot, but it’s not just clever marketing – it’s a real property of the material. These mats are made from a specialised PVC composite, layered in a way that allows the material to part temporarily when your rotary cutter glides over it.
Instead of actually slicing a sliver of material away, the blade’s pressure just pushes the composite fibres apart for a moment. As soon as the blade passes, the mat’s natural density and flexibility cause those fibres to spring back together, essentially “healing” the cut. This is what stops those annoying grooves from forming, which can catch your blade and throw your straight lines off course.
A well-made self-healing mat is the key to both precision and longevity. It’s the single most important feature, ensuring you have a smooth, reliable surface for thousands of cuts.
The way the mat is constructed is also a big part of its success. Most premium mats are a sort of sandwich:
- A soft top layer: This is the self-healing surface that your blade cuts into.
- A hard inner core: This solid middle layer stops the blade from slicing right through and damaging your table.
- Another soft bottom layer: This often makes the mat reversible, effectively doubling its lifespan.
This multi-layer design gives you the best of both worlds: a forgiving surface to cut on and a rigid structure that provides stability.
More Than Just a Grid
While the self-healing surface is the main event, the printed grid is the trusty guide that makes all that precision possible. A good mat’s grid is more than just a few lines; it’s a detailed roadmap for accuracy.
First and foremost, the gridlines are essential for squaring up your fabric. Getting that initial cut perfectly straight is crucial, especially in quilting, where one slightly skewed block can throw off an entire design.
Beyond the basic squares, you should look for a few other critical markings:
- Angle Lines: For any quilter, markings for 30°, 45°, and 60° angles are an absolute must. They let you cut triangles, diamonds, and other common shapes quickly and confidently, without faffing about with separate templates.
- Bias Lines: These diagonal lines, usually set at a 45° angle, are a lifesaver for cutting bias strips for binding or garment details. They give you a clear, easy-to-follow guide for achieving a perfect true bias.
These markings turn your mat from a simple protective board into a proper measuring tool.
Thickness and Other Handy Features
The thickness of a cutting mat for sewing is another factor to consider. As a general rule, thicker mats (around 3mm) are better. They’re less likely to warp over time and provide a more stable, substantial feel under your hands. They also stand up better to heavy-duty cutting on tougher fabrics like denim or canvas.
Finally, look for those little extras that just make life easier. Many mats are reversible, with a different colour on each side. This is surprisingly useful. A dark grid is often easier to see against light-coloured fabrics, while a light grid provides better contrast when you’re cutting dark materials. Being able to flip it over can reduce eye strain and help you make sure every cut is perfectly on the line.
Finding the Perfect Cutting Mat Size for Your Space
Picking out a cutting mat isn't all that different from choosing a chef's knife. The right size feels like an extension of your hand, making the work effortless, while the wrong one can make every task a chore. A mat that’s too small will have you constantly shifting your fabric, which is a recipe for frustration and wonky cuts. On the other hand, a giant mat that dwarfs your workspace is just plain impractical.
The trick is finding that sweet spot between the size of your usual projects and the actual space you have to work in. When your mat fits your creative flow, you'll find everything from the first cut to the final trim goes much more smoothly.
The Small Mat: Precision and Portability
Think of a small cutting mat for sewing, usually around 12" x 18", as your detail-work specialist. It's not the tool you'd grab to cut out a full dress pattern, but for those small, intricate jobs that need absolute focus and control, it’s a game-changer.
This size is absolutely perfect for:
- Trimming quilt blocks: It gives you just enough room to square up individual blocks with perfect precision.
- Appliqué pieces: When you're cutting tiny, fiddly shapes, a massive surface just gets in the way.
- Travel and classes: It’s compact enough to easily pop in a bag for a sewing workshop or retreat.
If you’re working in a tight corner or you focus on smaller crafts, this little mat is a must-have. It also works brilliantly as a second mat for sewists who have a larger one but want a dedicated spot for detailed cuts right next to their sewing machine.
The Medium Mat: The Everyday Workhorse
The most common and versatile size you’ll find is the 18" x 24" mat. This is the true all-rounder in the sewing world, offering plenty of space for a huge range of tasks without taking over your entire cutting table. It provides a generous work area that handles most everyday sewing and quilting projects with ease.
This is your go-to size if you regularly find yourself:
- Cutting pattern pieces for children’s clothes or smaller adult garments.
- Slicing multiple fabric strips for your next quilt.
- Squaring up larger blocks or medium-sized cuts of fabric.
For most home sewists, this mat hits the perfect balance. It’s big enough to be truly useful for dressmaking but still fits comfortably on a standard desk or small craft table, making it a fantastic choice for multi-purpose spaces.
The Large Mat: For Ambitious Projects
When you're ready to tackle the big stuff, you need a surface that can keep up. The 24" x 36" cutting mat is built for exactly that. With this much space, you can lay out a full width of standard quilting fabric (which is typically 42"-44" wide) folded in half. This completely changes how you cut long strips or large pattern pieces, saving you time and improving your accuracy.
A mat this size is practically essential for:
- Cutting garment patterns: Handle large sections for dresses, trousers, and coats without a struggle.
- Quilting: Cut long border strips or backing fabric with minimal repositioning.
- Home décor projects: It’s a lifesaver for big fabric panels needed for curtains or cushion covers.
Of course, a mat this big needs a proper home. You'll want a substantial table to support it properly. For anyone with a dedicated sewing room, the investment pays for itself almost immediately in time saved and precision gained. If you're on the hunt for the perfect foundation, our guide to choosing a sewing and cutting table can help you find one that's just right.
A Quick Guide to Cutting Mat Sizes
Choosing a size can feel overwhelming, so let's break it down. This table gives you a clear comparison of the most common options to help you match a mat to your projects and your workspace.
| Choosing Your Ideal Sewing Cutting Mat Size |
| :--- | :--- | :--- | :--- |
| Mat Size (Imperial & Metric) | Common Dimensions | Best For | Workspace Requirement |
| Small | 12" x 18" (A3) | Intricate work like appliqué, trimming quilt blocks, travel, and small craft projects. | A small desk or alongside your sewing machine. Highly portable. |
| Medium | 18" x 24" (A2) | The all-rounder for most home sewing, including smaller garments and strip cutting. | A standard desk or a dedicated small craft table. |
| Large | 24" x 36" (A1) | Large-scale projects, dressmaking, cutting full widths of fabric, and home décor. | A dedicated, large cutting table or a sturdy workbench. |
Ultimately, the best mat is one that won't limit your creativity. Think about the biggest project you're likely to tackle and make sure your mat can handle it.
Speciality Mats: Rotating and Folding Options
Beyond the standard rectangles, you'll find some clever designs that solve specific sewing problems. A rotating cutting mat, for instance, is a stroke of genius, especially for quilters. These mats, often square, sit on a spinning base, letting you turn the mat instead of the fabric. This makes trimming all four sides of a quilt block a breeze and helps you get incredibly accurate cuts every time.
Folding mats are another fantastic solution, particularly if you’re short on storage space. They’re designed with a special hinge that allows them to be folded in half, making them much easier to tuck away without causing a permanent crease or crack.
Mastering Your Cutting Mat for Flawless Results
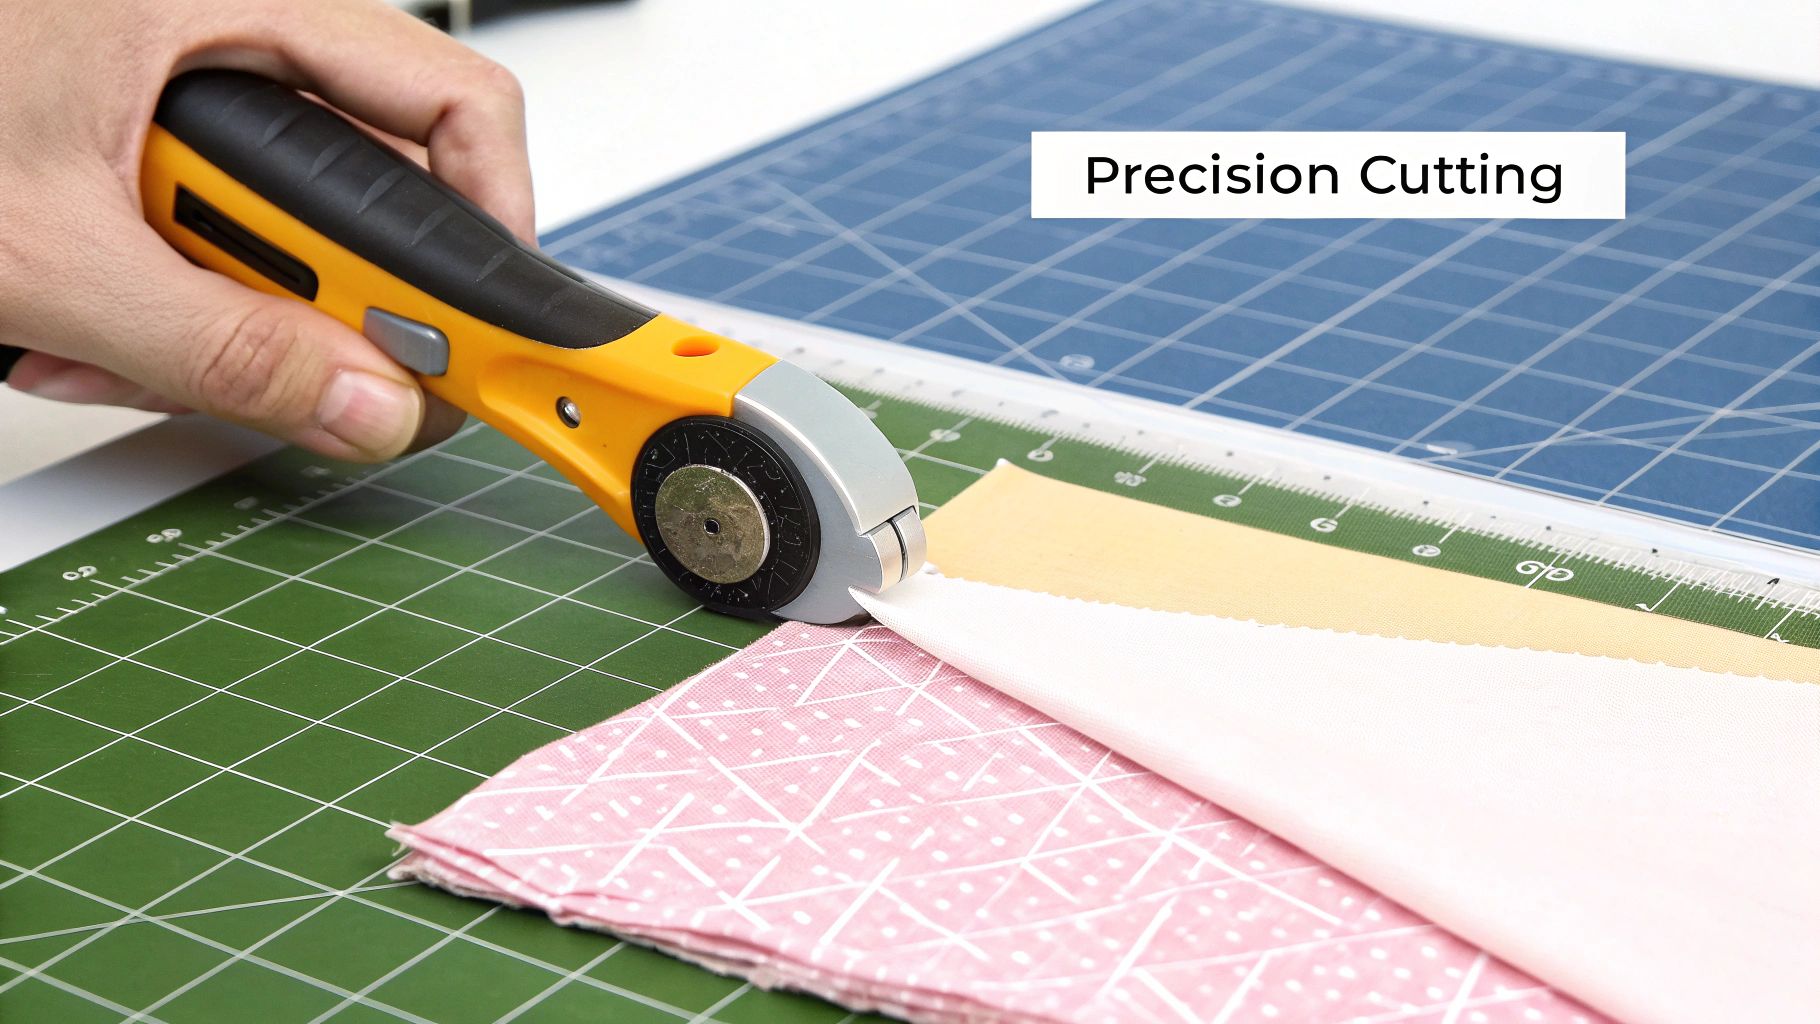
So, you’ve got the perfect cutting mat for sewing. That's a great start, but the real magic happens when you know how to use it properly. Your mat, a sharp rotary cutter, and a clear acrylic ruler aren't just separate tools; they’re a system designed to work together.
Think of it like a three-legged stool. The mat is your stable, gridded foundation. Your ruler is the straight-edge guide keeping everything in line. The rotary cutter is the powerhouse that does the heavy lifting. When you get this trio working in perfect harmony, fabric prep goes from being a chore to a truly satisfying part of the process.
The Foundation of a Perfect Cut
Before a single thread is cut, getting your setup right is everything. It's about both accuracy and safety. First rule: always stand up when using a rotary cutter. This lets you apply firm, even pressure straight down from your shoulder, giving you far more control than you’d get from just using your wrist. It leads to cleaner cuts and puts much less strain on your body.
Your hand placement is just as critical. Plant your non-dominant hand firmly on the ruler, spreading your fingers wide to hold it steady. A classic rookie error is letting your fingertips hang over the edge – a massive safety risk. Keep them well back! Some rulers even come with special grips to help with this.
Pro Tip: Always, always cut away from your body. This is the golden rule of rotary cutting. If the blade ever slips, this one simple habit ensures it moves harmlessly into space, not towards you.
Nailing these fundamentals creates a safe, controlled workspace. It frees you up to concentrate on making that perfectly precise cut, without worrying about accidents.
Squaring Fabric and Cutting Strips
Most sewing projects begin with “squaring up” the fabric. This just means creating one perfectly straight edge that you can measure everything else from. It's easy. Fold your fabric so the selvedges meet, then lay the folded edge along one of the horizontal lines on your mat. Now, place your ruler along a vertical line, creating a perfect 90-degree angle, and slice off that wonky raw edge.
With that clean, straight edge established, cutting accurate strips is a breeze.
- Align the Edge: Keep your freshly cut straight edge lined up perfectly with a vertical line on the mat.
- Position Your Ruler: Lay the ruler over the fabric. To cut a 2.5-inch strip, for example, line up the 2.5-inch mark on your ruler with the fabric's straight edge.
- Make the Cut: Hold that ruler down firmly and glide the rotary cutter smoothly along its edge.
When a project calls for lots of different pieces, a bit of organisation goes a long way. To get your cutting list sorted before you start, check out our guide on using a sewing project planner.
Advanced Techniques for Greater Precision
Ever need to cut a piece of fabric that’s longer than your ruler? Don't panic. The trick is a technique called "walking the ruler." Make your first cut, but stop a few inches from the end of the ruler. Hold the cutter in place, then carefully lift and slide the ruler forward, re-aligning it to continue the line. It's a fantastic way to get perfectly straight cuts of any length.
And don't ignore those angle markings on your mat! For quilters, they're an absolute game-changer. Need to cut a 45-degree triangle? Just align your fabric with the grid, then place your ruler along the printed 45-degree line. It takes all the guesswork out of the equation and gives you perfect shapes for your quilt blocks every single time.
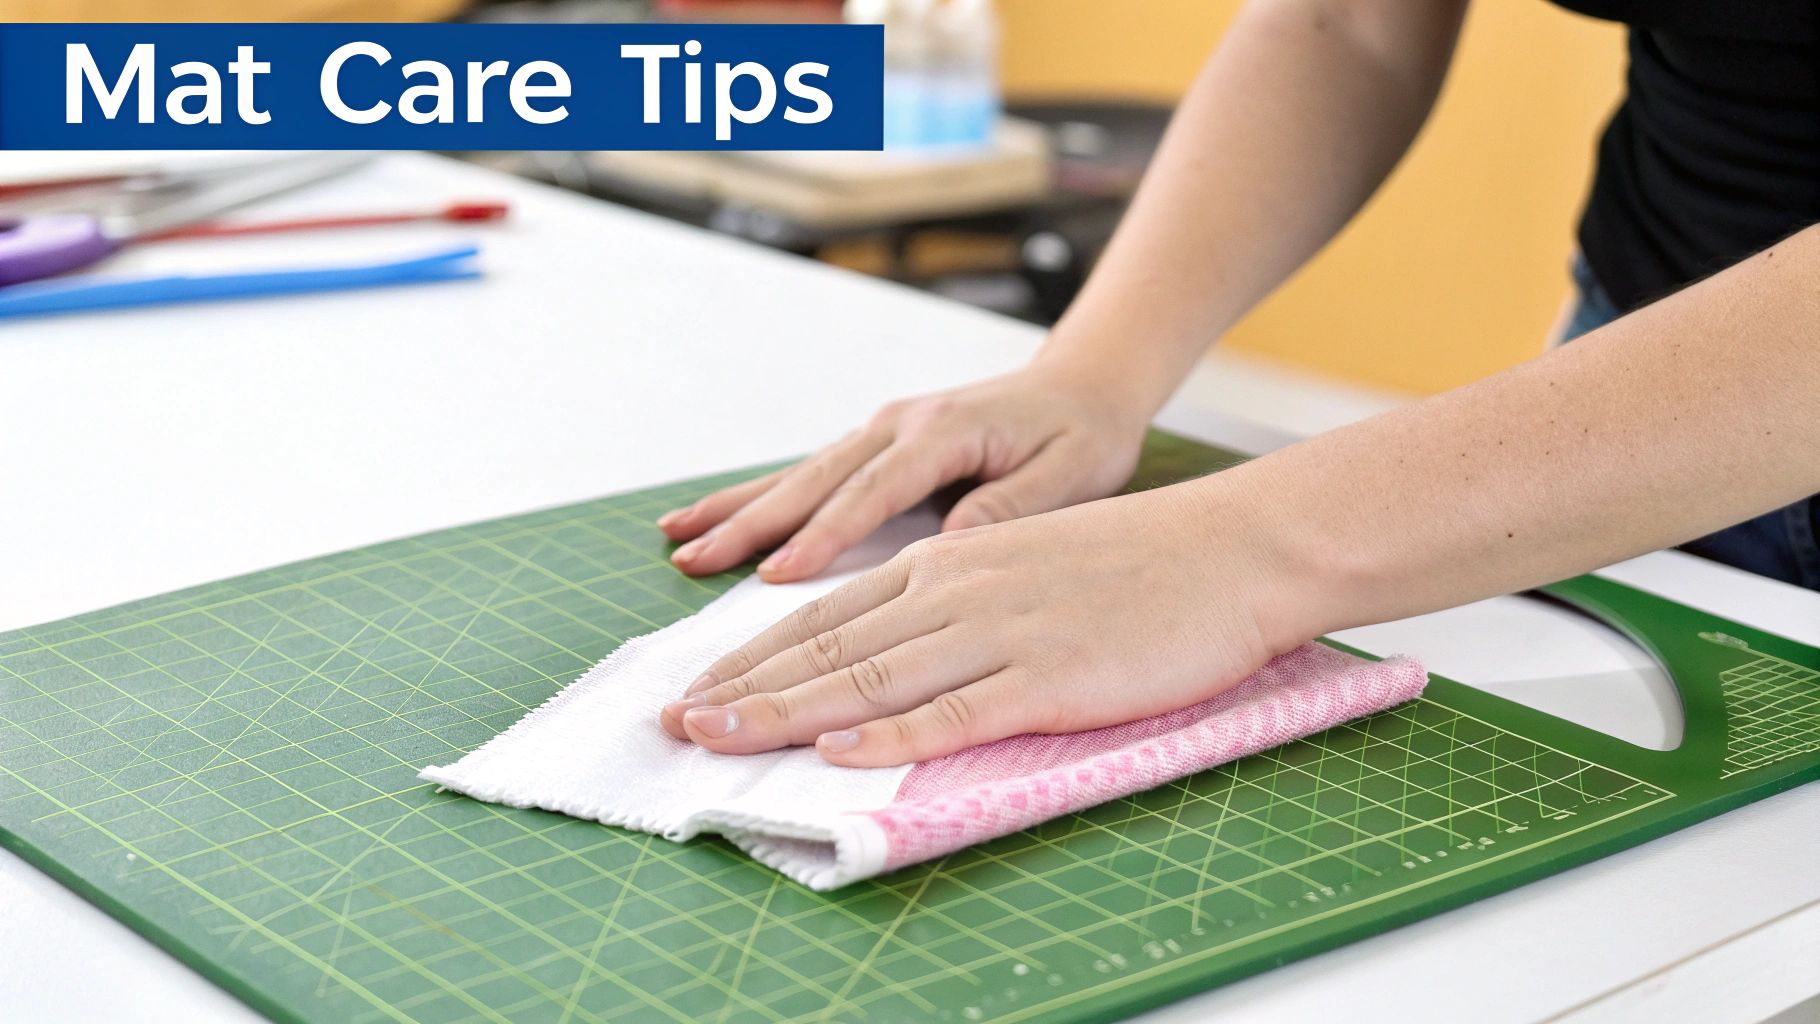
Essential Care to Extend the Life of Your Cutting Mat
A good cutting mat for sewing is a proper investment in your craft. Look after it, and it will be your trusted partner for years to come. Think of it like a quality kitchen knife – you wouldn't just chuck it in a drawer or leave it out in the sun. Protecting your mat means you’ll always have a flat, reliable surface for every single project.
The single most important rule? Always store it flat. Never, ever be tempted to roll it up or stand it on its side against a wall. Gravity is a mat’s worst enemy, and poor storage will cause permanent warping that makes accurate cutting completely impossible. Let’s face it, a warped mat is a useless mat.
Your Simple Cleaning Routine
With every project, tiny fibres and lint from your fabric will inevitably get pushed into the cuts on your mat's surface. Over time, this build-up stops the self-healing magic from working as it should. Thankfully, a quick, regular clean is all it takes to keep it in prime condition.
Here's a simple routine to get into the habit of:
- Remove Debris: Start by using a soft brush or a special mat scraper to gently coax any visible lint out of the grooves. An old credit card or a plastic scraper works a treat, too.
- Wash Gently: Fill a basin or your bathtub with lukewarm water and a drop of mild soap, like washing-up liquid. Pop the mat in and let it soak for a few minutes.
- Scrub Lightly: With a soft brush (a mushroom brush is perfect for this), gently scrub the surface in small circles to lift out any stubborn fibres.
- Rinse and Dry: Rinse the mat thoroughly under cool, clean water and pat it dry with a soft towel. The crucial final step is to lay it completely flat to air dry, well away from any heat.
This simple process doesn't just get your mat clean; it can actually help revive its self-healing powers. Soaking in cool water encourages the material to contract a tiny bit, which helps to close up shallower cuts and bring back a smoother surface.
Critical Don'ts for Mat Maintenance
Knowing what not to do is just as important as knowing what to do. A couple of common mistakes can cause irreparable damage, so it’s worth committing these to memory.
The biggest threats to your cutting mat are heat and direct sunlight. The PVC material is incredibly sensitive to temperature changes, and exposure can lead to severe warping, bubbling, or even melting.
Never leave your mat in a hot car, propped against a radiator, or in that lovely sunny spot by the window. It's also absolutely vital that you never iron on your cutting mat. The direct heat from an iron will destroy the surface in an instant.
By following these simple rules, you’ll protect your workspace and ensure your mat is around for countless sewing projects. Smart care goes hand-in-hand with smart organisation, a topic we dive into in our article on sewing room storage ideas.
Your Cutting Mat Questions Answered
Even after covering the basics, it's natural to have a few questions pop up once you start using a new tool. A sewing cutting mat is no different. This section tackles some of the most common queries we hear from sewers, designed to help you solve little problems and get the best performance from your mat.
Think of this as your personal troubleshooting guide for those "what if" moments. We've put together clear, straightforward answers to clear up any doubts and help you cut with confidence.
Can I Use a Craft Knife on My Sewing Cutting Mat?
Yes, absolutely. You can definitely use a craft knife, like an X-Acto blade, on a self-healing cutting mat. These surfaces are designed to take a beating from sharp blades, making them useful for much more than just rotary cutters.
A word of caution, though: be mindful of how much pressure you're applying. A craft knife has a much finer point than a rotary blade, which means it can slice deeper into the mat's surface.
For really detailed work like appliqué or fiddly paper pattern pieces, a craft knife is often the best tool for the job. Just make sure your blade is sharp. A sharp blade glides through cleanly, but a dull one will drag and tear, which can damage your project and leave a permanent scar on your mat.
Why Does My New Cutting Mat Have a Strong Smell?
That distinct plastic-like smell from a brand-new cutting mat is completely normal, so don't worry. The odour is caused by a process called "off-gassing."
Cutting mats are made from PVC composites, and when they're fresh from the factory, they release harmless volatile organic compounds (VOCs) left over from the manufacturing process. The smell can be a bit strong at first, but it won't last.
To get rid of the smell faster, just take the mat out of its packaging and let it air out in a well-ventilated room for a day or two. Wiping it down with a mild mix of water and vinegar can also help. The smell should disappear completely within a week or so.
What Is the Difference Between a Quilting Mat and a General Craft Mat?
At first glance, they might look pretty similar, but there are some important differences between a proper sewing cutting mat and a general-purpose craft mat. The main distinction comes down to what they're built for.
A quilting or sewing mat is specifically designed to be used with a rotary cutter. It has a powerful self-healing surface made to handle the unique rolling pressure of that circular blade. These mats are also printed with detailed measurement grids and helpful angle markings (like 30°, 45°, and 60°), which are indispensable for accurate fabric work.
On the other hand, a general craft mat is typically made for craft knives. It often has a harder, less forgiving surface, and its grid markings might be much more basic. For the best results in your sewing projects, always go for a mat made specifically for quilting or fabric cutting. It’ll perform better with your rotary cutter and last much longer. As you grow more confident, having the right tools makes exploring advanced sewing techniques a whole lot easier.
My Cutting Mat Is Warped – How Can I Fix It?
A warped cutting mat is a real pain, but the good news is you can often fix it. Warping is nearly always caused by storing the mat incorrectly (like standing it on its edge) or exposing it to heat.
Here's how to try and flatten it out:
- Find a Flat Surface: Lay the mat on a perfectly flat floor or a large, sturdy table.
- Add Gentle Warmth: Put it in a warm room, but never in direct sunlight or near a radiator. A bit of gentle, ambient warmth will make the material more pliable.
- Apply Even Weight: Cover the entire mat with heavy, flat items like big books or wooden boards.
- Be Patient: Leave it weighted down for at least 24-48 hours.
This combination of gentle warmth and consistent pressure can often coax the mat back into its original flat shape. The most important thing to remember is to never use direct heat from an iron or hairdryer—that will cause permanent, irreparable damage. In the end, prevention is always the best cure: always store your cutting mat flat.
At Display Guru, we provide the essential tools that sewing professionals and hobbyists rely on for precision and quality. Our range of self-healing cutting mats is designed to provide the perfect foundation for all your creative projects, ensuring every cut is clean and accurate. https://www.displayguru.co.uk