


Your Guide to Adjustable Dressmaking Dummies
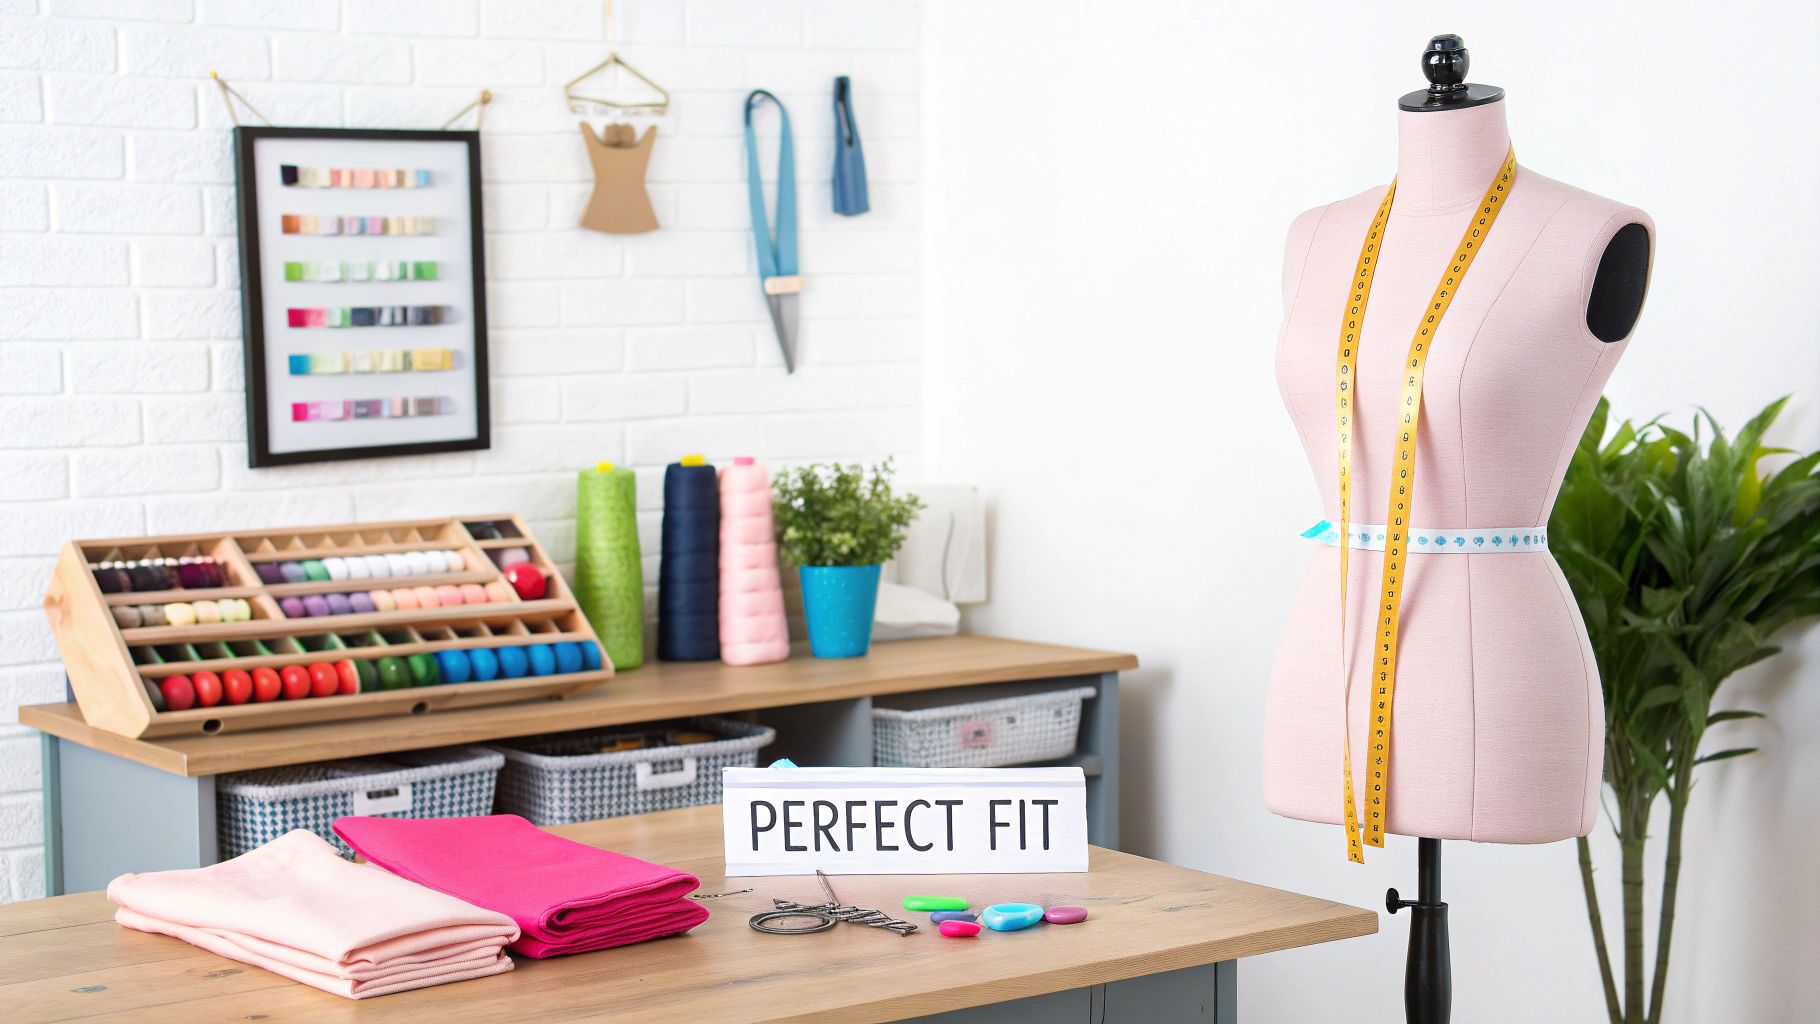
Picture this: you're creating a garment, and instead of wrestling with a tape measure and guessing at the fit, you have a perfect body double right there in your sewing room. That's exactly what an adjustable dressmaking dummy is—a stable, 3D canvas that lets you drape, pin, and tailor with absolute precision. It's the secret to taking your sewing projects from looking homemade to looking truly bespoke.
Why a Dress Form Is Your Best Sewing Partner
If you've ever sewn for yourself, you know the struggle. The awkward twisting to pin a hem, the blind fumbling to get a dart just right over your shoulder—it's frustrating. An adjustable dress form puts an end to all that. It becomes your patient, perfectly still stand-in, allowing you to work on a garment without the gymnastics.
Think of it like a sculptor's armature. The dummy provides the core structure you need to bring your fabric creations to life. You can finally see exactly how a material hangs, check your work for symmetry from all angles, and make adjustments with confidence and ease.
Achieving a Professional Finish
Working with a dummy naturally encourages a more professional workflow. It opens up new possibilities and refines your technique, letting you:
- Drape with Confidence: You can design directly onto the form, allowing the fabric's weight and fall to inspire your creative process.
- Pin Accurately: Setting in sleeves, attaching collars, and placing darts becomes a straightforward task, not a struggle.
- Ensure Perfect Symmetry: It's simple to compare the left and right sides of your garment, guaranteeing a balanced and polished final look.
This hands-on, 3D perspective is something a flat paper pattern alone can never provide. It’s what bridges the gap between a two-dimensional design and a three-dimensional piece of wearable art. Keeping your dummy accessible is crucial, which highlights the importance of an organised workspace. For some great tips, have a look at our guide on top sewing room organisation ideas.
The real magic of an adjustable dressmaking dummy lies in its ability to help you achieve a flawless, bespoke fit. It eliminates the guesswork, saving you hours of frustration and dramatically lifting the quality of your finished clothes.
A Tool with a Rich History
The value of these forms is hardly a new discovery. Here in the UK, their importance skyrocketed in bespoke tailoring workshops during the 20th century. By the 1950s, a growing demand for better-fitting clothes led to the creation of dummies with adjustable dials for the bust, waist, and hips, designed to cover UK sizes from 6 to 16. These innovative models were reported to reduce fitting errors by around 30%, making custom-made clothing a much more efficient craft.
How Do Adjustable Dummies Actually Work?

When you first see an adjustable dressmaking dummy, it can look a bit intimidating with all its dials and sections. But the concept behind it is actually quite simple and brilliant. The magic is all on the inside—a system of expansion joints that you control with the dials or keys on the outside. This lets the dummy’s torso expand and contract in all the right places, essentially mimicking the way you'd take someone's body measurements.
I like to think of it like tuning a guitar. You wouldn't just twist one peg and hope for the best, would you? You carefully adjust each string, one by one, until they work together in perfect harmony. It’s the same with your dummy. You’ll be fine-tuning each dial to match a specific measurement, gradually building a shape that accurately reflects a real human body. This patient, incremental process is the secret to getting a truly great fit.
Most of the dummies you'll find for home or semi-professional use are built with between 8 and 12 adjustment points. These aren't placed randomly; they correspond to the most crucial measurements we rely on for pattern drafting and fitting.
The Key Adjustment Points
Every dial on an adjustable dummy controls a specific part of the form’s circumference. While there are slight variations between brands, the standard adjustment points are pretty universal, all working together to create a complete silhouette. When you turn a dial, you're usually operating a simple gear mechanism that gently pushes the torso sections apart or pulls them closer together. It’s wonderfully low-tech and effective.
The main areas you'll have control over are:
- Bust: You’ll find dials on both the front and back of the chest, allowing you to get the bust measurement just right.
- Waist: Adjustments around the natural waistline let you nail this absolutely critical dimension.
- Hips: Located lower down on the form, these dials expand the dummy to match the fullest part of the hips.
- Neck: There's usually a smaller dial right at the top for tweaking the neckline circumference.
- Back Length: Many good models also have a way to lengthen or shorten the torso. This is a game-changer for anyone fitting a client with a particularly long or short waist.
Creating a Bespoke Figure
This system of interconnected parts is what turns a generic mannequin into a personalised body double. Let's say you're making a dress for someone with a 38-inch bust, a 30-inch waist, and 42-inch hips. You'd simply turn the relevant dials, checking with your tape measure as you go, until each part of the dummy matches those exact figures.
The true genius of an adjustable dummy, though, is its ability to replicate asymmetry. By making small, independent adjustments at each point, you can account for the slight, natural variations we all have. It's something standard sizes completely ignore, making these dummies essential for genuine custom fitting.
This straightforward, mechanical design is precisely what makes these tools so reliable. There are no finicky electronics or complicated software to worry about—just a robust system of gears and panels that do exactly what you tell them to. That direct, hands-on control is what gives you the power to build a faithful replica of any body, creating the perfect foundation for all your tailoring and dressmaking projects.
Choosing the Right Adjustable Dressmaking Dummy
Think of choosing an adjustable dressmaking dummy as finding the perfect sewing companion. It’s a significant decision, and with so many options out there, it can feel a little daunting. But it all comes down to one golden rule: make sure your own body measurements sit comfortably within the dummy’s adjustment range. Get this right, and you'll have an indispensable partner for years to come. Get it wrong, and you’ll just have a source of constant frustration.
The single most important piece of advice I can give is this: always choose a model that is smaller than you, not larger. An adjustable dummy is built to expand outwards; it can’t shrink smaller than its base measurements. If your waist is 26 inches, a dummy with a minimum waist of 28 inches is never going to work for you. You can always add padding to a smaller form to mimic your shape, but you can never subtract from a form that’s too big to begin with.
Understanding Sizing and Adjustment Range
Before you even start browsing, it’s time to get reacquainted with your tape measure. Take accurate, up-to-date measurements of your bust, waist, and hips. These three numbers are your compass for finding the right model.
Most brands group their dummies into specific size brackets, like a "Petite" model for UK sizes 4-10 or a "Full Figure" model for sizes 16-22. Your goal is to find the dummy where your personal measurements fall somewhere in the middle of its stated range. This gives you the flexibility to adjust up or down as needed.
This image shows just how much a standard adjustable dummy can change, giving you a real sense of its versatility.
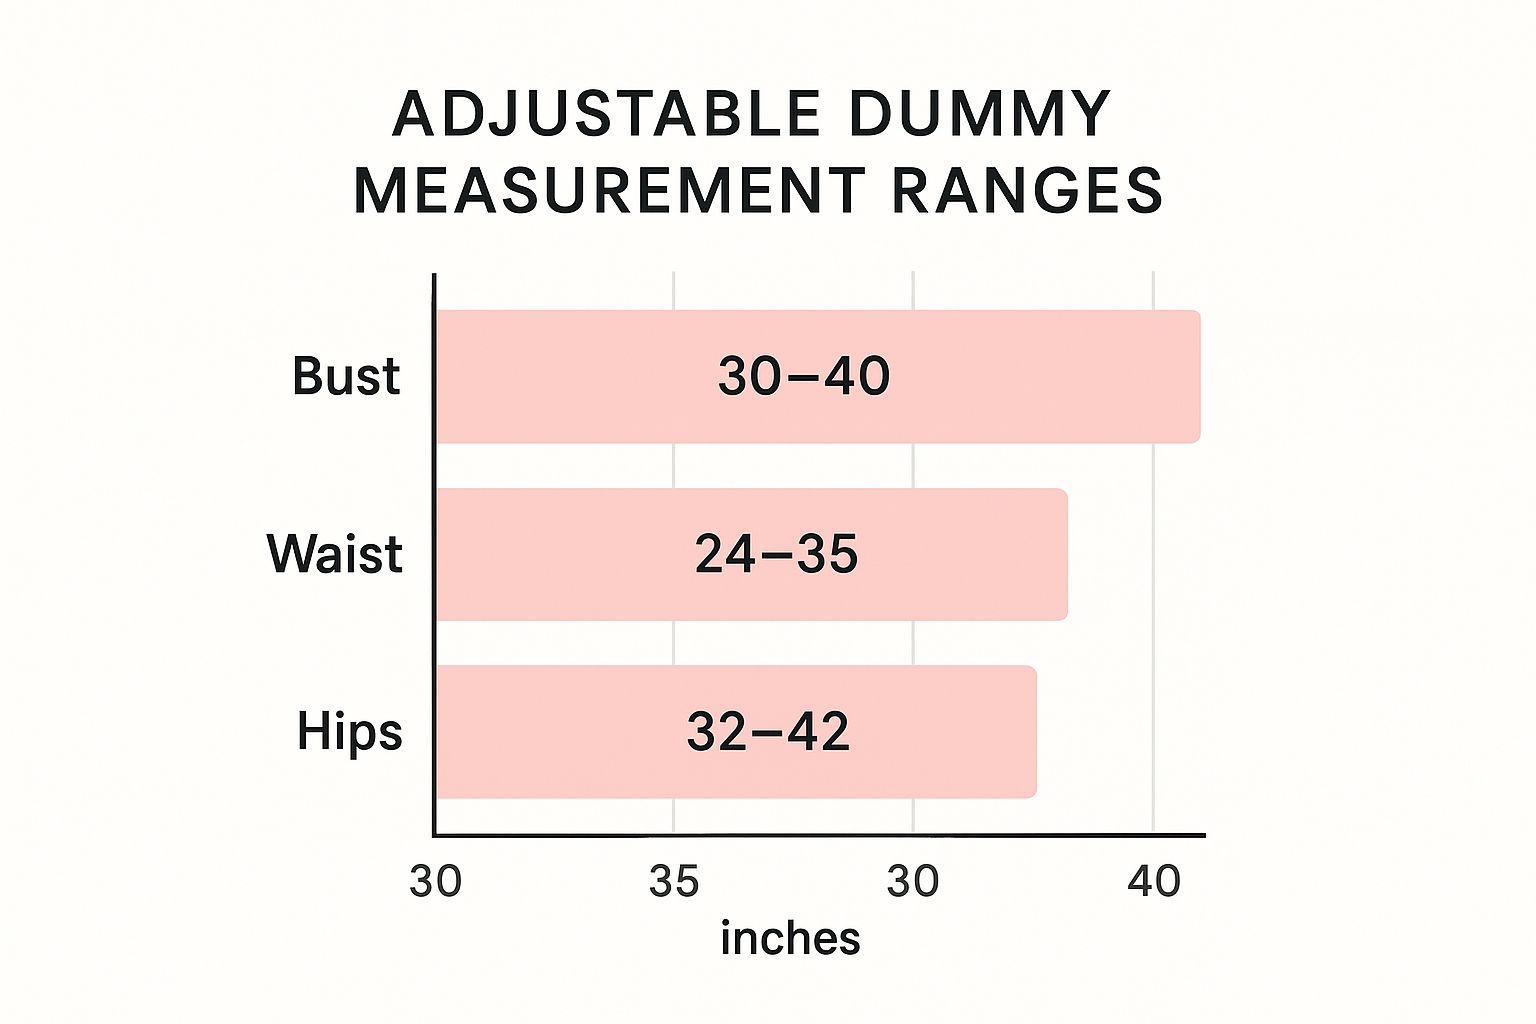
As you can see, a single form can cover a whole spectrum of sizes. This is a huge advantage for anyone whose weight naturally fluctuates or for those who sew for friends and family of different shapes and sizes.
Key Features to Consider
Beyond the basic measurements, a few other features separate a good dummy from a great one. What you need will really depend on the kind of sewing you do and what you're willing to spend.
- Number of Adjustment Points: Simpler models typically come with 8 adjustment points, which are dials for the neck, bust, waist, and hips. More sophisticated forms might have 12 or more, giving you much finer control over the final silhouette and crucial measurements like the back-waist length.
- Bifurcated Legs: If you’re a fan of making trousers, shorts, or jumpsuits, a dummy with split or "bifurcated" legs is a game-changer. Standard forms just end at the upper thigh, which makes fitting the crotch and inseam pretty much impossible.
- Cover Material: You'll want a foam-backed fabric cover, usually made from nylon or a similar felt-like material. This is what allows you to stick pins directly into the form at an angle, which is essential for draping fabric and holding pattern pieces securely in place.
- Stand Stability: A sturdy, stable base is absolutely non-negotiable. A wobbly stand isn’t just annoying; it can be a real safety hazard when you're working with sharp pins and shears. Look for a solid metal or wooden tripod, or a heavy base with four casters for easy movement.
Adjustable Dress Form Feature Comparison
To help you visualise the differences, this table breaks down the features you can expect to find at various price points and levels of complexity.
| Feature | Beginner Models (e.g., 8-Part) | Intermediate Models (e.g., 12-Part) | Advanced/Professional Models |
|---|---|---|---|
| Adjustment Points | 8 dials (bust, waist, hips) | 12+ dials, often including back-waist length | 12+ fine-tune dials, split waist/hip adjustments |
| Legs | Solid torso, no legs | Usually a solid torso; some models offer a trouser option | Often features bifurcated (split) legs as standard for trousers |
| Cover Material | Basic felt or nylon cover | Foam-backed cover for easy pinning | High-quality, pinnable linen or canvas over a dense foam body |
| Stand | Lightweight plastic or thin metal stand | Sturdier metal or wooden tripod stand | Heavy-duty metal base, often with lockable casters |
| Best For | Hobbyists, simple dresses, skirts, and tops | Serious sewists, pattern drafters, and those making trousers | Professional dressmakers, tailors, and fashion students |
Looking at the options this way can make it much clearer which features are "nice-to-haves" and which are genuine necessities for the type of sewing you do.
These dummies have really grown in popularity, and for good reason. Market data reveals that the share for adjustable dress forms in the UK has jumped from roughly 45% to over 65% in the past decade. This trend makes sense when you see that surveys show 40% of sewing enthusiasts are ready to invest in better, mid-range models.
Choosing wisely means you’ll have a tool that not only fits you now but can also grow with you as your skills develop. For a much more detailed breakdown, you can read our complete guide on how to find the perfect adjustable mannequin for sewing.
How to Pad Your Dummy for a Perfect Body Match
Let's be honest, an adjustable dummy straight out of the box gets you about 80% of the way there. It’s a brilliant foundation. The dials are great for hitting your core circumference measurements, but they can't quite capture the subtle, unique landscape of a real human body. This is where the true craft comes in: padding.
Padding is what transforms your adjustable dummy from a generic stand-in to your personal body double. After all, nobody is perfectly symmetrical or shaped like a standard mannequin. We have gentle curves, slight dips, and individual quirks—a rounded tummy, a prominent shoulder blade, or a sway back—that dials alone simply can't replicate.
By taking the time to pad your form, you're ensuring your finished garments hang beautifully on your body, not just on the dummy's approximation of it. It’s the secret to achieving that truly bespoke fit.
Gathering Your Padding Materials
Before you dive in, you’ll want to gather a few key supplies. You don’t need to spend a fortune; in fact, many sewers find everything they need right in their existing craft stash. The idea is to build up shape gradually with soft layers.
Here's what you might have in your padding toolkit:
- Quilt Batting or Wadding: This is probably the most common choice, and for good reason. It's soft, easy to layer, and can be sculpted to create smooth, natural-looking curves.
- Shoulder Pads: Perfect for building up the shoulder line, but they can also be cleverly repurposed to add volume to the bust or hips.
- Foam Cups: Old bra cups or pre-made foam inserts are fantastic for accurately shaping the bust area.
- Pre-Made Padding Systems: If you prefer a more structured approach, you can buy kits with pre-shaped pads for the tummy, thighs, and back.
You'll also need plenty of pins to hold your padding in place as you work. Finally, you’ll need a snug-fitting cover to pull over the top, which compresses everything and creates a smooth, pinnable surface. An old t-shirt or a simple custom-sewn cover will do the job perfectly.
The Padding Process Step-by-Step
First things first: adjust your dummy’s dials to be just a little smaller than your actual body measurements. This creates the space you need to build up the padding without accidentally making the final form too large. Always work from accurate numbers; our guide on how to take body measurements for clothes is a great resource if you need a refresher.
- Start with the Bust: Pin your foam cups or layers of batting over the bust. Step back and check the position and shape against your own body in a mirror.
- Build Up the Torso: Add layers of batting to the waist, tummy, and back, concentrating on mirroring your unique curves. If you have a sway back, for instance, this is where you’ll add extra padding to the lower back.
- Shape the Hips and Bottom: Use larger pieces of batting to build out the hips and rear. Keep your tape measure handy and check your progress against your own dimensions.
- Cover and Compress: Once you're feeling good about the shape, carefully pull your fitted cover over the entire dummy. This is the magic step that smooths everything out and holds it all securely.
- Final Measurement Check: With the cover on, do one last check of the bust, waist, and hip measurements. If something isn't quite right, you can still make small tweaks by adding or removing padding underneath the cover.
Padding is a process of adding, shaping, and measuring. It’s more art than science, so don't rush it. The goal is to create a faithful replica of you, capturing every nuance that makes your shape unique. This careful preparation is what paves the way for a flawless fit later on.
Advanced Techniques for Your Dress Form
So, you’ve got your dummy padded out and it’s a near-perfect mirror of your own shape. Brilliant. You've already got a powerful fitting tool, but now the real fun begins. Let’s move beyond the basics and look at how you can use your form to truly elevate your sewing. This is where your dummy stops being just a stand-in and becomes a genuine partner in your design process, unlocking a world of couture-level skill.
One of the most rewarding advanced skills you can learn is draping. Instead of wrestling with a flat paper pattern, draping is all about sculpting with fabric directly onto the form. You can play with how a certain material falls, create unique pleats and gathers on the fly, and build entire garments organically. It's a completely three-dimensional way of working that gives you an immediate, intuitive feel for a design that flat pattern drafting just can't replicate.
Mastering Complex Alterations
An adjustable dummy is also a secret weapon for tackling tricky fit issues. Working on a 3D form gives you a 360-degree view, making it so much easier to see exactly what’s going on and how to fix it—something that’s incredibly difficult when you’re just looking at a flat pattern piece.
Here are a few common alterations that become much clearer on a dummy:
- Full Bust Adjustments (FBA): Seeing how an FBA affects the side seams and where the dart points in 3D is a total game-changer.
- Sway Back Adjustments: You can literally pinch out the excess fabric at the small of the back and see precisely how much to remove from your pattern. No more guesswork.
- Checking Grainlines: Making sure the fabric hangs straight and true is simple when you can step back and assess it properly on a form.
Performing these adjustments directly on your body double means you can see the result instantly. It takes the trial-and-error out of the equation, saving you a whole lot of time and fabric in the process.
Creative and Technical Applications
Beyond the technical side of pattern making, your dummy can become the centre of your entire creative workflow. Use it to plan outfits, see how different tops and skirts actually work together, or just to display your finished masterpieces. It’s a constant source of inspiration and a genuinely practical tool for visualising your next project. For more tips on getting that perfect fit, you can find a wealth of information in our ultimate fit guide for adjustable dressmaking forms.
The technology behind these forms is always moving forward, too. In the UK, some companies have introduced 3D body form technology that gives their dummies a much greater measurement range, with some now accommodating bust sizes up to 54 inches. There are even innovations in remote imaging that can create a perfect digital body double, allowing designers to produce bespoke garments with unbelievable accuracy. This constant progress ensures that adjustable dressmaking dummies will remain one of the most essential tools for any serious sewer for years to come.
Common Questions About Dressmaking Dummies
Stepping into the world of adjustable dressmaking dummies naturally brings up a few questions. Whether you're trying to choose your very first model or want to get more out of the one you already own, good advice is golden. I've heard these queries time and again from fellow sewers, so let's clear up the common sticking points.
Think of a dress form as a serious investment in your craft. It’s completely normal to want to get it right from the very beginning.
My Measurements Fall Between Two Sizes—Which Dummy Should I Buy?
This is easily the most common and crucial question, and the answer is refreshingly simple: always buy the smaller size. It might feel wrong at first, but remember how these dummies work—they adjust outwards from a base set of measurements.
You can never shrink a dress form smaller than its minimum dimensions. On the other hand, you can always add padding to a smaller dummy to build it out and perfectly replicate your own unique curves. If you buy a dummy that's too big to begin with, you'll never be able to get a true-to-you fit, which defeats the whole purpose.
Can I Use an Adjustable Dummy for Fitting Trousers?
Most adjustable dress forms you'll see are torso-only models, stopping around the upper thigh. This design is perfect for dresses, blouses, and skirts, but it's not at all suitable for fitting trousers. Without the legs, there's simply no way to check the crotch curve, inseam, or how the fabric hangs down the leg.
That said, some brilliant manufacturers make models with split (bifurcated) legs or even full-body forms. If you're a dedicated trouser-maker, you'll want to specifically look for a "trouser form" or a "full-body" adjustable dummy. This gives you the right anatomy to work with. For a deeper dive into how body measurements correspond to mannequins, our article offers some fantastic mannequin measurements and accurate size charts.
The main takeaway here is to match your tools to your projects. Trying to fit trousers on a standard torso dummy is a recipe for frustration and a poor fit. Investing in the right type of form from the get-go will pay off in beautifully finished garments.
How Should I Care for My Adjustable Dressmaking Dummy?
A little bit of care goes a long way in making sure your dress form stays a trusted sewing partner for years to come. It’s not complicated, just a matter of building some good habits.
- Avoid Direct Sunlight: Try to keep your dummy out of the path of strong, direct sun. Over time, UV rays can cause the fabric cover to fade and become brittle.
- Adjust Gently: When you turn the dials, be patient and avoid using force. Jamming them too hard can strip the internal mechanisms.
- Check the Stand: Every so often, just give the bolts and screws on the stand a quick check to make sure they're tight. This keeps it stable and prevents any wobbling.
- Keep It Clean: A lint roller is your best friend for whisking away dust and stray threads. For any marks, gently spot-clean with a damp cloth and a mild detergent, but be careful not to soak the form—you don't want to damage the insides.
Is It Worth Investing in a More Expensive Dummy?
While a budget-friendly model can be a great way to get started, there's a very real argument for investing in a more premium dummy if you're serious about your sewing. The extra cost almost always translates into better quality and more useful features.
Pricier dummies often come with more adjustment points (12 instead of 8, for example), which gives you much finer control over the final shape. They also tend to boast a wider range of measurements, a significantly sturdier stand, and a higher-quality fabric cover that’s easier to pin into. Plus, clever features like an offset pole for fitting trousers or a built-in hem marker can genuinely streamline your process and improve the final result.
At Display Guru, we provide a wide selection of high-quality dressmaking dummies and display tools to support everyone from home sewing enthusiasts to professional designers. Find the perfect form to elevate your craft at https://www.displayguru.co.uk.